4-2.
Power Supply Unit
Be sure to perform the following operation when replacing or removing the main parts.
• Turn off the main power and disconnect the plug from the outlet.
Note
Wait for at least three minutes before starting replacement, because even after turning off the power, a high voltage
remains in the machine that could cause electric shock.
4-2-1.
Power Block Assembly (D00)
WARNING
The components marked are critical to safe operation. If you replace with parts other than the specified
ones, a fire or electric shock may result from that.
CAUTION
When repairing or replacing the power supply, set the voltage. If the voltage is set incorrectly, a fire or
electric shock may result from that.
• When repairing or replacing the power supply, set to the same power voltage as that of repair work
bench.
• When delivering to the user, adjust the power supply voltage to suit the user.
Gently remove or attach the power supply unit while holding it by hand.
Otherwise, the power supply unit may fall, causing an injury.
Replacement Part
Part : Power block assembly (D00)
Procedure
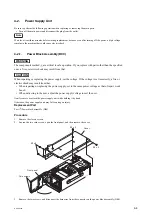
1.
Remove the eleven screws.
2.
Loosen the two coin screws, open the front panel, and then remove the cover.
B3 x 5
Coin screws
Front panel
Cover
B3 x 5
B3 x 5
3.
Remove the two screws, and disconnect the harnesses from the connector on the power block assembly (D00).
HDCU2500
4-4
Summary of Contents for 10001
Page 6: ......
Page 12: ......
Page 14: ......
Page 25: ...1 5 Outside Dimensions HD CAMERA CONTROL UNIT 1 5 200 1 3 7 1 4 7 2 1 9 Unit mm HDCU2500 1 11 ...
Page 118: ......
Page 148: ......
Page 162: ......
Page 264: ......
Page 369: ... B SIDE SUFFIX 11 EN 159B EN 159A HDCU2500 9 13 ...
Page 374: ...PS 778D00 B SIDE SUFFIX 11 HDCU2500 9 18 ...
Page 392: ...HDCU2500 SY HDCU2500 CE J E 9 968 889 01 Sony Corporation Printed in Japan 2012 1 08 2012 ...


