background image

1-23

DNW-75/75P

DNW-65/65P

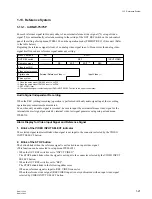
1-14-3. System Phase Alignment

An external reference video signal and analog composite signal must be input to this unit after they are

adjusted so that SC-H conforms to the specifications.

When Connecting to a Digital Switcher

Fundamentally, the system phase adjustment is not necessary.

Refer to the manual of digital switcher for details.

When Connecting to an Analog Switcher

Perform the system phase adjustment according to the manual of the analog switcher.

To adjust the system phase of this unit, use the SYNC and SC control knobs of SYSTEM PHASE on the

sub control panel.

m
.

When the DNW-75/75P, be sure to adjust in PB mode.

The system phase does not change even if the SYNC/SC control knob is turned in the REC mode, but it

changes when the REC mode is shifted to the PB mode.

.

The playback sound may be momentarily interrupted when the SYNC/SC control knob is turned during

tape playback.

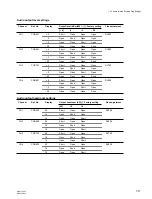
1-14-4. Setup Menu Settings

Video/Sync Delay Setting “ITEM-701” (DNW-75/75P only)

Commonly, when integrating the menu into the editing system, set on “VIDEO”.

To prevent the picture shift during EE/PB switching in the VTR-to-VTR edit operation, this setup menu is

also set to “VIDEO”.

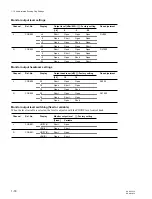
Analog Component Signal Format Setting “ITEM-709” (525/60 system only)

The input (SUB-ITEM-0: DNW-75/75P only) and output (SUB-ITEM-1) sides are set to “D-1” or “B-

CAM” according to the operating system, respectively.

1-14. Settings and Adjustment when External Equipment is Connected

Summary of Contents for 10001

Page 1: ...INSTALLATION MANUAL 1st Edition Revised 3 Serial No 10001 and Higher DNW 75 65 Serial No 40001 and Higher DNW 75P 65P DIGITAL VIDEOCASSETTE RECORDER DNW 75 75P DIGITAL VIDEOCASSETTE PLAYER DNW 65 65P ...

Page 2: ...ure n effectuer que les réparations indiquées dans le mode d emploi à moins d être qualifié pour en effectuer d autres Pour toute réparation faire appel à une personne compétente uniquement Attention when the product is installed in Rack 1 Prevention against overloading of branch circuit When this product is installed in a rack and is supplied power from an outlet on the rack please make sure that...

Page 3: ...atterie du même type ou d un type équivalent recommandé par le constructeur Mettre au rebut les batteries usagées conformément aux instructions du fabricant ADVARSEL Lithiumbatteri Eksplosionsfare ved fejlagtig håndtering Udskiftning må kun ske med batteri af samme fabrikat og type Levér det brugte batteri tilbage til leverandøren Voor de klanten in Nederland Dit apparaat bevat een CF n Li batteri...

Page 4: ......

Page 5: ... 9 Switch Settings on Connector Panel 1 14 1 10 Audio related Shorting Plug Settings 1 15 1 11 Displaying Setup Extended Menu 1 19 1 12 Switching Search Dial Mode 1 20 1 13 Reference System 1 21 1 13 1 In DNW 75 75P 1 21 1 13 2 In DNW 65 65P 1 22 1 14 Settings and Adjustment when External Equipment is Connected 1 22 1 14 1 Settings for Time Code DNW 75 75P only 1 22 1 14 2 VTR Constant Values Sett...

Page 6: ...e Instruction Volume 2 Parts List Volume 3 Diagrams These manuals describe the maintenace and service information service overview adjustments board layouts schematic diagrams detailed parts list etc for this unit Protocol Manual of Remote 9 pin Connector Available on request This manual explains the protocol for controlling the VTR via the RS 422A 9 pin serial remote Interface Manual of Parallel ...

Page 7: ...ables 1 8 Signal Inputs and Outputs 1 9 Switch Settings on Connector Panel 1 10 Audio related Shorting Plug Setting 1 11 Displaying Setup Extended Menu 1 12 Switching Search Dial Mode 1 13 Reference System 1 14 Settings and Adjustment when External Equipment is Connected Start Determination of installation place Unpacking Rack mounting Connection Initial setup Operation check End n If an error mes...

Page 8: ...y 25 to 80 non condensing Storage temperature _20dC to 60dC Locations to avoid Areas where the unit will be exposed to direct sunlight of any other strong lights Areas near heat sources Dusty areas or areas subject to vibration Areas with strong magnetic field Areas with much electrical noise Areas with much static electricity Areas that is impossible to find a specified room for installation Refe...

Page 9: ...lation space must be secured in consideration of the ventilation and service operation Do not block ventilation slots at the right side panel and upper lid or bottom plate and vents of the fans Leave a space around the unit for ventilation Leave more than 40 centimeters of space in the rear of the unit to secure the operation area When the unit is installed on the desk or the like leave at least f...

Page 10: ...bottom of this unit by 1U Adjust the temperature inside the rack within the range of the unit s operating temperature Refer to Section 1 3 Specified Rack Mount Kit RMM 111 Option or RMM 110 Option The color of rack angle of RMM 111 fits to the unit RMM 110 is the same consistance strength and dimension as RMM 111 but the color of rack angle is different n To mount this unit into the FLEXICART it i...

Page 11: ...ner rails 4 Pull out the inner rails from the two intermediate rails 5 While pressing the stopper of the inner rail in the direction of the arrow A in the figure pull inner rail out in the direction of the arrow B 6 Remove the ten screws from both sides left and right of the unit as shown in the figure below 7 Attach the two inner rails to both sides left and right of unit with the removed screws ...

Page 12: ...ully tighten the eight screws B4 x 8 fixing the four rail brackets Tightening torque 120 x 10_2 N m 12 2 kgf cm 1 6 Rack Mounting Loosely attaching the rail brackets 10 Slide the intermediate rail as shown in the figure and then loosely attach the rail bracket to the outer rail with a plate nut large and two screws 11 Slide the ball retainer in direction of the arrow and then loosely attach the ra...

Page 13: ...ate rails attached to the rack are parallel 16 To fix the two outer rails to the rack fully tighten the eight loosely fitted hexagon socket head cap screws in step 12 using the L shaped hexagon wrench 1 6 Rack Mounting A A Intermediate rails Width A A 416 mm ...

Page 14: ... torque 120 x 10_2 N m 12 2 kgf cm 1 6 Rack Mounting Mounting in rack c Be sure to carry the unit by the two persons or more 17 Slide each ball retainer of intermediate rails on both sides left and right in the direction of the arrow 18 Pull equal length of each rail both sides out 19 Lift the unit holding the handles on both sides slowly insert the inner rails into the intermediate rails 20 While...

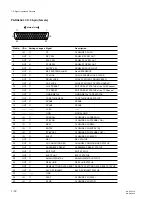
Page 15: ...21 JUNCTION SHELL 15P 1 561 929 00 RS 232C D SUB 9P FEMALE 1 563 815 21 REMOTE1 IN 9P 9P remote control cable RCC G series _ or D SUB 9P MALE and 1 560 651 00 JUNCTION SHEEL 9P 1 561 749 00 REMOTE1 OUT 9P 9P remote control cable RCC G series _ or D SUB 9P MALE and 1 560 651 00 JUNCTION SHEEL 9P 1 561 749 00 REMOTE 2 D SUB 50P MALE and 1 565 516 11 PARALLEL I O 50P JUNCTION SHELL 50P 1 563 379 11 C...

Page 16: ...Black burst or composite sync 0 3 V p p 75 Z sync negative 1 VIDEO INPUT COMPOSITE BNC x 2 in loop through connection DNW 75 75P only Analog composite video 1 0 V p p 75 Z sync negative 1 VIDEO INPUT COMPONENT BNC x 3 1 set Y R Y and B Y DNW 75 75P only Analog component video Y 1 0 V p p 75 Z sync negative R Y B Y 0 7 V p p 75 Z 3 SDI BNC x 1 active through out x 1 DNW 75 75P only Serial digital i...

Page 17: ...rd 600 Z load low impedance balanced 7 AUDIO OUTPUT AES EBU BNC x 2 1 set CH1 2 and CH3 4 Digital audio 4 channels AES EBU format complies with AES 3id 1995 SDTI BNC x 2 optional kit BKNW 118 or BKNW 124 Serial data transport interface 270 Mbit s BKNW 118 Complies with SMPTE 305M SDTI SX BKNW 124 Complies with SMPTE 305M 326M SDTI CP PHONE JM 60 stereo phone jack Upper control panel Analog audio u...

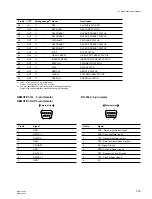
Page 18: ... TAPE STATUS 13 OUT O TAPE THICKNESS TAPE THICKNESS STATUS 14 OUT X SPARE SPARE 15 OUT X SPARE SPARE 16 12V 17 GND SIGNAL GND 18 IN O PREROLL CLOSURE SW PREROLL 19 IN O STBY ON CLOSURE SW STANDBY ON 20 IN O REW CLOSURE SW REW 21 IN O ENTRY CLOSURE SW ENTRY IN 22 IN O STBY OFF CLOSURE SW STANDBY OFF 23 IN O EJECT CLOSURE SW EJECT 24 OUT X REC REC STATUS 25 OUT X CH CONDITION RED CHANNEL CONDITION R...

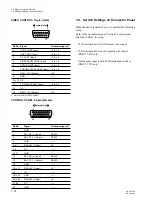
Page 19: ...STATUS 48 OUT X REMOTE REMOTE STATUS 49 OUT X ALARM SYSTEM ALARM STATUS 50 OUT O PREROLL PREROLL STATUS 1 Input 47 kZ pull up to 5 V close open Output 10 kZ pull up to 5 V 0 V or open 2 The pins described as O mark are possible to change the setting Refer to the optional interface manual for changing the setting REMOTE1 IN 9 pin female REMOTE1 OUT 9 pin female Pin No Signal 1 GND 2 RM TX _ 3 RM RX...

Page 20: ... male Pin No Signal Terminal voltage V 1 SYNC CONT Input _5 to 5 2 HUE CONT Input _5 to 5 3 SC CONT Input _5 to 5 4 VIDEO LEVEL CONT Input _5 to 5 5 SETUP CONT Input _5 to 5 6 CHROMA LEVEL CONT Input _5 to 5 7 REG _12V Output _12 8 GND 9 to 12 NC 13 Y C DELAY CONT Input _5 to 5 14 NC 15 REG 12V Output 12 Not use in DNW 75 75P 65 65P CONTROL PANEL 29 pin female Pin No Signal Terminal voltage V 1 GN...

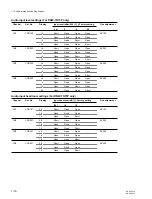
Page 21: ... from 20 18 16 dB Factory settings 20 dB for each channel 1 10 Audio related Shorting Plug Settings Top View n Refer to Section 1 15 for removing reattaching the plug in boards APR 40 Board Side A 1 670 578 MADE IN JAPAN A D 6 7 5 4 3 2 1 B A E F C J G H K L M DNW 75 75P only N P R EP GW A No S No LOT No COR100 3 0 4 20 COR501 3 0 4 20 3 0 4 20 COR500 COR601 COR600 20 18 16 20 18 16 COR701 3 0 4 2...

Page 22: ...4 Short Open Open Open RV300 0 Open Short Open Open _3 Open Open Short Open _20 Open Open Open Short CH4 COR400 4 Short Open Open Open RV400 0 Open Short Open Open _3 Open Open Short Open _20 Open Open Open Short Audio input headroom settings For DNW 75 75P only Channel Ref No Display Input headroom dB Factory setting Fine adjustment 20 18 16 CH1 COR101 20 Short Open Open RV100 18 Open Short Open ...

Page 23: ...Open Open _3 Open Open Short Open _20 Open Open Open Short CH4 COR801 4 Short Open Open Open RV800 0 Open Short Open Open _3 Open Open Short Open _20 Open Open Open Short Audio output headroom settings Channel Ref No Display Output headroom dB Factory setting Fine adjustment 20 18 16 CH1 COR500 20 Short Open Open RV500 18 Open Short Open 16 Open Open Short CH2 COR600 20 Short Open Open RV600 18 Op...

Page 24: ...oom settings Channel Ref No Display Output headroom dB Factory setting Fine adjustment 20 18 16 L COR900 20 Short Open Open RV900 18 Open Short Open 16 Open Open Short R COR950 20 Short Open Open RV1000 18 Open Short Open 16 Open Open Short Monitor output level switching fixed or variable When the level variable is selected the level is adjusted with the PHONE level control knob Channel Ref No Dis...

Page 25: ...he maintenance manual volume 1 Switch No Name Description Factory setting S1100 1 EXTENDED MENU OFF OPEN Not display the extended menu of the setup menu OFF OPEN ON CLOSE Displays the extended menu of the setup menu n Never change the settings of the switches except above SS 83 Board Side A 1 11 Displaying Setup Extended Menu Top View n Refer to Section 1 15 for removing reattaching the plug in bo...

Page 26: ... dial pressing When you press the dial this unit toggles between shuttle and jog modes It is possible to prohibit a manner of toggling Prohibiting Search Dial Pressing 1 Open the lower control panel as shown in the figure 2 Loosen a screw on the backside of the search dial as shown in the figure 3 Slide the mode selection plate in the direction indicat ed by the arrow as far as it will go 4 Check ...

Page 27: ...en the REC editing recording operation is performed with only audio signal input the recording operation may sometimes be disordered Even when only an audio signal is recorded be sure to input the external reference video signal or the internal video test signal generated by internal video test signal generator using setup extend menu ITEM 710 Alarm Display for Video Input Signal and Reference Sig...

Page 28: ...machine to machine PRESET REGEN PRESET REGEN CONTROL MODE VTR to VTR FREE RUN REC RUN REC RUN must be set to AS IN 1 14 2 VTR Constant Values Settings of Editor Set the VTR constant values according to the table below when the editor which needs the setting of VTR constant values is connected Moreover the change of VTR constant values are required when the 525 625 system is switched by setup menu ...

Page 29: ...sure to adjust in PB mode The system phase does not change even if the SYNC SC control knob is turned in the REC mode but it changes when the REC mode is shifted to the PB mode The playback sound may be momentarily interrupted when the SYNC SC control knob is turned during tape playback 1 14 4 Setup Menu Settings Video Sync Delay Setting ITEM 701 DNW 75 75P only Commonly when integrating the menu ...

Page 30: ...00 F 1 G 1 2 1P Blue 1 DNW 75 75P only 2 At the suffix 11 or 21 3 At the suffix 11 21 or 13 When removing the DPR 118 board with BKNW 118 DPR 119 board disconnect the two cables from the following connectors on the DPR 119 board DPR 119 board CN1 1P Orange CN3 1P Green When removing the DPR 150 board of BKNW 124 disconnect the two cables from the following connec tors on the DPR 150 board or the p...

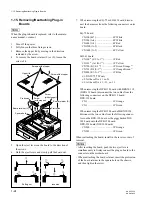
Page 31: ... figure until the cassette is ejected completely 1 16 Taking Out the Cassette in Tape Slacking When the tape is slacked in this unit follow the steps below to take out the cassette tape n Being careful not to damage the tape take out the cassette tape with care 1 Turn off the power 2 Remove the upper lid Refer to steps 1 and 2 in Section 1 15 3 Slide the knobs on the plate MD assembly each in the ...

Page 32: ......

Page 33: ...al No _____________________________ Optional hardware SDTI output Not installed Installed BKNW 118 Installed BKNW 124 Firmware SY1 ROM version ____________________________ SY2 ROM version ____________________________ SY3 ROM version ____________________________ When the BKNW 124 is used SV1 ROM version ____________________________ RS 232C baud rate bps Hours meter Write down the value of hours met...

Page 34: ...E AUDIO MIXING CH 1 NOT MIX NOT MIX MIX DNW 75 75P only CH 1 CH 2 CH 3 CH 4 CH 2 NOT MIX NOT MIX MIX CH 1 CH 2 CH 3 CH 4 CH 3 NOT MIX NOT MIX MIX CH 1 CH 2 CH 3 CH 4 CH 4 NOT MIX NOT MIX MIX CH 1 CH 2 CH 3 CH 4 AUDIO INPUT CH 1 ANALOG SDI AES EBU ANALOG DNW 75 75P only CH 2 ANALOG SDI AES EBU ANALOG CH 3 ANALOG SDI AES EBU ANALOG CH 4 ANALOG SDI AES EBU ANALOG AUDIO MONITOR L CH 1 CH 1 CH 2 CH 3 C...

Page 35: ...W 75 75P only CH2 COR200 4 dBm 600 Z 4 0 _3 _20 CH3 COR300 4 dBm 600 Z 4 0 _3 _20 CH4 COR400 4 dBm 600 Z 4 0 _3 _20 Audio input headroom CH1 COR101 20 dB 20 18 16 DNW 75 75P only CH2 COR201 20 dB 20 18 16 CH3 COR301 20 dB 20 18 16 CH4 COR401 20 dB 20 18 16 Audio output level CH1 COR501 4 dBm 600 Z 4 0 _3 _20 CH2 COR601 4 dBm 600 Z 4 0 _3 _20 CH3 COR701 4 dBm 600 Z 4 0 _3 _20 CH4 COR801 4 dBm 600 Z...

Page 36: ...OFF 4 RS232C DEBUG OFF 5 _ 8 Factory use OFF _ S1102 Never change the settings of S1102 switch since each switch is set according to the characteristics of the unit 1 2 Factory use OFF _ 3 _ 6 Model ID Model 3 4 5 6 _ DNW 75 75P OFF OFF OFF ON DNW 65 65P OFF OFF ON ON TTV 4074 P ON OFF OFF ON TTV 4064 P ON OFF ON ON 7 J UC ON _ 8 525 625 DNW 75 65 OFF _ DNW 75P 65P ON _ S1900 1 _ 8 Factory use OFF...

Page 37: ...LAY INFORMATION SELECT T STA 006 LOCAL FUNCTION ENABLE ST EJ 007 TAPE TIMER DISPLAY _12H 008 MONITORING SELECTION MANU FOR VTR TO VTR EDIT 75 009 CHARACTER TYPE WHITE 011 CHARACTER V SIZE x1 013 525 625 SYSTEM SELECT OFF _ _ _ _ _ ITEM 013 is no relation with Bank ITEM B00 series Menu bank parameter This series is not necessary to write down the setting All settings of B00 series are OFF on the no...

Page 38: ...PUT SEL 75 DIS 2 MONITOR SELECT 65 DIS 3 CONTROL PANEL DIS 119 VARIABLE SPEED LIMIT IN OFF KEY PANEL CONTROL 120 CTL LOCK IN VAR SHTL OFF ITEM 200 series Remote interface parameter ITEM Factory setting Current Bank 1 Bank 2 Bank 3 Bank 4 201 PARA RUN DIS ITEM 300 series Editing parameter ITEM Factory setting Current Bank 1 Bank 2 Bank 3 Bank 4 301 VAR SPEED RANGE FOR SYNCHRONIZATION _1 2 302 CAPST...

Page 39: ...S 405 CUE UP BY CTL CAP ITEM 500 series Tape protection parameter ITEM Factory setting Current Bank 1 Bank 2 Bank 3 Bank 4 501 STILL TIMER 8M 502 TAPE PROTECTION MODE FROM SEARCH STEP 503 TAPE PROTECTION MODE FROM STOP STDBY 504 DRUM ROTATION IN STANDBY OFF OFF 505 STILL TENSION NORM ITEM 600 series Time code generator parameter ITEM Factory setting Current Bank 1 Bank 2 Bank 3 Bank 4 601 VITC POS...

Page 40: ...5 line B W 16 16 line B W 17 17 line B W 18 18 line B W 19 19 line B W 20 20 line B W 21 21 line COMB 22 22 line COMB 705 EDGE SUBCARRIER REDUCER MODE AUTO 706 VERTICAL BLANKING V SHIFT ON 707 FORCED VERTICAL INTERPOLATION OFF AUTO 709 CAV LEVEL FORMAT SUB ITEM 0 INPUT CAV LEVEL 75 B CAM 1 OUTPUT CAV LEVEL B CAM 710 INTERNAL VIDEO SIGNAL GENERATOR 75 CB75 65 OFF 712 VIDEO PROCESS ON CAP LOCK 2FIEL...

Page 41: ...ank 4 802 DIGITAL AUDIO MUTE IN SHUTTLE MODE OFF 803 DIGITAL AUDIO FADE TIME 75 10MS 805 AUDIO MONITOR OUTPUT MIXING RMS 806 LEVEL METER SCALE PEAK 0 807 AUDIO OUTPUT PHASE 80 808 INTERNAL AUDIO SIGNAL GENERATOR OFF 809 AUDIO LEVEL METER DIMMER CONTROL 0 810 AUDIO EDIT PREVIEW SWITCHER 75 INT 815 AUDIO SAMPLING RATE CONVERTER 75 OFF 817 EMPHASIS OFF ITEM 900 series Digital process parameter ITEM F...

Page 42: ...FF TIME 20M 2 F35 AUDIO DITHER 75 ON 1 When the SY1 ROM s version is eralier than 1 33 the ITEM F21 s factory setting is OFF 2 When the SY2 ROM s version is eralier than 1 40 the ITEM F34 s factory setting is 5M ITEM G00 series Shot mark operation parameter ITEM Factory setting Current Bank 1 Bank 2 Bank 3 Bank 4 G01 SEARCH TYPE SELECT ALL G02 LISTING TYPE SELECT SUB ITEM REC START MARK ON SHOT MA...

Page 43: ...LAY INFORMATION SELECT T STA 006 LOCAL FUNCTION ENABLE ST EJ 007 TAPE TIMER DISPLAY _12H 008 MONITORING SELECTION MANU FOR VTR TO VTR EDIT 75 009 CHARACTER TYPE WHITE 011 CHARACTER V SIZE x1 013 525 625 SYSTEM SELECT OFF _ _ _ _ _ ITEM 013 is no relation with Bank ITEM B00 series Menu bank parameter This series is not necessary to write down the setting All settings of B00 series are OFF on the no...

Page 44: ...IS 2 MONITOR SELECT 65 DIS 3 CONTROL PANEL DIS 119 VARIABLE SPEED LIMIT IN OFF KEY PANEL CONTROL 120 CTL LOCK IN VAR SHTL OFF ITEM 200 series Remote interface parameter ITEM Factory setting Current Bank 1 Bank 2 Bank 3 Bank 4 201 PARA RUN DIS 202 CF FLAG REPLY 75 8F ITEM 300 series Editing parameter ITEM Factory setting Current Bank 1 Bank 2 Bank 3 Bank 4 301 VAR SPEED RANGE FOR SYNCHRONIZATION _1...

Page 45: ...ENTRY DIS 405 CUE UP BY CTL CAP ITEM 500 series Tape protection parameter ITEM Factory setting Current Bank 1 Bank 2 Bank 3 Bank 4 501 STILL TIMER 8M 502 TAPE PROTECTION MODE FROM SEARCH STEP 503 TAPE PROTECTION MODE FROM STOP STDBY 504 DRUM ROTATION IN STANDBY OFF OFF 505 STILL TENSION NORM ITEM 600 series Time code generator parameter ITEM Factory setting Current Bank 1 Bank 2 Bank 3 Bank 4 601 ...

Page 46: ...31 line BLANK 19 19 332 line BLANK 20 20 333 line BLANK 21 21 334 line BLANK 22 22 335 line BLANK 23 23 line HALF 704 DECODER Y C SEP MODE 75 SUB ITEM 9 9 322 line B W 10 10 323 line B W 11 11 324 line B W 12 12 325 line B W 13 13 326 line B W 14 14 327 line B W 15 15 328 line B W 16 16 329 line B W 17 17 330 line B W 18 18 331 line B W 19 19 332 line B W 20 20 333 line B W 21 21 334 line B W 22 2...

Page 47: ...ne THROU 17 17 330 line THROU 18 18 331 line THROU 19 19 332 line THROU 20 20 333 line THROU 21 21 334 line THROU 22 22 335 line THROU 726 H BLANKING WIDTH NAROW 727 VIDEO EDIT PREVIEW SWITCHER 75 INT 728 OUTPUT SCH PHASE 800H ITEM 800 series Audio control parameter ITEM Factory setting Current Bank 1 Bank 2 Bank 3 Bank 4 802 DIGITAL AUDIO MUTE IN SHUTTLE MODE OFF 803 DIGITAL AUDIO FADE TIME 75 10...

Page 48: ... Factory setting Current Bank 1 Bank 2 Bank 3 Bank 4 F02 EMERGENCY TAPE PROTECTION ENA F16 DEVICE TYPE MODIFY 0 F21 PROCESS CONT VR ON 1 F25 SERVO AV REF SEL IN PREREAD MODE 75 OFF F34 STOP PINCH OFF TIME 20M 2 F35 AUDIO DITHER 75 ON 1 When the SY1 ROM s version is eralier than 1 33 the ITEM F21 s factory setting is OFF 2 When the SY2 ROM s version is eralier than 1 40 the ITEM F34 s factory setti...

Page 49: ...urs de l équipement décrit dans ce manuel Sony Corporation interdit formellement la copie de quelque partie que ce soit de ce manuel ou son emploi pour tout autre but que des opérations ou entretiens de l équipement à moins d une permission écrite de Sony Corporation Das in dieser Anleitung enthaltene Material besteht aus Informationen die Eigentum der Sony Corporation sind und ausschließlich zum ...

Page 50: ...Printed in Japan Sony Corporation 2001 12 08 B P Company 1999 DNW 75 SY DNW 75P SY DNW 65 SY DNW 65P SY E 3 202 993 04 ...

Reviews: