background image

D:\TV's JOB\SONY TV\SY12007_A5 (Rev-3)\4411951131_GB\GB03STU.fm

KDL-HX750/HX753/EX650/EX653/EX65A/EX550

4-411-951-

13

(1)

8

GB

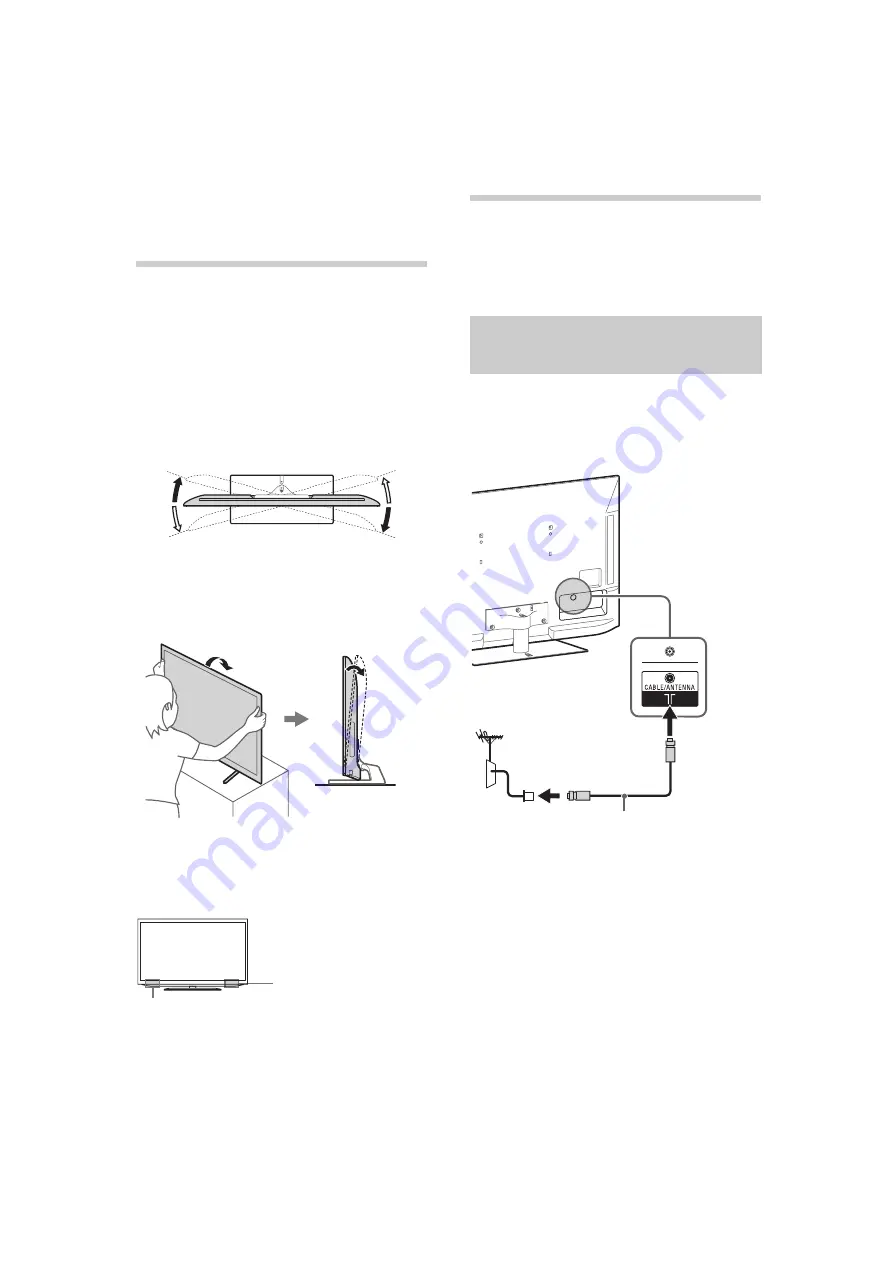
2: Adjusting the 

viewing angle 
of the TV

This TV can be adjusted within the angles as 
illustrated.

x

Angle adjustment (Swivel)

(Except KDL-26EX550)

~

When adjusting the angle, hold the stand with 
one hand to avoid having the stand slip or TV tip 
over.

x

Angle adjustment (Tilt)

(KDL-26EX550 only)

* The angle is approximate value.

~

Ensure that there are no objects in front of the TV.

3: Connections

~

Use an antenna cable connector no greater than 
14 mm in thickness.

Use an HDMI cable connector within 12 mm 
(thickness) × 21 mm (width).

x

To connect an antenna/cable

KDL-55/46/40/32HX75x, 
KDL-46/40/32EX65x, KDL-32EX550

*15°

*15°

*15°

*15°

*6°

IR Sensor

3D Sync Transmitter
(KDL-55/46/40/32HX75x 
only)

Connecting an antenna/
cable/VCR

Antenna cable
(not supplied)

Summary of Contents for 26EX550

Page 1: ... fm 4 411 951 13 1 KDL HX750 HX753 EX650 EX653 EX65A EX550 4 411 951 13 1 LCD TV Operating Instructions KDL 55HX750 55HX753 46HX750 46HX753 46EX650 46EX653 46EX65A 40HX750 KDL 40HX753 40EX650 40EX653 40EX65A 32HX750 32HX753 32EX650 32EX653 KDL 32EX550 26EX550 ...

Page 2: ...sit divx com for more information and software tools to convert your files into DivX videos ABOUT DIVX VIDEO ON DEMAND This DivX Certified device must be registered in order to play purchased DivX Video on Demand VOD movies To obtain your registration code locate the DivX VOD section in your device setup menu Go to vod divx com for more information on how to complete your registration Manufactured...

Page 3: ...the edge of the supporting furniture Not placing the television on tall furniture for example cupboards or bookcases without anchoring both the furniture and the television to a suitable support Not standing the televisions on cloth or other materials placed between the television and supporting furniture Educating children about the dangers of climbing on furniture to reach the television or its ...

Page 4: ...more information on how to use BRAVIA TV refer to the Electronic manual Operating Instructions Electronic manual i Manual Explains how to set up your TV such as connections initial set up and basic operations For more information press the i MANUAL button Explains how to use all the features See page 23 on how to use the i Manual Images and illustrations used in this manual may differ from the act...

Page 5: ...ections 8 4 Preventing the TV from toppling over 12 5 Bundling the cables 13 6 Connecting the TV to the Internet 14 7 Performing the initial set up 15 Using Your BRAVIA TV Watching TV B qk Selecting various functions and settings Home Menu 20 Watching Internet Video 22 Looking for Instructions Looking for instructions in the electronic manual i Manual B wd Additional Information Troubleshooting 25...

Page 6: ...5 16 3 Except KDL 26EX550 Fixing screws for Table Top Stand M5 16 2 KDL 26EX550 only Assembling screws for Table Top Stand M5 x 16 4 KDL 55 46 40 32HX75x KDL 46 40 32EX65x KDL 32EX550 only HDMI cable 1 KDL 46 40EX65A only Operating Instructions this manual and other documents 1 Refer to the supplied Table Top Stand leaflet to assemble the Table Top Stand Inserting batteries into the remote 1 Remov...

Page 7: ...rks indicate the location of the screw holes used for securing the Table Top Stand KDL 55 46 40 32HX75x KDL 46 40 32EX65x KDL 32EX550 KDL 26EX550 If using an electric screwdriver set the torque at approximately 1 5 N m 15 kgf cm To detach the Table Top Stand from the TV remove the screws fixed in step 2 Do not remove the Table Top Stand for any reason other than to install corresponding accessorie...

Page 8: ... avoid having the stand slip or TV tip over x Angle adjustment Tilt KDL 26EX550 only The angle is approximate value Ensure that there are no objects in front of the TV 3 Connections Use an antenna cable connector no greater than 14 mm in thickness Use an HDMI cable connector within 12 mm thickness 21 mm width x To connect an antenna cable KDL 55 46 40 32HX75x KDL 46 40 32EX65x KDL 32EX550 15 15 15...

Page 9: ... 13 1 Getting Started 9 GB KDL 26EX550 x To connect a Set Top Box recorder e g DVD recorder with HDMI KDL 55 46 40 32HX75x KDL 46 40 32EX65x KDL 32EX550 HDMI cable is supplied for KDL 46 40EX65A only Antenna cable not supplied Set Top Box recorder e g DVD recorder Antenna cable not supplied HDMI cable Continued ...

Page 10: ...EX550 4 411 951 13 1 10 GB KDL 26EX550 x Connecting an antenna cable and VCR KDL 55 46 40 32HX75x KDL 46 40 32EX65x KDL 32EX550 Set Top Box recorder e g DVD recorder Antenna cable not supplied HDMI cable not supplied Antenna cable not supplied Antenna cable not supplied AV cable not supplied VCR ...

Page 11: ...411 951 13 1 Getting Started 11 GB KDL 26EX550 KDL 55 46 40 32HX75x KDL 46 40 32EX65x KDL 32EX550 Antenna cable not supplied Antenna cable not supplied AV cable not supplied VCR Connecting audio video devices DVD Player Antenna cable not supplied AV cable not supplied Antenna cable not supplied Continued ...

Page 12: ...pling over KDL 55 46 40 32HX75x KDL 46 40 32EX65x KDL 32EX550 1 Install a wood screw 4 mm in diameter not supplied in the TV stand 2 Install a machine screw M4 not supplied into the screw hole of the TV 3 Tie the wood screw and the machine screw with a strong cord not supplied DVD Player Antenna cable not supplied AV cable not supplied Antenna cable not supplied ...

Page 13: ... a strong cord not supplied 2 Install a wood screw 4 mm in diameter not supplied in the TV stand Then tie the strong cord to the wood screw The length of the M4 machine screw differs depending on the cord diameter Please see below illustration 5 Bundling the cables Before bundling the cables remove the cable holder from the AC cover Reuse the cable holder to bundle the other cables Do not bundle t...

Page 14: ...rnet service provider to connect to the Internet KDL 55 46 40 32HX75x KDL 46 40 32EX65x KDL 32EX550 KDL 26EX550 For LAN connections use a Category 7 cable not supplied KDL 55 46 40 32HX75x The built in wireless LAN device allows you to access the Internet and your home network With this feature you can connect to a wireless LAN and enjoy the benefits of networking in a cable free environment Prepa...

Page 15: ...ter 7 Performing the initial set up 1 Connect the TV to your AC power outlet mains socket 2 Press 1 on the TV The power indicator will light up in green When you switch on the TV for the first time the Language menu appears on the screen When you turn on the TV for the first time the TV requires some internal processing for optimisation before you can perform the initial setup There will be no pic...

Page 16: ...automatically Select Custom to connect manually If you do not access the Internet or to set up later select Skip If you use WEP security select Custom t Wireless Set up t Scan Then select the network name SSID you want to connect If you cannot find the required network name select Manual Entry and press to enter network name Use the optional USB Wireless LAN Adapter to connect with your wireless r...

Page 17: ...D TV s JOB SONY TV SY12007_A5 Rev 3 4411951131_GB GB03STU fm KDL HX750 HX753 EX650 EX653 EX65A EX550 4 411 951 13 1 17 GB ...

Page 18: ... EX550 4 411 951 13 1 18 GB Using Your BRAVIA TV Watching TV 1 Turn on the TV Press 1 on the TV or remote to turn on the TV 2 Select a mode 3 Select a TV channel or select an input x To select digital channels Use 0 9 For channel numbers 10 and above press the next digit quickly 1 3 3 2 1 or or ...

Page 19: ...tch the 3D contents Watching 3D contents KDL 55 46 40 32HX75x only Frequently used buttons 3 4 5 1 2 1 GUIDE Displays the digital programme guide only available for EPG supported countries regions 2 Colour buttons When the colour buttons are available an operation guide appears on the screen 3 Info Text reveal Displays channel number details of programmes and the clock 4 Subtitle setting You can t...

Page 20: ... item and modify the TV settings 1 Press HOME 2 Press G g to select Settings category The contents of Settings are displayed on the right See page 21 Category list for all categories 3 Press F f to select Display then press 4 Modify the settings x To exit the Home menu Press HOME x To select using the OPTIONS button Press OPTIONS A list of convenient functions and menu shortcuts are displayed The ...

Page 21: ...e an Internet connection Sony Entertainment Network Enables selection of content from the online service SEN Sony Entertainment Network Internet Content Enables access to Internet services for TV TV Allows you to select a list of TV channels or a programme guide Media Enables selection of media files photo music video to play in a connected USB storage device or your home network Inputs Enables se...

Page 22: ... the TV to the Internet If you experience difficulties with this feature check that the Internet connection is set up properly The interface to Internet content depends on the Internet content providers Services block video content based on the Parental Lock setting of the TV Some service providers do not support this function To update Internet Video content services press HOME then select Settin...

Page 23: ... into your BRAVIA TV and can be displayed on the screen To learn more about your TV features access your i Manual with the touch of a button 1 Press i MANUAL 2 Select an item 1 Press G g to select an item 2 Press F f G g to select an item then press The page of the selected item appears You can step through pages using G g Press RETURN to return to the previous page 1 2 RETURN If a scroll bar appe...

Page 24: ...splayed press the yellow button on the remote You can switch between the i Manual screen and the TV screen This feature allows you to refer to the instructions in the i Manual while using your BRAVIA TV Press i MANUAL to switch between the i Manual screen previously displayed and the TV screen To jump to the top page of i Manual press the red button on the remote You can also press HOME then selec...

Page 25: ... Connect the TV to the AC power and press 1 on the TV If the 1 standby indicator lights up in red press 1 on the remote Tiny black points and or bright points appear on the screen The screen is composed of pixels Tiny black points and or bright points pixels on the screen do not indicate a malfunction Some programmes cannot be tuned Check the antenna or dish The TV turns off automatically the TV e...

Page 26: ... Audio Two channel linear PCM 32 44 1 and 48 kHz 16 20 and 24 bits Dolby Digital Analogue audio input stereo minijack HDMI IN 2 only common with PC IN ARC Audio Return Channel HDMI IN 1 only HDMI IN1 2 3 4 KDL 46 40 32EX65x KDL 32EX550 only Video 1080p 30 50 60Hz 1080 24p 1080i 50 60Hz 720p 30 50 60Hz 720 24p 576p 576i 480p 480i PC Formats Audio Two channel linear PCM 32 44 1 and 48 kHz 16 20 and ...

Page 27: ... BR50 KDL 55 46 40HX75x only Camera and Microphone Unit CMU BR100 KDL 55 46 40HX750 KDL 46EX650 KDL 46EX65A only Operating temperature 0 ºC 40 ºC Operating humidity 10 80 RH non condensing Model name KDL 40EX650 40EX653 40EX65A 32HX750 32HX753 32EX650 32EX653 32EX550 26EX550 Power and others Power requirements 110 V 240 V AC 50 60 Hz Screen size measured diagonally Approx 101 6 cm 40 inches Approx...

Page 28: ...sold separately Refer to the Instructions supplied with the Wall Mount Bracket to properly carry out the installation See page 7 Detaching the Table Top Stand from the TV When installing the base bracket on the wall for SU WL50B 1 Install one side of each plate to the upper bracket and the other side to the lower bracket 2 Attach the base bracket to the wall 3 Remove the plates except KDL 26EX550 ...

Page 29: ...ving the Table Top Stand from the TV lay the display face down on a stable work surface that is larger than the TV To prevent damaging the surface of the LCD display make sure to place a soft cloth on the work surface Attach the Mounting Hook using the four screws supplied with the Wall Mount Bracket When attaching the Table Top Stand again be sure to fasten the screws previously removed to the or...

Page 30: ...aching the Table Top Stand again be sure to fasten the screws previously removed to the original holes on the rear of the TV SU WL100 KDL 26EX550 only Screw and Hook locations diagram table Model Name KDL Screw location Hook location SU WL50B SU WL500 SU WL50B SU WL500 55HX75x e j e j b b 46HX75x 46EX65x 40HX75x 40EX65x 32HX75x e h e g c c 32EX65x 32EX550 SU WL100 26EX550 a Soft cloth Screw PSW 4 ...

Page 31: ...l Information x SU WL50B x SU WL500 a b c c b a Screw location When installing the Mounting Hook on the TV Hook location When installing the TV onto the Base Bracket b a c Mounting Hook Base Bracket a b c Screw location When installing the Mounting Hook on the TV Hook location When installing the TV onto the Base Bracket Continued ...

Page 32: ...3 4411951131_GB GB06OPT fm KDL HX750 HX753 EX650 EX653 EX65A EX550 4 411 951 13 1 32 GB x SU WL100 SU WL50B 1 TV installation dimensions table Hook location When installing the TV onto the Base Bracket b a B C A E D Screen centre point ...

Page 33: ...7_A5 Rev 3 4411951131_GB GB06OPT fm KDL HX750 HX753 EX650 EX653 EX65A EX550 4 411 951 13 1 33 GB Additional Information SU WL500 2 SU WL100 3 A B C D E F G H Screen centre point B C A E F G H D 125 Screen centre point Continued ...

Page 34: ...le 0 Angle 20 A B C D E F G H SU WL50B 1 55HX75x 1271 761 106 495 108 46HX75x 1076 650 161 495 108 46EX65x 1074 649 161 496 108 40HX75x 943 576 198 496 107 40EX65x 941 575 198 495 108 32HX75x 756 471 190 436 107 32EX65x 753 470 190 436 108 32EX55x 753 470 190 436 108 SU WL500 2 55HX75x 1271 761 78 468 107 334 705 477 46HX75x 1076 650 133 468 107 296 602 477 46EX65x 1074 649 133 468 108 294 599 476...

Page 35: ...ount bracket in order to provide adequate air circulation Installed on the wall Installed with stand To ensure proper ventilation and prevent the collection of dirt or dust Do not lay the TV set flat install upside down backwards or sideways Do not place the TV set on a shelf rug bed or in a closet Do not cover the TV set with a cloth such as curtains or items such as newspapers etc Do not install...

Page 36: ... the enclosure and or TV malfunction Situation Do not use when your hands are wet with the cabinet removed or with attachments not recommended by the manufacturer Disconnect the TV set from AC power outlet and antenna during lightning storms Do not install the TV so that it sticks out into an open space Injury or damage from a person or object bumping into the TV may result Broken pieces Do not th...

Page 37: ...tures are displayed continuously It may disappear after a few moments The screen and cabinet get warm when this TV set is in use This is not a malfunction The LCD screen contains a small amount of liquid crystal Follow your local ordinances and regulations for disposal Handling and cleaning the screen surface cabinet of the TV set Be sure to unplug the AC power cord connected to the TV set from AC...

Page 38: ...l and electronic equipment Your co operation shall facilitate proper disposal help prevent potential negative consequences hazards to the environment and human health which could otherwise be caused by inappropriate waste disposal including improper handling accidental breakage damage and or improper recycling of e waste The recycling of materials will help to conserve natural resources For more d...

Page 39: ......

Page 40: ...rporation Printed in Malaysia 4 411 951 13 1 KDL HX750 HX753 EX650 EX653 EX65A EX550 4 411 951 13 1 Instructions about Installing Wall Mount Bracket are included within this TV s instructions manual Customer Support ...

Reviews: