background image

8

GB

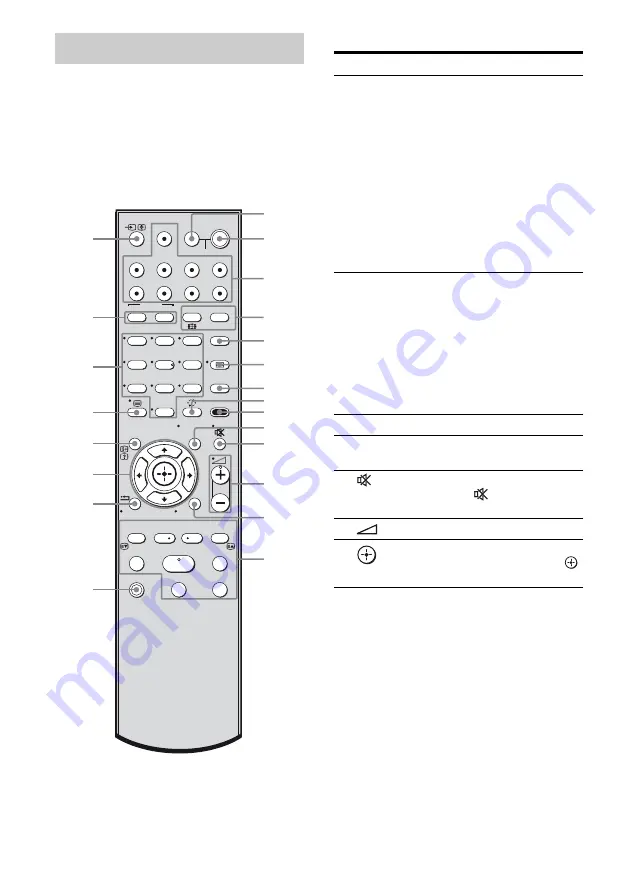
You can use the supplied RM-AAU058 
Remote Commander to operate the receiver 
and to control the Sony audio/video 
components that the remote is assigned to 
operate (page 51).

RM-AAU058

Basic operations

Remote commander

1

2

3

4

6

7

8

0

ENTER

9

SYSTEM STANDBY

DMPORT

VIDEO1

VIDEO2

BD

DVD

RETURN/EXIT

TV CH –

PRESET –

TV CH +

TUNING –

TV

F1

MENU

TOP MENU

F2

AMP MENU

CLEAR

DISPLAY

SOUND

FIELD

AUDIO

ANALOG

DIGITAL

THEATRE

SA-CD/CD

TV

TUNER

?/1

.

H

m

M

X

x

<

<

>

5

TV 

?/1


AV 

?/1

TOOLS/
OPTIONS

MENU/HOME

SAT

BD/DVD

1

3

2

6

7

8

q;

qa

9

qf

qs

qd

4

5

qh

qk

qj

ql

w;

wa

qg

ws

Remote Button Function

B

?

/

1


(on/standby)

Press to turn the receiver on 
or off.
To turn off all Sony 
components, press 

?

/

1

 and 

AV 

?

/

1

 (

A

) at the same 

time (SYSTEM 
STANDBY).

Saving the power in 
standby mode

When “CONTROL FOR 
HDMI” is set to “CTRL 
ON” and “P.SAVE” is set to 
“SAVE ON” (page 35).

C

Input buttons

Press one of the buttons to 
select the component you 
want to use. The buttons are 
factory assigned to control 
Sony components.


You can change the button 
assignments following the 
steps in “Changing the input 
button assignments” on page 
51.

G

SOUND FIELD

Press to select a sound field.

I

AMP MENU

Press to display the menu of 
the receiver. 

K

(Muting)

Press to turn off the sound. 
Press 

 again to restore the 

sound.

L

 +

*

/–

Press to adjust the volume.

Q


V

/

v

/

B

/

b

Press 

V

v

B

 or 

b

 to select 

the settings. Then, press 


to enter the selection.

,

Summary of Contents for 4-130-029-13(1)

Page 1: ... 2009 Sony Corporation 4 130 029 13 1 Home Theatre System Operating Instructions HT SF100 HT SS100 ...

Page 2: ...ehold waste disposal service or the shop where you purchased the product Disposal of waste batteries applicable in the European Union and other European countries with separate collection systems This symbol on the battery or on the packaging indicates that the battery provided with this product shall not be treated as household waste On certain batteries this symbol might be used in combination w...

Page 3: ...he DTS Digital Surround System Manufactured under license from Dolby Laboratories Dolby Pro Logic and the double D symbol are trademarks of Dolby Laboratories Manufactured under license under U S Patent s 5 451 942 5 956 674 5 974 380 5 978 762 6 487 535 other U S and worldwide patents issued pending DTS and DTS Digital Surround are registered trademarks and the DTS logos and Symbol are trademarks...

Page 4: ...he tone TONE menu 37 Custom settings CUSTOM menu 38 Enjoying Surround Sound Selecting the sound field 39 Tuner Operations Listening to FM AM radio 40 Presetting radio stations 41 Using the Radio Data System RDS 43 Models of area code CEL CEK only BRAVIA Sync Features What is BRAVIA Sync 44 Preparing for the BRAVIA Sync 45 Playing back components with one touch operation One Touch Play 46 Enjoying ...

Page 5: ...DMI is set to on and the receiver is on standby mode Note If the ACTIVE STANDBY lamp is flashing see page 59 C Display The current status of the selected component or a list of selectable items appears here page 6 D Remote sensor Receives signals from remote commander E INPUT SELECTOR Press to select the input source to playback page 28 30 31 40 41 42 F MASTER VOLUME Turn to adjust the volume leve...

Page 6: ... made digital connections E HDMI Lights up when a playback component is connected to this receiver using an HDMI jack page 18 L C R SL SR SW Name Function F Preset station indicators Lights up when using the receiver to tune in radio stations you have preset For details on presetting radio stations see page 41 G Tuner indicators Lights up when using the receiver to tune in radio stations page 40 e...

Page 7: ...ophone for the Auto Calibration function page 24 D AUDIO INPUT section AUDIO IN jacks Connects to a Super Audio CD player CD player etc page 16 17 18 20 White L Red R E DIGITAL INPUT OUTPUT section OPT IN jacks Connects to a satellite tuner etc The COAX IN jack provides a better sound quality page 20 COAX IN jack HDMI IN OUT jacks Connects to a DVD player satellite tuner or a Blu ray disc player T...

Page 8: ...on B 1 on standby Press to turn the receiver on or off To turn off all Sony components press 1 and AV 1 A at the same time SYSTEM STANDBY Saving the power in standby mode When CONTROL FOR HDMI is set to CTRL ON and P SAVE is set to SAVE ON page 35 C Input buttons Press one of the buttons to select the component you want to use The buttons are factory assigned to control Sony components You can cha...

Page 9: ...ess again to resume normal playback x stop Play mode buttons Remote Button Function A TV 1 AV 1 on standby Press to turn on or off the Sony audio video components that the remote is assigned to operate page 51 Press 1 B and TV 1 AV 1 A at the same time to turn off the receiver and other components that the remote is assigned to operate SYSTEM STANDBY H ENTER Press to enter the selection T Numeric ...

Page 10: ...lay information such as current channel number and screen format In Text mode Press to reveal hidden information e g answers to a quiz S Text Press to display text T Numeric buttons number 5 Press to select channels Press ENTER H to change channels immediately U ANALOG Press to change to analog mode DIGITAL Press to change to digital mode Remote Button Function V Input select Text hold In TV mode ...

Page 11: ... playback X pause press again to resume normal playback x stop Play mode buttons Q V v B b Press to select a menu item and enter the selection U BD DVD TOP MENU MENU Press to display the top menu or disc menu Remote Button Function D F1 Press to select the HDD F2 Press to select the DVD M MENU HOME Press to display the menu N Press to specify the previous or next chapter or track Press to change t...

Page 12: ...o front speakers a center speaker and two surround speakers and a subwoofer 5 1 channel You can place your speakers as shown below AFront speaker left BFront speaker right CCenter speaker DSurround speaker left ESurround speaker right FSubwoofer HT SF100 only HT SS100 only Tip Since the subwoofer does not emit highly directional signals you can place it wherever you want Getting Started ...

Page 13: ...eakers you are recommended to use the speaker stand as below Installing the speakers on a flat surface Model Speakers HT SF100 Center speaker and subwoofer HT SS100 All the speakers and subwoofer Installing the speakers on the speaker stand Model Speaker stand HT SF100 Supplied For details refer to the supplied speaker stand installation guide HT SS100 Optional WS FV11 or WS FV10D speaker stand av...

Page 14: ... is especially fragile attach the screws securely to a beam and fasten them to the wall Install the speakers on a vertical and flat wall where reinforcement is applied Contact a screw shop or installer regarding the wall material or screws to be used Sony is not responsible for accident or damage caused by improper installation insufficient wall strength or improper screw installation natural cala...

Page 15: ... connector to the speaker jack on the receiver To connect the speakers correctly Check the speaker type by referring to the speaker label at the rear panel of the speakers The center speaker and subwoofer do not have the character on the speaker label For details on the speaker type see page 3 SPEAKERS CENTER SUBWOOFER FRONT R FRONT L SUR R SUR L E B ASpeaker cord supplied A A Connector C F D A A ...

Page 16: ... insert the plugs straight in until they click into place Do not bend or tie optical digital cords Tips To output the sound of the TV from the speakers connected to the receiver be sure to connect the audio output jacks of the TV to the TV IN jacks of the receiver turn off the TV s volume or activate the TV s muting function All the digital audio jacks are compatible with 32 kHz 44 1 kHz 48 kHz an...

Page 17: ...er to the video input of the TV However depending on the DIGITAL MEDIA PORT adapter video output may not be possible The type of connector varies depending on the DIGITAL MEDIA PORT adapter For details refer to the operating instructions supplied with the DIGITAL MEDIA PORT adapter How to hook up your components To connect See TV page 16 Audio components Super Audio CD player CD player DIGITAL MED...

Page 18: ...ransmits video and audio signals in digital format Sony recommends that you connect components to the receiver using an HDMI cable With HDMI you can easily enjoy both high quality sound and high quality images However it is necessary to connect the audio output of the TV to the audio input of the receiver using an optical cord to listen to the TV multi channel surround sound broadcasting from the ...

Page 19: ...h copyright protection technology HDCP the image and or the sound from the HDMI OUT jack may be distorted or may not be output In this case check the specification of the connected component You can enjoy multi channel Linear PCM only with an HDMI connection Set the image resolution of the playback component to 720p 1080i or 1080p when you output 96 kHz multi channel sound over an HDMI connection ...

Page 20: ...recorder and VCR to the TV so that the image is displayed on the TV Refer to the operating instructions of each connected component for details You cannot do recording on the DVD recorder or VCR via this receiver For details refer to the operating instructions supplied with the DVD recorder or VCR Tip All the digital audio jacks are compatible with 32 kHz 44 1 kHz 48 kHz and 96 kHz sampling freque...

Page 21: ...ver and other components Be sure to fully extend the FM wire antenna After connecting the FM wire antenna keep it as horizontal as possible 6 Preparing the receiver and the remote Connect the AC power cord to a wall outlet RT HDMI mA MAX BD IN OUT SAT IN DVD IN AUDIO IN VIDEO 1 VIDEO 2 L R L R AUDIO IN SA CD CD COAX IN SAT OPT IN OPT IN AUDIO IN TV DIGITAL TV AM ANTENNA FM wire antenna supplied AM...

Page 22: ...t leave the remote in an extremely hot or humid place Do not use a new battery with old ones Do not mix manganese batteries and other kinds of batteries Do not expose the remote sensor to direct sunlight or lighting apparatuses Doing so may cause a malfunction If you do not intend to use the remote for an extended period of time remove the batteries to avoid possible damage from battery leakage an...

Page 23: ... the Auto Calibration set up and connect the speakers page 12 15 The AUTO CAL MIC jack is used for the supplied optimizer microphone only Do not connect other microphones to this jack Doing so may damage the receiver and the microphone During the calibration the sound that comes out of the speakers is very loud The volume of the sound cannot be adjusted Pay attention to the presence of children or...

Page 24: ...area to avoid measurement error The measurement process will take approximately 30 seconds to complete The table below shows the display when measurement starts AM ANTENNA AUTO CAL MIC DMPORT FRONT R HDMI SPEAKERS FRONT L SUR R SUR L CENTER SUBWOOFER DC5V 700mA MAX BD IN OUT SAT IN DVD IN AUDIO IN VIDEO 1 VIDEO 2 L R L R AUDIO IN SA CD CD COAX IN SAT OPT IN OPT IN AUDIO IN TV DIGITAL TV Optimizer ...

Page 25: ... procedure 3 Save the measurement result Select SAVE in step 2 The measurement results are saved When error codes appear Try the remedies and perform the Auto Calibration again Confirming saving the measurement results Measurement result Display Explanation When the measurement process completes properly SAVE Proceed to step 2 When the measurement process fails ERROR XXXX See When error codes appe...

Page 26: ...lt is deleted The settings for speaker distance and speaker level return to their defaults Error code Cause and remedies ERROR SR33 Either the surround left or surround right speaker is not connected Check that the surround speakers are connected properly ERROR SW33 The subwoofer may be damaged Contact your Sony dealer or local authorized Sony service facility Warning code Explanation WARN 40 The ...

Page 27: ...r level FR LVL adjusts the front right speaker level SR LVL adjusts the surround right speaker level SL LVL adjusts the surround left speaker level SW LVL adjusts the subwoofer level Notes CNT LVL does not appear when you set CNT N in the SP SETUP setting SR LVL and SL LVL do not appear when you set SUR N in the SP SETUP setting 7 Press V v repeatedly to adjust the speaker level then press or b Yo...

Page 28: ...ponents that can be played back DMPORT DMPORT DIGITAL MEDIA PORT adapter connected to the DMPORT jack VIDEO1 or VIDEO2 VIDEO 1 or VIDEO 2 VCR etc connected to the VIDEO 1 or VIDEO 2 jack BD BD Blu ray disc player etc connected to the BD jack DVD DVD DVD player DVD recorder etc connected to the DVD jack SAT SAT Satellite tuner set top box etc connected to the SAT jack 1 2 3 4 6 7 8 0 ENTER 9 SYSTEM...

Page 29: ...a program For details refer to the operating instructions of the TV 2 Turn on the receiver 3 Press TV 4 Adjust the volume of the receiver Selected input Display Components that can be played back TV TV TV etc connected to the TV jack SA CD CD SA CD CD Super Audio CD CD player etc connected to the SA CD CD jack TUNER FM or AM band Built in radio tuner Enjoying TV 1 2 3 4 6 7 8 0 ENTER 9 SYSTEM STAN...

Page 30: ... the TV s speaker down to the minimum 1 Turn on the TV 2 Turn on the Blu ray disc DVD player recorder and the receiver 3 Press DVD or BD You can also use INPUT SELECTOR on the receiver to select DVD or BD Be sure to change the factory setting of the DVD input button on the remote so that you can use the button to control your DVD player For details see Changing the input button assignments page 51...

Page 31: ... the tray 2 Turn on the receiver 3 Press SA CD CD You can also use INPUT SELECTOR on the receiver to select SA CD CD 4 Adjust the volume of the receiver 1 Press DMPORT You can also use INPUT SELECTOR on the receiver to select DMPORT 2 Start playback of the connected component Tip When listening to MP3 or other compressed music files using a portable audio source you can enhance the sound Press SOU...

Page 32: ... 3 Press or b to enter the menu 4 Press V v repeatedly to select the parameter you want to adjust 5 Press or b to enter the parameter 6 Press V v repeatedly to select the setting you want 7 Press to enter the setting To return to the previous display Press B To exit the menu Press AMP MENU Amplifier Operations 4 6 7 8 0 ENTER 9 RETURN EXIT AMP MENU CLEAR DISPLAY SOUND FIELD 5 TOOLS OPTIONS MENU HO...

Page 33: ...Calibration page 24 Clear Auto Calibration resulta c A CAL CLR YES NO NO Speaker setting SP SETUP page 36 Center speakera CNT SP CNT Y CNT N CNT Y Surround speakersa SUR SP SUR Y SUR N SUR Y Front left speaker distancea d FL DIST FL 0 00 m to FL 7 00 m 0 10 m step FL 3 00 m Center speaker distancea d CNT DIST CNT 0 00 m to CNT 7 00 m 0 10 m step CNT 3 00 m Front right speaker distancea d FR DIST F...

Page 34: ...dB to FR 6 0 dB 0 5 dB step FR 0 0 dB Surround right speaker level SR LVL SR 6 0 dB to SR 6 0 dB 0 5 dB step SR 0 0 dB Surround left speaker level SL LVL SL 6 0 dB to SL 6 0 dB 0 5 dB step SL 0 0 dB Subwoofer level SW LVL SW 6 0 dB to SW 6 0 dB 0 5 dB step SW 0 0 dB Tone setting TONE page 37 Bass level BASS BASS 6 0 dB to BASS 6 0 dB 0 5 dB step BASS 0 0 dB Treble level TREBLE TRE 6 0 dB to TRE 6 ...

Page 35: ...47 x P SAVE Power Save Lets you save the power consumption during power standby mode while Control for HDMI function is set to on For details see Using the Power Saving function Power Save page 48 Settings for the Auto Calibration A CAL menu You can use the A CAL menu to make settings for the Auto Calibration function to suit your preference Select A CAL in the amplifier menus For details on adjus...

Page 36: ...n equal distance from your listening position set the distance to the closest speaker x CNT DIST Center speaker distance Lets you set the distance from your listening position to the center speaker x SR DIST Surround right speaker distance x SL DIST Surround left speaker distance Lets you set the distance from your listening position to the surround speakers x SW DIST Subwoofer distance Lets you s...

Page 37: ...x FL LVL Front left speaker level x CNT LVL Center speaker level x FR LVL Front right speaker level x SR LVL Surround right speaker level x SL LVL Surround left speaker level x SW LVL Subwoofer level Notes CNT LVL does not appear when you set CNT N in the SP SETUP setting SR LVL and SL LVL do not appear when you set SUR N in the SP SETUP setting Adjusting the tone TONE menu You can use the TONE me...

Page 38: ...he sound track This may be useful when you want to watch movies at low volumes late at night Audio dynamic range compression is possible with Dolby Digital sources only DRC OFF The audio dynamic range is not compressed DRC STD The audio dynamic range is compressed as intended by the recording engineer DRC MAX The audio dynamic range is compressed dramatically Tip Audio dynamic range compression le...

Page 39: ... F D MULTI A F D MULT Reproduce sound from any of the format to 2 or more speakers PRO LOGIC DOLBY PL Performs Dolby Pro Logic decoding The source recorded in 2 channel format is decoded into 4 1 channels PRO LOGIC II MOVIE PLII MV Performs Dolby Pro Logic II Movie mode decoding This setting is ideal for movies encoded in Dolby Surround In addition this mode can reproduce sound in 5 1 channel for ...

Page 40: ...he bilingual broadcast sound is input Dolby Pro Logic II MOVIE MUSIC are not effective Depending on the input stream the decoding mode may not be effective When you select MV D C S depending on the input stream Dolby Pro Logic may be applied automatically Tip You can identify the encoding format of DVD software etc by looking at the logo on the package Listening to FM AM radio You can listen to FM...

Page 41: ...ed antennas Presetting radio stations You can preset up to 20 FM stations and 10 AM stations Then you can easily tune in the stations you often listen to 1 Press TUNER repeatedly to select the FM or AM band You can also use INPUT SELECTOR on the receiver 2 Press and hold TUNING or TUNING until the auto scanning starts Scanning stops when the receiver tunes in a station ST for stereo program lights...

Page 42: ... XYZ appear in the display when a station is selected Note that no more than one name can be entered for each preset station 1 Press TUNER repeatedly to select the FM or AM band You can also use INPUT SELECTOR on the receiver 2 Press PRESET or PRESET repeatedly to select the preset station you want to create an index name for 3 Press MENU HOME 4 Press V v repeatedly to select NAME IN 5 Press 6 Cre...

Page 43: ...FM stations Not all FM stations provide RDS service nor do they provide the same type of services If you are not familiar with the RDS services in your area check with your local radio stations for details Simply select a station on the FM band using automatic tuning page 40 or preset tuning page 42 When you tune in a station that provides RDS services the program service name appears on the displ...

Page 44: ...V speaker or the speakers connected to the receiver System Power Off When you turn off the TV the receiver and connected components are also turned off simultaneously Control for HDMI is a mutual control function standard used by HDMI CEC Consumer Electronics Control for HDMI High Definition Multimedia Interface The Control for HDMI function will not operate correctly in the following cases When y...

Page 45: ... appear Wait until the setup is complete For details on setup of the TV refer to the operating instructions of your TV When your TV is not compatible with the Control for HDMI Easy Setting function Turn the Control for HDMI function of the receiver and the connected component on individually 1 Perform the steps given in When your TV is compatible with the Control for HDMI Easy Setting function pag...

Page 46: ...the Control for HDMI function for the connected components to on before you perform the Control for HDMI Easy Setting from the TV Playing back components with one touch operation One Touch Play You can enjoy sound and image from the components connected to the receiver via HDMI connections by a simple operation Play back a connected component The receiver and the TV are turned on automatically and...

Page 47: ...dio Control function the System Audio Control function does not work If the TV is turned on before turning on the receiver the TV sound will not be output for a moment When the System Audio Control function is active and the output method changes from the TV speaker to the speakers connected to the receiver automatically loud sound may be output depending on the volume level of the receiver You ca...

Page 48: ...nc compatible TV to this receiver During active standby mode if the TV is turned off the HDMI signal transmission will stop Thus power consumption will reduce 1 Press AMP MENU SET HDMI appears on the display 2 Press or b to enter the menu 3 Press v V repeatedly to select P SAVE then press or b 4 Press v V repeatedly to select the setting then press or b SAVE ON Reduces power consumption in standby...

Page 49: ...rol for HDMI function is set to on Changing the brightness of the display DIMMER You can change the brightness of the display 1 Press AMP MENU SET HDMI appears on the display 2 Press V v repeatedly until CUSTOM appears then press or b 3 Press V v repeatedly until DIMMER appears then press or b 4 Press V v repeatedly to select the brightness of the display then press DIMMER Y Low lighting DIMMER N ...

Page 50: ...play appears when you operate the receiver 5 Press AMP MENU The AMP menu turns off Using the Sleep Timer SLEEP You can set the receiver to turn off automatically at a specified time 1 Press AMP MENU SET HDMI appears on the display 2 Press V v repeatedly until CUSTOM appears then press or b 3 Press V v repeatedly until SLEEP appears then press or b 4 Press V v repeatedly to select the preset time t...

Page 51: ...g the input button assignments You can change the factory settings of the input buttons to suit the components in your system For example if you connect a Blu ray disc player to the DVD jack on the receiver you can set the DVD button on this remote to control the Blu ray disc player You cannot assign any component other than a TV to the TV white button of the remote Notes You can change the remote...

Page 52: ... recorder c The default setting of the SAT button Categories and the corresponding buttons for TV d The default setting of the TV white button When this setting is selected the audio input of the TV is switched and the image from the TV tuner is displayed on the TV screen automatically by pressing the TV white button e When this setting is selected the audio input of the TV is switched automatical...

Page 53: ...ng method for DVD video x DTS Digital Surround Digital audio encoding decoding technology for theaters developed by DTS Inc It compresses audio less than Dolby Digital delivering a higher quality sound reproduction x HDMI High Definition Multimedia Interface HDMI High Definition Multimedia Interface is an interface that supports both video and audio on a single digital connection allowing you to e...

Page 54: ...hecked by qualified personnel before operating it any further On power sources Before operating the receiver check that the operating voltage is identical with your local power supply The operating voltage is indicated on the nameplate on the back of the receiver The unit is not disconnected from the AC power source mains as long as it is connected to the wall outlet even if the unit itself has be...

Page 55: ... On operation Before connecting other components be sure to turn off and unplug the receiver If you encounter color irregularity on a nearby TV screen The center speaker is magnetically shielded to allow it to be installed near a TV set However color irregularities may still be observed on certain types of TV sets As the front speakers surround speakers and subwoofer are not magnetically shielded ...

Page 56: ... sure you have connected to both the L and R jacks of an analog component and not only to either the L or R jack Use an audio cord not supplied There is no sound from digital sources from OPTICAL input jack Check that the IN MODE is set to AUTO for SAT input There is severe hum or noise Check that the speakers and components are connected securely Check that the connecting cords are away from a tr...

Page 57: ...dapter video output may not be possible HDMI The source sound input to the HDMI jack on the receiver is not output from the receiver or the TV speaker Check the HDMI connection page 18 You cannot listen to the Super Audio CD by connecting HDMI Depending on the playback component you may need to set up the component Refer to the operating instructions supplied with each component The source image i...

Page 58: ...eiver page 48 The volume turns down when the output method changes from the TV speaker to the speakers connected to the receiver The Volume Limit function is working For details see Using the Volume Limit function page 47 Tuner The FM reception is poor Use a 75 ohm coaxial cable not supplied to connect the receiver to an outdoor FM antenna as shown below If you connect the receiver to an outdoor a...

Page 59: ...n off the receiver and turn it on again Error messages If an error message appears while you perform Auto Calibration see When error codes appear page 25 to solve the problem If you are unable to remedy the problem using the troubleshooting guide Clearing the receiver s memory may remedy the problem page 22 However note that all memorized settings will be reset to their factory settings and you wi...

Page 60: ...B 0 5 dB step Reproduction frequency range 28 20 000 Hz FM tuner section Tuning range 87 5 108 0 MHz Antenna FM wire antenna Antenna terminals 75 ohms unbalanced Intermediate frequency 10 7 MHz AM tuner section Tuning range Models of area code CEL CEK With 9 kHz tuning scale 531 kHz 1 602 kHz Antenna Loop antenna Intermediate frequency 450 kHz General Power requirements Power output DIGITAL MEDIA ...

Page 61: ... with stand Center speaker 0 38 kg Subwoofer SS WP36 Speaker unit 160 mm cone type Enclosure type Bass reflex Rated impedance 1 5 ohms Dimensions w h d Approx 220 395 325 mm with foot Mass Approx 5 6 kg HT SS100 only Front speaker SS MSP36S Surround speaker SS SRP36S Center speaker SS CNP36 Center speaker Full range magnetically shielded Front Surround speaker Full range Speaker unit Front Surroun...

Page 62: ...tenna 1 Remote commander RM AAU058 1 R6 size AA batteries 2 Optimizer microphone ECM AC2 1 Speaker cords 5 Foot pads Speakers HT SS100 only 20 HT SF100 only 4 Subwoofer 4 Screws small HT SF100 only 12 Screws large HT SF100 only 8 Design and specifications are subject to change without notice For details on the area code of the component you are using see page 3 Halogenated flame retardants are not...

Page 63: ...sages 59 H HDMI connecting 18 I IN MODE 51 Initial setup 22 M Menu A CAL 35 CUSTOM 38 LEVEL 37 SET HDMI 35 SP SETUP 36 TONE 37 Muting 29 O One Touch Play 46 P Power Save 48 R RDS 43 Remote commander 8 S Satellite tuner Set top box connecting 18 playback 30 Selecting component 28 Sleep Timer 50 Sound fields selecting 39 Speakers connecting 15 installing 12 Super Audio CD player connecting 17 playba...

Page 64: ...Sony Corporation Printed in Malaysia 1 ...

Reviews: