background image

4-657-847-

05 

(1)

Rack Mounting Kit

© 2001 Sony Corporation

ACY-RK2

取扱説明書

Page 2

______________________________________

JP

Operating Instructions

Page 10

_____________________________

GB

お買い上げいただきありがとうございます。

電気製品は安全のための注意事項を守らないと、
火災や人身事故になることがあります。

この取扱説明書には、事故を防ぐための重要な注意事項と製品の取り扱いかたを示してあり
ます。

この取扱説明書をよくお読みのうえ

、製品を安全にお使いください。お読みになった

あとは、いつでも見られるところに必ず保管してください。

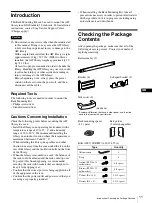
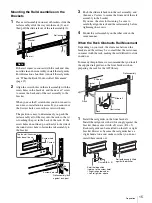
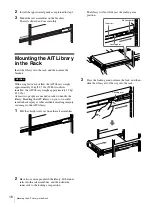
Summary of Contents for ACY-RK2

Page 1: ... ______________________________________ JP Operating Instructions Page 10 _____________________________ GB お買い上げいただきありがとうございます 電気製品は安全のための注意事項を守らないと 火災や人身事故になることがあります この取扱説明書には 事故を防ぐための重要な注意事項と製品の取り扱いかたを示してあり ます この取扱説明書をよくお読みのうえ 製品を安全にお使いください お読みになった あとは いつでも見られるところに必ず保管してください ...

Page 2: ...同梱品を確認する 3 準備をする 4 インナーレールを取り出す 4 本機の準備をする 4 ラックの準備をする 6 本機をラックに取り付ける 8 本機をラックから取り外すには 9 2001 Sony Corporation All rights reserved 商標について Advanced Intelligent Tape は日本およびその他の国におけるソニー株式会社の登録商標または商標です その他 本書に記載されている製品名は各社の登録商標または商標です ...

Page 3: ...気孔付近に ケーブルやそ の他の障害物がこないように設置してください 本機をラックに取り付けたときに ラックの重量バラン スが崩れて転倒することを防ぐため ラックに転倒防止 金具などを取り付けることをおすすめします ラック内のすべての機器に電源供給回路が適合すること を確認してください 使用するコンセントや電源ケーブルが正しくアースされ ていることを確認してください ラックマウントキットを設置しているときに 静電気が 放電しないように作業環境を整えてください 作業中 は 静電防止マットやアースされた静電防止リストバン ドを使用してください 同梱品を確認する パッケージを開けたら 以下のものがそろっているかお 確かめください 付属品の中に欠けているものがあると きは お買い上げ店にご連絡ください レールアセンブリー 2 ブラケット 4 L 型金具 2 サイドカバー 2 ラック取り付けスペーサ...

Page 4: ...取り付けます 本機の準備をする L 型金具とインナーレールを本機に取り付けます ご注意 体にたまった静電気により部品を破損する場合がありま す 作業を始める前に 必ず AIT ライブラリー本体の 金属部分 塗装されていない部分 に触れてください 作業のために指定されている部品以外は内部部品に触ら ないでください 破損した場合は 有償修理となりま す キャップ B を取り付ける フロントパネルを外してキャップ A をキャップ B に付け 替えてから L 型金具を取り付けます すでにキャップ B が付いている機種の場合は 以下の作 業は不要ですので L 型金具を取り付ける にお進みく ださい キャップ A が付いている機種 キャップ B が付いている機種 1 フロントパネル両側面のネジをゆるめる キャップ A が 5mm 位出るまで ゆるめてくださ い レールアセンブリーの裏側 ロックアーム ...

Page 5: ...合わせて キャップ B を差し込みま す D カット部と止めネジの位置が合っていること を確認してから キャップ B の頭を内側に押し付け L レンチで締めます 4 フロントパネルを元に戻す L 型金具を取り付ける 1 プラスドライバーを使って 本機側面のネジを取り 外す 2 ネジ A を使って 図のようにして 両面に L 型金具を 取り付ける 3 同様にして もう一方の側面に L 型金具を取り付け る インナーレールを取り付ける 1 ネジ D を使って インナーレールを取り付ける 2 同様にして もう一方の側面にインナーレールを取 り付ける ST AN D BY ME NU EN TE R CA NC EL ER RO R L レンチ キャップ A 止めネジ キャップ B D カット部 軸の平面部を D カット部と いいます インナーレール ネジ D ...

Page 6: ...わせてから固定してください ご注意 ブラケット位置決めネジを使うのは 前側のブラ ケットの上側のネジだけです 3 ネジ B ラック取り付けスペーサーを使って 後ろ側 のブラケット 2 個をラックに取り付ける ラックの上側のネジ穴にスペーサを取り付け ネジ B がラックのネジ穴の横幅の中心にくるようにブラ ケットを取り付けてください ブラケットの向きと高さをまちがえないように気を つけてください ご注意 スペーサーを使用するのは 後ろ側のブラケットの 上側のネジだけです スペーサーは 後ろ側のブラ ケットにのみ取り付けます レールアセンブリーをブラケットに取り付 ける 1 レールアセンブリーをブラケットにのせて ラック の奥まで差し込み 1 レールアセンブリーからス ライドレールを手前に引き出す 2 メモ スライドレールがラックのフレームに接触して ス ムーズに引き出せないときは スライドレ...

Page 7: ... 4 同様にして もう一方の側面にレールアセンブリー を左右対称の位置に取り付ける スライドレールがラックのフレームに接触 する場合 お使いのラックによっては ブラケットとスライドレー ルの隙間が少なく スライドレールがラックのフレーム に接触して スムーズに引き出せないことがあります その場合は 同梱のレールガイドを前側のブラケットに 取り付けることで 引っかかりを防ぐことができます 1 前側のブラケットにレールガイドを取り付ける レールガイドをブラケットのガイドにきちんと寄せ て ネジ D B4 5 で固定します レールガイドは左右共通です 左右をまちがえない ように気をつけてください 2 同様にして もう一方の前側のブラケットにレール ガイドを取り付ける 3 ブラケットとレールアセンブリーを取り付ける スライドレールがスムーズに引き出せるようになり ます 合わないときは 長穴を使う ...

Page 8: ...上で作業してください 腰を痛めたり 落下 してけがの原因または機器の損傷につながる可能性があ ります 1 レールアセンブリーからスライドレールを引き出す 2 2 人以上で本機を持ち上げ インナーレールをレール アセンブリーにのせ ロックアームの位置までスラ イドさせる ロックアームの位置で止まります 3 ロックアームを押してロックを解除してから 本機 をラックの奥までスライドさせる 4 前面の L 型金具のファスナーを回し 本機が動かない ように固定する 5 同様にして もう一方も固定する 6 本機がきちんとラックに入っていることを確認する レールアセンブリー インナーレール ロックアーム ロックアーム ファスナー ...

Page 9: ...クから取り外 すには ご注意 本機の質量は約 18kg ドライブ1台搭載時 あります ドライブ 2 台搭載時は約 19kg 必ず 2 人以上で作業してください 腰を痛めたり 落下 してけがの原因または機器の損傷につながる可能性があ ります 1 本機の電源を切る フロントパネルのスタンバイスイッチをオフにして から 背面の電源スイッチで電源を切ってください 2 ケーブル類をすべて取り外す 3 両側のサイドカバーを取り外す 4 両側の L 型金具のファスナーをゆるめる 5 本機をラックから引き出す 6 必要に応じて ラックからレールアセンブリーとブ ラケットを取り外す 7 必要に応じて 本機からインナーレールと L 型金具を 取り外す サイドカバー サイド カバー 溝 A キャップ B サイドカバー サイド カバー ...

Page 10: ...ary 12 Preparing the Rack 14 Mounting the AIT Library in the Rack 16 Removing the Library from the Rack 17 2001 Sony Corporation All rights reserved Trademarks Advanced Intelligent Tape is a trademark of Sony Corporation in this country other countries or both Other product names are trademarks or registered trademarks of their respective owners in this country other countries or both ...

Page 11: ...end installing the library in an indoor location where the temperature is maintained between 15 and 25 C When installing the library keep cables and other obstructions away from the area around the fan on the rear of the library and the ventilation holes on the front of the library When the library is mounted in a rack the balance of the rack could be affected and the rack could tip over To preven...

Page 12: ...ile the rail assembly will be mounted on the rack Preparing the Library Mount the L shaped brackets and inner rails on the library Caution Electrostatic charges that build up on your body can damage the components Before starting work touch the metal chassis of the AIT Library Do not touch any components other than those that must be replaced In the event of damage a charge will be assessed for re...

Page 13: ...in in notch D on the front panel and insert the B cap into notch D After confirming that notch D and the set screw are properly aligned use the Allen wrench to tighten the set screw while pressing the B cap inward with your finger 4 Return the front panel to its original position Mounting the L shaped Brackets 1 Use a Philips screwdriver to remove the screws on one side of the library 2 Use two A ...

Page 14: ...screw hole from the bottom of the bracket and tighten it slightly Align the screws with the center of the rack screw holes and then tighten the screws completely securing the bracket to the rack Caution Use the bracket positioning screws only with the upper part of the screw holes on the front brackets 3 Using the B screws and rack mounting spacers mount the two rear brackets on the rack First ali...

Page 15: ... secure the front end of the rail assembly to the bracket If you use the slots for fastening be sure to carefully align the rack and the rail assembly before tightening the screws 4 Mount the rail assembly on the other side in the same manner When the Rack Obstructs Rail Movement Depending on your rack the clearance between the bracket and the rail may be so small that the rail comes in contact wi...

Page 16: ...mately 19 kg 41 9 lbs At least two people are needed in order to handle the library Handling the AIT library on your own could result in back injury or other accidents resulting in injury or damage to the AIT library 1 Pull the straight rails out from the rail assemblies 2 Have two or more people lift the library fit the inner rails into the rail assemblies and then slide the inner rails to the lo...

Page 17: ...h a single drive installed the AIT library weighs approximately 18 kg 39 7 lbs With two drives installed the AIT library weighs approximately 19 kg 41 9 lbs At least two people are needed in order to handle the library Handling the AIT library on your own could result in back injury or other accidents resulting in injury or damage to the AIT library 1 Turn off the library To turn the power off pre...

Page 18: ...Printed in Japan ...

Reviews: