background image

Com

m

unic

a

tin
g

 with th

e AIBO® Ente

rt

ai

nme

n

t Rob

o

t

63

Using AIBO

®

 cards

The AIBO cards provided with the AIBO Entertainment Robot allow many different types of 
Autonomous mode play, and also allow you to switch the AIBO robot to various modes. The 
AIBO robot can understand communications from you by recognizing the graphics printed on 
cards. This allows you to give it commands even when it is moving around or when the 
surroundings are noisy.
For information about how to use the AIBO cards, please see the “AIBO card at a glance” (page 
114).

Showing the AIBO cards to the AIBO robot

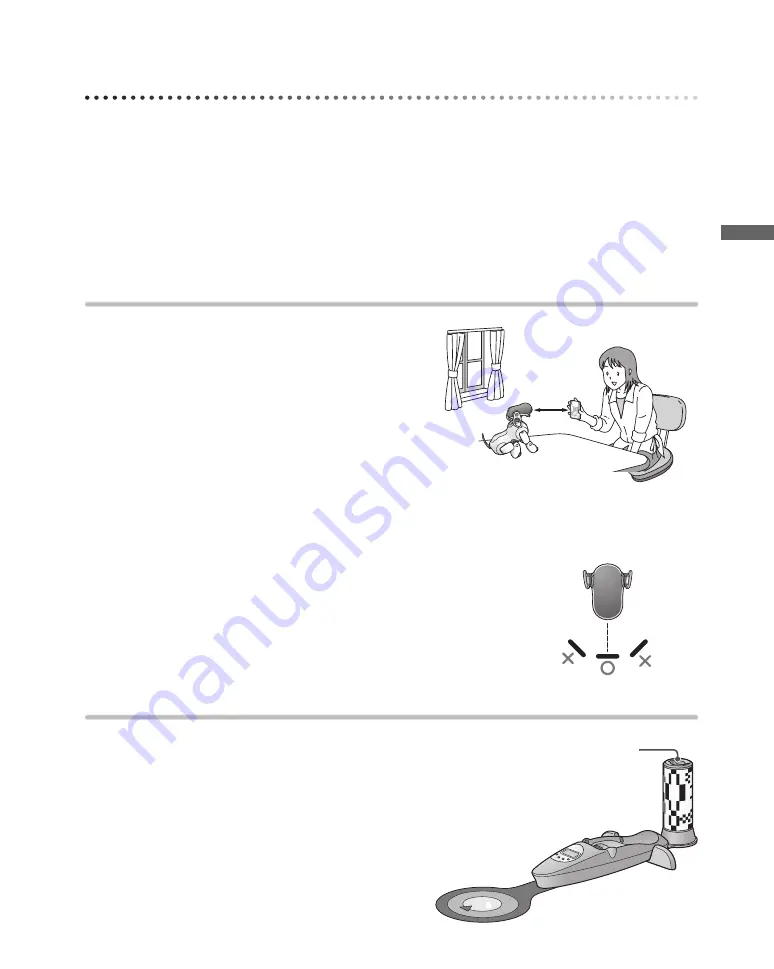
Show AIBO cards (the side with the graphics) to the 
AIBO robot as shown in the illustration.
If the AIBO robot does not recognize the card, 
adjust the card height so that it is at the same height 
as the color camera in the AIBO robot’s nose.

Take note of the following points.

If the card is too close to the AIBO robot, the AIBO 
robot will not be able to see the entire card. Hold 
the card at a distance of 8 to 12 in./20 to 30 cm.

Make sure that you hold the card right in front of 
the AIBO robot’s camera vertically.

Remember that the AIBO robot will not be able to recognize 
the card if the card’s graphic is partially hidden by your 
fingers or the sleeve of your clothing.

The AIBO robot may also have difficulty recognizing a card if 
the room is dark or lighting is falling from behind.

When finished using the AIBO cards

To prevent losing the cards, place them into the card 
pocket on the station pole.

About 8 to 
12 in. (20 to 
30 cm)

Also make sure that the AIBO robot is not 
looking at the card against bright 
background lighting.

Hold straight

AIBO card pocket

Summary of Contents for Aibo ERS-7

Page 1: ...User s Guide Basic 4 6 7 8 7 9 3 1 1 1 Printed in Japan 2003 Sony Corporation 4 678 793 11 1 ...

Page 2: ...to Part 15 of the FCC Rules These limits are designed to provide reasonable protection against harmful interference in a residential installation This equipment generates uses and can radiate radio frequency energy and if not installed and used in accordance with the instructions may cause harmful interference to radio communications However there is no guarantee that interference will not occur i...

Page 3: ...ontact the AIBO Customer Link for customer service page 5 Periodically examine the AC adapter for conditions that may result in the risk of fire electric shock or injury to persons such as damage to the cords blades housing and in the event of such conditions the AC adapter should not be used until properly replaced The robot is not intended or recommended for children under 8 years old The robot ...

Page 4: ...t above 60 ºC 140 ºF or incinerate Dispose of used battery promptly Keep away from children Voor de Klanten in Nederland For customers in the Netherlands Gooi de batterij niet weg maar lever deze in als klein chemisch afval KCA Opmerking betreffende de geheugen backupbatterij Note on a battery for memory backup Dit apparaat bevat een vast ingebouwde batterij die niet vervangen hoeft te worden tijd...

Page 5: ... U S A Call 1 800 427 2988 E mail address aibosupport info sel sony com In Europe English line 44 0 20 7365 2937 German line 49 0 69 9508 6309 French line 33 0 1 5569 5117 2003 Sony Corporation Reproduction in whole or in part without written permission is prohibited All rights reserved ...

Page 6: ... items before starting to play with the AIBO Entertainment Robot AIBO Entertainment Robot ERS 7 Self charge markers must be mounted on the Energy Station AIBO ware Memory Stick media Lithium ion battery pack Energy Station Energy Station AC adapter Station marker Station pole Foot stopper ...

Page 7: ...ink ball AIBO cards 15 User s Guide PC Network for the AIBO robot ERS 7 AIBO WLAN Manager CD ROM Printed materials Safety Notice User s Guide Basic for the AIBO robot ERS 7 this document AIBO Info Sheet Service and Support Information Other brochures Quick Guide Software License Agreement Limited Warranty Card Wireless LAN Use Caution Sticker Before use be sure to read the supplied Safety Notice a...

Page 8: ...logo Memory Stick and are trademarks or registered trademarks of Sony Corporation Adobe Acrobat and Reader are registered trademarks of Adobe Systems Incorporated The visual pattern recognition software used for AIBO MIND incorporates technology developed by Evolution Robotics Inc The logo shown on the left is a trademark of Evolution Robotics Inc The toes station pole and foot stopper of the AIBO...

Page 9: ...S 7 parts 20 The AIBO Entertainment Robot stomach 22 Energy Station 24 Playing with the AIBO Entertainment Robot Getting started 28 Preparing the AIBO robot 28 Preparing the Energy Station 30 Playing with the AIBO Entertainment Robot 33 Various interactions 34 Let the AIBO Entertainment Robot rest on the Energy Station 35 Placing the AIBO robot on the Energy Station 35 Removing the AIBO robot from...

Page 10: ...h the AIBO Entertainment Robot From you to the AIBO Entertainment Robot 58 Sight 58 Touch 58 Talking to the AIBO robot 59 Giving the AIBO Entertainment Robot its own name 60 Teaching the AIBO Entertainment Robot to recognize your name and face 61 Using AIBO cards 63 From the AIBO Entertainment Robot to you 64 Having the AIBO Entertainment Robot take a pictures 66 Raising the AIBO Entertainment Rob...

Page 11: ...ormat 88 Turning the wireless LAN function ON and OFF 89 Additional Information Notes on use 92 Handling the AIBO robot 92 Memory Stick media handling 93 Energy Station handling 94 AC adapter handling 95 Battery handling 95 Cleaning 95 Troubleshooting 96 Check this first 96 Checking with Clinic mode 101 Limited warranty for the U S A only 107 Service procedure for the U S A only 109 Specifications...

Page 12: ......

Page 13: ... of the AIBO Entertainment Robot ERS 7 Living together with you the AIBO robot ERS 7 will develop into a pet that is uniquely yours Before beginning your life together with the AIBO robot please familiarize yourself with the following ...

Page 14: ...hardware and mind the AIBO MIND software that allow it to move think and display the lifelike attributes of emotion instinct learning and growth It establishes communication with people by displaying emotions and assumes various behaviors autonomous actions based on information which it gathers from its environment The AIBO robot is not only a robot but an autonomous robot with the ability to comp...

Page 15: ...his instincts displays itself as sleepy behavior For example Sometimes it will want to do things on its own and sometimes it will seek your help Sometimes it will think deeply before acting and sometimes it will act on the spur of the moment Sometimes its mood will be happy and sometimes it will display all the signs of annoyance Ultimately the convergence of these instincts becomes noticeable as ...

Page 16: ... paws allowing it to feel human contact Sense of hearing The AIBO robot detects sounds in its environment through a pair of stereo microphones This makes it possible for it to respond to your voice Sense of sight The AIBO robot is equipped with a color camera and distance sensors This allows it to seek colors it likes and to avoid obstacles It can also recognize your face Sense of balance The AIBO...

Page 17: ...nctions depending on how they are presented when you show them to the AIBO robot In this guide the things you can do with AIBO cards are noted with the icon For a full list of available AIBO cards see List of AIBO cards page 115 Each AIBO robot is unique The AIBO robot will develop into a pet that is uniquely yours Whether it develops into an AIBO robot with a deep love of communication or becomes...

Page 18: ...ee page 44 When it is hungry it will self charge on the Energy Station which it locates by recognizing the station s pole and markers and when it is tired it simply relaxes The AIBO robot also loves playing with you but is perfectly capable of amusing itself with its AIBOne toy and pink ball When you go out it will take pictures upon your command and can spend time alone at home on the Energy Stat...

Page 19: ...ou can view pictures that the AIBO robot takes using a Web browser The following facilities are required in order to take advantage of the AIBO robot through a mobile communication device 1 or the Internet For details on how to use the AIBO robot through a mobile communication device 1 or the Internet refer to the User s Guide PC Network for the AIBO robot ERS 7 PDF on the supplied CD ROM Note tha...

Page 20: ...nsors with stickers or similar objects Do not limit the AIBO robot s freedom of movement by affixing stickers to the AIBO robot s joints or inserting objects into moving parts When lifting the AIBO robot be sure to handle it by its body page 33 To avoid damage to the AIBO robot never lift it by its head ears legs tail or any other part ...

Page 21: ... LAN function J Pause button When pressed the AIBO robot s activity will pause or resume K Back sensors front middle and rear Detect and turn white when you gently stroke the AIBO robot s back L Face lights These lights turn various colors to show the AIBO robot s emotions and conditions M Head light Detects and turns white when you touch the head sensor Turns orange when an AIBO robot s joint is ...

Page 22: ...IBO Entertainment Robot stomach This shows the AIBO robot with its stomach compartment cover off Caution Do not touch the charging contacts with your bare hands Touching the contacts will reduce contact quality ...

Page 23: ...y means of the Memory Stick media eject button Z or the battery latch Z Under this circumstance never attempt to forcibly remove the Memory Stick media G Battery pack latch BATT Z Flip this latch to the rear when you want to remove the battery H Chin sensor Senses when you touch the AIBO robot s chin I FCC ID MAC address label Indicates the FCC ID and MAC address of the AIBO robot s wireless unit ...

Page 24: ...nel In the setting mode pressing this button changes the item you are setting D DISPLAY minus button When the date or time indication is displayed press this button to change the display format In the setting mode each press of the button decreases the value Hold down the button to decreases the value continuously E LIGHT plus button In the normal mode press this button to turn ON the backlight In...

Page 25: ...IBO robot mounts the Energy Station by backing on to it J AC Adapter terminal on the base of the Energy Station Connect this terminal to the AC adapter supplied with the AIBO robot or the optional AC adapter ERA 201P1 K Station marker The AIBO robot uses this as a reference guide to determine the position of the Energy Station when self charging L Date Time Time zone Volume level indication M Batt...

Page 26: ......

Page 27: ... s try playing with the AIBO robot At first the AIBO robot will come to life as a mature robot Here we will describe how to prepare and play with the AIBO robot and provide further information such as how to place the AIBO robot on the Energy Station ...

Page 28: ...the Energy Station Charge the battery Preparing the AIBO robot Insert the battery and AIBO MIND software Memory Stick media into the AIBO robot 1 Securely hold the body of the AIBO robot from above turn it upside down and open the stomach compartment cover Caution Always lift the AIBO robot by its body not by it extremities Do not touch the charging contacts located on the AIBO robot with your han...

Page 29: ... with the body When you want to eject the Memory Stick media Press the Memory Stick media eject button Z located next to the Memory Stick media slot Caution Do not set the safety switch of the Memory Stick media to LOCK Doing so will make it impossible for AIBO s learning and picture taking functions to work 4 Insert the battery into the slot until it clicks into place Angled corner Push here 1Ins...

Page 30: ... these attachments are not necessary Positioning the Energy Station The AIBO robot s self charge operation using the station pole and station marker requires an open space with a radius of at least 4 ft 1 2 m around the station pole the AIBO robot will make a turn on top of the station marker and walk backwards over the Energy Station and sit down facing outwards For details on appropriate locatio...

Page 31: ...ble through one of the cutouts on the right or left side of the station pole base Caution If installation is not performed correctly as shown above self charging may not be possible Before transporting the Energy Station remove the station marker station pole and foot stopper Foot stopper Attach the foot stopper after routing and connecting the AC adapter cable ...

Page 32: ... battery indicator shows a full charge zHint When the AIBO robot is past the newborn stage it will be able to locate and mount the Energy Station and charge itself For information on the self charging function see page 52 If the station pole and station marker are not attached route the AC adapter cable through one of the cutouts in the station base as shown When charging is complete the pump hand...

Page 33: ...ctedly and being damaged when you press the pause button 2 Press the pause button on the AIBO robot s back The Pause mode ends and the operation light turns green In a moment the AIBO robot will automatically begin moving Caution When you press the pause button the face lights of the AIBO robot may turn red This indicates that the safety switch of the Memory Stick media is set to the LOCK position...

Page 34: ... its favorite AIBOne toy and pink ball it will react with great enthusiasm Try moving the AIBOne toy and pink ball slowly and watch the AIBO robot as it eagerly tries its best to follow along If you put them on the floor the AIBO robot will entertain you and play with its toys From here on the AIBO robot will make its own judgments and move autonomously developing into a pet that is uniquely yours...

Page 35: ...lf once a day on the Energy Station in order to save data and perform other maintenance functions Before going out and leaving the AIBO robot we recommend you set up the AIBO robot so that it will not dismount the Energy Station while you are away For details see page 54 Caution There shouldn t be any objects within reach of the AIBO robot s front legs Otherwise the legs may hit and overturn the o...

Page 36: ...attery latch to the rear to remove the battery Caution Be sure to press the pause button on the AIBO robot s back Be sure to put the AIBO robot in Pause mode before removing the battery When removing the battery support it with your hand Otherwise the battery may pop out and fall Battery latch Why is it called a pause button Unlike conventional electrical products found in the home the AIBO robot ...

Page 37: ...Modes and Conditions of the AIBO Entertainment Robot This chapter explains the various modes and conditions of the AIBO robot as well as the transition between them ...

Page 38: ... active Pause mode inactive condition The pause button on the back of the AIBO robot was pressed to turn the power OFF The AIBO robot must be in this mode to replace the battery or Memory StickTM media or to change the ON OFF setting of the wireless LAN switch Back pause button The AIBO robot stops being active in any of the following situations The back pause button is pressed The battery is empt...

Page 39: ...sumes a position that makes it easier for you to hold it This is to prevent people from dropping the AIBO robot in reaction to movements that may cause surprise Station mode The AIBO robot dismounts the Energy Station by itself The AIBO robot is removed from the Energy Station On the Energy Station the AIBO robot wakes up and goes to sleep at a preset time Pick up while touching the back sensors P...

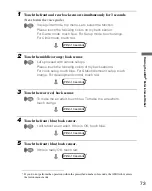
Page 40: ...ceived Touch the front and rear back sensors simultaneously for 3 seconds Touch the front blue back sensor Touch the rear red back sensor Talk to the AIBO robot When you show the AIBO robot the Game Mode L card in Autonomous mode the game begins right away When you show the AIBO robot the Clinic Mode O card in Autonomous mode it goes straight into Clinic mode The game starts Clinic mode Mode indic...

Page 41: ...p I card in Autonomous mode it goes straight into the mode to set up the time you want it to wake up You can set up the following Clock setup When self charging is complete the AIBO robot will dismount the Energy Station by itself Energy Station dismount setup You can also have fun raising the AIBO robot from the baby stage Development control Setup mode Touch the center orange back sensor I To ca...

Page 42: ...he desired setting When you show the AIBO robot a Game Mode card the game begins immediately For information on showing the AIBO robot its AIBO cards see page 63 zHints To cancel a mode setting procedure and have the AIBO robot return to Autonomous mode touch the head sensor for 3 seconds For information on how to change modes with the head sensor and the back sensors of the AIBO robot see page 38...

Page 43: ...ment Robot When the AIBO robot is hungry it instinctively searches and recharges itself on its Energy Station and if it is tired it goes off to relax Enjoy the functions of an autonomous robot and your lifestyle with the AIBO robot ...

Page 44: ...the AIBO robot on the Energy Station it will stay awake beyond its bedtime but will go to sleep as soon as you place it on the Energy Station You can only set the AIBO robot s activity period while the AIBO robot is in Autonomous mode zHints If you want the AIBO robot to be active 24 hours a day simply set the AIBO robot s bedtime and walk up time to the same value For data storage purposes the AI...

Page 45: ...ors on my back sensor For Game mode touch blue For Setup mode touch orange For Clinic mode touch red 2 Touch the middle orange back sensor Let s proceed with various setups Please touch the following colors of my back sensors For clock setup touch blue For Station dismount setup touch orange For development control touch red 12 hour time system 24 hour time system Midnight is 12 a m Midnight is 0 ...

Page 46: ...place of xx xx a m 5 Touch the front blue back sensor AM or PM Please show me the card 6 Show the AIBO Entertainment Robot the AM M card AM What hour Please show me the card 7 Show the AIBO robot the 7 G card 7 AM How many minutes in the ten s column Please show me the card If you do not perform the operation within the prescribed number of seconds the AIBO robot enters the Autonomous mode or retu...

Page 47: ...touch the chin sensor to return to the voice guide in step 3 To cancel changes altogether touch the head sensor for 3 seconds This will return the AIBO robot to Autonomous mode Switching the AIBO robot s chime ON and OFF You can have the AIBO robot sound a chime and make some movement to signal the hour and half hour when it is sitting on the Energy Station This feature is turned OFF when the AIBO...

Page 48: ...my back sensors For clock setup touch blue For Station dismount setup touch orange For development control touch red 3 Touch the front blue back sensor Time setup To set my wake up time touch blue To set the time I go to sleep touch orange To set my chime touch red 4 Touch the rear red back sensor I will not emit any chimes To change these time settings touch blue If you do not perform the operati...

Page 49: ...s see page 44 When you want to use the alarm clock feature you must turn it ON each day However the alarm time once set remains effective until you change it You can turn ON the AIBO robot s alarm clock feature as follows The alarm clock can be turned OFF in the same manner 1 Show the AIBO Entertainment Robot the Alarm On Off J card Alternatively you can give it the verbal command Set alarm Next f...

Page 50: ...for AM XX YY The actual time set is given in place of xx xx a m The change is now complete Turning the alarm OFF when it is ringing Touch the head sensor chin sensor or any of the back sensors The alarm also stops automatically after ringing for one minute ...

Page 51: ...ch of the AIBO robot s front legs Otherwise the legs may hit and overturn the object when the AIBO robot tries to move or the AIBO robot may fall off the Energy Station If the AIBO robot s body is too warm when being placed on the Energy Station charging will only start after it has cooled down Do not move the AIBO robot s rear legs while in Station mode Otherwise the front legs which move in Stat...

Page 52: ... is recommended Adjust lighting so that the AIBO robot s shadow will not fall on the station marker Make sure that there are no objects nearby with color or patterns similar to the station marker and station pole Make sure the walls and floor close to the station pole are relatively free of patterns e g stripes The walls and floor close to the station marker and station pole should be as plain as ...

Page 53: ...rgy Station facing away from the station pole If the AIBO robot cannot find the Energy Station The AIBO robot may not be able to find the Energy Station if the room is poorly lit even if the station pole and station marker are properly connected to the Station In this case use the Clinic mode to check whether the AIBO robot can properly see the station pole and station marker in your indoor enviro...

Page 54: ...leg when it is positioned on the Energy Station Caution When the AIBO robot is set to Dismount the Station be careful of the following Do not dismount the AIBO robot alone in a room where no one is present Do not place the Energy Station on an unsafe surface such as one where it might fall or an unstable or tilted surface Falling could result in injury to a person or damage to the AIBO robot The f...

Page 55: ...ase don t place the station at a high location I ve finished registration The setting is now complete zHint If you want to cancel changes by voice guide pressing the head sensor for 3 seconds to return the AIBO robot to Autonomous mode When the AIBO robot recharge is not successful If the AIBO robot does not successfully self charge and you do not charge it manually the operation light on the back...

Page 56: ......

Page 57: ...Communicating with the AIBO Entertainment Robot Show the AIBO robot its AIBOne toy or pink ball or talk to it The AIBO robot is always waiting to communicating with you ...

Page 58: ...f visual communication Touch When you lightly touch the AIBO robot s sensors for a moment the AIBO robot will recognize this as another form of communication The AIBO robot always looks forward to having you interact with its sensors When you touch the AIBO robot s head or back sensors the AIBO robot recognizes this as communication from you and the sensors should turn white If they do not the AIB...

Page 59: ...boy Good girl Scold You can scold the AIBO robot by very lightly tapping its back sensors You can also scold it by saying Don t do that Talking to the AIBO robot The AIBO robot enjoys having you speak to it See page 116 for words that the AIBO robot can understand Encouragement When the AIBO robot is unsuccessful at something say Go for it to the AIBO robot as encouragement Then the AIBO robot wil...

Page 60: ... Autonomous mode say Name registration Next follow the voice guide Name registration Please touch my back sensor 2 Touch a back sensor any one After I count down please say a name that is no longer than two seconds 3 2 1 go 3 Tell the AIBO robot its name in 2 seconds I ve registered the name I ve finished name registration If name registration is unsuccessful Follow the voice guide and register th...

Page 61: ... mode say Owner registration Owner registration I m going to register my owner s name face and voice Please touch my back sensor 2 Touch a back sensor any one After I count down please say the owner s name that is no longer than two seconds 3 2 1 go 3 Tell the AIBO robot its owner s name in 2 seconds or less I ve registered my owner s name Next I ll learn your voice First please say I am your owne...

Page 62: ... in its nose is at the same height as your face When room brightness differs from that during which it learned your face it may not be able to recognize you When teaching the AIBO robot to recognize your face make sure you face it directly without tilting it either right or left If you are wearing a distinctive item such as thick rimmed glasses the AIBO robot may not be able to identify you If you...

Page 63: ...just the card height so that it is at the same height as the color camera in the AIBO robot s nose Take note of the following points If the card is too close to the AIBO robot the AIBO robot will not be able to see the entire card Hold the card at a distance of 8 to 12 in 20 to 30 cm Make sure that you hold the card right in front of the AIBO robot s camera vertically Remember that the AIBO robot ...

Page 64: ...ns blue Refer to the User s Guide PC Network for the AIBO robot ERS 7 PDF for details about the wireless LAN function Out Autonomous mode Station mode Orange Jam condition Pink Game mode Green Rest mode Slowly flashing green Pick up condition Yellow Clinic mode Slowly flashing yellow The AIBO robot operation check mode Mode indicators Wireless light Note When you first adopt the AIBO robot its wir...

Page 65: ...he AIBO Entertainment Robot 65 Operation light Indicates the AIBO Entertainment Robot s activity condition Green Active Orange Charging Flashing orange Charging malfunction Out Pause mode inactive condition Operation light ...

Page 66: ...robot to take pictures by sending the AIBO robot mail to it from your mobile communication device or PC For details refer to the User s Guide PC Network for the AIBO robot ERS 7 PDF on the CD ROM provided with the AIBO robot Caution Your PC or mobile communication device must be able to receive JPEG e mail AIBO card Photo Color camera About the pictures Pictures are stored into the Memory Stick me...

Page 67: ...bot Pictures taken by the AIBO robot are stored in the AIBO robot s AIBO MIND software Memory Stick media You can view them using either of the following methods By using a Web browser to view the AIBO robot photo album requires a PC and wireless LAN connection By using a Memory Stick media reader writer For details on viewing pictures refer to the User s Guide PC Network for the AIBO robot ERS 7 ...

Page 68: ......

Page 69: ... should keep in mind while raising the AIBO robot Once you become acquainted with these it will be easy to guide the AIBO robot into developing just the kind of personality you like As the AIBO robot shares its life with you it will grow to adapt to your lifestyle ...

Page 70: ...fficulty trying to stand up by itself and you will enjoy raising it to a mature AIBO robot See page 75 for information on how to raise the AIBO robot from the puppy stage Caution Note that putting the AIBO robot in the puppy stage will erase everything it has learned about you from its memory If you decide to switch the AIBO robot back to mature stage it will start from the maturity level it was a...

Page 71: ...h the middle orange back sensor I will reboot as a newborn If this is OK touch blue 5 Touch the front blue back sensor If this is really OK touch red 6 Touch the rear red back sensor I will reboot as a newborn I will turn OFF The AIBO Entertainment Robot enters the Pause mode 7 Touch the pause button on the AIBO robot s back to awaken it The AIBO robot wakes up as a newborn puppy If you do not per...

Page 72: ...ur owner s name Take a picture zHint The key to getting AIBO to stand up is to show it its favorite AIBOne toy and pink ball It can easily become depressed when its attempts to stand up and isn t successful Encourage it by frequently showing it the AIBOne toy and pink ball Once the AIBO robot is able to walk it is no longer an infant From this point on the AIBO robot will behave autonomously devel...

Page 73: ...uch the following colors of my back sensors For clock setup touch blue For Station dismount setup touch orange For development control touch red 3 Touch the rear red back sensor To make me an adult touch blue To make me a newborn touch orange 4 Touch the front blue back sensor I will reboot as an adult If this is OK touch blue 5 Touch the front blue back sensor If this is really OK touch red If yo...

Page 74: ...e rear red back sensor I will reboot as an adult I will turn OFF The AIBO Entertainment Robot enters the Pause mode 7 Touch the pause button on the AIBO robot s back to awaken it The AIBO robot wakes up as an adult ...

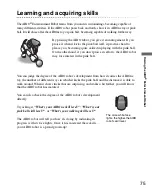
Page 75: ...fforts the AIBO robot may lose interest in the pink ball You can judge the degree of the AIBO robot s development from how it carries the AIBOne toy the number of different ways in which it kicks the pink ball and the distance it is able to walk around When it shows tricks that are surprising and walks a bit farther you will know that the AIBO robot has matured You can also check the degree of the...

Page 76: ...rough the accumulation of such heart to heart interactions When the AIBO robot falls down and can t get up it will appreciate if you lend a helping hand In return it will make every effort possible to right itself on its own from the next fall On the other hand if you do not help it it may become somewhat rebellious and come to depend on your help The personality that the AIBO robot forms can also...

Page 77: ...Playing in Game mode The AIBO MIND software features a Game mode in which you can enjoy playing games with the AIBO Entertainment Robot ...

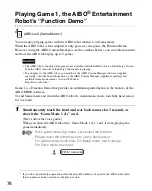
Page 78: ...tely and available Game mode content visit our Web site at http www aibo com Game 1 is a Function Demo that provides an entertaining introduction to the features of the AIBO MIND software To end Game mode and return the AIBO robot to Autonomous mode touch the head sensor for 3 seconds 1 Simultaneously touch the front and rear back sensors for 3 seconds or show it the Game Mode 1 L card Next follow...

Page 79: ... and place it on the floor during the Function Demo the AIBO robot will show you a variety of tricks To stop the demo hide the AIBOne toy or pink ball from the AIBO robot then touch the AIBO robot s head sensor If you do not perform the operation within the prescribed number of seconds the AIBO robot enters the Autonomous mode or returns to the previous state Card name Demos explanations A Dancing...

Page 80: ...hen Game 1 starts the AIBO Entertainment Robot interprets the cards as shown in step 4 on the previous page In Game mode 1 the AIBO robot will only respond to the following phrases AIBO Shake hands Good morning Hello Bye Bye Sit down To end Game 1 Touch the head sensor for three seconds ...

Page 81: ...Settings This chapter explains how to set various items that you may occasionally want to change ...

Page 82: ...Show the AIBO robot the Volume K card The volume level is controlled by the direction in which the card is pointing Volume adjustment is not possible if you hold the AIBO card sideways The volume can be adjusted in four steps including mute Each time you show the card the volume changes by one step Repeat the process until the desired volume level is set To increase the volume show the card like t...

Page 83: ...aution Always lift the AIBO robot by its body not by it extremities Do not touch the charging contacts located on the AIBO robot with your hand Touching the contacts will reduce contact quality 2 Use the volume control switch to set the volume Slide the switch towards the side to increase and towards the side to reduce the volume When you release the switch it will return to the center position Th...

Page 84: ...ation and for about four seconds when the AIBO robot is not on the Energy Station 1 Place the AIBO robot on the Energy Station 2 Press the MODE NEXT button repeatedly until the volume level indication appears Each push of the MODE NEXT button cycles through the display indications for date t time t time zone t volume 3 Press the SET CANCEL button The current volume level setting starts to flash 4 ...

Page 85: ...on the Energy Station and for about four seconds when the AIBO robot is not on the Energy Station Setting the date and time The following procedure assumes that the date display format is Year Month Day 1 Place the AIBO robot on the Energy Station 2 Press the MODE NEXT button repeatedly until the date or time indication appears Each push of the MODE NEXT button cycles through the display indicatio...

Page 86: ...ted Universal Time in the range from 12 to 12 in 1 hour increments The time zones for the continental United States are 8 7 6 and 5 For details on the time zones of the world see Time zone table on page 118 Caution When the AIBO Entertainment Robot is not on the Energy Station you cannot change the setting If you attempt to change this setting when the AIBO robot is not on the Energy Station the p...

Page 87: ... time zone t volume 3 Press the SET CANCEL button The time zone indication starts to flash 4 Use the DISPLAY or LIGHT buttons to set the time zone Then press the MODE NEXT button The setting is entered and the time zone indication appears again Caution The time zone function does not support daylight savings To cancel the setting process press the SET CANCEL button The initial indication appears a...

Page 88: ...s on the Energy Station and for about four seconds when the AIBO is not on the Energy Station 1 Place the AIBO robot on the Energy Station 2 With the date or time indication being displayed press the DISPLAY button Each press of the button changes the display format as follows Date Year Month Day t Month Day Year t Day Month Year Time 12 hour clock t 24 hour clock Caution The date and time formats...

Page 89: ...N function usable Refer to the User s Guide PC Network for the AIBO robot ERS 7 PDF for instructions on how to configure the network 1 Hold the AIBO robot firmly by its body turn it upside down and remove the stomach compartment cover Caution Always lift the AIBO robot by its body not by it extremities Do not touch the charging contacts located on the AIBO robot with your hand Touching the contact...

Page 90: ......

Page 91: ...Additional Information This chapter provides notes on use a troubleshooting guide and other information concerning the AIBO Entertainment Robot ...

Page 92: ...Otherwise it may be damaged by water or foreign objects Do not use the AIBO robot on concrete floors or similar hard surfaces Otherwise it may be damaged and malfunction may occur Do not use the AIBO robot on slippery floors or on thick piled carpets Otherwise it may be damaged by falling over or by carpet hair getting caught in the joints which prevents the AIBO robot from moving forward Do not l...

Page 93: ...ther version of the AIBO robot Do not use the AIBO ware Memory Stick media to save data on PCs or camcorders or for any purpose other than for the AIBO robot Doing so may result in damage to the AIBO robot Do not touch the terminal A with your hand or metal objects If the Memory Stick media is used in a location subject to static electricity or electric noise data may be lost or corrupted Do not a...

Page 94: ...media is set to LOCK the AIBO robot s face lights will turn red to warn you when you press the pause button to start the AIBO robot up Press the pause button once more to put the AIBO robot in Pause mode then unlock the safety switch on the Memory Stick media When the AIBO robot starts up normally the face lights turn white Energy Station handling While the AIBO robot is on top of the Energy Stati...

Page 95: ...Battery handling Do not expose the battery to temperatures above 113 F 45 C Doing so may result in performance degradation and damage Take care that no dust or foreign objects enter the terminals of the battery When not intending to use the AIBO Entertainment Robot for a long time remove the battery and store it in a cool location Also when not in use the battery will be subject to natural dischar...

Page 96: ...ck this first Symptom Cause c Remedy see page The AIBO Entertainment Robot does not move even when you press the pause button The battery is not inserted c Insert the battery in the AIBO robot Then press the pause button again to end Pause mode The battery power is low c Recharge the battery or replace the battery with a charged one When you press the pause button the operation light alternately f...

Page 97: ...ery It takes a long time for the AIBO robot to start moving Data is being read from the Memory Stick media Wait a while The AIBO robot tries to walk but it does not move forward The floor may be too slippery c Place the AIBO robot on a surface that is not too slippery such as low pile carpet The AIBO robot falls often The floor may be too slippery inclined or unstable c Place the AIBO robot on a f...

Page 98: ... activity stops after a while The AIBO robot is overheated c Wait for the AIBO robot to cool down Activity will resume automatically after an hour or so The AIBO robot does not self charge The station pole and station marker are not mounted correctly c Attach these parts correctly page 30 The AIBO robot cannot recognize the station marker due to its surroundings c Make the room brighter fluorescen...

Page 99: ...on There is a problem with the connection between the Energy Station and the AC adapter or between the AC adapter and the AC outlet c Make sure that all connections are correctly established page 32 When a button is pressed the battery level indicator on the Energy Station LCD display flashes The AIBO robot is not correctly positioned on the Energy Station c Press the button again after correctly ...

Page 100: ...e No response when the sensors on the AIBO robot s back are touched The back sensors do not light when touched See The AIBO Entertainment Robot does not go into Clinic mode above and check the touch sensors on the back of the AIBO robot When in Game mode or Clinic mode the mode light goes out and the AIBO robot returns to Autonomous mode When in modes other than Autonomous mode such as Game mode a...

Page 101: ... completed or during a check touch the head sensor for 3 seconds 1 While the AIBO robot is in Autonomous mode simultaneously touch the front blue and rear red back sensors for 3 seconds Alternatively show the AIBO robot the Clinic Mode O card Next follow the voice guide If you have used the Clinic Mode O card the voice guide of step 2 is heard immediately and you can proceed to step 3 Voice guide ...

Page 102: ...inue with ball tracking check please move the ball If you re finished touch my head sensor 2 Touch the head sensor to end the check I m finished with the condition and motion check Please touch the following colors on my back sensor For condition and motion touch blue To check sensors touch orange For recognition check touch red 4 Touch the middle orange back sensor I m going to check my sensors T...

Page 103: ...x Chin sensor check Please touch my chin sensor When you touch the chin sensor a sound should be heard and the face lights turn ON x Head sensor check Please touch my head sensor When you touch the head sensor a sound should be heard and the head light turns ON x Back sensor check Please touch the lit up area of my back sensor When you touch the lit sensor a sound should be heard and the back ligh...

Page 104: ...s too far or too close Keep within the sensor range 2 Touch the head sensor to end the check when prompted x Chest distance sensor check If you place your hand in front of my chest and move it forward and backwards you can change the sound please confirm 1 When you hold your hand in front of the chest distance sensor on the AIBO robot s chest a sound should be heard unless the volume setting is se...

Page 105: ...ion touch blue To check sensors touch orange For recognition check touch red 5 Touch the rear red back sensor I will start the recognition check x Voice recognition check Voice recognition check Please say AIBO Say AIBO When voice recognition is successful a sound should be heard and the face lights turn ON x Ball recognition check Please show me my pink ball Show the pink ball to the AIBO robot W...

Page 106: ...d station marker recognition is successful a sound should be heard and the face lights turn ON x Face recognition check Please show me your face Show the AIBO robot your face When face recognition is successful a sound should be heard and the face lights turn ON I ve finished the recognition check Please touch the following colors on my back sensor For condition and motion touch blue To check sens...

Page 107: ...ain this limited warranty service you must first obtain an event number from AIBO Customer Link customer service page 5 You will need to return the Product and all accessories to SONY in the original carton using the original packaging materials All supplied accessories must be returned with the Product SONY is not responsible for any damage during shipment arising from the failure to properly pac...

Page 108: ... from the Product Some states do not allow the exclusion or limitation of incidental or consequential damages or allow limitations on how long an implied warranty lasts so the above limitations or exclusions may not apply to you This limited warranty gives you specific legal rights and you may have other rights which vary from state to state For your convenience SONY ELECTRONICS INC has establishe...

Page 109: ...t will be charged to you after the limited warranty period c Mark your event number on the top of the box and send it to the designated address The AIBO Customer Link customer service will designate the shipping method and pay the shipping charges within the limited warranty period after the limited warranty period you must pre pay the shipping charges d As soon as the repair is completed your AIB...

Page 110: ...or Back sensors Chin sensor Paw sensors Power consumption Approx 7 W in standard mode Operating time Approx 1 5 hours With fully charged ERA 7B1 in standard mode Dimensions Approx 7 1 16 1015 16 12 9 16 in 180 278 319 mm w h d Weight Approx 3 lb 8 oz 1 6 kg including battery pack and Memory Stick media Operating temperature 41 F to 95 F 5 C to 35 C Operating humidity 10 to 80 no condensation Opera...

Page 111: ...me Approx 2 hours see page 51 Display LCD with back lighting Display size Approx 0 6 1 6 in 15 40 mm Dimensions Approx 15 9 16 3 5 8 2 5 8 in 396 92 66 mm w h d Energy Station only Weight Approx 9 oz 260 g Energy Station only Color Black Operating temperature 41 F to 95 F 5 C to 35 C Operating humidity 20 to 80 Storage temperature 4 F to 140 F 20 C to 60 C Storage humidity 10 to 90 Charging time m...

Page 112: ...ons Approx 2 3 8 1 3 16 4 3 4 in 60 30 120 mm w h d Weight Approx 11 5 oz 325 g Cable length DC cable approx 70 7 8 in 1 8 m Power cord approx 70 7 8 in 1 8 m Lithium ion battery Battery type Lithium ion Rated voltage 7 4 V DC Capacity 2200 mAh Operating temperature 41 F to 104 F 5 C to 40 C temperature change less than 50 F 10 C h Operating humidity 10 to 80 no condensation Operating wet bulb tem...

Page 113: ...Reference Material z AIBO card at a glance z Words understood by the AIBO Entertainment Robot z Time zone table ...

Page 114: ...ck Front side Show the AIBO Entertainment Robot the side with the graphic Back side Card name Reserved for future product expansion Time Function For the latest information on future Game mode content visit our Web site at http www aibo com ...

Page 115: ...BO robot looks for the Energy Station and charges itself 7 7 H Follow When you move slowly while showing this card the AIBO robot will follow the card 8 8 I Alarm Clock Set Up The AIBO robot lets you set the wake up time and the clock time page 44 9 9 J Alarm On Off Switches the wake up function ON and OFF page 49 10 10 K Volume The AIBO robot lets you adjust its volume When you show the card poin...

Page 116: ... can understand when it is at the puppy stage see page 72 z Calling the AIBO robot s name AIBO Registered name the name you gave AIBO The AIBO robot reacts when it is called Even after the AIBO robot learns its own name it reacts when you call it AIBO z Teaching the AIBO robot Name registration Give a name to the AIBO robot page 60 What s your name The AIBO robot says the name you gave it in its o...

Page 117: ...oy in its mouth the AIBO robot comes to you z Playing with the ball Find your ball The AIBO robot looks for the ball z Wake up setting Set alarm Lets you set the wake up function ON or OFF page 49 z Moving Come here Over here Sit down Stand up Lay down Turn right Turn left Walk around Go forward Go back z Questions for the AIBO robot Are you sleepy Are you tired Are you bored How are you The AIBO ...

Page 118: ...his table to enter the appropriate time zone Time zones indicate the difference to UTC Coordinated Universal Time in the range from 12 to 12 in 1 hour increments The time zones for the continental United States are 8 7 6 and 5 ...

Page 119: ...Reference Material 119 ...

Page 120: ...User s Guide Basic 4 6 7 8 7 9 3 1 1 1 Printed in Japan 2003 Sony Corporation 4 678 793 11 1 ...

Reviews: