background image

9(J)

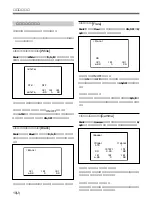
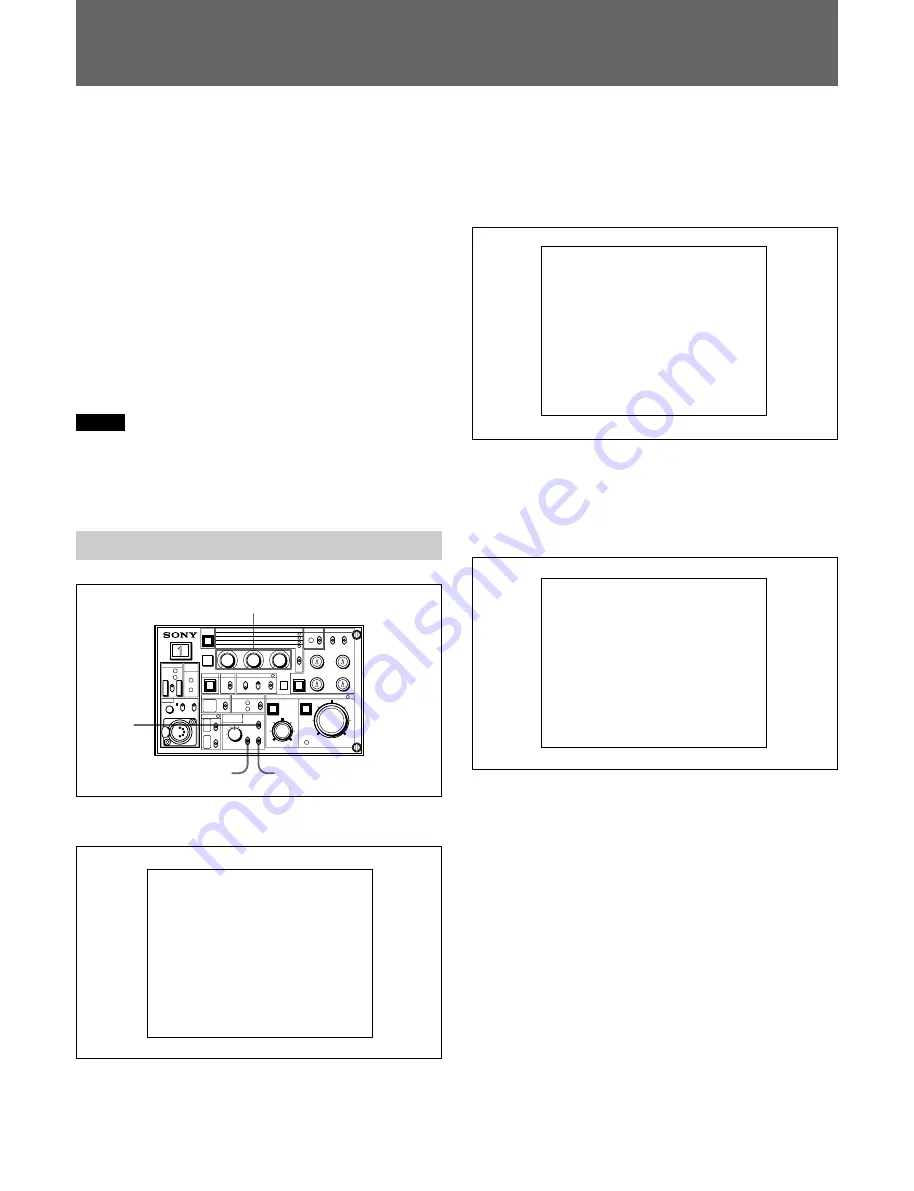
DISPLAY切り換えスイッチをMENUに設定すると、PIX 端子の映

像信号にキャラクター信号がミックスされ、

ピクチャーモニター画面

にメニュー画面が表示されます。

メニューは、以下の 5 種類に分類されています。

Paint

(ペイント)メニュー

撮影シーンに合わせたペイント設定を行います。

File

(ファイル) メニュー

リファレンスファイル、

シーンファイル、OHBファイルを保存します。

Maintenance

(メンテナンス)メニュー

カメラとCCU-550シリーズの基本設定を行います。

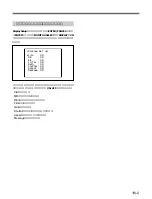
Display Setup

(ディスプレイセットアップ) メニュー

ピクチャーモニター画面に表示する項目を選択します。

ご注意

接続しているカメラによっては調整できない項目があります。詳し

くは、それぞれのカメラのマニュアルをお読みください。

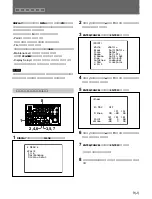
メニュー設定の基本操作

1

DISPLAY 切り換えスイッチをMENUに切り換える。

メニュー設定

2

アップ/ダウンスイッチを

v

または

V

側に倒して→マークを移動

し、メニューを選択する。

3

ENTER/CANCELスイッチをENTER 側に倒す。

4

アップ/ダウンスイッチを

v

または

V

側に倒して→マークを移動

し、設定項目を選択する。

5

ENTER/CANCELスイッチをENTER 側に倒す。

6

アップ/ダウンスイッチを

v

または

V

側に倒して→マークを移動

し、設定内容を選択する。

7

ENTER/CANCELスイッチをENTER 側に倒す。

→表示が、?表示になります。

8

マルチファンクション調整部の調整つまみで、設定を変更す

る。

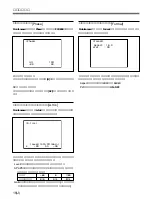
<PAINT>
 
 White      Matrix
 Black      MultiMatrix
 Flare      Detail
 Gamma      Skin DTL
 B.Gamma    Sat/Kn Sat
 Knee       ECS/S-EVS

V.Mod      CrossColor


c

AutoKnee   LowKeySat

W.Clip     

<Knee>


 Kn MAX :   OFF
 
                [P]  [S]
 M.Knee :   ON  -99   99
 
           [R]  [G]  [B]
 Point  :  -99    0   99
 Slope  :  -99    0   99

c

* MENU *
 
 Paint
 File
 Maintenance
 Display Setup


c

2,4,6

1

8

3,5,7

Summary of Contents for BKP-5973

Page 1: ...ュアルを よくお読みのうえ 製品を安全にお使いください お読みになったあと は いつでも見られるところに必ず保管してください ご使用にあたっては 装着する機器に付属のオペレーションマニュアル の 安全のために をよくお読みください 本機を誤って装着すると 火災 感電やその他の事故により けがをし たり周辺の物品に損害を与えたりすることがあります 危険を避けるた め 装着はサービストレーニングを受けた技術者にご依頼ください 本機を装着する技術者のかたに 装着の前に 本機のマニュアルと併せて 装着される側の機器に付属のマ ニュアルを必ずお読みください OPERATION MANUAL Japanese English 1st Edition Revised 1 ...

Page 2: ......

Page 3: ...1 J 目次 概要 2 J 各部の名称と働き 3 J メニュー設定 9 J メニュー設定の基本操作 9 J ペイ ン ト メニュー 10 J フ ァイルメニュー 16 J メ ンテナンスメニュー 17 J ディ スプレイ セッ ト アップメニュー 19 J 仕様 20 J 日 本 語 ...

Page 4: ...0に接続した場合 本機の表示はすべて消灯し 機能しません 本機を使用する こ とによ り リ モー ト コ ン ト ロールパネルRCP 700シ リ ーズを接続するこ とな くCCU 550シ リ ーズから ビデオカメ ラをコン ト ロールする こ とができます 本機の主な特長は次のとおりです フルコントロール機能 マルチフ ァ ンクシ ョ ン調整部の任意の設定項目をコ ン ト ロールパネル上の3つの調整つま みでダイ レク ト に調整する こ とができます 設定メニュー画面によ り マス ターセ ッ ト アップユニッ トMSU 700Aとほぼ同等のペイ ン ト項 目 メ ンテナンス項目の設定と各種フ ァイ ルの保存が可能 ...

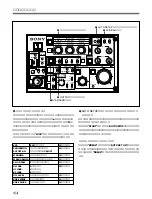
Page 5: ...ボタン ボタ ンを押している間 カメ ラのTALLYラ ンプやビューフ ァイ ンダー のTALLYラ ンプ CCU 550シ リ ーズに接続されたリ モー ト コン ト ロー ルパネルのCALLボタ ンが点灯します また 本機のTALLYラ ン プも赤く 点灯してボタ ンを押したこ とが確認できます TALLYラ ン プが点灯中にCALLボタ ンが押される と TALLYラ ンプは消灯しま す 各部の名称と働き POWER CALL SAT OFF ON V MOD SAW B FLARE KNEE SLOPE SATURATION M BLK GAMMA G FLARE KNEE POINT ECS M GAMMA R FLARE DTL LEVEL PANEL ACTIVE STANDARD MASTER GAIN FILTER MONITOR SELECT SHUTTER MASTE...

Page 6: ...部 調整つまみで下記のペイ ン ト調整項目を調整する こ とができ ます マルチフ ァ ンクシ ョ ン調整項目選択レバーをv側に倒すたびに 調 整項目列の点灯が切り換わり ます 点灯している項目列を 3つの ペイ ン ト調整つまみ ロータ リ ーエンコーダー でそれぞれ調整する こ とができます 調整項目選択レバーを LOCK 側に倒すと 調整内容が固定さ れ 誤ってつまみを回しても設定が変わるこ とはあり ません ECS ECS周波数調整 15ページ参照 SATURATION サチュ レーシ ョ ン調整 14ページ参照 SAT OFF ON サチュ レーシ ョ ンON OFF M GAMMA マスターガンマ調整 10ページ参照 M BLK GAMMA マスターブラ ッ クガンマ調整 11ページ参照 V MOD SAW Vモジュ レーシ ョ ン調整 12ページ参照 R FLARE Rフ レ...

Page 7: ...イ ンジケーターは消灯します ABB 側に倒すと AUTO SETUPイ ンジケーターが緑色に点灯 し ブラ ックバラ ンス ブラ ックセッ トの自動調整がス ター ト します 調整を途中で中止するには AUTO SETUPスイ ッチを BREAK 側に倒します AUTO SETUPイ ンジケーターが赤く 点滅し 設定 を調整開始前の状態に戻します も う一度 BREAK 側に倒すと イ ンジケーターは消灯します WHITEバランス調整つまみ ホワイ トバラ ンス手動調整用のつまみです R信号 B信号をそれぞ れ調整します BLACKバランス調整つまみ ブラ ックバラ ンス手動調整用のつまみです R信号 B信号をそれ ぞれ調整します ABSOLUTEボタン ボタ ンを押すたびにボタ ンの点灯 消灯が切り換わり ホワイ トバラ ンスおよびブラ ッ クバラ ンスの手動調整用のつまみ調整モー ド...

Page 8: ...た これらのシーンフ ァイ ルは CCU 550シ リ ーズに接続されたリ モー ト コン ト ロールパネルでも操作する こ とができます STORE シーンファイル登録 スイッチ スイ ッチを STORE 側に倒すと 現在の調整値がシーンフ ァイ ルと して登録されます 登録するシーン番号はスイ ッチを倒した時点の シーン番号選択スイ ッチ 1 3 の位置で決定されます シーン番号選択スイッチ 1 3 登録する または呼び出すシーンフ ァイ ルの番号を選択します RECALL CANCEL シーン呼び出し 取り消し スイッチ シーンフ ァイ ルの呼び出しと取り消しを行います RECALL シーン番号選択スイ ッチで選択したシーンフ ァイ ルの データが呼び出されます CANCEL シーンファイルを呼び出す前 SCENE FILEイ ンジ ケーターが点灯する前 の設定状態に戻り ます SC...

Page 9: ...すたびに 設定メニュー画面の矢印が下に移動し 選択 項目を変更します 数値および設定を変更するには マルチフ ァ ンクシ ョ ン調整部のペイ ン ト調整つまみ ロータ リ ーエン コーダー で変更します qs SHUTTER シャッター モード選択部 シャ ッ タースピー ドのモー ドを切り換えます スイ ッチを ON 側に倒 すたびに ECS と SHUTTER イ ンジケーターの点灯が切り換わ り ECSモー ドまたはシャ ッ ターモー ドになり ます OFF 側に倒す と 両方のイ ンジケーターが消灯し ECSモー ド シャ ッ ターモー ドが OFFになり ます ECS エクステンディッドクリアスキャン モード ECS周波数を変化させる こ とによって 1 30 1 58 3 秒 または 1 60 1 7000 秒 のシャ ッ タース ピー ドを選択できます ス ピー ドはマルチフ...

Page 10: ...対値 ボタン マスターブラ ックの調整モー ドを選択します ボタ ンを押すたびに 点灯 消灯が切り換わり ます 相対値モー ド RELATIVEボタ ン点灯 つまみの位置と調整値 との対応関係がなく なり ます 相対値モー ドが選択されたと きの位 置が その後の基準位置になり ます 中央位置は必ずしも調整可 能範囲の中央値には対応しません 絶対値モー ド RELATIVEボタ ン消灯 つまみの位置と調整値 とが対応し 中央位置がそのまま調整可能範囲の中央値に対応し ます ご注意 次の場合は 自動的に相対値モー ドになり ます 本機がアクティ ブでないと き オー ト セッ ト アップ終了時 シーンフ ァイ ルを呼び出したとき IRIS MB ACTIVEイ ンジケーターが消灯している と き このと き RELATIVEボタ ンは機能しません qj IRIS調整部 qh MASTER B...

Page 11: ...基本操作 1 DISPLAY切り換えスイ ッチをMENUに切り換える メニュー設定 2 アップ ダウ ンスイ ッチをvまたはV側に倒して マーク を移動 し メニューを選択する 3 ENTER CANCELスイ ッチをENTER側に倒す 4 アップ ダウ ンスイ ッチをvまたはV側に倒して マーク を移動 し 設定項目を選択する 5 ENTER CANCELスイ ッチをENTER側に倒す 6 アップ ダウ ンスイ ッチをvまたはV側に倒して マーク を移動 し 設定内容を選択する 7 ENTER CANCELスイ ッチをENTER側に倒す 表示が 表示になり ます 8 マルチフ ァ ンクシ ョ ン調整部の調整つまみで 設定を変更す る PAINT White Matrix Black MultiMatrix Flare Detail Gamma Skin DTL B Gamma Sat K...

Page 12: ...段に を合わせて 表示に切り換え マルチフ ァ ンクシ ョ ン調整 部の右端の調整つまみで調整します ペイントメニュー ペイ ン ト メニューには 以下の項目があ り ます メニュー設定の方法については メニュー設定の基本操作 9ペー ジ をご覧く ださい ホワイトバランス調整 White PaintメニューのWhiteを選択する と R G B信号それぞれのホワ イ ト レベルを調整して ホワイ トバラ ンスを調整する こ とができます 調整は マルチフ ァ ンクシ ョ ン調整部の調整つまみで行います 自動追尾ホワイトバランス機能をON OFFするには 上段のATWに を合わせて 表示に切り換え マルチフ ァ ンクシ ョ ン調整部の左端の調整つまみでON OFFを切り換えます ブラックバランス調整 Black PaintメニューのBlackを選択すると R G B信号それぞれのブ ラ ッ...

Page 13: ...イント ニー機能が働き始める点 を設定するには Pointに を合わせて 表示に切り換え R G B信号それぞれのポ イ ン ト をマルチフ ァ ンクシ ョ ン調整部の調整つまみで指定します マスターニースロープを設定するには M Kneeに を合わせて 表示に切り換え マルチフ ァ ンクシ ョ ン調 整部の右端 S の調整つまみでR G B信号のニースロープを 同時に調整します マスターニーポイントを設定するには M Kneeに を合わせて 表示に切り換え マルチフ ァ ンクシ ョ ン調 整部の中央 P の調整つまみでR G B信号のニーポイ ン ト を同 時に指定します ニーマックス機能を使うには Kn MAXに を合わせて 表示に切り換え マルチフ ァ ンクシ ョ ン調 整部の左端の調整つまみでON OFFを切り換えます ONにする と ニースロープは完全に倒れた状態になり ニーポイ...

Page 14: ...ホワイ ト ク リ ップレベ ルおよびR G B信号それぞれのホワイ ト ク リ ップレベルを調整する こ とができます メニュー設定 Matrix Matrix ON User ON Preset OFF R G B R 0 99 G 99 99 B 99 0 c Multi OFF W Clip M ON 99 R G B c 99 0 99 マスターホワイトクリップを調整するには 上段に を合わせて 表示に切り換え マルチフ ァ ンクシ ョ ン調整 部の右端の調整つまみで調整します R G Bのホワイ ト ク リ ップが同時に調整されます R G Bのホワイトクリップをそれぞれに調整するには 最下段 数値の行 に を合わせて 表示に切り換え マルチフ ァ ンクシ ョ ン調整部の各調整つまみで調整します マトリックス調整 Matrix PaintメニューのMatrixを選択すると リニ...

Page 15: ... と 輪郭を強調する各種のディ テールレベルを調整する こ とができ ます ディテール補正機能をON OFFするには Detailに を合わせて 表示に切り換え マルチフ ァ ンクシ ョ ン調整 部の左端の調整つまみでON OFFを切り換えます ディ テールレベルは右端の調整つまみで調整します ディテールリミッターを調整するには Limitに を合わせて 表示に切り換え M マス ター リ ミ ッ ターレベ ル Wht ホワイ ト リ ミ ッ ター レベル Blk ブラ ッ ク リ ミ ッ ターレベル そ れぞれをマルチフ ァ ンクシ ョ ン調整部の各調整つまみで調整しま す その他のディテール項目を調整するには 各項目列に を合わせて 表示に切り換え マルチフ ァ ンクシ ョ ン 調整部の各調整つまみで調整します 調整項目は下記の通りです Crsp ディ テールク リ スプニング L D...

Page 16: ...るには S DTLX Xは選択しているエリ アチャ ンネル に を合わせて 表 示に切り換え マルチフ ァ ンクシ ョ ン調整部の左端の調整つまみで ON OFFを切り換えます ディ テールレベルは中央の調整つまみで調整します スキンディテール機能の各エリアを調整するには Areaに を合わせて 表示に切り換え Phs 位相 Wdth 帯域 Sat サチュレーシ ョ ン のレベルをマルチフ ァ ンクシ ョ ン調整部の各 調整つまみで調整します オートヒューディテクト機能のスタート Auto Hue Detectに を合わせて 表示に切り換え マルチフ ァ ン クシ ョ ン調整部の右端の調整つまみを右に回すと オー ト ヒューディ テク ト機能がス ター ト します 自動調整中はOPを表示し 終了する とOKまたはNGを表示しま す サチュレーション ニーサチュレーション調整 Sat Kn ...

Page 17: ...表示に切り換え マルチフ ァ ンクシ ョ ン調整 部の左端の調整つまみでON OFFを切り換えます ECS周波数は右端の調整つまみで 1 30 1 58 3 1 60 1 7000のシャ ッ タースピー ドから選択します S EVS Super Enhanced Vertical Definition System をON OFFするには S EVSに を合わせて 表示に切り換え マルチフ ァ ンクシ ョ ン調整 部の左端の調整つまみでON OFFを切り換えます 右端の調整つまみで 垂直解像度を350本から450本の間で自由 に調整できます 表示は0 100 パーセン ト 表示です ローキーサチュレーション調整 LowKeySat PaintメニューのLowKeySatを選択する と 暗い部分の彩度を調 整できます ローキーサチュレーションを調整するには 最下段に を合わせて 表示に切り換...

Page 18: ... の値に一致するよう に自動調整されます リファレンスファイルを保存するには FileメニューのReferenceを選択する と リ フ ァ レンスフ ァイ ルを保 存する画面が表示されます Storeに を合わせて 表示に切り換え マルチフ ァ ンクシ ョ ン調整 部の左端の調整つまみを右に回して実行します Reference Store c Lens File Store c OHB File Store c レンズファイルの保存 FileメニューのLens Fileを選択する と 現在のレンズ設定を保存 する画面が表示されます Storeに を合わせて 表示に切り換え マルチフ ァ ンクシ ョ ン調整 部の左端の調整つまみを右に回して実行します OHBファイルの保存 FileメニューのOHB Fileを選択する と 現在のフ ィ ルター設定を保 存する画面が表示されます Storeに...

Page 19: ... Para Vパラボラシェーディ ング H Saw Hソーシェーディ ング H Para Hパラボラシェーディ ング Blk Set ブラ ックセッ ト Black ブラ ックバラ ンス Gain B ゲイ ンブラ ッ ク Auto Black Sh オー ト ブラ ックシェーディ ング機能のス ター ト ホワイトシェーディング調整 White Sh MaintenanceメニューのWhite Shを選択する と R G B信号それ ぞれのホワイ ト シェーディ ングとホワイ トバラ ンスを調整する こ とがで きます また オー ト ホワイ ト シェーディ ング機能をス ター トする こ とが できます 調整する項目に を合わせて 表示に切り換え マルチファンク シ ョ ン調整部の各調整つまみで調整します V Saw Vソーシェーディ ング V Para Vパラボラシェーディ ング H ...

Page 20: ...整 オー ト ア イ リ ス の各種条件を調整する こ とができます 調整する項目に を合わせて 表示に切り換え マルチフ ァ ンク シ ョ ン調整部の各調整つまみで調整します Level オー ト アイ リ ス時の絞り値の収束レベルの調整 APL PK オー ト アイ リ スを動作させる と きの 入力光量の平均値 とピーク値の重み付けの調整 設定値 99 0 99 ピーク対平均値 1 0 1 1 0 1 Gain オー ト アイ リ スにおける収束度の強さの調整 収束度を強く する と レンズによってはハンチングする場合があり ます フォーマットセットアップ Format Maintenanceメニューの Formatを選択すると ビデオ信号の フ ォーマッ トの設定ができ ます 調整する項目に を合わせて 表示に切り換え マルチファンク シ ョ ン調整部の左端の調整つまみで調整します...

Page 21: ...y Setupメニューに を合わせ ENTER CANCELスイ ッチ をENTER側に倒すと MONITOR SELECT部のDISPLAYがON の時のピクチャーモニター画面に表示する項目を選択する こ とがで きます 調整する項目に を合わせて 表示に切り換え マルチフ ァ ンク シ ョ ン調整部の左端の調整つまみでON OFFを切り換えます Iris 絞り値表示 MB マス ターブラ ッ ク表示 RE ロータ リ ーエンコーダー表示 Filter フ ィ ルター表示 Gain ゲイ ン表示 Shutter シャ ッ タースピー ド モー ド表示 Aspect 画面のアスペク ト比表示 Message メ ッセージ表示 ...

Page 22: ...20 J 仕様 外形寸法 200 124 49 mm 幅 高さ 奥行き 突 起部を除く 質量 約0 5kg 仕様および外観は 改良のため予告なく 変更する こ とがあ り ます ...

Page 23: ...onformité aux normes européennes suivantes EN55103 1 Interférences électromagnétiques émission EN55103 2 Sensibilité électromagnétique immunité Ce produit est prévu pour être utilisé dans les environnements électromagnétiques suivants E1 résidentiel E2 commercial et industrie légère E3 urbain extérieur et E4 environnement EMC contrôlé ex studio de télévision CAUTION Danger of explosion if battery ...

Page 24: ...Table of contens 2 ...

Page 25: ...tents Overview 4 E Function and Location of Parts and Controls 5 E Menu Settings 11 E Basic menu setting procedure 11 E Paint menu 11 E File menu 18 E Maintenance menu 19 E Display Set up menu 21 E Specifications 22 E ...

Page 26: ...e BKP 5973 go off and the buttons and controls do not work When attached to the CCU 550 series unit the BKP 5973 can be used to control the video camera directly without the use of a remote control panel The BKP 5973 has the following features Simple and direct adjustments A variety of functions can be adjusted simply by turning the respective controls in the multi function setting section on the ...

Page 27: ... video camera connected to the CCU 550 series unit goes on air When the CALL button on the video camera MSU 700A RCM 700 series remote control panel or an optional BKP 5973 is pressed the indicator lights if it is not lit and goes off if it is lit The indicator lights green when the green tally signal is input e g when the video signal from the camera connected to the CCU 550 series unit goes off ...

Page 28: ... item settings do not change even if the controls are turned accidentally page 17 ECS SATURATION SAT ON OFF M GAMMA R FLARE G FLARE B FLARE DTL LEVEL KNEE SLOPE Item Function Refer to V MOD SAW KNEE POINT M BLK GAMMA page 13 page 13 page 17 page 14 page 12 page 16 page 13 page 13 Adjusts detail level Adjusts B flare balance Adjusts G flare balance Adjusts V modulation shading Adjusts knee point Ad...

Page 29: ...se controls to manually adjust the the white balance The left hand control adjusts the R signal level and the right hand control adjusts the B signal level BLACK black balance manual adjustment controls Turn these controls to manually adjust the black balance The left hand control adjusts the R signal level and the right hand control adjusts the B signal level ABSOLUTE button Pressing this button ...

Page 30: ...ed to the CCU 550 series unit STORE painting data storage button Press to store the current paint settings in a scene file The scene file number is the number currently specified by the scene file number selector Scene file number selector Selects the number of the scene file 1 to 3 to be used for storing or recalling paint data RECALL CANCEL scene file recalling canceling switch Recalls or cancel...

Page 31: ...nal only B Outputs the B signal only R G B Outputs the R G and B signals together to the PIX connector and the R G or B signal to the WF connector SEQ sequence You can monitor the waveforms of the R G and B signals in sequence by connecting a waveform monitor to the WF connector ENC signals are output to the PIX connector ENC encode The R G B and SEQ circuits are turned off and the ENC signal is o...

Page 32: ...h the middle value within the possible adjustment range Absolute mode the button is off An absolute correspondence exists between the positions of the MASTER BLACK control and the adjustment values The center position always corresponds to the middle value within the possible adjustment range Note The relative mode is automatically selected when the BKP 5973 is not active automatic adjustment has ...

Page 33: ...Set the DISPLAY switch to MENU MENU Paint File Maintenance Display Setup c PAINT White Matrix Black MultiMatrix Flare Detail Gamma Skin DTL B Gamma Sat Kn Sat Knee ECS S EVS V Mod CrossColor c AutoKnee LowKeySat W Clip Knee Kn MAX OFF P S M Knee ON 99 99 R G B Point 99 0 99 Slope 99 0 99 c 2 4 6 1 8 3 5 7 2 Press the up down switch towards v or V to move the arrow t to the menu that you want 3 Set...

Page 34: ...n or off the flare function or individually adjust the flare level of the R G and B signals To turn on or off the flare function Move the arrow t to ON or OFF on the upper column change the arrow to and turn the left hand control in the multi function setting section to turn it on or off To adjust the flare Move the arrow t to the numeric value on the lower column change the arrow to and turn the ...

Page 35: ...mains within the standard video signal range To set the knee slope1 Move the arrow t to Slope change the arrow to and turn the three controls in the multi function setting section to adjust the R G and B signals individually To set the knee point2 Move the arrow t to Point change the arrow to and turn the three controls in the multi function setting section to adjust the R G and B signals individu...

Page 36: ...g the auto knee slope in the multi function setting section Adjusting the V modulation shading V Mod Select V Mod in the Paint menu to adjust the master V modulation shading and the V modulation shading for the R G and B signals individually To adjust the master V modulation shading Move the arrow t to the upper column change the arrow to and turn the right hand control in the multi function setti...

Page 37: ... turn on or off the preset matrix Move the arrow t to Preset change the arrow to and turn the left hand control in the multi function setting section to turn the preset matrix on or off To turn on or off the multi matrix Move the arrow t to Multi change the arrow to and turn the left hand control in the multi function setting section to turn it on or off To adjust the matrix compensation Move the ...

Page 38: ...ils Detail Select Detail in the Paint menu to adjust the detail level to emphasize image contours To turn on or off the detail adjustment Move the arrow t to Detail change the arrow to and turn the left hand control in the multi function setting section to turn the detail level adjustment on or off Adjust the detail level by turning the right hand control in the multi function setting section To t...

Page 39: ...ff To turn on or off the saturation function Move the arrow t to Sat change the arrow to and turn the left hand control in the multi function setting section to turn the saturation function on or off Use the right hand control in the multi function setting section to adjust the chroma signal level To turn on or off the knee saturation function Move the arrow t to Kn Sat change the arrow to and tur...

Page 40: ...eft hand control in the multi function setting section clockwise To turn on or off the S EVS Move the arrow t to S EVS change the arrow to and turn the left hand control in the multi function setting section to turn the S EVS on or off Use the right hand control in the multi function setting section to change the vertical resolution You can specify vertical resolution of 350 to 450 lines and a dis...

Page 41: ...e for setting menus refer to Basic menu setting procedure on page 11 Adjusting the black shading Black Sh Select Black Sh in the Maintenance menu to adjust the black shading black set black balance and gain black for the R G and B signals individually You can also turn the automatic black shade adjustment function on Move the arrow t to the item you want to adjust change the arrow to then turn the...

Page 42: ...arrow to and turn the three controls in the multi function setting section to adjust the R G Y R Y and B Y signals individually To adjust the black level of the camera signal Move the arrow t to Black change the arrow to and turn the three controls in the multi function setting section to adjust the black level of the R G Y R Y and B Y signals individually Adjusting the signal phases Phase Select ...

Page 43: ... want to specify change the arrow to and turn the left hand control in the multi function setting section Aspect Sets the aspect ratio 4 3 or 16 9 on the picutre monitor PsF Turns on or off the progressive scan Display Set up menu Move the arrow t to Display Set up and set the ENTER CANCEL switch to ENTER to select the items you want displayed on the picture monitor when the DISPLAY switch is set ...

Page 44: ...22 E Menu Settings Specifications Dimensions 200 124 49 mm 77 8 5 115 16 in w h d Mass 0 5 kg 1 lb 2 oz Design and specifications are subject to change without notice ...

Page 45: ...des acquéreurs de l équipement décrit dans ce manuel Sony Corporation interdit formellement la copie de quelque partie que ce soit de ce manuel ou son emploi pour tout autre but que des opérations ou entretiens de l équipement à moins d une permission écrite de Sony Corporation Das in dieser Anleitung enthaltene Material besteht aus Informationen die Eigentum der Sony Corporation sind und ausschli...

Page 46: ...BKP 5973 SY 3 856 953 02 1 Printed in Japan 2003 09 13 1996 Sony Corporation B P Company ...

Reviews: