background image

20

 GB

Navigating through 
menus

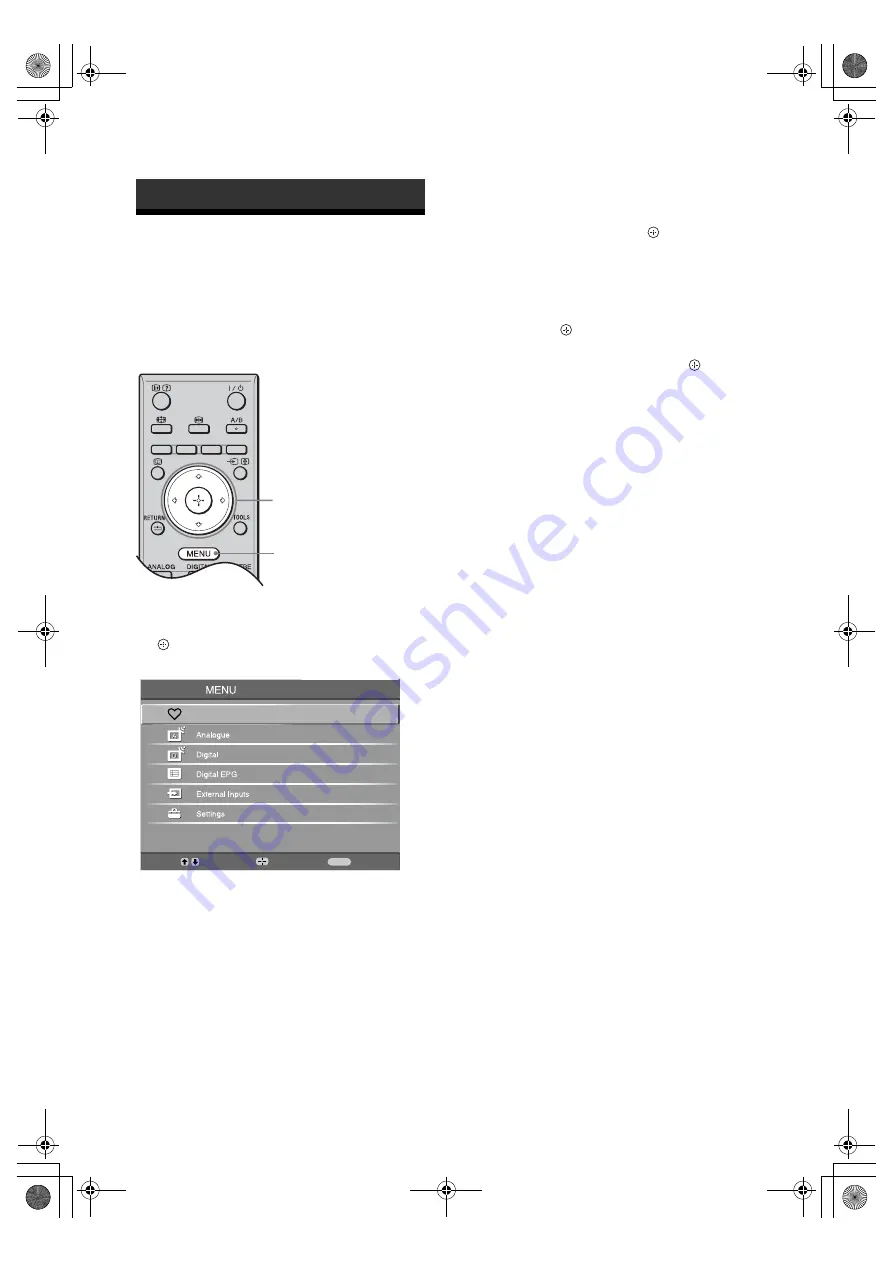
“MENU” allows you to enjoy various convenient 
features of this TV. You can easily select channels or 
inputs sources and change the settings for your TV.

1

Press MENU.

2

Press 

F

/

f

 to select an option, then press 

.

To exit the menu, press MENU.

1

Digital Favourites

*

Displays the Favourite list. For details about 
settings, see page 16.

2

Analogue

Returns to the last viewed analogue channel.

3

Digital

*

Returns to the last viewed digital channel.

4

Digital EPG

*

Displays the Digital Electronic Programme 
Guide (EPG).
For details about settings, see page 14.

5

External Inputs

Selects equipment connected to your TV.
• To watch the desired external input, select the 

input source, then press 

.

6

Settings

Displays the Settings menu where most of the 
advanced settings and adjustments are 
performed.

1

Press 

F

/

f

 to select a menu icon, then 

press .

2

Press 

F

/

f

/

G

/

g

 to select an option or 

adjust a setting, then press 

.

For details about settings, see page 21 to 31.

~


The options you can adjust vary depending on the 
situation. Unavailable options are greyed out or not 
displayed.

* This function may not be available in some countries/

regions.

Using MENU Functions

2

1

Select:

Enter:

Exit:

ME

N

U

Digital Fa

v

o

u

rites

010COV.book  Page 20  Monday, September 24, 2007  10:08 AM

Summary of Contents for BRAVIA 3-273-475-11(2)

Page 1: ...KDL 26S28xx KDL 40U30xx KDL 37U30xx KDL 32U30xx KDL 26U30xx KDL 26T28xx KDL 26T26xx Operating Instructions Before operating the TV please read the Safety information section of this manual Retain this manual for future reference For useful information about Sony products 010COV fm Page 1 Thursday September 20 2007 4 06 PM ...

Page 2: ...tural resources For more detailed information about recycling of this product please contact your local Civic Office your household waste disposal service or the shop where you purchased the product Any functions related to Digital TV will only work in countries or areas where DVB T MPEG2 digital terrestrial signals are broadcasted Please confirm with your local dealer if you can receive a DVB T s...

Page 3: ... Connecting optional equipment 17 Viewing pictures from connected equipment 18 Using HDMI control 19 Navigating through menus 20 Picture Adjustment menu 21 Sound Adjustment menu 23 Features menu 25 Set up menu 27 Digital Set up menu 30 Specifications 32 Troubleshooting 34 Start up Guide 4 Watching TV Using Optional Equipment Using MENU Functions Additional Information GB for digital channels only ...

Page 4: ...nd new batteries Dispose of batteries in an environmentally friendly way Certain regions may regulate disposal of batteries Please consult your local authority Handle the remote with care Do not drop or step on it or spill liquid of any kind onto it Do not place the remote in a location near a heat source a place subject to direct sunlight or a damp room 2 Attaching the stand 1 Open the carton box...

Page 5: ... aerial VCR DVD recorder KDL 32P30xx KDL 26P30xx KDL 32U30xx KDL 26U30xx KDL 26S30xx KDL 26S28xx KDL 26T28xx KDL 26T26xx KDL 40P30xx KDL 37P30xx KDL 40U30xx KDL 37U30xx KDL 40P30xx KDL 37P30xx KDL 40U30xx KDL 37U30xx KDL 32P30xx KDL 26P30xx KDL 32U30xx KDL 26U30xx KDL 26S30xx KDL 26S28xx KDL 26T28xx KDL 26T26xx Connecting an aerial only Connecting an aerial VCR DVD recorder Coaxial cable Scart lea...

Page 6: ...your mains socket 220 240V AC 50Hz 2 Press 1 on the TV top side When you switch on the TV for the first time the Language menu appears on the screen 3 Press F f to select the language displayed on the menu screens then press 3 4 5 Auto Start Up Language Country Location Select Confirm 010COV book Page 6 Monday September 24 2007 10 08 AM ...

Page 7: ...you to confirm the aerial connection No digital or analogue channels were found Check all the aerial connections and press to start auto tuning again 3 When the Programme Sorting menu appears on the screen follow the steps of Programme Sorting page 27 If you do not change the order in which the analogue channels are stored on the TV go to step 4 4 Press MENU to exit The TV has now tuned in all the...

Page 8: ...ation Installed on the wall Installed with stand To ensure proper ventilation and prevent the collection of dirt or dust Do not lay the TV set flat install upside down backwards or sideways Do not place the TV set on a shelf rug bed or in a closet Do not cover the TV set with a cloth such as curtains or items such as newspapers etc Do not install the TV set as shown below Mains lead Handle the mai...

Page 9: ...t falls through openings in the cabinet Precautions Viewing the TV View the TV in moderate light as viewing the TV in poor light or during long period of time strains your eyes When using headphones adjust the volume so as to avoid excessive levels as hearing damage may result LCD Screen Although the LCD screen is made with high precision technology and 99 99 or more of the pixels are effective bl...

Page 10: ...ers the three digit page number to select the page 0 Previous channel Returns to the previous channel watched for more than five seconds qa PROG In TV mode Selects the next or previous channel In Text mode page 13 Selects the next or previous page qs Mute the sound qd 2 Volume qf Text page 13 qg DIGITAL Digital mode page 12 qh ANALOG Analogue mode page 12 qj RETURN Returns to the previous screen o...

Page 11: ... Lights up in green when the picture is switched off page 25 Lights up in orange when the timer is set page 26 7 1 Standby indicator Lights up in red when the TV is in standby mode 8 Power Timer REC programme indicator Lights up in green when the TV is turned on Lights up in orange when the timer recording is set page 14 Lights up in red during the timer recording 9 Remote control sensor Receives ...

Page 12: ...ormation banner appears briefly The following icons may be indicated on the banner Additional operations Watching TV 3 2 2 3 Interactive service is available MHEG Digital Text Interactive service MHEG Digital Text is currently disabled Radio service Scrambled Subscription service Multiple audio languages available Subtitles available Subtitles available for the hearing impaired Recommended minimum...

Page 13: ...be visible in Smart mode In such a case you can select V Size using the Screen menu and adjust vertical size to make it visible z When Auto Format is set to On the TV will automatically select the best mode to suit the broadcast page 25 You can adjust the position of the picture when selecting Smart 50Hz 14 9 or Zoom Press F f to move up or down e g to read subtitles Using the Tools menu Press TOO...

Page 14: ...rresponding to the selected category Set a programme to be recorded Timer REC 1 Press F f G g to select the future programme you want to record then press 2 Press F f to select Timer REC 3 Press to set the TV and your VCR timers A red c symbol appears by that programme s information The indicator on the TV front panel lights up in orange z To record the programme you are currently watching press S...

Page 15: ...nt to record then press 2 Press F f to select Manual timer REC then press 3 Press F f to select the date then press g 4 Set the start and stop time in the same way as in step 3 5 Press F f to select the programme then press 6 Press to set the TV and your VCR timers A red c symbol appears by that programme s information The indicator on the TV front panel lights up in orange z To record the program...

Page 16: ...Favourite list for the first time 1 Press to select Yes 2 Press yellow key to select favourite list 3 Press F f to select the channel you want to add then press Channels that are stored in the Favourite list are indicated by a symbol Watch a channel 1 Press yellow key to navigate through favourite lists 2 Press F f to select the channel then press Turn off the Favourite list Press RETURN Add or re...

Page 17: ...pplied Using Optional Equipment For service use only S VHS Hi8 DVC camcorder Headphones DVD player with component output DVD recorder Decoder VCR Video game equipment DVD player Decoder PC Audio system PC HDMI output Blu ray disc player Digital video camera DVD player Hi Fi audio equipment CAM card 010COV book Page 17 Monday September 24 2007 10 08 AM ...

Page 18: ...only an HDMI cable that bears the HDMI logo When HDMI control compatible equipment is connected communication with the connected equipment is supported Refer to page 19 to set up this communication AV6 or AV6 To see the equipment connected to H z To avoid picture noise do not connect the camcorder to the video socket 6 and the S video socket 6 at the same time If you connect mono equipment connect...

Page 19: ...tly connect and set the compatible equipment to use the HDMI control function To connect the HDMI control compatible equipment Connect the compatible equipment and the TV with an HDMI cable When connecting an audio system in addition to the HDMI cable be sure to also connect the audio output socket of the TV and the audio system For details see page 17 To make the HDMI control settings HDMI contro...

Page 20: ...PG For details about settings see page 14 5 External Inputs Selects equipment connected to your TV To watch the desired external input select the input source then press 6 Settings Displays the Settings menu where most of the advanced settings and adjustments are performed 1 Press F f to select a menu icon then press 2 Press F f G g to select an option or adjust a setting then press For details ab...

Page 21: ...ages Text For text charts or tables Backlight Adjusts the brightness of the backlight Contrast Increases or decreases picture contrast Brightness Brightens or darkens the picture Colour Increases or decreases colour intensity Hue Increases or decreases the green tones z Hue can only be adjusted for an NTSC colour signal e g U S A video tapes Sharpness Sharpens or softens the picture Colour Tone Ad...

Page 22: ...se reduction Off Turns off the Noise Reduction feature z Auto is not available for AV3 AV4 AV5 and PC mode Adv Contrast Enhancer Automatically adjusts Backlight and Contrast to the most suitable settings judging from the brightness of the screen This setting is especially effective for dark images scenes It will increase the contrast distinction of the darker picture scenes Reset Resets all pictur...

Page 23: ...ced by a multi channel system Off Flat response Also allows you to store your preferred settings z If you set Auto Volume to On Dolby Virtual changes to Standard If headphones are connected Sound Effect changes to Off Treble Adjusts higher pitched sounds Bass Adjusts lower pitched sounds Balance Emphasizes left or right speaker balance Reset Resets all the sound settings to the factory settings Du...

Page 24: ... s sound through the TV speakers Audio System The TV speakers are turned off in order to listen to the TV s sound only through your external audio equipment connected to the audio output sockets When connected with an HDMI control compatible equipment you can turn the connected equipment on interlocked with the TV This setting must be made after connecting the equipment 010COV book Page 24 Monday ...

Page 25: ...of the TV Standard Default settings Reduce Reduces the power consumption of the TV Picture Off Switches off the picture You can listen to the sound with the picture off AV2 Output Sets a signal to be output through the socket labelled 2 on the rear of the TV If you connect a VCR to the 2 socket you can then record from the equipment connected to other sockets of the TV TV Outputs a broadcast Auto ...

Page 26: ...ime after which the TV automatically switches itself into standby mode When the Sleep Timer is activated the Timer indicator on the TV front lights up in orange z If you switch off the TV and switch it on again Sleep Timer is reset to Off Sleep timer will end soon Power will be turned off appears on the screen one minute before the TV switches to standby mode Clock Set Allows you to adjust the clo...

Page 27: ...alogue channels are stored on the TV 1 Press F f to select the channel you want to move to a new position then press g 2 Press F f to select the new position for your channel then press AV Preset Assigns a name to any equipment connected to the side and rear sockets The name will be displayed briefly on the screen when the equipment is selected You can skip an input source that is not connected to...

Page 28: ... f to select the programme number you want to modify Then press System Presets programme channels manually 1 Press F f to select System then press 2 Press F f to select one of the following TV broadcast systems then press G B G For western European countries regions D K For eastern European countries regions L For France I For the United Kingdom Depending on the country region selected for Country...

Page 29: ...or dual sound when Low or High is selected Audio Filter is not available when System is set to L Skip Skips unused analogue channels when you press PROG to select channels You can still select a skipped channel using the number buttons Decoder Views and records the scrambled channel selected when using a decoder connected directly to scart connector 1 or to scart connector 2 via a VCR Depending on...

Page 30: ...roadcast you want 2 Remove or change the order of the digital channels as follows To remove the digital channel Press After a confirmation message appears press G to select Yes then press To change the order of the digital channels Press g then press F f to select the new position for the channel and press G 3 Press RETURN Digital Manual Tuning Tunes the digital channels manually 1 Press the numbe...

Page 31: ...ber buttons to enter your existing PIN code If you have not previously set a PIN a PIN code entry screen appears Follow the instructions of PIN Code below 2 Press F f to select the age restriction or None for unrestricted watching then press 3 Press RETURN PIN Code To set your PIN for the first time 1 Press the number buttons to enter the new PIN code 2 Press RETURN To change your PIN 1 Press the ...

Page 32: ...ith stand Approx 10 5 kg without stand Panel System LCD Liquid Crystal Display Panel TV System Depending on your country region selection Analogue B G H D K L I Digital DVB T Colour Video System Analogue PAL SECAM NTSC 3 58 4 43 only Video In Digital MPEG 2 MP ML Aerial 75 ohm external terminal for VHF UHF Channel Coverage Analogue 48 25 855 25 MHz Digital VHF Band III 177 5 226 5 MHz UHF E21 E69 ...

Page 33: ...s signals in the above chart with a 60 Hz vertical frequency For other signals you will see the message NO SYNC PC Input Signal Reference Chart for HDMI IN 4 5 Signals Horizontal Pixel Vertical Line Horizontal frequency kHz Vertical frequency Hz Standard VGA 640 480 31 5 60 VGA SVGA 800 600 37 9 60 VESA Guidelines XGA 1024 768 48 4 60 VESA Guidelines WXGA 1280 768 47 4 60 VESA 1280 768 47 8 60 VES...

Page 34: ...Picture or sound noise when viewing a TV channel Adjust AFT Automatic Fine Tuning to obtain better picture reception page 28 Some tiny black points and or bright points appear on the screen The picture of a display unit is composed of pixels Tiny black points and or bright points pixels on the screen do not indicate a malfunction No colour on programmes Select Reset page 22 No colour or irregular ...

Page 35: ...in 3 273 475 11 2 U KDL 40P30xx KDL 37P30xx KDL 32P30xx KDL 26P30xx KDL 26S30xx KDL 26S28xx KDL 40U30xx KDL 37U30xx KDL 32U30xx KDL 26U30xx KDL 26T28xx KDL 26T26xx 100BCO fm Page 1 Thursday September 20 2007 4 25 PM ...

Reviews: