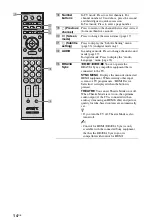
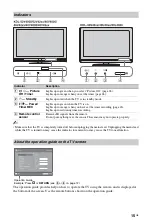
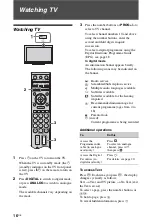
background image

© 2008 Sony Corporation

3-298-969-

61

(1)

GB

TR

KDL-52V4000/52V42xx

KDL-46V4000/46V42xx

KDL-40V4000/40V42xx

KDL-40S40xx/40U40xx

KDL-40L4000

LCD Digital Colour TV

Operating Instructions 

Kullanım Kılavuzu 

Summary of Contents for BRAVIA 3-298-969-61(1)

Page 1: ... 2008 Sony Corporation 3 298 969 61 1 GB TR KDL 52V4000 52V42xx KDL 46V4000 46V42xx KDL 40V4000 40V42xx KDL 40S40xx 40U40xx KDL 40L4000 LCD Digital Colour TV Operating Instructions Kullanım Kılavuzu ...

Page 2: ...ital TV functions may not be available in some countries areas and DVB C cable may not operate correctly with some providers For a list of compatible cable providers refer to the support web site http support sony europe com TV DVBC Trademark information is a registered trademark of the DVB Project Manufactured under license from BBE Sound Inc Licensed by BBE Sound Inc under one or more of the fol...

Page 3: ...Favourite List 20 Using Optional Equipment Connecting Optional Equipment 21 Viewing Pictures from Connected Equipment 23 Using BRAVIA Sync Control for HDMI 24 Using Menu Functions Navigating through menus 25 TV Settings Menu 26 Additional Information Specifications 35 Troubleshooting 37 for digital channels only Before operating the TV please read Safety Information page 9 Retain this manual for f...

Page 4: ...except for KDL 52V4000 52V42xx Remote RM ED013 1 Size AA batteries R6 type 2 To insert batteries into the remote 2 Attaching the stand except for KDL 52V4000 52V42xx If using an electric screwdriver set the tightening torque at approximately 1 5 N m 15 kgf cm Push and lift the cover to open ...

Page 5: ...ial Set Top Box recorder e g DVD recorder Connecting a Set Top Box recorder e g DVD recorder with SCART Connecting a Set Top Box recorder e g DVD recorder with HDMI Set Top Box recorder e g DVD recorder Set Top Box recorder e g DVD recorder ...

Page 6: ...l a wood screw 4 mm in diameter not supplied in the TV stand 2 Install a machine screw M6 12 not supplied into the screw hole of the TV 3 Tie the wood screw and the machine screw with a strong cord 5 Bundling the cables 6 Performing the initial set up 3 ...

Page 7: ...uick Scan try Full Scan though it may take some time For a list of compatible cable providers refer to the support web site http support sony europe com TV DVBC Do not press any buttons on the TV or remote while searching for available channels 8 If you want to change the order of analogue channels follow the steps in Programme Sorting on page 31 If your TV cannot receive digital broadcasts the Cl...

Page 8: ...wn below Adjust the angle left and right swivel Detaching the Table Top Stand from the TV Remove the screws guided by the arrow marks of the TV Do not remove the Table Top Stand for any reason other than to wall mount the TV KDL 52V4000 52V42xx 46V4000 46V42xx 40V4000 40V42xx 40L4000 KDL 40S40xx 40U40xx Top view Front ...

Page 9: ... anything in the cabinet s Leave space around the TV set as shown below s It is strongly recommended that you use a Sony wall mount bracket in order to provide adequate air circulation Installed on the wall Installed with stand s To ensure proper ventilation and prevent the collection of dirt or dust Do not lay the TV set flat install upside down backwards or sideways Do not place the TV set on a ...

Page 10: ...ong period of time strains your eyes s When using headphones adjust the volume so as to avoid excessive levels as hearing damage may result LCD Screen s Although the LCD screen is made with high precision technology and 99 99 or more of the pixels are effective black dots may appear or bright points of light red blue or green may appear constantly on the LCD screen This is a structural property of...

Page 11: ...re disposed of correctly you will help prevent potentially negative consequences for the environment and human health which could otherwise be caused by inappropriate waste handling of the battery The recycling of the materials will help to conserve natural resources In case of products that for safety performance or data integrity reasons require a permanent connection with an incorporated batter...

Page 12: ... mains lead from the mains 3 F f G g Press F f G g to move the on screen cursor Press to select confirm the highlighted item 4 MENU Press to display the TV menu page 25 5 RETURN Press to return to the previous screen of the displayed menu Buttons on the TV will work the same as those on the remote control In TV menu these buttons will work as F f G g z The number 5 N PROG and AUDIO buttons have a ...

Page 13: ...ol for HDMI The listed options vary depending on the input source qa Text Press to display text information page 16 qs Info Text reveal In digital mode Displays details of the programme currently being viewed In analogue mode Displays information such as current channel number and screen format In Text mode page 16 Reveals hidden information e g answers to a quiz qd GUIDE EPG Press to display the ...

Page 14: ...he Audio Language menu page 33 wd BRAVIA Sync m N X M x You can operate the BRAVIA Sync compatible equipment that is connected to the TV SYNC MENU Displays the menu of connected HDMI equipment While viewing other input screens or TV programmes HDMI Device Selection is displayed when the button is pressed THEATRE You can set Theatre Mode on or off When Theatre Mode is set to on the optimum audio ou...

Page 15: ...ator Description 1 Picture Off Timer Lights up in green when you select Picture Off page 28 Lights up in orange when you set the timer page 28 2 1 Standby Lights up in red when the TV is in standby mode 3 Power Timer REC Lights up in green when the TV is on Lights up in orange when you have set the timer recording page 18 Lights up in red during timer recording 4 Remote control sensor Receives IR ...

Page 16: ...lowing icons may be indicated on the banner Radio service Scrambled Subscription service Multiple audio languages available Subtitles available Subtitles available for the hearing impaired Recommended minimum age for current programme ages from 4 to 18 Parental lock c in red Current programme is being recorded Additional operations To access Text Press Each time you press the display changes cycli...

Page 17: ... Screen Settings menu page 29 You cannot select 4 3 or 14 9 for HD signal source pictures z When Auto Format page 29 is set to On the TV automatically selects the best mode to suit the broadcast If 720p 1080i or 1080p source pictures are displayed with black borders on the screen edges select Smart or Zoom to adjust the pictures Smart Displays conventional 4 3 broadcasts with an imitation wide scr...

Page 18: ... on the TV and recorder A c symbol in red appears next to the programme s information The indicator on the TV front panel lights up in orange z You can perform the above procedure even if the programme you want to record has already started Set a programme to be displayed automatically on the screen when it starts Reminder 1 Press F f G g to select a future programme you want to display then press...

Page 19: ...n switch the TV to standby mode but do not turn off the TV completely or the recording will be cancelled If an age restriction has been set to programmes a message asking for a PIN code appears on the screen For details see Parental Lock on page 34 Cancel a recording reminder Timer list 1 Press 2 Press F f to select Timer list then press 3 Press F f to select the programme you want to cancel then ...

Page 20: ...Press F f to select the channel you want to add then press A symbol appears next to channels that you have stored in the Favourite list Watch a channel 1 Press the yellow button to select a Favourite list 2 Press F f to select a channel then press Add or remove channels in a Favourite list 1 Press the blue button 2 Press the yellow button to select the Favourite list to edit 3 Press F f to select ...

Page 21: ...V1 When you connect a decoder the TV tuner outputs scrambled signals to the decoder and the decoder unscrambles the signals before outputting them 2 AV2 AV2 SmartLink provides a direct link between the TV and a recorder e g DVD recorder 3 COMPONENT IN Component The component video sockets support the following video inputs only 480i 480p 576i 576p 720p 1080i and 1080p For service use only Continue...

Page 22: ...ntrol for HDMI be sure to also connect it to the DIGITAL AUDIO PCM OUT OPTICAL socket 9 HDMI IN 3 except for KDL 40L4000 HDMI 3 5 PC IN PC It is recommended to use a PC cable with ferrites like the Connector D sub 15 ref 1 793 504 11 available in Sony Service Centre or equivalent 6 DIGITAL AUDIO PCM OUT OPTICAL except for KDL 40S40xx 40U40xx 40L4000 Use an optical audio cable 7 You can listen to T...

Page 23: ... function is not available for a PC input source You cannot change the size of the pictures The analogue TV video in the TV programme picture will not appear while displaying AV1 AV2 or AV3 in the external input picture However you can hear the analogue video s sound 1 Press TOOLS 2 Press F f to select PAP then press The picture from the connected equipment is displayed on the left and the TV prog...

Page 24: ...uipment that has the BRAVIA Sync logo by the TV remote by pressing N x X m M to operate the connected equipment directly SYNC MENU to display the menu of the connected HDMI equipment on the screen After displaying the menu you can operate the menu screen by using F f G g and TOOLS to display Device Control then select options from Menu Options and Content List to operate the equipment Refer to the...

Page 25: ...l Electronic Programme Guide EPG page 18 5 External Inputs Displays a list of equipment connected to the TV To view pictures from an external input select the input source then press To select the equipment that is compatible with control for HDMI select HDMI Device Selection 6 Settings Displays the Settings menu where most of the advanced settings and adjustments are performed 1 Press F f to sele...

Page 26: ...and Display Mode Backlight Adjusts the brightness of the backlight Contrast Increases or decreases picture contrast Brightness Brightens or darkens the picture Colour Increases or decreases colour intensity Hue Increases or decreases the green tones and red tones Hue can be adjusted only for the NTSC colour signal e g U S A video tapes Colour Temperature Adjusts the whiteness of the picture Cool G...

Page 27: ...rity of the sound is improved by BBE while the width depth and height of sound image are expanded by BBE s proprietary 3D sound process BBE ViVA Sound is compatible with all TV programs including news music dramas movies sports and electronic games If Auto Volume is set to On Dolby Virtual is automatically changed to Standard Reset Resets all the Sound settings to the factory settings excluding Du...

Page 28: ...quipment that supports Video A mode Video Produces suitable image quality for moving pictures Photo Produces suitable image quality for still images If the connected equipment does not support Video A mode the setting is automatically set to Video even if you select Video A Video Photo is available only for HDMI or component input source 1080p and 1080i Timer Settings Sleep Timer Sets the TV to au...

Page 29: ...ize Horizontal Shift Adjusts the horizontal position of the picture Vertical Shift Adjusts the vertical position of the picture when Screen Format is set to Smart Zoom or 14 9 Vertical Shift is not available when Display Area is set to Full Pixel Vertical Size Adjusts the vertical size of the picture when Screen Format is set to Smart Zoom or 14 9 PC Settings Screen Format Sets a screen format for...

Page 30: ...tput to the AV2 socket If you connect a recorder or other recording equipment to the AV2 socket you can record the output signal from other equipment connected to the TV TV Outputs TV broadcasts Auto Outputs whatever is being viewed on the screen except signals from the COMPONENT IN HDMI IN 1 HDMI IN 2 HDMI IN 3 and PC IN sockets HDMI IN 3 is not available in KDL 40L4000 Speaker TV Speaker Turns o...

Page 31: ...nge the connections or settings If the specific Sony equipment that is compatible with control for HDMI is connected Control for HDMI is applied to the connected equipment automatically when the Device List Update is executed on the TV HDMI Device List Displays a list of connected equipment that is compatible with control for HDMI You cannot use Control for HDMI if the TV operations are linked to ...

Page 32: ...name of your choice up to five letters or numbers to the selected channel This name appears briefly on the screen when you select the channel AFT Allows you to fine tune the selected channel manually if you feel that a slight tuning adjustment may improve picture quality You can adjust the fine tuning over a range of 15 to 15 When On is selected fine tuning adjustments are made automatically Audio...

Page 33: ...t Yes then press To change the order of the digital channels Press g then press F f or number buttons to select the new position for the channel and press G 3 Press RETURN Digital Manual Tuning Tunes the digital channels manually This feature is available when Digital Auto Tuning is set to Antenna 1 Press the number buttons to enter the channel number you want to tune then press F f 2 When the ava...

Page 34: ...N code 2 Press RETURN To change your PIN 1 Press the number buttons to enter your PIN code 2 Press the number buttons to enter a new PIN code 3 Press RETURN z PIN code 9999 is always accepted Technical Set up Auto Service Update Enables the TV to detect and store new digital services as they become available Software Download Enables the TV to automatically receive free software updates through yo...

Page 35: ... 576i 480p 480i Y 1 Vp p 75 ohms 0 3V negative sync PB CB 0 7 Vp p 75 ohms PR CR 0 7 Vp p 75 ohms COMPONENT IN Audio input phono jacks HDMI IN 1 2 3 HDMI IN 3 is not available in KDL 40L4000 Video 1080 24p 1080p 1080i 720p 576p 576i 480p 480i Audio Two channel linear PCM 32 44 1 and 48 kHz 16 20 and 24 bits Analogue audio input minijack HDMI IN 2 only PC Input see page 36 AV3 Video input phono jac...

Page 36: ... cm 112 0 74 2 11 5 cm 126 2 82 9 11 9 cm Mass Approx with Table Top Stand 23 0 kg KDL 40S40xx 40U40xx 21 5 kg KDL 40L4000 21 5 kg 29 0 kg 38 0 kg without Table Top Stand 20 0 kg KDL 40S40xx 40U40xx 18 5 kg KDL 40L4000 18 5 kg 25 0 kg 32 0 kg Supplied accessories See 1 Checking the accessories on page 4 Optional accessories SU WL500 Wall Mount Bracket SU FL300M TV stand SU WL500 Wall Mount Bracket...

Page 37: ...ouble images appear Check the aerial cable connection Check the aerial location and direction Only snow and noise appear on the screen Check if the aerial is broken or bent Check if the aerial has reached the end of its serviceable life three to five years for normal use one to two years when used at the seaside The picture is distorted dotted lines or stripes appear Keep the TV away from electric...

Page 38: ...Duration setting of On Timer Settings page 28 If no signal is received and no operation is performed in the TV mode for 10 minutes the TV automatically switches to standby mode The TV turns on automatically Check if the On Timer Settings is activated page 28 Some input sources cannot be selected Select AV Preset and cancel the Skip setting for the input source page 30 The remote does not function ...

Page 39: ...39GB Additional Information ...

Page 40: ...dijital TV işlevleri bazı ülkelerde bölgelerde kullanılmayabilir ve DVB C kablosu bazı sağlayıcıların yayınlarında doğru şekilde çalışmayabilir Uyumlu kablolu TV hizmeti sağlayıcılarınınbirlistesi için destekWeb sitesine bakınız http support sony europe com TV DVBC Ticari marka bilgisi is a registered trademark of the DVB Project BBE Sound Inc nin lisansı altında üretilmiştir Licensed by BBE Sound...

Page 41: ...lanımı 20 İsteğe Bağlı Donanımın Kullanılması İsteğe bağlı donanım bağlama 21 Bağlı donanımdan resim izleme 23 BRAVIA Sync HDMI Kontrolü kullanımı 24 Menü İşlevlerinin Kullanımı Menülerde gezinme 25 TV Ayarları menüsü 26 Ek Bilgiler Teknik Özellikler 36 Sorun Giderme 38 sadece dijital kanallar için TV cihazını kullanmadan önce lütfen okuyun Güvenlik bilgileri sayfa 9 Bu kullanma kılavuzunu ileride...

Page 42: ...r 4 KDL 52V4000 52V42xx hariç Uzaktan kumanda RM ED013 1 AA boy piller R6 tipi 2 Pillerin uzaktan kumandaya takılması 2 Sehpanın takılması KDL 52V4000 52V42xx hariç Eğer bir elektrikli tornavida kullanılırsa sıkma torkunu yaklaşık 1 5 N m 15 kgf cm olarak ayarlayın Kapağı itip kaldırarak açın ...

Page 43: ...hazı Bir Set Üstü Kutuyu kayıt cihazını örneğin DVD kayıt cihazını SCART yoluyla bağlama Bir Set Üstü Kutuyu kayıt cihazını örneğin DVD kayıt cihazını HDMI yoluyla bağlama Set Üstü Kutu kayıt cihazı örneğin DVD kayıt cihazı Set Üstü Kutu kayıt cihazı örneğin DVD kayıt cihazı ...

Page 44: ...idası 4 mm çaplı ürünle birlikte verilmez takın 2 TV cihazının vida deliğine bir makine vidası M6 12 ürünle birlikte verilmez takın 3 Ağaç vidasını ve makine vidasını dayanıklı bir telle birbirine bağlayın 5 Kabloların destelenmesi 6 Başlangıç ayarının yapılması 3 4 ...

Page 45: ...apın Eğer Hızlı Tarama kullanılarak hiçbir kanal bulunmazsa Tam Tarama seçeneğini deneyin ama biraz zaman alır Uyumlu kablolu TV hizmeti sağlayıcılarının bir listesi için destek Web sitesine bakınız http support sony europe com TV DVBC Mevcut kanalları ararken TV cihazı veya uzaktan kumanda üzerinde herhangi bir düğmeye basmayın 8 Analog kanalların sırasını değiştirmek isterseniz sayfa 32 Program ...

Page 46: ...bilir Sol ve sağ açıyı ayarlayın döner tabla TV sehpasının TV cihazından sökülmesi TV cihazının ok işaretleriyle gösterilen vidalarını çıkarın TV cihazını duvara monte etme dışındaki herhangi bir nedenle cihazı Sehpadan ayırmayın KDL 52V4000 52V42xx 46V4000 46V42xx 40V4000 40V42xx 40L4000 KDL 40S40xx 40U40xx Üstten görünüş Ön ...

Page 47: ...setini elle taşırken sağ tarafta gösterildiğigibitutunuz LCD panele baskı uygulamayın s Televizyon setini kaldırırken veya yerini değiştirirken alt kısmından sıkıca tutunuz s Televizyon setini taşırken sarsıntılara ve aşırı titreşimlere maruz bırakmayınız s Televizyon setini tamir için taşırken veya yerini değiştirirken orijinal karton ve ambalaj malzemelerini kullanarak paketleyiniz Havalandırma ...

Page 48: ...esiz yerlere suyun yağmurun nemin veya dumanın olduğu yerlerin yakınına Ortam Sıcak nemli veya aşırı tozlu yerler böceklerin girebileceği yerler mekanik titreşime maruz kalabilecek yerler yanıcı maddelerin yanı mumlar v s Televizyon setine su damlaları veya su sıçramaları gelmemelidir ve vazo gibi içi sıvı dolu eşyalar televizyonun üzerine konulmamalıdır Durum Elleriniz ıslakken cihazın kasası açı...

Page 49: ...a veya eski ve yeni pilleri karıştırarak kullanmayınız s Pilleri çevreye saygılı bir şekilde imha ediniz Belirli bölgelerde pillerin imhasıyla ilgili düzenlemeler olabilir Lütfen yerel makamlarınıza danışınız s Uzaktan kumandayı dikkatli kullanınız Düşürmeyiniz veya üzerine basmayınız yada üzerine herhangi bir sıvı dökmeyiniz s Uzaktan kumandayı bir ısı kaynağı yakınına veya direk güneş ışığına ma...

Page 50: ...şini prizden çekin 3 F f G g Ekran üstündeki imleci hareket ettirmek için F f G g düğmelerine basın İşaretlenen öğeyi seçmek onaylamak için düğmesine basın 4 MENU TV menüsünü görüntülemek için basın sayfa 25 5 RETURN Görüntülenen menünün önceki ekranına dönmek için basın TV cihazı üstündeki düğmeler uzaktan kumandanın üstündekilerle aynı şekilde çalışır TV menüsünde bu düğmeler F f G g şeklinde ça...

Page 51: ...z Kontrolü menüsünü kullanın Listedeki seçenekler giriş kaynağına bağlı olarak değişir qa Text Text bilgisi ni görüntülemek için basın sayfa 17 qs Bilgi Text gösterimi Dijital modda İzlenilmekte olan programın ayrıntılarını görüntüler Analog modda O andaki kanal numarası ve ekran formatı gibi bilgileri görüntüler Text modunda sayfa 17 Gizli bilgileri örneğin bir sınav sorularının yanıtlarını göste...

Page 52: ...a Ses Dili menüsünü sayfa 34 görüntülemek için basın wd BRAVIA Sync m N X M x TV cihazına bağlı BRAVIA Sync uyumlu donanımları çalıştırabilirsiniz SYNC MENU Bağlı HDMI donanımı menüsünü görüntüler Diğer giriş ekranlarını veya TV programlarını izlerken bu düğmeye basılınca HDMI Cihaz Seçimi görüntülenir THEATRE Theatre Modunu açabilir veya kapatabilirsiniz Theatre Modu açık olarak ayarlandığı zaman...

Page 53: ...ran Kapalı Zamanlayıcı Ekran Kapalı sayfa 28 seçildiği zaman yeşil yanar Zamanlayıcı ayarlanmışken turuncu yanar sayfa 28 2 1 Hazırda bekletme TV cihazı hazırda bekleme modundayken kırmızı yanar 3 Güç Zamanlayıcı Kayıt TV cihazı açıkken yeşil yanar Zamanlayıcıyla kayıt ayarlanmışken turuncu yanar sayfa 18 Zaman ayarlı kayıt sırasında kırmızı yanar 4 Uzaktan kumanda algılayıcısı Uzaktan kumanda cih...

Page 54: ...m Kılavuzunu EPG kullanarak dijital bir program seçmek için bakınız sayfa 18 Dijital modda Bir bilgi başlığı kısa süreyle görüntülenir Bu başlıkta aşağıdaki simgeler gösterilebilir Radyo servisi Engellenmiş Aboneli servis Birden çok dilde ses kullanılabilir Altyazı kullanılabilir İşitme engelliler için altyazı kullanılabilir İzlenen program için tavsiye edilen yaş sınırı 4 ila 18 yaş Ebeveyn Kilid...

Page 55: ...f düğmelerine basın Akıllı seçeneğinde görüntünün üstünde ve altında bazı karakterler ve veya harfler gözükmeyebilir Bu durumda Ekran Ayarları menüsünde Dikey Ebat ayarı yapın sayfa 29 HD sinyal kaynağı görüntüleri için 4 3 veya 14 9 seçimi yapamazsınız z Otomatik Format sayfa 29 Açık olarak ayarlandığı zaman TV cihazı yayına en uygun modu otomatik olarak seçer Eğer 720p 1080i veya 1080p kaynaklı ...

Page 56: ... bir program belirleyin Kayıt Zamanlayıcı 1 Kaydetmek istediğiniz programı seçmek için F f G g düğmelerine sonra düğmesine basın 2 F f düğmelerine basarak Kayıt Zamanlayıcı seçimini yapın 3 TV cihazı ve kayıt cihazı üstündeki zamanlayıcıları ayarlamak için düğmesine basın Bu program bilgisinin yanında bir c simgesi kırmızı görünür TV cihazı ön panelindeki göstergesi turuncu yanar z Kaydetmek isted...

Page 57: ...1 düğmesine basın 2 F f düğmelerine basarak Manuel kayıt zamanlayıcı seçimini yapın sonra düğmesine basın 3 F f düğmelerine basarak tarihi seçin sonra g düğmesine basın 4 Başlama ve durma zamanını adım 3 te olduğu gibi ayarlayın 5 F f düğmelerine basarak programı seçin sonra düğmesine basın 6 TV cihazı ve kayıt cihazı üstündeki zamanlayıcıları ayarlamak için düğmesine basın TV cihazı ön panelindek...

Page 58: ... seçin sonra düğmesine basın Favoriler listesine kaydettiğiniz kanalların yanında bir simgesi gözükür Bir kanal izleyin 1 Bir Favori listesi seçmek için sarı düğmeye basın 2 F f düğmelerine basarak bir kanal seçin sonra düğmesine basın Bir Favoriler listesine kanallar eklemek veya çıkarmak 1 Mavi düğmeye basın 2 Düzenlenecek Favoriler listesini seçmek için sarı düğmeye basın 3 F f düğmelerine basa...

Page 59: ...V1 Bir dekoder bağladığınız zaman TV kanal ayarlayıcısı tuner şifreli sinyalleri dekodere iletir ve dekoder sinyallerin şifresini çözerek dışarı verir 2 AV2 AV2 SmartLink TV ve bir kayıt cihazı örneğin DVD kayıt cihazı arasında doğrudan bir bağlantı sağlar 3 COMPONENT IN Component Component video soketleri sadece aşağıdaki video girişlerini destekler 480i 480p 576i 576p 720p 1080i ve 1080p Sadece ...

Page 60: ...UDIO PCM OUT OPTICAL soketine de bağlamayı unutmayın 9 HDMI IN 3 KDL 40L4000 hariç HDMI 3 5 PC IN PC Konektör D sub 15 ref 1 793 504 11 Sony Servis Merkezinde temin edilir veya başka bir eşdeğeri gibi ferritli bir PC kablosu kullanılması tavsiye edilir 6 DIGITAL AUDIO PCM OUT OPTICAL KDL 40S40xx 40U40xx 40L4000 hariç Bir optik ses kablosu kullanın 7 TV sesini bağlı Hi Fi ses donanımından dinleyebi...

Page 61: ...n kullanılamaz Görüntülerin boyutlarını değiştiremezsiniz Harici giriş görüntü alanında AV1 AV2 veya AV3 görüntülenirken TV programı görüntü alanında analog TV videosu gözükmez Ancak analog videonun sesini duyabilirsiniz 1 TOOLS düğmesine basın 2 F f düğmelerine basarak PAP seçimini yapın sonra düğmesine basın Bağlı donanımdan gelen görüntü solda ve TV programı sağda görüntülenir 3 TV kanalını seç...

Page 62: ...un uzaktan kumandayla aşağıdaki düğmelere basarak işletebilirsiniz N x X m M bağlı donanımı doğrudan işletir SYNC MENU bağlı HDMI donanımının menüsünü ekranda gösterir Menüyü görüntüledikten sonra menu ekranını F f G g ve düğmelerini kullanarak işletebilirsiniz TOOLS düğmesi Cihaz Kontrolü n ü ekrana getirir sonra donanımı işletmek için Menü Seçenekler ve İçerik Listesi içindeki seçenekler kullanı...

Page 63: ...G Dijital Elektronik Program Kılavuzunu EPG görüntüler sayfa 18 5 Dış Girişler TV cihazına bağlı donanımın listesini görüntüler Harici bir girişten görüntüler izlemek için giriş kaynağını seçin sonra düğmesine basın HDMI kontrolü uyumlu donanımı seçmek için HDMI Cihaz Seçimi öğesini seçin 6 Ayarlar Gelişmiş ayarların çoğunun yapıldığı Ayarlar menüsünü görüntüler 1 F f düğmelerine basarak bir menü ...

Page 64: ...rka Işık Arka ışığın parlaklığını ayarlar Kontrast Görüntü kontrastını arttırır veya azaltır Parlaklık Görüntüyü parlaklaştırır veya sönükleştirir Renk Renk yoğunluğunu arttırır veya azaltır Ton Yeşil tonlarını ve kırmızı tonlarını arttırır veya azaltır Ton sadece NTSC renk sinyali örneğin ABD video bantları için ayarlanabilir Renklerin sıcaklığı Görüntünün beyazlığını ayarlar Soğuk Beyaz renklere...

Page 65: ...liği BBE nin tescilli 3D ses işlemiyle arttırılırken BBE tarafından sesin netliği iyileştirilir BBE ViVA Sound haber müzik tiyatro film spor ve elektronik oyunlar dahil tüm TV programlarıyla uyumludur Eğer Otomatik ses ayarı Açık durumundaysa Dolby Virtual otomatik olarak değiştirilip Standart seçeneğine ayarlanır Fabrika Ayarlarına Dön Çift ses dışında tüm Ses ayarlarını fabrika ayarlarına döndür...

Page 66: ...uygun görüntü kalitesi üretir Fotoğraf Hareketsiz görüntüler için uygun görüntü kalitesi üretir Eğer bağlı donanım Video A modunu desteklemiyorsa Video A seçilse bile bu ayar otomatik olarak Video seçeneğine ayarlanır Video Fotoğraf sadece HDMI veya component giriş kaynağı 1080p ve 1080i için kullanılabilir Zamanlayıcı Ayarları Oto Kapanma TV cihazını belli bir süre sonunda otomatik olarak hazırda...

Page 67: ...avsiye edilen boyutlarında görüntüler Yatay Geçiş Görüntünün yatay konumunu ayarlar Dikey Geçiş Ekran Formatı için Akıllı Zoom veya 14 9 seçildiği zaman resmin dikey konumunu ayarlar Görüntü Alanı ayarı Tam Piksel olarak ayarlandığı zaman Dikey Geçiş kullanılamaz Dikey Ebat Ekran Formatı için Akıllı Zoom veya 14 9 seçildiği zaman görüntünün dikey boyutunu ayarlar PC Ayarı Ekran Formatı PC nizden r...

Page 68: ...ne bağlı donanımdan alınan video doğru şekilde görüntülenmezse bağlı donanımın sinyalini Kompozit S Video veya RGB seçeneğine ayarlayın AV2 Çıkışı AV2 soketine bir sinyal verilmesini ayarlar AV2 soketine bir kayıt cihazı veya başka kayıt donanımı bağlarsanız TV cihazına bağlı diğer donanımlardan alınan sinyalleri kaydedebilirsiniz TV TV yayınlarını harici donanıma verir Otomatik Ekranda izleneni h...

Page 69: ... olan herhangi bir HDMI kontrolü uyumlu donanım açıldığı zaman TV cihazı da açılır Cihaz Listesi Güncelleme HDMI Cihaz Listesi oluşturur veya günceller En çok 11 uyumlu donanım bağlanabilir ve tek bir sokete en çok 5 donanım bağlanabilir Bağlantılarını veya ayarları değiştirdiğiniz zaman mutlaka HDMI Cihaz Listesi güncellemesi yapın Eğer HDMI kontrolü uyumlu belli bir Sony donanımı bağlanırsa TV c...

Page 70: ...f düğmelerine basarak Kanal seçimini yapın sonra düğmesine basın 4 F f düğmelerine basarak S kablo kanalları için veya C karasal kanallar için seçimini yapın sonra g düğmesine basın 5 Kanalları aşağıdaki gibi ayarlayın Eğer kanal numarasını frekansı bilmiyorsanız Bir sonraki kullanılabilir kanalı aramak için F f düğmelerine basın Bir kanal bulunduğu zaman arama durur Aramaya devam etmek için F f d...

Page 71: ...e herhangi bir iyileşme göremiyorsanız bu seçeneği Kapalı fabrika ayarı olarak ayarlayın Atla Kanalları seçmek için PROG düğmesine bastığınız zaman kullanılmayan analog kanalları atlar Atlanacak şekilde programlamış olduğunuz kanalları seçmek için bunlara karşılık gelen sayı düğmelerini kullanın Dekoder Doğrudan skart konektörüne AV1 veya bir kayıt cihazı üzerinden AV2 soketine bağlı bir dekoder k...

Page 72: ...llar bulunduğu zaman F f düğmelerine basarak saklamak istediğiniz kanalı seçin sonra düğmesine basın 3 F f düğmesine basarak yeni kanalı saklamak istediğiniz kanal numarasını seçin sonra düğmesine basın Diğer kanalları ayarlamak için yukarıdaki prosedürü tekrar edin Dijital kurulum Altyazı Ayarları Altyazı ayarları İşitme güçlüğü seçeneği ayarlandığı zaman işitme engelliler için altyazılarla birli...

Page 73: ...ın z 9999 PIN kodu her zaman kabul edilir Teknik Ayarları Oto Servis Güncelle Kullanılabilir olduklarındaTV cihazının yeni dijital servisleri saptayıp saklayabilmesini sağlar Yazılım İndirme Mevcut anteniniz kablonuz aracılığıyla TV cihazının yazılım güncellemelerini yayınlandıkları zaman otomatik olarak alabilmesini sağlar Bu ayarı her zaman Açık olarak bırakmanızı tavsiye ederiz Sistem Bilgisi G...

Page 74: ...76i 480p 480i Y 1 Vp p 75 ohm 0 3V negatif sync PB CB 0 7 Vp p 75 ohm PR CR 0 7 Vp p 75 ohm COMPONENT IN Audio girişi fono jaklar HDMI IN 1 2 3 HDMI IN 3 KDL 40L4000 modelinde kullanılamaz Video 1080 24p 1080p 1080i 720p 576p 576i 480p 480i Audio İki kanal doğrusal PCM 32 44 1 ve 48 kHz 16 20 ve 24 bit Analog audio girişi minijak sadece HDMI IN 2 PC Girişi bakınız sayfa 37 AV3 Video girişi fono ja...

Page 75: ...cm KDL 40S40xx 40U40xx 99 5 65 1 11 1 cm KDL 40L4000 98 6 64 6 11 0 cm 112 0 74 2 11 5 cm 126 2 82 9 11 9 cm Ağırlık Yaklaşık Masa Üstü Sehpası ile 23 0 kg KDL 40S40xx 40U40xx 21 5 kg KDL 40L4000 21 5 kg 29 0 kg 38 0 kg Masa Üstü Sehpası hariç 20 0 kg KDL 40S40xx 40U40xx 18 5 kg KDL 40L4000 18 5 kg 25 0 kg 32 0 kg Verilen aksesuarlar Bakınız 1 Aksesuarların kontrolü sayfa 4 İsteğe Bağlı aksesuarla...

Page 76: ...trol edin Gölgelenme oluşuyor veya çift görüntü gözüküyor Anten kablo bağlantısını kontrol edin Anten konumunu ve yönünü kontrol edin Ekranda sadece karlanma ve parazit görüntüleniyor Antenin kırık veya eğilmiş olup olmadığın kontrol edin Antenin kullanım ömrünün normal kullanımda üç ila beş yıl deniz kenarında kullanıldığında ise bir ila iki yıl dolup dolmadığını kontrol edin Bozuk görüntü noktal...

Page 77: ...amanlayıcılı Açılma Ayarları işlevinin Süre ayarını sayfa 28 kontrol edin Eğer 10 dakika boyunca hiç sinyal alınmazsa ve TV modunda herhangi bir işlem yapılmazsa TV cihazı otomatik olarak hazırda bekleme moduna geçer TV cihazı otomatik olarak açılıyor Zamanlayıcılı Açılma Ayarları işlevinin etkin olup olmadığını sayfa 28 kontrol edin Bazı giriş kaynakları seçilemiyor AV hafızası ayarını seçin ve g...

Page 78: ...İŞEHİR GÖRGÜN ELEKTRONİK 222 2265626 ELAZIĞ MİKROSEK ELEKTRONİK 424 2366348 ERZURUM ELEKTRONAL TİC 442 2130528 GİRESUN ÖZEN ELEKTRONİK 454 2168161 HATAY ZEKİ ELEKTRONİK 326 2210597 İÇEL SEDAFON ELK S T LTD ŞTİ 324 3227655 İSTANBUL Moda SENTEZ ELK S T LTD ŞTİ 216 4145250 İSTANBUL Göztepe İTEM LTD ŞTİ 216 5664888 İSTANBUL Üsküdar BURCU ELEKTRONİK 216 5536929 İSTANBUL Şişli VEBE ELK SN TC LT ŞTİ 212 ...

Page 79: ......

Page 80: ......

Page 81: ......

Page 82: ......

Page 83: ......

Page 84: ...Printed in Spain 3 298 969 61 1 For useful information about Sony products Sony ürünleri için faydali bilgiler ...

Reviews: