background image

10

GB

Using the Remote Control

You can operate the TV by using the supplied 
Touchpad Remote Control or IR (infrared) 
Remote Control.

Note

• Touchpad Remote Control can only be used after 

registration with the TV. You can register the 
Touchpad Remote Control by pressing 

HOME

, then 

select  

[Settings] 

t


 [System Settings] 

t


[Touchpad Remote Control Setup].

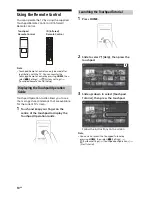
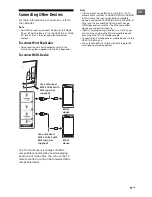
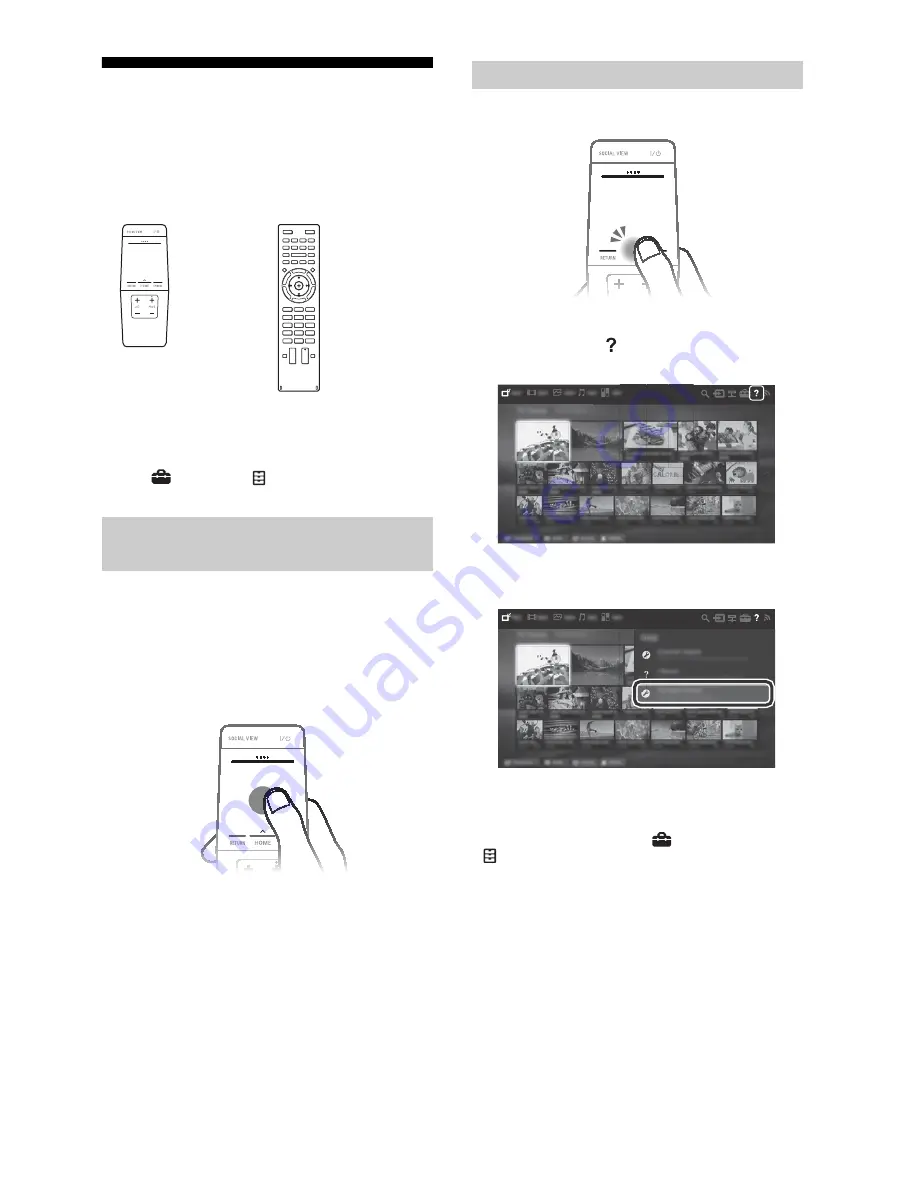
Touchpad Operation Guide allows you to see 
the main gesture commands that are available 
for the current TV screen. 

1

Touch and keep your finger on the 
centre of the touchpad to display the 
Touchpad Operation Guide.

1

Press 

HOME

.

2

Slide to select 


[Help], then press the 

touchpad.

3

Slide up/down to select [Touchpad 
Tutorial], then press the touchpad.

Follow the instructions on the screen. 

Note

• You can also launch the Touchpad Tutorial by 

pressing 

HOME

, then select 

 [Settings] 

t


 [System Settings] 

t

 [Touchpad configurations] 

t


[Start Tutorial].

Displaying the Touchpad Operation 
Guide

Touchpad 
Remote Control

IR (infrared)
Remote Control

Launching the Touchpad Tutorial

Summary of Contents for BRAVIA 55X9005B

Page 1: ...renzleitfaden DE Guia de referência PT Guida di riferimento IT Referensguide SE Referencevejledning DK Viiteopas FI Referanseveiledning NO Instrukcja PL Referenční příručka CZ Referenčná príručka SK Referencia útmutató HU Ghid de referinţă RO Справочно ръководство BG Οδηγός αναφοράς GR Başvuru Kılavuzu TR Справочное руководство RU Довідник UA ...

Page 2: ...n of the identification label Labels for the Model No Production Date month year and Power Supply rating in accordance with applicable safety regulation are located on the rear of the TV or package WARNING TO PREVENT THE SPREAD OF FIRE KEEP CANDLES OR OTHER OPEN FLAMES AWAY FROM THIS PRODUCT AT ALL TIMES NOTICE FOR CUSTOMERS IN THE UNITED KINGDOM A moulded plug complying with BS1363 is fitted to t...

Page 3: ...nal injury or damage to the TV Only qualified service personnel should carry out wall installations For safety reasons it is strongly recommended that you use Sony accessories including Wall Mount Bracket SU WL450 KD 65X9505B KD 65 55X9005B Be sure to use the screws supplied with the Wall Mount Bracket when attaching the Wall Mount Bracket to the TV set The supplied screws are designed as indicate...

Page 4: ...xposed or broken Do not modify the mains lead Do not put anything heavy on the mains lead Do not pull on the mains lead itself when disconnecting the mains lead Do not connect too many appliances to the same mains socket Do not use a poor fitting mains socket Prohibited Usage Do not install use the TV set in locations environments or situations such as those listed below or the TV set may malfunct...

Page 5: ...a high temperature e g in direct sunlight or in sun heated cars When using the simulated 3D function please note that the displayed image is modified from the original due to the conversion done by this television View the TV in moderate light as viewing the TV in poor light or during long period of time strains your eyes When using headphones adjust the volume so as to avoid excessive levels as h...

Page 6: ...ces For more detailed information about recycling of this product please contact your local Civic Office your household waste disposal service or the shop where you purchased the product Disposal of waste batteries applicable in the European Union and other European countries with separate collection systems This symbol on the battery or on the packaging indicates that the battery provided with th...

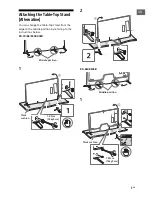
Page 7: ...ive You can change the Table Top Stand from the edge to the middle position by referring to the instructions below KD 79 65 55X9005B 1 2 KD 65X9505B 1 Middle position Thick cushion 1 5 N m 15 kgf cm Middle position Thick cushion 1 5 N m 15 kgf cm ...

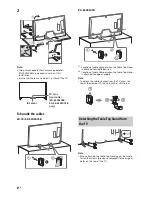
Page 8: ...is attached to middle position 2 Location of cable clamper when the Table Top Stand is attached to edge or middle Note To detach the cable clamper from the TV press the top of the clamper 1 then pinch 2 as illustrated Note When attaching the Table Top Stand again be sure to fasten the screws previously removed to the original holes on the rear of the TV IR Sensor 3D Sync Transmitter KD 65X9505B KD...

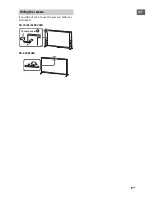
Page 9: ...9GB GB If you do not wish to use the camera hide it as illustrated KD 79 65 55X9005B KD 65X9505B Hiding the camera Camera cover K ...

Page 10: ...esture commands that are available for the current TV screen 1 Touch and keep your finger on the centre of the touchpad to display the Touchpad Operation Guide 1 Press HOME 2 Slide to select Help then press the touchpad 3 Slide up down to select Touchpad Tutorial then press the touchpad Follow the instructions on the screen Note You can also launch the Touchpad Tutorial by pressing HOME then selec...

Page 11: ...mpatible device Note If Auto Input Change MHL is set to On the TV automatically switches to HDMI IN 2 MHL or HDMI IN 4 MHL from other input when MHL compatible device is connected to HDMI IN 2 MHL or HDMI IN 4 MHL jack The availability of Auto Input Change MHL depends on whether the MHL compatible device can support this feature If MHL Charging during Standby is set to On you can continue charging...

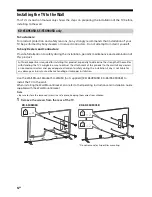
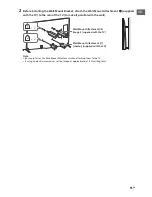
Page 12: ...TV to the wall When installing the Wall Mount Bracket also refer to the Operating Instructions and Installation Guide supplied with the Wall Mount Bracket Note Be sure to store the removed screws in a safe place keeping them away from children 1 Remove the screws from the rear of the TV KD 65X9505B 65 55X9005B only Sufficient expertise is required for installing this product especially to determin...

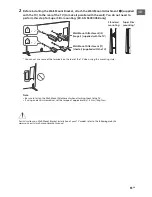
Page 13: ...f the TV when using this mounting style Note Be sure to fasten the Wall Mount Attachment when attaching them to the TV If using an electric screwdriver set the torque at approximately 1 5 N m 15 kgf cm For instructions on Wall Mount Bracket installation of your TV model refer to the following website www sony eu tv wall mount bracket manual 2 1 2 2 Wall Mount Attachment I2 longer supplied with the...

Page 14: ...ls Do not attempt to install it yourself Follow the instructions provided with the Wall Mount Bracket for your model Sufficient expertise is required in installing this TV especially to determine the strength of the wall for withstanding the TV s weight The length of the screw for Wall Mount Bracket differs depending on the Wall Mount Bracket thickness Please see below illustration Be sure to stor...

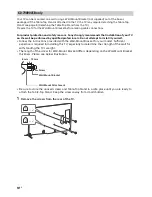
Page 15: ...of the TV to make it parallel with the wall Note Be sure to fasten the Wall Mount Attachment when attaching them to the TV If using an electric screwdriver set the torque at approximately 1 5 N m 15 kgf cm 2 1 2 2 Wall Mount Attachment I2 longer supplied with the TV Wall Mount Attachment I1 shorter supplied with the TV ...

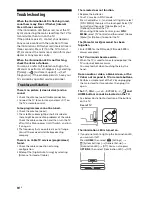
Page 16: ... frequency that you entered is out of range Consult the received satellite broadcasting company There is no Cable TV services programmes found Check the cable connection or tuning configuration Attempt the Digital Auto Tuning by selecting Antenna instead of Cable The remote does not function Replace the batteries Your TV may be in SYNC mode Press Control Bar and slide left right to select SYNC MEN...

Page 17: ...e Analogue UHF VHF Cable Depending on your country area selection Digital UHF VHF Cable Depending on your country area selection Satellite IF Frequency 950 2150 MHz Sound output 10 W 10 W 10 W KD 65X9505B 12 5 W 12 5 W 20 W 20 W KD 79 65 55X9005B Wireless technology Protocol IEEE802 11a b g n Input Output jacks Antenna aerial cable 75 ohm external terminal for VHF UHF Satellite antenna MAIN SUB Fe...

Page 18: ... Two channel linear PCM Dolby Digital AUDIO OUT Audio output stereo mini jack Headphone jack supports Subwoofer out 1 2 HDD REC 3 USB HDD device port 2 only USB port CAM Conditional Access Module slot LAN 10BASE T 100BASE TX connector Depending on the operating environment of the network connection speed may differ 10BASE T 100BASE TX communication rate and communication quality are not guaranteed...

Page 19: ...sary internal processes Note Optional accessories availability depends on countries region TV model stock Design and specifications are subject to change without notice Power consumption will increase when Port Replicator connected to the TV This TV set incorporates MHL 2 for HDMI IN 4 MHL and MHL 3 for HDMI IN 2 MHL Notes on Digital TV function Any functions related to Digital TV will only work i...

Page 20: ...Mobile High Definition Link and the MHL Logo are trademarks or registered trademarks of MHL Licensing LLC For DTS patents see http patents dts com Manufactured under license from DTS Licensing Limited DTS the Symbol DTS and the Symbol together are registered trademarks and DTS Digital Surround is a trademark of DTS Inc DTS Inc All Rights Reserved Designed with UEI TechnologyTM Under License from U...

Reviews: