background image

2

GB

D:\_SONY TV\SY160176_QF.QH PA RG (S5)\4584911151\010COVTOC.fm

masterpage: Left

KD-85X8500D / 75X9400D / 75X8500D / 65X9300D / 65X8500D / 55X9300D / 55X8500D / FW-65X8501D /

55X8501D

4-584-911-

15

(1)

Table of Contents

Safety information  . . . . . . . . . . . . . . . . . . . . . 2
Precautions . . . . . . . . . . . . . . . . . . . . . . . . . . . 7

Parts and Controls . . . . . . . . . . . . . . . . . . . 9

Controls and Indicators  . . . . . . . . . . . . . . . . . 9

Using Remote Control . . . . . . . . . . . . . . . 10

Remote Control Parts Description . . . . . . . . 10

Connection Diagram  . . . . . . . . . . . . . . . .  12

Installing the TV to the Wall  . . . . . . . . . .  15

Using the supplied Wall-Mount Bracket 
(KD-75X9400D, KD-65/55X9300D only) . . . 15
Using the optional Wall-Mount Bracket . . . 16
SU-WL500 (KD-85/75X8500D, 
KD-75X9400D only). . . . . . . . . . . . . . . . . . . . 18
SU-WL450 (KD-65/55X9300D, 
KD-65/55X8500D, FW-65/55X8501D 
only) . . . . . . . . . . . . . . . . . . . . . . . . . . . . . . . . 22

Troubleshooting . . . . . . . . . . . . . . . . . . . . 26

Troubles and Solutions  . . . . . . . . . . . . . . . . 26

Specifications . . . . . . . . . . . . . . . . . . . . . . 27

Introduction

Thank you for choosing this Sony product.
Before operating the TV, please read this manual thoroughly and 
retain it for future reference.

Note

• Before operating the TV, please read the “Safety information” 

(page 2).

• Instructions about “Installing the TV to the Wall” are included 

within this TV’s instruction manual.

• Images and illustrations used in the Setup Guide and this 

manual are for reference only and may differ from the actual 
product.

Location of the Setup Guide

Setup Guide is placed on top of the cushion inside the TV carton.

Help Guide

Help Guide explains the information on how to use the TV's 
features. To display Help Guide on the TV, press 

HELP

 on the 

remote control and select [Help Guide].

Location of the identification label

Labels for the TV Model No. and Power Supply rating are located 
on the rear of the TV.

For models with supplied AC adapter:
Labels for the AC adapter Model No. and Serial No. are located
on the bottom of the AC adapter.

Notice for customers in Thailand 

This telecommunication equipment conforms to NTC technical 
requirement.

Notes for Australia and New Zealand model

This product is ENERGY RATING qualified in the default mode. 
ENERGY RATING is a programme designed to promote energy 
efficient products and practices.
• When the TV is initially set up, it is designed to meet ENERGY 

RATING requirements while maintaining optimum picture 
quality.

• Changes to certain features, settings and functionalities of this 

TV (e.g. TV Guide, Picture/Sound, Eco setting) can slightly 
change the power consumption.

Depending upon such changed settings (e.g. Shop mode), the 
power consumption may vary which possibly could exceed the 
stated energy rating. 
To reset the TV to ENERGY RATING qualified settings, complete 
the initial set-up procedure in [Settings] 

t

 [Storage & reset] 

t


[Factory data reset]. 
After factory data reset, downloaded application data will be 
deleted. Please download them again.

WARNING

Batteries must not be exposed to excessive heat such as 
sunshine, fire or the like.
Never place a television set in an unstable location. A television 
set may fall, causing serious personal injury or death. Many 
injuries, particularly to children, can be avoided by taking simple 
precautions such as:

Using cabinets or stands recommended by the manufacturer of 
the television set.

Only using furniture that can safely support the television set.

Ensuring the television set is not overhanging the edge of the 
supporting furniture.

Not placing the television set on tall furniture (for example, 
cupboards or bookcases) without anchoring both the furniture 
and the television set to a suitable support.

Not placing the television set on cloth or other materials that 
may be located between the television set and supporting 
furniture.

Educating children about the dangers of climbing on furniture 
to reach the television set or its controls.

If your existing television set is being retained and relocated, the 
same considerations as above should be applied.

Safety information

Summary of Contents for BRAVIA FW-55X8501D

Page 1: ...0D 55X9300D KD 55X8500D FW 65X8501D 55X8501D D _SONY TV SY160176_QF QH PA RG S5 4584911151 010COV fm masterpage Cover KD 85X8500D 75X9400D 75X8500D 65X9300D 65X8500D 55X9300D 55X8500D FW 65X8501D 55X8501D 4 584 911 15 1 Television Reference Guide ...

Page 2: ...chnical requirement Notes for Australia and New Zealand model This product is ENERGY RATING qualified in the default mode ENERGY RATING is a programme designed to promote energy efficient products and practices When the TV is initially set up it is designed to meet ENERGY RATING requirements while maintaining optimum picture quality Changes to certain features settings and functionalities of this ...

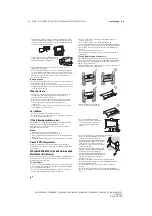
Page 3: ... the Wall Mount Bracket to the TV set The supplied screws are designed as indicated by illustration when measured from the attaching surface of the Wall Mount Bracket The diameter and length of the screws differ depending on the Wall Mount Bracket model Use of screws other than those supplied may result in internal damage to the TV set or cause it to fall etc Supplied Wall Mount Bracket KD 75X9400...

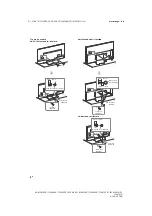
Page 4: ...1D 55X8501D 4 584 911 15 1 Topple prevention KD 85 75 65X8500D FW 65X8501D KD 75X9400D KD 65 55X9300D KD 55X8500D FW 55X8501D 8 mm 12 mm Screw previously removed Screw not supplied Cord not supplied 8 mm 12 mm M6 eye bolt not supplied Screw not supplied Cord not supplied 18 mm or more 8 mm 12 mm M6 screw not supplied Screw not supplied Cord not supplied ...

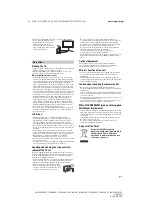
Page 5: ... same AC power outlet mains socket Do not use a poor fitting AC power outlet mains socket NOTE ON AC ADAPTER models with supplied AC adapter only Warning To reduce the risk of fire or electric shock do not expose this apparatus to rain or moisture To prevent fire or shock hazard do not place objects filled with liquids such as vases on the apparatus Do not install this equipment in a confined spac...

Page 6: ... panel surrounds become warm You may feel hot when touching there by the hand WALL MOUNTBRACKET models withsupplied Wall Mount Bracket only Below information shows the correct handling of the Wall Mount Bracket Be sure to read this information thoroughly and use the Wall Mount Bracket correctly To Customers Be sure to observe the following precautions for safety to prevent a serious injury through...

Page 7: ...rystal Follow your local ordinances and regulations for disposal Handling and cleaning the screen surface cabinet of the TV set Be sure to unplug the AC power cord mains lead connected to the TV set from AC power outlet mains socket before cleaning To avoid material degradation or screen coating degradation observe the following precautions To remove dust from the screen surface cabinet wipe gentl...

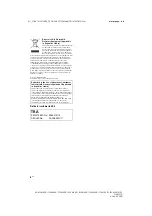
Page 8: ... of e waste The recycling of materials will help to conserve natural resources For more detailed information about recycling of this product please contact your local civic office your household waste disposal service provider or the store where you made the purchase You may contact our company s toll free number in India for assistance Toll Free 1800 103 7799 Visit www sony co in for product recy...

Page 9: ...llumination LED lights up or blinks according to the status of the TV White When turning on the TV picture off mode software update etc Cyan When connecting with a mobile device wirelessly Pink 2 Recording mode Amber Timer is set Power CH Channel Volume Input select Display and select the input source TV Switch to a TV channel or input from other applications 1 Do not place anything near the senso...

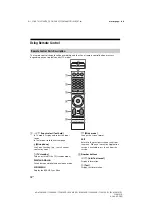
Page 10: ...nd select the input source In Text mode Hold the current page Microphone Use Voice Function e g Search various content by voice TV standby Turn on or turn off the TV standby mode DIGITAL ANALOG Switch between digital and analogue mode SYNC MENU Display the BRAVIA Sync Menu Wide mode Change the screen format EXIT Return to the previous screen or exit from the menu When an Interactive Application se...

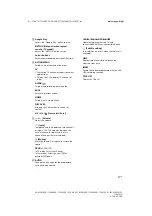
Page 11: ...n HOME Display the TV Home Menu DISCOVER Bring up the Content Bar to search for content Item select Enter Volume Adjust the volume Jump Jump back and forth between two channels or inputs The TV alternates between the current channel or input and the last channel or input that was selected Muting Mute the sound Press again to restore the sound PROG In TV mode Select the channel In Text mode Select ...

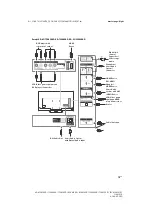
Page 12: ...uide page 2 KD 85 75X8500D KD 75X9400D KD 65 55X9300D only 4 1 1 1 1 3 2 Headphone Home Audio System Subwoofer Digital still camera Camcorder USB storage media DVI HDMI Adapter HDMI Device Home Audio System with ARC HDMI Device Cable Antenna Home Audio System with Optical Audio Input VCR Video game equipment DVD player Camcorder VCR Video game equipment DVD player Camcorder DVD player with compone...

Page 13: ... 55X9300D AUDIO L R VIDEO 1 4 2 3 1 1 1 Headphone Home Audio System Subwoofer Digital still camera Camcorder USB storage media DVI HDMI Adapter HDMI Device Home Audio System with ARC HDMI Device Cable Antenna Home Audio System with Optical Audio Input DVI Audio Out VCR Video game equipment DVD player Camcorder HDMI Device VCR Video game equipment DVD player Camcorder DVD player with component outp...

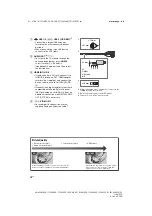
Page 14: ... audio out jack to HDMI 3 AUDIO IN If connecting a digital audio system that is compatible with Audio Return Channel ARC technology use HDMI IN 4 If not an additional connection with DIGITAL AUDIO OUT OPTICAL is necessary VIDEO IN 1 For a composite connection use the supplied Analogue Extension Cable 5 1 2 3 4 When connecting mono equipment connect to the L MONO audio jack socket 5 Only on limited...

Page 15: ...uctions on Wall Mount Bracket installation of your TV model refer to the supplied Wall Mount Bracket Installation Guide Using the supplied Wall Mount Bracket KD 75X9400D KD 65 55X9300D only To Customers Sufficient expertise is required for installing this product Be sure to subcontract the installation to Sony dealers or licensed contractors and pay special attention to safety during the installat...

Page 16: ...SU WL450 not supplied KD 65 55X9300D KD 65 55X8500D FW 65 55X8501D to install the TV to the wall When installing the Wall Mount Bracket also refer to the Operating Instructions and Installation Guide supplied with the Wall Mount Bracket Note Be sure to store the removed screws in a safe place keeping them away from children KD 75X9400D KD 65 55X9300D only 1 Remove the stand cover and terminal cove...

Page 17: ...lectric screwdriver set the torque at approximately 1 5 N m 15 kgf cm Be sure to fasten the Wall Mount Attachment when attaching them to the TV Use only a flat head screwdriver to install the Wall Mount Attachment Use of another tool might result in over torqueing the Wall Mount Attachment and damaging the TV Except KD 75X9400D KD 65 55X9300D 1 Remove the stand cover KD 85 75X8500D only 2 Detach t...

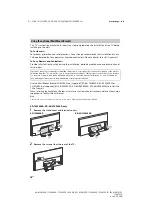
Page 18: ...00D 75X8500D 65X9300D 65X8500D 55X9300D 55X8500D FW 65X8501D 55X8501D 4 584 911 15 1 3 Remove the screws from the rear of the TV 1 Remove the screws SU WL500 KD 85 75X8500D KD 75X9400D only 2 1 2 2 KD 85 65X8500D FW 65X8501D 2 2 KD 75X8500D 2 1 KD 55X8500D FW 55X8501D KD 85 75X8500D KD 75X9400D ...

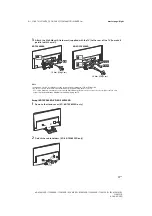
Page 19: ...911 15 1 2 Attach the Mounting Hook using the four screws supplied with the Wall Mount Bracket Note If using an electric screwdriver set the torque at approximately 1 5 N m 15 kgf cm Be sure to store the unused parts in a safe place for future use Retain this manual for future reference Mounting Hook Screw PSW 6 16 KD 85 75X8500D Mounting Hook Screw PSW 6 16 KD 75X9400D ...

Page 20: ...he TV to the wall See page 27 29 Specifications for the TV s weight Unit mm Bracket positioning is below the screen centre point Note Only applicable for 0 for this TV model Figures in the table may differ slightly depending on the installation 4 Connect necessary cables to the TV Note You cannot access to any terminal after installing the TV to the wall Model Name KD Display dimensions Screen cen...

Page 21: ...e screws may have already been removed in step 1 and you can directly detach the Table Top Stand 6 Install the TV on the wall Refer to the instructions supplied with the Wall Mount Bracket for your model to install the TV on the wall Model Name KD Screw location Hook location 85X8500D 75X8500D d g a 75X9400D e j a KD 75X9400D only Hook location When installing the TV onto the Base Bracket Screw lo...

Page 22: ...7 29 Specifications for the TV s weight Unit mm Note Figures in the table may differ slightly depending on the installation When your TV is installed on the wall the upper side of the TV slightly leans forward SU WL450 KD 65 55X9300D KD 65 55X8500D FW 65 55X8501D only Model Name KD FW Display dimensions Screen centre dimension Length for mounting Standard mounting Slim mounting 65X9300D 1 458 839 ...

Page 23: ...chment parts by referring to 1 of the Wall Mount Bracket Installation Guide Note If using an electric screwdriver set the torque at approximately 1 5 N m 15 kgf cm Be sure to store the unused parts in a safe place for future use Retain this manual for future reference Standard mounting KD 65 55X9300D KD 65 55X8500D FW 65 55X8501D Screw PSW 6 x 20 Pulley Screw PSW 6 x 50 Belt Spacer 60 mm Screw PSW...

Page 24: ...ote You cannot use some of the terminals on the rear of the TV when using this mounting style Connect the Analogue Extension Cable Availability depends on countries regions TV models if you need to use the VIDEO IN 1 jack KD 65 55X9300D KD 65 55X8500D FW 65 55X8501D KD 65 55X8500D FW 65 55X8501D KD 65 55X9300D Screw PSW 6 x 20 Pulley Belt Spacer 20 mm Screw PSW 6 x 20 Pulley Belt Spacer 20 mm ...

Page 25: ...ng the TV to the wall 4 Detach the Table Top Stand from the TV KD 65 55X9300D KD 65 55X8500D FW 65 55X8501D 5 Install the TV to the Base Refer to 5 of Installation Guide and Installing the TV to the Wall of Operating Instructions supplied with the Wall Mount Bracket Refer to the instructions supplied with the Wall Mount Bracket for your model to install the TV on the wall Model Name KD FW Hook loc...

Page 26: ...count how many times it flashes interval time is three seconds If the illumination LED flashes red reset the TV by disconnecting the AC power cord mains lead for two minutes then turn on the TV If the problem persists contact your dealer or Sony service centre with the number of times the illumination LED flashes red interval time is three seconds Disconnect the AC power cord mains lead and inform...

Page 27: ...t TV system Depend on your country area selection Analogue B G I D K M Digital DVB T DVB T2 Colour system PAL SECAM NTSC3 58 NTSC4 43 Channel coverage Depend on your country area selection Analogue UHF VHF Cable Digital UHF VHF Sound output KD 85 65 55X8500D FW 65 55X8501D 10 W 10 W KD 75X9400D KD 75X8500D KD 65 55X9300D 7 5 W 7 5 W 7 5 W 7 5 W Wireless technology Protocol IEEE802 11ac a b g n IEE...

Page 28: ...X8500D KD 75X9400D only Wall Mount Bracket SU WL450 Except KD 85 75X8500D KD 75X9400D Wireless subwoofer SWF BR100 Camera and Microphone Unit CMU BR300 Active 3D Glasses TDG BT500A KD 75X9400D KD 65 55X9300D only Operating temperature 0 ºC 40 ºC Power and others Power requirements except models with supplied AC adapter 110 V 240 V AC 50 60 Hz models with supplied AC adapter only 24 V DC with AC ad...

Page 29: ...vision is used 4 Specified standby power is reached after the TV finishes necessary internal processes 5 Standby power consumption will increase when your TV is connected to the network Note Optional accessories availability depends on countries region TV model stock Design and specifications are subject to change without notice Notes on Digital TV function Any functions related to Digital TV will...

Page 30: ...urround is a trademark of DTS Inc DTS Inc All Rights Reserved Designed with UEI TechnologyTM Under License from Universal Electronics Inc Portions UEI 2000 2014 The Bluetooth word mark and logos are registered trademarks owned by Bluetooth SIG Inc and any use of such marks by Sony Corporation is under license Other trademarks and trade names are those of their respective owners TUXERA is a registe...

Page 31: ......

Page 32: ... 4584911151 060BCO fm masterpage BCO KD 85X8500D 75X9400D 75X8500D 65X9300D 65X8500D 55X9300D 55X8500D FW 65X8501D 55X8501D 4 584 911 15 1 2016 Sony Corporation Printed in Malaysia 4 584 911 15 1 Customer Support and Contact Help Guide ...

Reviews: