background image

C:\Users\CHAILING_2\Desktop\CU\PA\GB\4733012111_GB.fm

master page: Right

KD-85X9000F / 75X9000F / 65X9000F / 55X9000F / 49X9000F

4-733-012-

11

(1)

7

GB

Parts and Controls


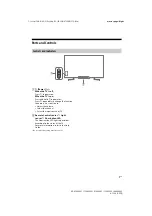
Controls and Indicators


 

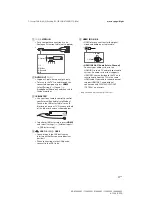
 (Power) /+/–

When the TV is off,

Press 

 to power on.

When the TV is on,

Press and hold 

 to power off.

Press 

 repeatedly to change the function, 

then press 

+

 or 

 button to:

• Adjust the volume.
• Select the channel.
• Select the input source of TV.

Remote Control sensor* / Light 
sensor* / Illumination LED

The illumination LED lights up or blinks 
according to the status of the TV.
For more information, refer to the Help 
Guide.

* Do not place anything near the sensor.

ȩ

̕

Summary of Contents for BRAVIA KD-49X9000F

Page 1: ...AILING_2 Desktop CU PA GB PA PA_GB_COV fm masterpage Cover KD 85X9000F 75X9000F 65X9000F 55X9000F 49X9000F 4 733 012 11 1 4 733 012 11 1 KD 85X9000F 75X9000F 65X9000F 55X9000F 49X9000F Television Reference Guide ...

Page 2: ...h NBTC standard or NBTC requirements This radio communication equipment has the electromagnetic field strength in compliance with the Safety Standard for the Use of Radio communication Equipment on Human Health announced by the National Telecommunications Commission Notes for Australia and New Zealand model This product is ENERGY RATING qualified in the default mode ENERGY RATING is a programme de...

Page 3: ...ng coaxial cable may in some circumstances create a fire hazard Connection to a television distribution system therefore has to be provided through a device providing electrical isolation below a certain frequency range galvanic isolator see EN 60728 11 Installation The TV set should be installed near an easily accessible AC power outlet mains socket Place the TV on a stable level surface to preve...

Page 4: ... cord mains lead away from heat sources Unplug the AC power plug mains plug and clean it regularly If the plug is covered with dust and it picks up moisture its insulation may deteriorate which could result in a fire Note Do not use the supplied AC power cord mains lead on any other equipment Do not pinch bend or twist the AC power cord mains lead excessively The core conductors may be exposed or ...

Page 5: ...ht as viewing the TV in poor light or during long period of time strains your eyes When using headphones adjust the volume so as to avoid excessive levels as hearing damage may result LCD Screen Although the LCD screen is made with high precision technology and 99 99 or more of the pixels are effective black dots may appear or bright points of light red blue or green may appear constantly on the L...

Page 6: ...lectrical and electronic equipment Your co operation shall facilitate proper disposal and help prevent potential negative consequences hazards to the environment and human health which could otherwise be caused by inappropriate waste disposal including improper handling accidental breakage damage and or improper recycling of e waste The recycling of materials will help to conserve natural resource...

Page 7: ... Press to power on When the TV is on Press and hold to power off Press repeatedly to change the function then press or button to Adjust the volume Select the channel Select the input source of TV Remote Control sensor Light sensor Illumination LED The illumination LED lights up or blinks according to the status of the TV For more information refer to the Help Guide Do not place anything near the s...

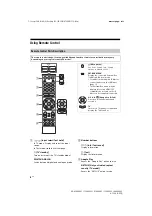
Page 8: ...ster connect and set up the IR Blaster page 11 The External Box menu may be displayed for some HDMI CEC compatible devices when the IR Blaster is not supplied connected Navigation D Pad On screen menu navigation and selection TV Switch to a TV channel or input and display the TV Menu Bar Input select Text hold In TV mode Display and select the input source In Text mode Hold the current page TV sta...

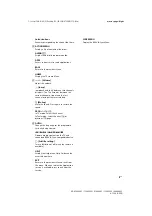
Page 9: ...alternates between the current channel or input and the last channel or input that was selected Muting Mute the sound Press again to restore the sound PROG In TV mode Select the channel In Text mode Select the next or previous page AUDIO Change the language for the programme currently being viewed Operate media contents on the TV and connected BRAVIA Sync compatible device Subtitle setting Turn su...

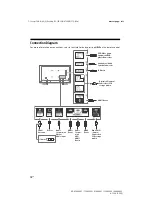
Page 10: ...ions refer to the Help Guide by pressing HELP on the remote control Headphone Audio System Subwoofer Digital still camera Camcorder USB storage media VCR Video game equipment DVD player Camcorder Audio System with ARC HDMI Device IR Blaster HDMI Device Cable Antenna Router Audio System with Optical Audio Input 14 mm HDMI Device HDMI Device Digital still camera Camcorder USB storage media ...

Page 11: ...ends as shown below To perform IR Blaster setup press HOME and select Settings t External inputs t IR Blaster setup USB 1 2 USB 3 Connecting a large USB device may interfere with other connected devices beside it When connecting a large USB device connect to the USB 1 port HDMI IN 1 2 3 4 HDMI interface can transfer the digital video and audio on a single cable HDMI IN 3 ARC Audio Return Channel C...

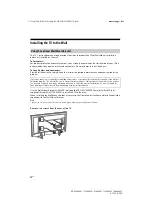
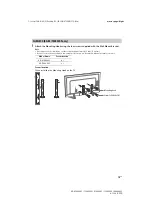
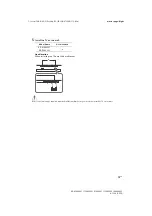
Page 12: ...ce and examination of this product Use the Wall Mount Bracket SU WL500 not supplied KD 85 75X9000F only or SU WL450 not supplied Except KD 85 75X9000F to install the TV to the wall When installing the Wall Mount Bracket also refer to the Operating Instructions and Installation Guide supplied with the Wall Mount Bracket Note Be sure to store the removed screws in a safe place keeping them away from...

Page 13: ...using the four screws supplied with the Wall Mount Bracket Note If using an electric screwdriver set the torque at approximately 1 5 N m 15 kgf cm Be sure to store the unused parts in a safe place for future use Retain this manual for future reference Screw location When installing the Mounting Hook on the TV Model Name Screw location KD 85X9000F d j KD 75X9000F e j Mounting Hook Screw PSW 6 16 ...

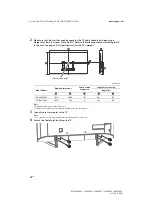
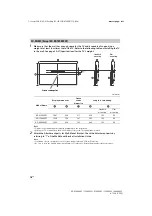
Page 14: ... TV to the wall See page 20 21 Specifications for the TV s weight Note Only applicable for 0º for this TV model Figures in the table may differ slightly depending on the installation 3 Connect necessary cables to the TV Note You cannot access to any terminal after installing the TV to the wall 4 Detach the Table Top Stand from the TV Unit mm Model Name Display dimensions Screen centre dimension Le...

Page 15: ...5X9000F 55X9000F 49X9000F 4 733 012 11 1 15GB 5 Install the TV on the wall Hook location When installing the TV onto the Base Bracket Refer to the instructions supplied with the Wall Mount Bracket for your model to install the TV on the wall Model Name Hook location KD 85X9000F KD 75X9000F a a ...

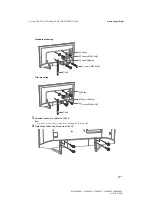
Page 16: ... installed on the wall the upper side of the TV slightly leans forward 2 Attach the Attachment parts for Wall Mount Bracket Check the Attachment parts by referring to 1 of the Wall Mount Bracket Installation Guide Note If using an electric screwdriver set the torque at approximately 1 5 N m 15 kgf cm Be sure to store the unused parts in a safe place for future use Retain this manual for future ref...

Page 17: ... 733 012 11 1 17GB Standard mounting Slim mounting 3 Connect necessary cables to the TV Note You cannot access to any terminal after installing the TV to the wall 4 Detach the Table Top Stand from the TV ʲ ʸ ʷ ʯ ʮ Belt Screw PSW 6 x 50 Pulley Screw PSW 6 x 20 Spacer 60 mm ʲ ʯ ʱ ʮ Belt Screw PSW 6 x 20 Pulley Spacer 20 mm ...

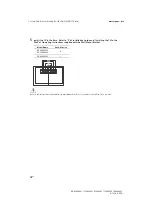
Page 18: ...5 Install the TV to the Base Refer to 5 of Installation Guide and Installing the TV to the Wall of Operating Instructions supplied with the Wall Mount Bracket Refer to the instructions supplied with the Wall Mount Bracket for your model to install the TV on the wall Model Name Hook location KD 65X9000F KD 55X9000F b KD 49X9000F c a b c d ...

Page 19: ...o 15 minutes When you plug in the TV the TV may not be able to turn on for a while even if you press the power button on the remote control or the TV It takes time to initialize the system Wait for about one minute then operate it again Troubles and Solutions When the illumination LED is flashing in red Count how many times it flashes interval time is three seconds Reboot the TV by disconnecting t...

Page 20: ...near PCM 32 44 1 48 88 2 96 176 4 192 kHz 16 20 24 bits Dolby Digital Dolby Digital Plus and DTS ARC Audio Return Channel HDMI IN 3 only Two channel linear PCM 48 kHz 16 bits Dolby Digital Dolby Digital Plus DTS DIGITAL AUDIO OUT OPTICAL Digital optical jack Two channel linear PCM 48 kHz 16 bits Dolby Digital DTS AUDIO OUT Stereo mini jack Headphone Audio output Subwoofer 1 2 3 USB port 1 and 2 su...

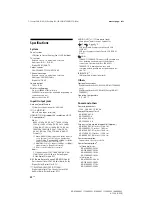
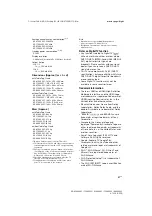
Page 21: ...ll increase when your TV is connected to the network Note Optional accessories availability depends on countries region TV model stock Design and specifications are subject to change without notice Notes on Digital TV function Any functions related to Digital TV will only work in countries or areas where DVB T DVB T2 MPEG 2 and H 264 MPEG 4 AVC digital terrestrial signals are broadcast Please conf...

Page 22: ...hts Reserved The Bluetooth word mark and logos are registered trademarks owned by the Bluetooth SIG Inc and any use of such marks by Sony Corporation is under license Other trademarks and trade names are those of their respective owners Netflix is a registered trademark of Netflix Inc TUXERA is a registered trademark of Tuxera Inc in the US and other countries USB IF SuperSpeed USB Trident logo is...

Page 23: ......

Page 24: ...2 Desktop CU PA GB PA PA_GB_BCO fm masterpage BCO KD 85X9000F 75X9000F 65X9000F 55X9000F 49X9000F 4 733 012 11 1 2018 Sony Visual Products Inc Customer Support and Contact Help Guide http rd1 sony net help tv fga1 h_ga ...

Reviews: