background image

7

GB


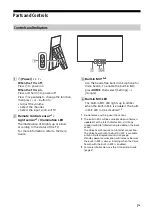
Parts and Controls

 

 (Power) / + / –

When the TV is off,

Press 

 to power on.

When the TV is on,

Press and hold 

 to power off.

Press 

 repeatedly to change the function, 

then press + or – button to:
• Adjust  the  volume.
• Select the channel.
• Select the input source of TV.

Remote Control sensor*

1

 / 


Light sensor*

1

 / Illumination LED

The illumination LED lights up or blinks 
according to the status of the TV. 
For more information, refer to the Help 
Guide.

Built-in MIC*

2

*

3

Use the hands-free built-in microphone for 
Voice Search. To enable the built-in MIC, 
press 

HOME

, then select [Settings] 


[Google].

Built-in MIC LED

The built-in MIC LED lights up in amber 
when the built-in MIC is enabled. The built-
in MIC LED can be disabled.*

3

*1 Do not place anything near the sensor.

*2 The built-in MIC will be available when software is 

updated. For the latest information, visit Sony 
support website (information provided on the back 
cover). 


The Voice Search requires an Internet connection. 


The Voice Search with the built-in MIC is available 
only on limited region/country/language. 


Standby power consumption will increase because 
the built-in MIC is always listening when the Voice 
Search with the built-in MIC is enabled.

*3 For more information, see the Online Help Guide 

(page 2).

Controls and Indicators

ȫȬ

Ȫ

Summary of Contents for BRAVIA KD-55A9F

Page 1: ...4 736 801 11 1 Television Reference Guide KD 65A9F 55A9F ...

Page 2: ... has the electromagnetic field strength in compliance with the Safety Standard for the Use of Radio communication Equipment on Human Health announced by the National Telecommunications Commission Notes for Australia and New Zealand model This product is ENERGY RATING qualified in the default mode ENERGY RATING is a programme designed to promote energy efficient products and practices When the TV i...

Page 3: ...k as shown and pull the centre block until a click is heard Otherwise the TV may fall causing serious personal injury or damage to the TV The TV set should be installed near an easily accessible AC power outlet mains socket Place the TV set on a stable level surface to prevent it from falling over and causing personal injury or property damage Install the TV where it cannot be pulled pushed or kno...

Page 4: ...er cord mains lead for your safety and take care not to catch your feet on the cables Disconnect the AC power cord mains lead from the AC power outlet mains socket before working on or moving the TV set Keep the AC power cord mains lead away from heat sources Unplug the AC power plug mains plug and clean it regularly If the plug is covered with dust and it picks up moisture its insulation may dete...

Page 5: ...ains socket TV set is damaged by being dropped hit or having something thrown at it Any liquid or solid object falls through openings in the cabinet About TV Temperature When the TV is used for an extended period the panel surrounds become warm You may feel hot when touching there by the hand Viewing the TV View the TV in moderate light as viewing the TV in poor light or during long period of time...

Page 6: ...such as photos Video games that might have static content in some part of the screen On screen menus programme guides channel logos etc Static content from applications On screen tickers such as those used for news and headlines To reduce the risk of image retention Sony recommends that you turn off the TV normally by pressing the power button on the remote control or the TV Fill the screen by cha...

Page 7: ...s HOME then select Settings Google Built in MIC LED The built in MIC LED lights up in amber when the built in MIC is enabled The built in MIC LED can be disabled 3 1 Do not place anything near the sensor 2 The built in MIC will be available when software is updated For the latest information visit Sony support website information provided on the back cover The Voice Search requires an Internet con...

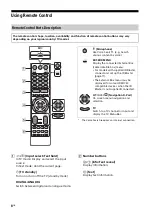
Page 8: ... and function of remote control buttons may vary depending on your region country TV model MIC Microphone Use Voice Search e g Search various content by voice EXT BOX MENU Display the connected External Box cable satellite box menu For models with supplied IR Blaster connect and set up the IR Blaster page 11 The External Box menu may be displayed for some HDMI CEC compatible devices when the IR Bl...

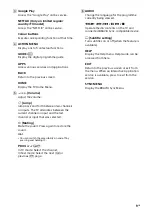
Page 9: ... or input and the last channel or input that was selected Muting Mute the sound Press again to restore the sound Hint You can switch the accessibility on and off by pressing and holding PROG In TV mode Select the channel In Text mode Select the next or previous page AUDIO Change the language for the programme currently being viewed Operate media contents on the TV and connected BRAVIA Sync compati...

Page 10: ...Ȭ Ȯ ȭ Ȭ ȫ ȭ Ȫ Digital still camera Camcorder USB storage media VCR Video game equipment DVD player Camcorder IR Blaster HDMI Device 14 mm Cable Antenna Router Audio System with Optical Audio Input Audio System with ARC HDMI Device HDMI Device Digital still camera Camcorder USB storage media Headphone HDMI Device AV Receiver ...

Page 11: ...high quality 4K 50p 60p contents connect a Premium High Speed HDMI cable and set the HDMI signal format to Enhanced format Do this setting individually for each connected HDMI IN terminal For details of supported formats refer to the Specifications in this manual page 23 25 HDMI IN 3 ARC Audio Return Channel Connect your audio system to the HDMI IN 3 to route TV audio to your audio system An audio...

Page 12: ...e wall When installing the Wall Mount Bracket also refer to the Operating Instructions and Installation Guide supplied with the Wall Mount Bracket Note Be sure to store the removed screws in a safe place keeping them away from children Be sure to hold the TV while preparing it for wall mount installation Please remove the corner guards after installing the TV to the wall Sufficient expertise is re...

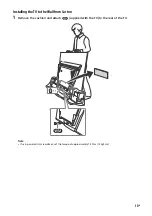
Page 13: ... Installing the TV to the Wall from Carton 1 Remove the cushion and attach supplied with the TV to the rear of the TV Note If using an electric screwdriver set the torque at approximately 1 5 N m 15 kgf cm ...

Page 14: ...14GB 2 Remove the screws from the rear of the TV ...

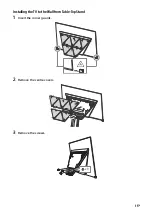
Page 15: ...15GB Installing the TV to the Wall from Table Top Stand 1 Insert the corner guards 2 Remove the centre covers 3 Remove the screws x 3 ...

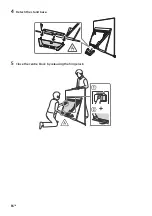
Page 16: ...16GB 4 Detach the stand base 5 Close the centre block by releasing the hinge lock ʓ ʔ ...

Page 17: ...17GB 6 Attach supplied with the TV to the rear of the TV Note If using an electric screwdriver set the torque at approximately 1 5 N m 15 kgf cm ...

Page 18: ...18GB 7 Remove the screws from the rear of the TV ...

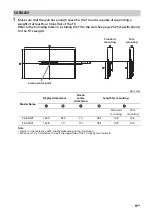
Page 19: ...s for the TV s weight Unit mm Note Figures in the table may differ slightly depending on the installation When your TV is installed on the wall the upper side of the TV slightly leans forward SU WL450 Screen centre point Slim mounting Standard mounting Model Name Display dimensions Screen centre dimension Length for mounting Standard mounting Slim mounting KD 65A9F 1 449 835 70 493 148 106 KD 55A9...

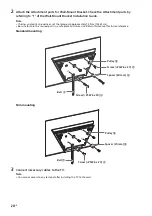
Page 20: ...e torque at approximately 1 5 N m 15 kgf cm Be sure to store the unused parts in a safe place for future use Retain this manual for future reference Standard mounting Slim mounting 3 Connect necessary cables to the TV Note You cannot access to any terminal after installing the TV to the wall Screw PSW 6 x 20 Pulley Spacer 60 mm Screw PSW 6 x 50 Belt Pulley Spacer 20 mm Screw PSW 6 x 20 Belt ...

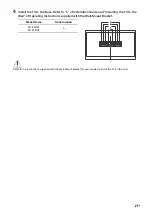
Page 21: ...Guide and Installing the TV to the Wall of Operating Instructions supplied with the Wall Mount Bracket Refer to the instructions supplied with the Wall Mount Bracket for your model to install the TV on the wall Model Name Hook location KD 65A9F KD 55A9F a a b c d ...

Page 22: ...he remote control does not function Replace the batteries The EXT BOX MENU button on the remote control does not work Connect and set up the IR Blaster models with supplied IR Blaster only page 11 Connect HDMI CEC compatible device except models with supplied IR Blaster and change to that input The parental lock for broadcast password has been forgotten Enter 9999 for the PIN code and select Chang...

Page 23: ...m PAL SECAM NTSC3 58 NTSC4 43 Channel coverage Depend on your country area selection Analogue UHF VHF Cable Digital UHF VHF Sound output 13 W 13 W 13 W 13 W 13 W 13 W 10 W 10 W Wireless technology Protocol IEEE802 11ac a b g n IEEE802 11ac may not be available depending on countries regions Bluetooth Version 4 2 Input Output jacks Antenna aerial cable 75 ohm external terminal for VHF UHF VIDEO IN ...

Page 24: ...00BASE TX connector Depending on the operating environment of the network connection speed may differ 10BASE T 100BASE TX communication rate and communication quality are not guaranteed for this TV IR BLASTER 1 IR Blaster Cable input mini jack CENTER SPEAKER IN Centre speaker input Binding post Others Optional accessories Wall Mount Bracket SU WL450 Operating temperature 0 ºC 40 ºC Power and other...

Page 25: ...ories Dolby Dolby Audio Dolby Vision and the double D symbol are trademarks of Dolby Laboratories BRAVIA and BRAVIA Sync are trademarks or registered marks of Sony Corporation Gracenote the Gracenote logo and logotype Powered by Gracenote logo are either registered trademarks or trademarks of Gracenote Inc in the United States and or other countries Vewd Core Copyright 1995 2017 Vewd Software AS A...

Page 26: ...26GB ...

Page 27: ......

Page 28: ...Customer Support and Contact Help Guide http rd1 sony net help tv fga2 h_ga 2018 Sony Visual Products Inc Printed in Malaysia ...

Reviews: