background image

Basic Operations

26

TV Controls 

TIMER

STANDBY

POWER

INPUT

MENU

POWER

CHANNEL

2

3

4

5

0

VOLUME

1

9

8

7

6

Item

Description

1

MENU

Press to display 

MENU 

with TV functions and settings (see “Overview of MENU” on page 

27).

2

INPUT

Press to display the list of external inputs. Press repeatedly to toggle through the inputs.

Inputs can be changed by pressing 

V

/

v

 and 

 while the list of external inputs is 

displayed.

See page 35 for information about setting up the external inputs labels, including 
the Skip feature.
In the MENU screen, this button serves as confirming the selection or setting.

3

Press to adjust the volume. In the 

MENU

 screen, these buttons serve as left/right buttons.

4

– C

Press to scan through channels. To scan quickly through channels, press and hold down either 

/+. In the 

MENU

 screen, these buttons serve as up/down buttons.

5

POWER

Press to turn on and off the TV.

6

TIMER LED

Lights up in orange when the sleep timer is set.

7

STANDBY LED

Lights up in red when your TV is in PC power saving mode.

8

POWER LED

Lights up in green when the TV is turned on.

9

(IR) Infrared 
Receiver

Receives IR signals from the remote control.

0

Speaker

Outputs audio signal.

The C button has a tactile dot. Use it as a reference when operating the TV.

Make sure that the TV is completely switched off before unplugging the power cord.

Summary of Contents for Bravia KDL-22L4000

Page 1: ...LCD Digital Color TV 4 115 438 11 1 Operating Instructions KDL 22L4000 2008 Sony Corporation ...

Page 2: ...ith Canadian ICES 003 Safety s Operate the TV only on 110 240 V AC s Use the AC power cord specified by Sony and suitable for the voltage where you use it s The plug is designed for safety purposes to fit into the wall outlet only one way If you are unable to insert the plug fully into the outlet contact your dealer s If you will not be using the TV for several days disconnect the power by pulling...

Page 3: ... Power Savings can slightly change the power consumption Depending upon such changed settings the power consumption may increase which possibly could exceed the limits required for the Energy Star qualification Important Safety Instructions 1 Read these instructions 2 Keep these instructions 3 Heed all warnings 4 Follow all instructions 5 Do not use this apparatus near water 6 Clean only with dry ...

Page 4: ...se damage s Never allow liquid or solid objects to fall into the ventilation openings s If any liquid or solid object falls inside the TV unplug the TV immediately and have it checked by qualified service personnel before operating it further s Never push objects of any kind into the TV through the ventilation openings as they may come in contact with dangerous voltage points or short out parts th...

Page 5: ...ts s Do not install the TV on furniture that can easily be used as steps such as a chest of drawers s Care should be taken to install the TV where it cannot be pushed pulled over or knocked down s Care should be taken to route all AC power cords and connecting cables so that they cannot be pulled or grabbed by curious children Medical institutions Do not place this TV in a place where medical equi...

Page 6: ... plug fully into the outlet If it is loose it may cause arcing and result in a fire s Do not overload the same AC power outlet Unplugging the AC power cord from the wall outlet will completely remove power from the TV s During lightning storms or when the TV is left unattended and unused for extended periods of time the AC power cord should be unplugged from the wall outlet This will avoid possibl...

Page 7: ...e the LCD screen glass to crack break or scatter s If damage occurs to the LCD panel small traces of liquid crystal sandwiched between the glass may be found on scattered broken glass s Do not touch the broken glass with bare hands As with any broken glass pieces avoid skin contact and exposure to your eyes or mouth Avoid direct contact with liquid or damp surfaces of the glass as these may have a...

Page 8: ......

Page 9: ... TV from Toppling 19 Recommended Measures to Secure the TV 19 Bundling the Connecting Cables 21 Setting Up the Channel List Initial Setup 22 Basic Operations Remote Control 23 TV Controls 26 Using the Menus Overview of MENU 27 Using the Picture Settings 27 Using the Sound Settings 28 Using the Screen Settings 29 Using the PC Settings 30 Using the Channel Settings 31 Using the Parental Lock Setting...

Page 10: ... definition signals are transmitted with different aspect ratios the width to height ratio of the image HDTV uses a wider screen than conventional standard definition TV You can use the Wide Mode function of the TV to adjust the 4 3 image to fit the entire screen see pages 24 29 and 30 16 9 high definition source Most HDTV signals use a wide screen aspect ratio of 16 9 The 16 9 fills your BRAVIA s...

Page 11: ...tach the Table Top Stand 1 Take out the Table Top Stand and screws from the carton The screws are found in the accessory bag 2 Place the Table Top Stand onto a level and stable surface Put your hands into the package when taking out the TV from the carton Accessory bag Screws TV unit Table Top Stand Continued ...

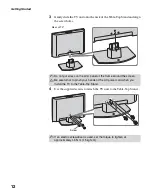
Page 12: ...rews to attach the TV unit to the Table Top Stand Do not put stress on the LCD panel or the frame around the screen Be careful not to pinch your hands or the AC power cord when you install the TV to the Table Top Stand If an electric screwdriver is used set the torque to tighten at approximately 1 5 N m 15 kgf cm Rear of TV Screw ...

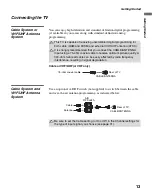
Page 13: ...ng as indicated below This TV is capable of receiving unscrambled digital programming for both cable QAM and 8VSB and external VHF UHF antenna ATSC It is strongly recommended that you connect the CABLE ANTENNA input using a 75 ohm coaxial cable to receive optimum picture quality A 300 ohm twin lead cable can be easily affected by radio frequency interference resulting in signal degradation 75 ohm ...

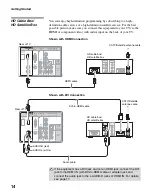
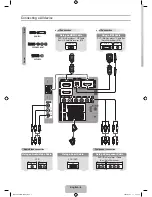
Page 14: ...E ONLY VIDEO R L PR PB Y IN PC IN VIDEO COMPONENT IN RGB IN 1 1080i 720p 480p 480i Rear of TV HDMI cable HD cable box HD satellite box CATV Satellite antenna cable AUDIO OUT DIGITAL AUDIO OUT OPTICAL MONO AUDIO R L AUDIO R L AUDIO R L AUDIO AUDIO SERVICE ONLY VIDEO R L PR PB Y IN PC IN VIDEO COMPONENT IN RGB IN 1 1080i 720p 480p 480i Rear of TV DVI to HDMI cable HD cable box HD satellite box CATV ...

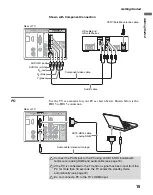
Page 15: ...ble Audio cable PR red PB blue Y green HD cable box HD satellite box AUDIO OUT DIGITAL AUDIO OUT OPTICAL MONO AUDIO R L AUDIO R L AUDIO R L AUDIO AUDIO SERVICE ONLY VIDEO R L PR PB Y IN PC IN VIDEO COMPONENT IN RGB IN 1 1080i 720p 480p 480i Rear of TV HD15 HD15 cable analog RGB Audio cable stereo mini plugs Connect the PC IN jack to the PC using an HD15 HD15 cable with ferrite core analog RGB and ...

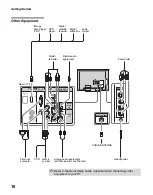
Page 16: ...80i 720p 480p 480i AUDIO VIDEO2 IN R L VIDEO MONO S VIDEO Rear of TV Personal computer Blu ray Disc Player PS3 DVD player Digital satellite receiver VCR Game system Digital recorder Analog audio equipment A V Receiver Home Theater Digital audio equipment CABLE ANTENNA Digital cable box Audio system Camcorder Headphones Refer to the Quick Setup Guide supplied when connecting other equipment to your...

Page 17: ...ects to your headphones If your headphones do not match the jack use a suitable plug adapter not supplied While headphones are connected the TV speakers are muted 4 HDMI IN HDMI L AUDIO R HDMI High Definition Multimedia Interface provides an uncompressed all digital audio video interface between this TV and any HDMI equipped audio video equipment such as a set top box DVD player and A V receiver H...

Page 18: ...o L R jacks Component video provides better picture quality than the S VIDEO 1 and the composite video 2 6 connections 8 DIGITAL AUDIO OUT OPTICAL Connects to the optical audio input of a digital audio equipment that is PCM Dolby digital compatible 9 AUDIO OUT L AUDIO R Connect to the left and right audio input jacks of your audio or video equipment You can use these outputs to listen to your TV s...

Page 19: ...ery unstable and or uneven surfaces furniture that can easily be used as steps such as a chest of drawers Install the TV where it cannot be pulled pushed or knocked over Route all AC power cords and connecting cables so that they are not accessible to curious children Recommended Measures to Secure the TV 1 Secure the Stand for the TV Make sure the TV stand can adequately support the weight of the...

Page 20: ...ear of the TV Rope or chain attach to one M4 anchor bolt Wall anchor attach to the wall stud strong enough to support the weight of the TV pass the rope through the wall anchor then attach to the other M4 anchor bolt Contact Sony Customer Support to obtain the optional Support Belt Kit by providing your TV model name For United States call 1 800 488 7669 or visit www sony com accessories For Canad...

Page 21: ...g Started 21 Getting Started Bundling the Connecting Cables You can bundle the connecting cables with the supplied cable band as illustrated below Do not bundle the AC power cord with other connecting cables ...

Page 22: ... the Initial Setup programming found cable channels you will be able to scan antenna channels as well Connect the antenna using an A B RF switch not supplied and change the switch to antenna then start Auto Program to search antenna channels If the Initial Setup programming found antenna channels the Auto Program process will finish If you want to scan cable channels you can do it later using the ...

Page 23: ... Your Favorites list will be cleared each time you run Auto Program see pages 22 and 31 for Auto Program 4 PICTURE Press repeatedly to cycle through the available picture modes Vivid Standard Custom The picture modes can also be accessed in the Picture settings For details see Using the Picture Settings on page 27 5 RETURN Press to go back to the previous screen when displaying MENU items and sett...

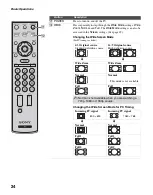
Page 24: ...s See page 29 4 3 Original source Standard definition source 16 9 Original source High definition source m m Wide Zoom Wide Zoom Normal Normal This mode is not available Full Full Normal is not available when you are watching a 720p 1080i or 1080p source Changing the Wide Screen Mode for PC Timing Button Description qa qs For PC timing see below Incoming PC signal Incoming PC signal m m Normal Nor...

Page 25: ...isplay the Tools Menu that is associated with your current input analog TV digital TV or external inputs See pages 27 28 32 and 36 qh JUMP Press to jump back and forth between two channels The TV alternates between the current channel and the last channel that was selected qj 0 9 ENT Press 0 9 to select a channel the channel changes after two seconds Press ENT to change channels immediately qk CH ...

Page 26: ...ection or setting 3 VOLUME Press to adjust the volume In the MENU screen these buttons serve as left right buttons 4 CHANNEL Press to scan through channels To scan quickly through channels press and hold down either In the MENU screen these buttons serve as up down buttons 5 POWER Press to turn on and off the TV 6 TIMER LED Lights up in orange when the sleep timer is set 7 STANDBY LED Lights up in...

Page 27: ...ent Picture Mode settings to the default values Backlight Adjust to brighten or darken the backlight Picture Adjust to increase or decrease picture contrast Brightness Adjust to brighten or darken the picture Color Adjust to increase or decrease color intensity Hue Adjust to increase or decrease the green tones Color Temp White adjustment Cool Select to give the white colors a bluish tint Neutral ...

Page 28: ...s received If no SAP signal is present the TV remains in Stereo mode Mono Select for mono reception Use to reduce noise during weak stereo broadcasts MTS is only available for analog programs Alternate Audio Digital channels only Select among the available options to switch among the alternate audio streams The program you are tuned to may be broadcasted in a different language in the alternate au...

Page 29: ...Choose a screen mode from the Wide Mode option Auto Wide is not available when you are watching analog TV 4 3 Default Select the default Screen Mode to use for 4 3 sources Wide Zoom Enlarges the 4 3 picture to fill the 16 9 screen displaying as much of the original image as possible Normal Select to display the 4 3 picture in its original size Full Select to enlarge the 4 3 picture horizontally on...

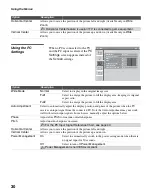
Page 30: ...he picture to fill the display area keeping its original aspect ratio Full2 Select to enlarge the picture to fill the display area Auto Adjustment Select to automatically adjust the display position and phase of the picture when the TV receives an input signal from the connected PC Note that Auto Adjustment may not work well with certain input signals In such cases manually adjust the options belo...

Page 31: ...t to show or hide Then press to select it 2 Press V v to determine if the channel will be shown or hidden Then press to select it Channels that you set to be hidden can be accessed only with the 0 9 buttons You can set channels to be hidden that are automatically set in Auto Program Label Channels Allows you to assign labels such as station call letters to channel numbers 1 Press V v to scroll thr...

Page 32: ...e rating system This action will delete the current Digital Rating menu and the menu will no longer be available until the TV is tuned to a channel that contains downloadable ratings You can also access Digital Rating by using the TOOLS button on the remote control Unrated Available only when Country is set to U S A Allow Allows programs and movies that are broadcasted without a rating Block Block...

Page 33: ...Movie Rating G All children and general audience PG Parental guidance suggested PG 13 Parental guidance for children under 13 R Restricted viewing parental guidance is suggested for children under 17 NC 17 and X No one 17 or under allowed TV Rating Block programs by their rating content or both Age Based Ratings TV Y All children TV Y7 Directed to children age 7 and older TV G General audience TV ...

Page 34: ...ntrol feature off To reactivate the Parental Lock settings turn off the TV When the TV is turned on again your Parental Lock settings are reactivated Option Description English Rating C All children C8 Children 8 years and older G General programming PG Parental guidance 14 Viewers 14 and older 18 Adult programming French Rating G General programming 8 ans Not recommended for young children 13 ans...

Page 35: ...hen when you press INPUT to change inputs the video label you assigned to that input appears on screen 1 Press V v to highlight the video input Video 1 2 Component HDMI PC to which you want to assign a label Then press to select the input 2 Press V v to highlight one of the displayed labels Then press to select the label You can select from the following labels for each input Video 1 2 DVD VCR Blu...

Page 36: ...ts of a program Should be set to CC1 for most programs Text1 Text2 Text3 Text4 Displays network station information presented using either half or the whole screen if available Digital CC Allows you to set digital closed captioning to Basic digital EIA 608 or Advanced digital EIA 708 Advanced Allows you to select advanced digital EIA 708 closed caption options Select from the available options Adv...

Page 37: ...e PC Settings page 30 No picture from some video sources Check the connection between the optional video equipment and the TV Press INPUT on the remote control page 25 Press MENU on the remote control Select your desired input from the external inputs list Poor picture Double images or ghosts Check antenna cable connections Check the antenna location and direction Only snow and noise appear on the...

Page 38: ...bottom of the screen For more details check the documentation that came with your DVD or contact your program provider Certain programs on DVD or other digital sources display a loss of detail especially during fast motion or dark scenes The compression used by certain digital broadcasts and DVDs may cause your TV s screen to display less detail than usual or cause artifacts small blocks or dots p...

Page 39: ... the Table Top Stand from the TV For bracket installation refer to the instruction guide provided by the Wall Mount Bracket model for your TV Sufficient expertise is required in installing this TV especially to determine the strength of the wall for withstanding the TV s weight For product protection and safety reasons Sony strongly recommends that you use the Wall Mount Bracket model designed for...

Page 40: ...60 0 75 VESA WXGA 1280 768 47 4 60 VESA 1280 768 47 8 60 VESA 1360 768 47 7 60 VESA This TV s PC input does not support Sync on Green or Composite Sync This TV s PC VGA input does not support interlaced signals Your PC must support one of the above PC input signals to display on the television For the best picture quality it is recommended to use the signals from the above chart with a 60 Hz verti...

Page 41: ...eadphones Stereo mini jack Impedance 16 ohms Power Requirement 110 V 240 V AC 50 60 Hz Screen size in inches 21 6 22 class Speaker Full range 2 in mm 50 90 in inches 2 3 5 8 Speaker output 5 W 5 W NTSC American TV standard ATSC 8VSB terrestrial ATSC compliant 8VSB QAM on cable ANSI SCTE 07 2000 Does not include CableCARD functionality Channel coverage Analog Digital Terrestrial 2 69 2 69 Cable 1 1...

Page 42: ...ck described 17 Horizontal Center 30 Hue 27 I Info Banner 35 Infrared Receiver IR 26 INPUT button 25 26 Installing the TV on a wall 39 J JUMP button 25 L Label Channels 31 Label Video Inputs 35 Language 35 M MENU button 23 26 Movie Rating 33 MTS 28 MUTING button 23 N Noise Reduction 27 P PC IN 18 Phase 30 Picture 27 PICTURE button 23 Picture Mode 27 Pitch 30 POWER button 24 26 POWER LED 26 Power M...

Page 43: ......

Page 44: ...p Guide z Experience difficulty operating your television For United States http www sony com tvsupport or to speak with a support representative 1 800 222 SONY 7669 For Canada http www sony ca support or to speak with a support representative 1 877 899 SONY 7669 Sony will work to resolve your questions more quickly than your retailer or place of purchase Please Do Not Return the Product to the St...

Reviews: