background image

10

Connecting the TV

Cable System or VHF/UHF Antenna System

You can enjoy high-definition and standard-definition digital programming (if available in your 
area) along with standard-definition analog programming.
This TV is capable of receiving unscrambled digital programming for both cable (QAM and 
8VSB) and external VHF/UHF antenna (ATSC).

Cable or VHF/UHF (or VHF only)

Cable System and VHF/UHF Antenna System

Use an optional A-B RF switch (not supplied) to switch between the cable and over-the-air antenna 
programming, as indicated below.

75-ohm coaxial cable

Rear of TV

CABLE/ANTENNA

• It is strongly recommended that you connect the CABLE/ANTENNA input using a 75-ohm 

coaxial cable to receive optimum picture quality. A 300-ohm twin lead cable can easily be affected 
by radio frequency interference, resulting in signal degradation.

B

A

Cable

Antenna

A/B RF Switch

Rear of TV

CABLE/ANTENNA

• Be sure to set the 

Signal Type 

setting to 

Cable

 or 

Antenna

 found under the 

Channel

 settings 

for your input signal (page 29).

Summary of Contents for BRAVIA KDL-32BX331

Page 1: ...g Started Operating the TV Using Features Using the Menus Other Information Sony Customer Support U S A http www sony com tvsupport Canada http www sony ca support United States 1 800 222 SONY Canada 1 877 899 SONY Please Do Not Return the Product to the Store KDL 32BX330 32BX331 ...

Page 2: ...red marks of Sony Corporation PlayStation is a registered trademark and PS3 is a trademark of Sony Computer Entertainment Inc Cleaning When cleaning be sure to unplug the power cord to avoid any chance of electric shock Wipe the LCD screen gently with a soft cloth Stubborn stains may be removed with a cloth slightly moistened with a solution of mild soap and warm water If using a chemically pretre...

Page 3: ...or Enclosed Area 15 Securing the TV 16 Running Initial Setup 17 Operating the TV Using the Remote Control 18 Remote Control Button Description 19 TV Controls and Indicators 21 Using Features Favorites 22 Wide Mode 22 Wide Mode with PC 23 Inputs 23 Playing back Photo Music via USB Playing back Music for KDL 32BX330 only 24 Using the Menus Navigating through TV Menus 25 Using the Picture Settings 26...

Page 4: ... HD programming Your BRAVIA TV can receive and display HD programming from Over the air broadcasting via HD quality antenna HD cable subscription HD satellite subscription Blu ray Disc player or other HD compatible external equipment Contact your cable satellite or HD service provider for information on upgrading to HD programming Safety Booklet Contains precautionary measures to keep you and your...

Page 5: ... connection setup Refer to the Quick Setup Guide enclosed separately for connecting optional equipment You can enjoy crisp clear images smooth movement and high impact visuals from 1080 HD signals as shown here When you compare a high definition signal to a standard analog signal you will notice a big difference in picture quality If black bars appear as shown here press WIDE on the remote control...

Page 6: ... the TV Carry the TV with the adequate number of people larger size TVs require two or more people Correct hand placement while carrying the TV is very important for safety and to avoid damage Ensure your TV has adequate ventilation see page 15 For best picture quality do not expose the screen to direct illumination or sunlight Avoid installing the TV in a room with reflective wall and floor mater...

Page 7: ...ews to attach the Table Top Stand to the TV Make sure that you carry out this task with at least two or three people see page 6 for details Thick and soft cloth Screw PSW 5 x 16 Supplied To detach the Table Top Stand from the TV remove the three screws guided by the allow mark on the Table Top Stand Do not remove any other screws Two of removed screws are needed to install the Wall Mount Bracket s...

Page 8: ...n also be connected to other analog RGB equipment See PC Input Signal Reference Chart on page 35 for the signals that can be displayed For some Apple Macintosh computers it may be necessary to use an adapter not supplied If an adapter is used connect the adapter to the computer before connecting the HD15 HD15 cable You may need to adjust the TV settings or your PC s resolution and timing See page ...

Page 9: ...s to the audio input jack of your analog audio equipment You can use these outputs to listen to your TV s audio through your stereo system 6 CABLE ANTENNA RF input that connects to your Cable or VHF UHF antenna 7 USB Connects to USB equipment to access photo and music files for KDL 32BX330 photo files for KDL 32BX331 Item Description An HDMI or Component video YPBPR connection is required to view ...

Page 10: ...stem Use an optional A B RF switch not supplied to switch between the cable and over the air antenna programming as indicated below 75 ohm coaxial cable Rear of TV CABLE ANTENNA It is strongly recommended that you connect the CABLE ANTENNA input using a 75 ohm coaxial cable to receive optimum picture quality A 300 ohm twin lead cable can easily be affected by radio frequency interference resulting...

Page 11: ...le picture make sure you connect this equipment to your TV via the HDMI or component video with audio input located on the back of your TV Shown with HDMI Connection Shown with DVI Connection Rear of TV HDMI cable HD cable box HD satellite box CATV Satellite antenna cable Rear of TV DVI to HDMI cable HD cable box HD satellite box CATV Satellite antenna cable Audio cable stereo mini plugs Continued...

Page 12: ...ite Component video cable Audio cable PR red PB blue Y green HD cable box HD satellite box If your equipment has a DVI output and not an HDMI output connect the DVI output to the HDMI IN 1 with DVI to HDMI cable or adapter and connect the audio output to the AUDIO IN of PC IN For details see page 8 ...

Page 13: ...ion as shown below This TV can also be connected to a PC with a DVI or HDMI output Refer to the separate Quick Setup Guide Rear of TV HD15 HD15 cable analog RGB Audio cable stereo mini plugs Connect the PC IN jack to the PC using an HD15 HD15 cable with ferrite core analog RGB and audio cable page 8 ...

Page 14: ...atellite receiver Digital cable box Audio system Digital audio equipment A V Receiver Home Theater Digital recorder USB CABLE ANTENNA VCR Game system Camcorder or Analog audio equipment A V Receiver Home Theater Refer to the Quick Setup Guide supplied when connecting other equipment to your TV ...

Page 15: ... 6 cm inches 4 inches 10 cm 4 inches 10 cm 2 3 8 Leave at least this much space around the set Installed with stand inches 11 7 8 4 inches 10 cm 4 inches 10 cm 4 inches 10 cm 30 cm Installed on the wall Leave at least this much space around the set Never install the TV set as follows Air circulation is blocked Air circulation is blocked Wall Wall Inadequate ventilation can lead to overheating of t...

Page 16: ...knocked over Route all AC power cords and connecting cables so that they are not accessible to curious children Recommended Measures to Secure the TV Consider the following measures when securing your TV to a TV stand not supplied 1 Secure the stand for the TV Make sure the TV stand can adequately support the weight of the TV Use two angle braces not supplied to secure the stand For each angle bra...

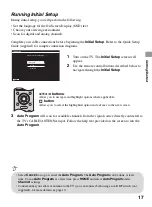
Page 17: ...Auto Program 1 Turn on the TV The Initial Setup screen will appear 2 Use the remote control buttons described below to navigate through the Initial Setup V v B b buttons Allow you to navigate and highlight options where applicable button Allows you to select the highlighted option and advance to the next screen Confirm Confirm Please select your language English Español Français Initial Setup Conf...

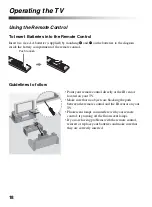
Page 18: ...uidelines to follow Push to open Point your remote control directly at the IR sensor located on your TV Make sure that no objects are blocking the path between the remote control and the IR sensor on your TV Fluorescent lamps can interfere with your remote control try turning off the fluorescent lamps If you are having problems with the remote control reinsert or replace your batteries and make su...

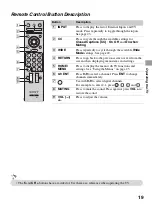
Page 19: ...e 22 4 RETURN Press to go back to the previous screen or exit from the screen when displaying menu items and settings 5 HOME MENU Press to display the menu with TV functions and settings See Using the Menus on page 25 6 0 9 ENT Press 0 9 to select a channel Press ENT to change channels immediately 7 Use with 0 9 to select digital channels For example to enter 2 1 press and 8 MUTING Press to mute t...

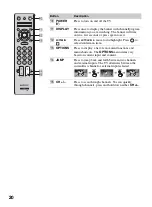
Page 20: ...o move focus highlight Press to select confirm an item qd OPTIONS Press to display a list of convenient functions and menu shortcuts The OPTIONS menu items vary based on current input and content qf JUMP Press to jump back and forth between two channels and external inputs The TV alternates between the current last channel or external input selected qg CH Press to scan through channels To scan qui...

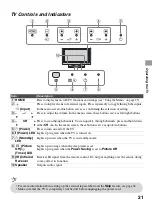
Page 21: ...wn either CH In the menu screen these buttons serve as up down buttons 5 1 Power Press to turn on and off the TV 6 Power LED Lights up in green when the TV is turned on 7 1 Standby LED Lights up in red when the TV is in standby mode 8 Picture Off Timer LED Lights up in orange when the sleep timer is set Lights up in green when the Power Saving is set to Picture Off 9 IR Infrared Receiver Receives ...

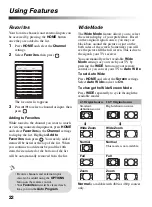
Page 22: ...or just on the both sides of the screen Sometimes you will see the picture fill the full screen This is due to the signals your TV receives You can manually select available Wide Mode settings as you watch your TV by pressing the WIDE button on your remote control or you can set your TV to Auto Wide To set Auto Wide Press HOME and select the Screen settings Select Auto Wide and set to On To change...

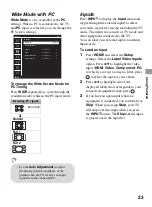
Page 23: ...he Setup settings Select the Label Video Inputs option Press V v to highlight the video input HDMI Video Component PC to which you want to assign a label press to select the input of your choice 2 Press V v to highlight one of the displayed labels that corresponds to your connected equipment then press 3 If you have an open input where no equipment is connected you can label it as Skip When you as...

Page 24: ...connect the USB cable Do not remove the USB device The data on the USB device may be damaged Sony will not be held liable for any damage to or loss of data on the recording media due to a malfunction of any connected devices or the TV USB playback is supported for the following photo file formats JPEG JPEG format files with the extension jpg and conforming to DCF 2 0 or Exif 2 21 USB playback is s...

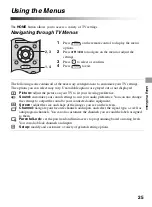
Page 25: ... Picture adjust the picture on your TV to fit your viewing preference Sound customize your sound settings to suit your audio preference You can also change the settings to output the sound to your connected audio equipment Screen adjust the size and shape of the images you see on the screen Channel navigate your favorite channels and inputs and select the signal type as well as autoprogram channel...

Page 26: ...darken the picture Color Adjust to increase or decrease color intensity Hue Adjust to increase or decrease the green tones Color Temperature White adjustment Cool Select to give the white colors a bluish tint Neutral Select to give the white colors a neutral tint Warm 1 Warm 2 Select to give the white colors a reddish tint Warm 2 gives a redder tint than Warm 1 Sharpness Adjust to sharpen or softe...

Page 27: ...r stereo reception when viewing a program broadcast in stereo Auto SAP Select to automatically switch the TV to second audio programs when a signal is received If no SAP signal is present the TV remains in Stereo mode Mono Select for mono reception Use to reduce noise during weak stereo broadcasts Alternate Audio Digital channels only Select among the available options to switch among the alternat...

Page 28: ...he PC settings screen appears instead of the Screen settings Wide Mode Normal Select to display in the original image size Full 1 Select to enlarge the picture to fill the display area keeping its original aspect ratio Full 2 Select to enlarge the picture to fill the display area Auto Adjustment Select to automatically adjust the display position and phase of the picture when the TV receives an in...

Page 29: ...rt Auto Program Show Hide Channels Allows you to show or hide channels that appear when you use the CH buttons 1 Press V v to scroll through the channels until you find the channel you want to show or hide Then press to select it 2 Press V v to determine if the channel will be shown or hidden Then press to select it You should run Auto Program after changing the Signal Type setting Running Auto Pr...

Page 30: ...Downloadable U S Rating off No programs that contain downloadable ratings are blocked from viewing Custom Select to block programs based on downloadable ratings Clear All Select to clear the entire downloadable rating system Unrated Available only when Country is set to U S A Allow Allows programs and movies that are broadcasted without a rating Block Blocks all programs and movies that are broadc...

Page 31: ...parental guidance is suggested for children under 17 NC 17 and X No one 17 or under allowed TV Rating Block programs by their rating content or both Age Based Ratings TV Y All children TV Y7 Directed to children age 7 and older TV G General audience TV PG Parental guidance suggested TV 14 Parents strongly cautioned TV MA Mature audience only Content Based Ratings FV Fantasy violence D Suggestive d...

Page 32: ...ure To reactivate the Parental Lock settings turn off the TV When the TV is turned on again your Parental Lock settings are reactivated Option Description English Rating C All children C8 Children 8 years and older G General programming PG Parental guidance 14 Viewers 14 and older 18 Adult programming French Rating G General programming 8 ans Not recommended for young children 13 ans Not recommend...

Page 33: ...mation presented using either half or the whole screen if available Digital CC When the digital closed caption service is available select from the Service 1 6 or CC1 4 Digital CC Options Allows you to make additional settings for digital closed caption options Select As Broadcast or Custom The Custom option is available on the Digital CC setting Custom Allows you to customize the following settin...

Page 34: ...able it Auto Shut Off Select On to automatically power off the TV when no input signal is detected for a certain period of time Select Off to disable this function Product Support Contact Sony Sony contact information is available on this screen for your convenience TV specific information such as Model Name Serial Number Software Version and downloadable ratings if available from the TV are displ...

Page 35: ... kHz Vertical frequency Hz Standard Signals Horizontal Pixel Vertical Line VGA 640 480 31 5 60 VGA SVGA 800 600 37 9 60 VESA Guidelines XGA 1 024 768 48 4 60 VESA Guidelines WXGA 1 280 768 47 4 60 VESA 1 280 768 47 8 60 VESA 1 360 768 47 7 60 VESA This TV s PC input does not support Sync on Green or Composite Sync This TV s PC VGA input does not support interlaced signals Your PC must support one ...

Page 36: ...this TV especially to determine the strength of the wall for withstanding the TV s weight Be sure to use the screws supplied with the Wall Mount Bracket when attaching the mounting hooks to the TV set The supplied screws are designed as indicated by illustration when measured from the attaching surface of the mounting hook The diameter and length of the screws differ depending on the Wall mount br...

Page 37: ... Wall Mount Bracket to your installer To Sony Dealers and Licensed Contractors To avoid injury and property damage read these instructions carefully Periodic inspection and maintenance is highly recommended to ensure that TV is securely mounted Note when installing When using the SU WL500 Wall Mount Bracket the space between the wall and the TV will be 6 cm 2 3 8 inches Use this space to route cab...

Page 38: ... slightly depending on the installation CAUTION The wall that the TV will be installed on should be capable of supporting a weight of at least four times that of the TV Refer to your TV s operating instructions for its weight Step 3 Installing the Base Bracket on the wall Refer to the Instructions for SU WL500 Unit mm inches TV Dimensions Screen center dimensions Length for each mounting angle Wei...

Page 39: ... Hooks to the rear of the TV Refer to the Screw and Hook Locations Diagram Table see page 40 1 Secure the Attachment Parts to the rear of the TV using the two screws Screws PSW 5 16 are common for attaching the Table Top Stand Thick and soft cloth Screw PSW 5 16 supplied Attachment Parts supplied When installing the TV on the wall one screw will be remained Be sure to store it in safe place keepin...

Page 40: ...3 Be sure to tighten the screws with equal torque strength Screw and Hook Locations Diagram Table TV Model Screw location Hook location KDL 32BX330 32BX331 d g c Screw location When installing the Mounting Hooks on the TV Hook location When installing the TV onto Base Bracket Screw PSW 6 16 Mounting Hook Wall TV ...

Page 41: ...0 Step 5 Installing the TV on the wall Refer to the Instructions for SU WL500 When you put the TV back on the Table Top Stand reverse the above steps When moving the TV do not squeeze the bottom of the front panel too tight Remove the screws or install the Mounting Hook on a stable and level surface ...

Page 42: ... the V button when the TV is turn on IMPORTANT The factory reset will clear all of your customized settings including the Parental Lock setting When the Password is lost or cannot remember enter the master password 4357 This password clears your previous password and allows you to enter a new password Condition Explanation Solution No picture No picture Check the Power Saving settings see page 34 ...

Page 43: ...is connected using a 75 ohm coaxial cable not supplied Keep the antenna cable away from other connecting cords To avoid TV interference make sure to use an undamaged antenna cable Blurry picture Poor color Transporting the TV from a cold to a warm location or a sudden change in room temperature may cause moisture condensation resulting in a blurry picture or poor color Turn off your TV and wait a ...

Page 44: ...option and no text is available see page 33 To turn off this feature set the CC Display option to Off If you were trying to select closed captioning select CC1 instead of Text1 4 Black bands appear at the edges of the screen Some wide screen programs are filmed in aspect ratios that are greater than 16 9 this is especially common with theatrical releases Your TV will show these programs with black...

Page 45: ...ers Files or folders are populated based on their time stamps Photo music files or folders exceeding the limit will not be displayed Photo images appear small in the screen Set display size to expanded Whether or not photo images can or cannot be displayed in full screen depends on the resolution or aspect ratio of the file Photo images or folders take time to display Depending on the image dimens...

Page 46: ...r which should allow you to receive unscrambled digital cable television programming via subscription service to a cable service provider Availability of digital cable television programming in your area depends on the type of programming and signal provided by your cable service provider For Customers in the United States The lamp in this product contains mercury Disposal of these materials may b...

Page 47: ...lby Digital PC Input see page 35 DIGITAL AUDIO OUT OPTICAL PCM Dolby Digital optical signal AUDIO OUT FIX Stereo mini jack 500 mVrms Typical PC IN D sub 15 pin analog RGB 0 7 Vp p 75 ohms positive See the PC Input Signal Reference Chart for PC and HDMI IN on page 35 PC HDMI IN 1 AUDIO INPUT Stereo mini jack 500 mVrms Typical Impedance 47 kilohms USB JPEG MP3 JPEG Power and others Power requirement...

Page 48: ...12 Sony Corporation Printed in U S A 4 420 038 11 2 For Your Convenience Online Registration Be sure to register your TV United States Canada http productregistration sony com http www sony ca registration ...

Reviews: