background image

KDL-32/40EX720,721,723,724(AEP/UK)

4

WARNINGS AND CAUTIONS 

- ENGLISH

CAUTION

These servicing instructions are for use by qualified service personnel only.

To reduce the risk of electric shock, do not perform any servicing other than that contained in the operating instructions unless you are qualified to do so.

WARNING!!

An isolation transformer should be used during any service to avoid possible shock hazard, because of live chassis.

The chassis of this receiver is directly connected to the ac power line.

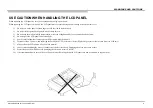
CARRYING THE TV

Be sure to follow these guidelines to protect your property and avoid causing serious injury.

• Carry the TV with an adequate number of people; larger size TVs require two or more people.

• Correct hand placement while carrying the TV is very important for safety and to avoid damages.

SAFETY-RELATED COMPONENT WARNING!!

Components identified by shading and ! mark on the schematic diagrams, exploded views, and in the parts list are critical for safe operation. Replace these components with Sony 

parts whose part numbers appear as shown in this manual or in supplements published by Sony. Circuit adjustments that are critical for safe operation are identified in this manual. 

Follow these procedures whenever critical components are replaced or improper operation is suspected.

Summary of Contents for BRAVIA KDL-32EX720

Page 1: ...1 0 10 2011 Original manual issue LCD Digital Color TV 9 888 458 01 HISTORY INFORMATION FOR THE FOLLOWING MANUAL ORIGINAL MANUAL ISSUE DATE 10 2011 AZ2F CHASSIS Segment 3a 2 KDL 32 40EX720 721 723 724 AEP UK S N range 1 000 001 1 950 000 ...

Page 2: ...SERVICE MANUAL LCD Digital Color TV AZ2F CHASSIS Segment 3a 2 9 888 458 01 ...

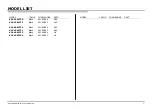
Page 3: ... LIST MODEL COLOR COMMANDER DEST MODEL COLOR COMMANDER DEST KDL 32EX720 Black RM ED044 AEP KDL 32EX721 Black RM ED041 AEP KDL 40EX720 Black RM ED044 AEP KDL 40EX721 Black RM ED041 AEP KDL 40EX723 Black RM ED044 UK KDL 40EX724 Black RM ED041 UK ...

Page 4: ...e guidelines to protect your property and avoid causing serious injury Carry the TV with an adequate number of people larger size TVs require two or more people Correct hand placement while carrying the TV is very important for safety and to avoid damages SAFETY RELATED COMPONENT WARNING Components identified by shading and mark on the schematic diagrams exploded views and in the parts list are cr...

Page 5: ...au moins deux personnes Lors du transport du téléviseur l emplacement des mains est très important pour votre sécurité ainsi que pour éviter de causer des dommages ALERTE Afi n d eviter tout risque d electrocution provenant d un chassis sous tension un transformateur d isolement doit etre utilise lors de tout depannage Le chassis de ce recepteur est directement raccorde a l alimentation du secteur...

Page 6: ...n areas of high humidity for an extended period of time 4 Do not expose the LCD panel to direct sunlight 5 Avoid contact with water It may cause a short circuit within the module 6 Disconnect the AC power when replacing the backlight CCFL or inverter circuit High voltage occurs at the inverter circuit at 650Vrms 7 Always clean the LCD panel with a soft cloth material 8 Use care when handling the w...

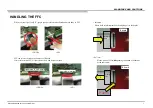
Page 7: ...ard and plunge it to the depths Please pull out FFC while pushing the button of both ends at the same time Reinforce plate B board FFC can reverse insertion to connector of B board If reverse insertion FFC all pins short circuit and board is broken Upper side is GND shield Upper side is terminal Pull out HANDLING THE FFC WARNINGS AND CAUTIONS Reinforce plate GOOD NG B board ...

Page 8: ...Be absolutely certain that you have replaced all the insulators 4 Look for unauthorized replacement parts particularly transistors that were installed during a previous repair Point them out to the customer and recommend their replacement 5 Look for parts which though functioning show obvious signs of deterioration Point them out to the customer and recommend their replacement 6 Check the line cor...

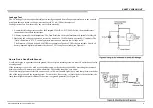
Page 9: ...ers must have an accurate low voltage scale The Simpson s 250 and Sanwa SH 63TRD are examples of passive VOMs that are suitable Nearly all battery operated digital multimeters that have a 2 VAC range are suitable see Figure A How to Find a Good Earth Ground A cold water pipe is a guaranteed earth ground the cover plate retaining screw on most AC outlet boxes is also at earth ground If the retainin...

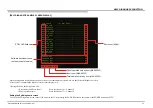
Page 10: ...o reveal past problems and how often these problems occur 0 5 0 5 3 DISPLAY OF STANDBY LED FLASH COUNT SELF DIAGNOSTIC SCREEN DISPLAY For errors with symptoms such as power sometimes shuts off or screen sometimes goes out that cannot be confirmed it is possible to bring up past occurrences of failure for confirmation on the screen To Bring Up Screen Test In standby mode press buttons on the remote...

Page 11: ...ash time Total operation time by hour MAX 65535 Boot count MAX 65535 Panel operation time by hour MAX 65535 Since the diagnostic results displayed on the screen are not automatically cleared always check the self diagnostic screen After you have completed the repairs clear the result display to 0 Clearing the Self Check Diagnostic List 1 Error history and Error count Press the Channel 8 Channel 0 ...

Page 12: ...uring the disassembly or assembly of parts Note When removing the rear cover to prevent damaging the rear cover and power supply cord please refer to APPENDIX 1 Note The Bezel and LCD panel have installation points with double sided tape For the procedure of those disassembly and assembly methods please refer to APPENDIX 2 ...

Page 13: ...1 KDL 32EX720 721 1 1 1 STAND BLOCK HEAD STAND NECK AND BASE STAND DISASSEMBLY HEAD STAND NECK BASE STAND 1 Screw USER SCREW ST Inside bag screw assy 3 Screws SCREW PSW M5X16 Inside bag screw assy 2 Screws USER SCREW ST Inside bag screw assy ...

Page 14: ...6 Screws SCREW PSW M3X6 W12 P N FX0001901 7 Screws SCREW BVTP 4X12 TYPE2 IT 3 P N FX0005801 2 Screws SCREW ORNAMENTAL M6X12 P N FX0066301 1 Screw SCREW BVTP 3X12 TYPE2 IT 3 P N FX0003779 2 Screws JOINT STAND P N FX0002101 AC COVER REAR COVER AC COVER REAR COVER 1 1 KDL 32EX720 721 ...

Page 15: ...KDL 32 40EX720 721 723 724 AEP UK 15 DISASSEMBLY 1 1 3 SWITCH UNIT AND SPEAKER SWITCH UNIT SPEAKER 1 1 KDL 32EX720 721 ...

Page 16: ...KDL 32 40EX720 721 723 724 AEP UK 16 DISASSEMBLY 1 1 4 HARNESS FLEXIBLE FLAT CABLE 56 PIN CONNECTOR ASSY 28P CONNECTOR ASSY 14P FLEXIBLE FLAT CABLE HARNESS ASSY 1 1 KDL 32EX720 721 ...

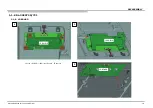
Page 17: ...KDL 32 40EX720 721 723 724 AEP UK 17 1 1 5 G10A BOARD DISASSEMBLY 1 2 3 5 Screws SCREW PSW M3X6 P N FX0001341 G10A BOARD G10A BOARD INSULATION SHEET 1 1 KDL 32EX720 721 ...

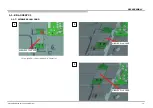
Page 18: ...KDL 32 40EX720 721 723 724 AEP UK 18 1 1 6 LD BOARD DISASSEMBLY 1 2 3 4 Screws SCREW PSW M3X6 P N FX0001341 LD SHIELD LD BOARD LD SHIELD 1 1 KDL 32EX720 721 ...

Page 19: ...KDL 32 40EX720 721 723 724 AEP UK 19 1 1 7 WIRELESS LAN CARD DISASSEMBLY 1 2 3 1 Screw SCREW PSW M3X6 P N FX0001341 WIRELESS LAN CARD WIRELESS LAN CARD WIRELESS LAN CARD 1 1 KDL 32EX721 ...

Page 20: ...X720 721 723 724 AEP UK 20 1 1 8 ANTENNA AND WIFI HOLDER V DISASSEMBLY 1 2 4 ANTENNA 3 1 Screw SCREW PSW M3X6 P N FX0001341 1 Screw SCREW PSW M3X6 P N FX0001341 ANTENNA WIFI HOLDER V WIFI HOLDER V 1 1 KDL 32EX721 ...

Page 21: ...X720 721 723 724 AEP UK 21 1 1 9 ANTENNA AND WIFI HOLDER H DISASSEMBLY 1 2 4 ANTENNA 3 1 Screw SCREW PSW M3X6 P N FX0001341 1 Screw SCREW PSW M3X6 P N FX0001341 ANTENNA WIFI HOLDER H WIFI HOLDER H 1 1 KDL 32EX721 ...

Page 22: ...KDL 32 40EX720 721 723 724 AEP UK 22 1 1 10 SIDE BRACKET AND BATV BOARD DISASSEMBLY 1 2 3 5 Screws SCREW PSW M3X6 P N FX0001341 BATV BOARD BATV BOARD BATV BOARD SIDE BRACKET 1 1 KDL 32EX720 721 ...

Page 23: ...KDL 32 40EX720 721 723 724 AEP UK 23 1 1 11 PANEL BRACKET DISASSEMBLY PANEL BRACKET C PANEL BRACKET C PANEL BRACKET C PANEL BRACKET H 1 1 KDL 32EX720 721 ...

Page 24: ...KDL 32 40EX720 721 723 724 AEP UK 24 1 1 12 LCD PANEL DISASSEMBLY 1 LCD PANEL LCD PANEL 2 1 1 KDL 32EX720 721 ...

Page 25: ...L 32 40EX720 721 723 724 AEP UK 25 1 1 13 HMS3 BOARD AND FRENEL LENS DISASSEMBLY 1 2 1 Screw SCREW BVTP 3X8 TYPE2 IT 3 P N FX0012601 HMS3 BOARD 3 4 5 FRENEL LENS HMS3 BOARD HMS3 BOARD 1 1 KDL 32EX720 721 ...

Page 26: ...KDL 32 40EX720 721 723 724 AEP UK 26 1 1 14 HLR2 BOARD DISASSEMBLY 1 3 2 HLR2 BOARD HLR2 BOARD HLR2 BOARD BEZEL ASSY 1 1 KDL 32EX720 721 ...

Page 27: ...KDL 32 40EX720 721 723 724 AEP UK 27 1 1 15 HEM2 BOARD AND BEZEL ASSY DISASSEMBLY 1 2 BEZEL ASSY 3 HEM2 BOARD HEM2 BOARD HEM2 BOARD 1 1 KDL 32EX720 721 ...

Page 28: ...STAND BLOCK HEAD STAND NECK AND BASE STAND DISASSEMBLY HEAD STAND NECK BASE STAND 1 2 KDL 40EX720 721 723 724 1 Screw USER SCREW ST Inside bag screw assy 3 Screws SCREW PSW M5X16 Inside bag screw assy 2 Screws USER SCREW ST Inside bag screw assy ...

Page 29: ...OVER REAR COVER AC COVER REAR COVER 1 2 KDL 40EX720 721 723 724 5 Screws SCREW PSW M3X6 W12 P N FX0001901 7 Screws SCREW BVTP 4X12 TYPE2 IT 3 P N FX0005801 2 Screws SCREW ORNAMENTAL M6X12 P N FX0006301 1 Screw SCREW BVTP 3X12 TYPE2 IT 3 P N FX0003779 2 Screws JOINT STAND P N FX0002101 ...

Page 30: ...KDL 32 40EX720 721 723 724 AEP UK 30 DISASSEMBLY 1 2 3 SWITCH UNIT AND SPEAKER SWITCH UNIT SPEAKER 1 2 KDL 40EX720 721 723 724 ...

Page 31: ...KDL 32 40EX720 721 723 724 AEP UK 31 DISASSEMBLY 1 2 4 HARNESS CONNECTOR ASSY 14P HARNESS ASSY FLEXIBLE FLAT CABLE 56 PIN FLEXIBLE FLAT CABLE CONNECTOR ASSY 28P 1 2 KDL 40EX720 721 723 724 ...

Page 32: ...KDL 32 40EX720 721 723 724 AEP UK 32 1 2 5 G4B BOARD DISASSEMBLY 1 2 3 3 Screws SCREW PSW M3X6 P N FX0001341 G4B BOARD G4B BOARD INSULATION SHEET 1 2 KDL 40EX720 721 723 724 ...

Page 33: ...KDL 32 40EX720 721 723 724 AEP UK 33 1 2 6 LD BOARD DISASSEMBLY 1 2 3 4 Screws SCREW PSW M3X6 P N FX0001341 LD SHIELD LD BOARD LD SHIELD 1 2 KDL 40EX720 721 723 724 ...

Page 34: ...KDL 32 40EX720 721 723 724 AEP UK 34 1 2 7 WIRELESS LAN CARD DISASSEMBLY 1 2 3 1 Screw SCREW PSW M3X6 P N FX0001341 WIRELESS LAN CARD WIRELESS LAN CARD WIRELESS LAN CARD 1 2 KDL 40EX721 724 ...

Page 35: ...20 721 723 724 AEP UK 35 1 2 8 ANTENNA AND WIFI HOLDER V DISASSEMBLY 1 2 4 ANTENNA 3 1 Screw SCREW PSW M3X6 P N FX0001341 1 Screw SCREW PSW M3X6 P N FX0001341 ANTENNA WIFI HOLDER V WIFI HOLDER V 1 2 KDL 40EX721 724 ...

Page 36: ...20 721 723 724 AEP UK 36 1 2 9 ANTENNA AND WIFI HOLDER H DISASSEMBLY 1 2 4 ANTENNA 3 1 Screw SCREW PSW M3X6 P N FX0001341 1 Screw SCREW PSW M3X6 P N FX0001341 ANTENNA WIFI HOLDER H WIFI HOLDER H 1 2 KDL 40EX721 724 ...

Page 37: ...KDL 32 40EX720 721 723 724 AEP UK 37 1 2 10 SIDE BRACKET AND BATV BOARD DISASSEMBLY 1 2 3 5 Screws SCREW PSW M3X6 P N FX0001341 BATV BOARD BATV BOARD BATV BOARD SIDE BRACKET 1 2 KDL 40EX720 721 723 724 ...

Page 38: ...KDL 32 40EX720 721 723 724 AEP UK 38 1 2 11 PANEL BRACKET DISASSEMBLY PANEL BRACKET C PANEL BRACKET C PANEL BRACKET C PANEL BRACKET H PANEL BRACKET C 1 2 KDL 40EX720 721 723 724 ...

Page 39: ...KDL 32 40EX720 721 723 724 AEP UK 39 1 2 12 LCD PANEL DISASSEMBLY 1 LCD PANEL LCD PANEL 2 1 2 KDL 40EX720 721 723 724 ...

Page 40: ... 40EX720 721 723 724 AEP UK 40 1 2 13 HMS3 BOARD AND FRENEL LENS DISASSEMBLY 1 2 1 Screw SCREW BVTP 3X8 TYPE2 IT 3 P N FX0003779 HMS3 BOARD 3 4 5 FRENEL LENS HMS3 BOARD HMS3 BOARD 1 2 KDL 40EX720 721 723 724 ...

Page 41: ...KDL 32 40EX720 721 723 724 AEP UK 41 1 2 14 HLR2 BOARD DISASSEMBLY 1 3 2 HLR2 BOARD HLR2 BOARD HLR2 BOARD BEZEL ASSY 1 2 KDL 40EX720 721 723 724 ...

Page 42: ...KDL 32 40EX720 721 723 724 AEP UK 42 1 2 15 HEM2 BOARD AND BEZEL ASSY DISASSEMBLY 1 2 BEZEL ASSY 3 HEM2 BOARD HEM2 BOARD HEM2 BOARD 1 2 KDL 40EX720 721 723 724 ...

Page 43: ...l when you enter Service Mode you can see Digital service mode Whenever you press OPTIONS or JUMP on remote each service mode is changed Digital Chassis VPC Press OPTIONS or JUMP button Item number Category number 5 DISPLAY TV POWER Channel Volume DIGITAL SERVICE 001 OP 000 VERS MAIN EXT DM1 301W00AA RF 01 05 WF1 003W00AA WF 2 0 0 99 DF1 001W00AA WF 0B YM1 010W00AA CAM X XXX DB2 105W00AA FD XXXX D...

Page 44: ...rvice mode then turn off the power switch Test TV Display 5 Vol Up Power Service mode on Other Power off on Service mode off Jump Option Mute 0 10 or 0 9 0 8 Mute 0 3 6 2 5 1 4 The flow of control Change module Write data Execute Read data Test reset Data up down Category up down Item up down Function ...

Page 45: ...y pressing 3 or 6 Each range of these items is 0 255 c Press mute 0 on remote to save the data SERVICE comment is changed to WRITE indicating writing process d After a while WRITE comment returns to SERVICE which means writing process is done VPC SERVICE 006 WB 000 R_DRV 128 VPC SERVICE 006 WB 001 G_DRV 128 VPC SERVICE 006 WB 002 B_DRV 128 VPC SERVICE 006 WB 003 R_BKG 128 VPC SERVICE 006 WB 004 G_...

Page 46: ...on remote b Change data from 0 to 1 by pressing 1 4 on remote c Wait until data is changed from 1 to 3 d When data is changed from 1 to 3 restoring process is finished e In case data is changed from 1 to 2 keep default setting No more process is needed End restore process VPC SERVICE 000 DATA_COPY 000 BU_TRANS 3 DATA TRANSFER SUCCESS Restore process VPC SERVICE 000 DATA_COPY 000 BU_TRANS 1 DO NOT ...

Page 47: ... VCOM category by pressing 2 5 on remote e Select 001 ADJUST item by pressing 1 4 on remote f Change data by pressing 3 6 on remote controller g Finish the adjustment when the picture seems OK Attention Every time the data changed by pressing 3 6 Key the VCOM pattern will display for 5s and in the mean time OSD will disappear After the 5s period VCOM pattern will disappear and OSD will display aga...

Page 48: ...ss Mute on remote It shows green SERVICE changes to green WRITE b Press 0 or enter on remote Green WRITE changes to red WRITE It indicate writing is processing c After a while red WRITE changes to green SERVICE Writing process is done at this point 3 TV reboot is necessary for applying data change ADJUSTMENT CHASSIS WRITE 000 WYVERN 000 S2_NOISE_TH 32 ...

Page 49: ... Press 2 5 on remote to select up down category b Press 1 4 on remote to select up down Item c Press 0 10 on remote to select item 2 Change Data of Digital service mode 003 DIG_SRV_MODE category 003 DIG_SRV_MODE is one category of Digital service mode Please note because this operation is special a Press 2 5 on remote to select 003 DIG_SRV_MODE b Press 1 4 on remote to select up down Item c Press ...

Page 50: ...he wrong setting is written TV may not operate 000 SEG Select JDM code information 001 DEST Select destination information 002 MODELNAME Select model name 004 SERIAL Can be set only once for the new board a Change data for each model b Press Mute 0 on remote sequentially It shows red WRITE It indicate writing is processing c After a while Red WRITE disappears Writing process is done after a while ...

Page 51: ... RST Press mute on remote Added green EXE after green RST d Press 0 on remote Green EXE RST changes to red EXE RST It indicate writing is processing After a while red EXE RST changes to green SERVICE And all LED lights Writing process is done at this point Another way You can set to shipping condition w o entering Service Mode Cursor Up on remote Power Key on Front panel TIMER Standby POWER ...

Page 52: ...ED output power strength Change Data of VPC service mode a Select 005 TD category by pressing 2 5 on remote b Select 000 EMIT_STR item by pressing 1 4 on remote c Change data from 0 to 1 by pressing 3 6 on remote 0 Strong Default 1 Weak d Save by pressing Mute 0 or 10 Reboot VPC SERVICE 005 TD 000 EMIT_STR 1 ...

Page 53: ...Dead Set Stationary colored lines or dots No video one of Inputs No video all Inputs No Remote Wireless can t connect No Audio Skype Can t Work BATV BOARD G BOARD HLR2 BOARD SPEAKER Skype MODULE WIFI MODULE LD BOARD LVDS CABLE T CON LCD PANEL Problem POWER POWER AUDIO POWER PANEL TCON PANEL INVERTER TEMP Software EMITTER doubtful part Few possibility Reference Video missing or distorted Symptoms S...

Page 54: ...ower See Standby LED Blink See No Picture No Sound Is the network connection OK See Can t connect network No Yes Yes No No Yes See 3D malfunction No Yes Is the 3D function OK Do the buttons on the TV Remote Commander work properly See TV Commander button malfunction No No Yes No Yes See Skype malfunction No Is the Skype function OK See HDD Rec malfunction No Is the HDD Rec function OK Yes Yes ...

Page 55: ...L 32 40EX720 721 723 724 AEP UK 55 TROUBLE SHOOTING 3 3 NO POWER No Power Check STBY 3 3V at pin 10 of CN6001 on the B Board Harness G Board Replace Between G Board to B Board Harness B Board NG OK NG OK ...

Page 56: ...K 56 1 2 times blinking Main Power Error TROUBLE SHOOTING 3 4 STANDBY LED BLINK 2 times blinking Check REG12V at pins 2 3 of CN6001 on the B Board B Board Harness G Board Replace Between G Board to B Board Harness 12V NG 12V OK NG OK ...

Page 57: ... B Board F6001 IC6005 etc B Board Speaker Check 3 3V_MAIN at pins 9 10 of CN9003 on the B Board Check Speaker Impedance at SP Connector F6003 IC6003 etc B Board Check AUDIO 12 5V at pins 8 9 of CN6001 on the B Board G Board Check 12 5V at F4601 on the B Board F4601 IC4601 etc B Board IC4601 etc B Board DC_ALERT NG OK AUDIO AUDIO FE BE Communication NG OK NG OK NG OK NG OK ...

Page 58: ...3 4 times blinking Balancer Error 4 time blinking Check PANEL_FAIL at pin 7 of CN6002 on the B Board Panel B Board Between 0 84V to 2 65V Change G Board G Board Below 0 84V Symptom improvement NG Change LED Driver Board LED Driver Board Symptom improvement ...

Page 59: ...ng Check PANEL_VCC at pin 1 of CN6001 on on the B Board G Board Replace the Harness Between G and Panel a Replace the LVDS Harness Panel T con change B Board Harness LVDS Harness Panel T con a exclude 60Hz Panel Model 12V NG 12V OK NG Symptom improvement Symptom improvement Symptom improvement NG NG ...

Page 60: ...ard and the LED driver board Harness Change G board G Board NG Light Source Inside Panel Module Change LED driver board LED Driver Board NG Check FFC connection between the LED driver board and the light source inside the panel module FFC Connection NG NG OK OK Symptom improvement Symptom improvement Change B board B Board Symptom improvement ...

Page 61: ... 7 times blinking Setting circumstance is OK Temperature Ventilation etc Set to another Location etc NO YES Change B Board and Aging a few hours B Board OK Panel 7 8 times blinking Software Error 8 times blinking If the Symptom Improved by changing the WIFI module B Board NO WIFI Module YES ...

Page 62: ...0 721 723 724 AEP UK 62 TROUBLE SHOOTING 8 10 times blinking Emitter Error 10 times blinking Check the harness between the T con Board and the HEM2 Board Harness NG OK Change HEM2 Board HEM2 Board OK T CON Board NG ...

Page 63: ...URE No Picture Press HOME Key OSD displayed Replace the B T con T con LD FFC G Board Check the G LD Harness No Change B Board Change G Board B Board Harness B T con T con LD FFC B Board LCD Panel T con LD Yes OK NG NG OK NG OK NG OK TROUBLE SHOOTING ...

Page 64: ... 723 724 AEP UK 64 TROUBLE SHOOTING 3 6 NO SOUND No Sound Check the Speaker Harness Speaker Harness Replace the B Board B Board Speaker OK NG NG OK Check the Speakers setting Change to TV Speaker Audio System TV Speakers ...

Page 65: ...724 AEP UK 65 3 7 TV COMMANDER BUTTONS MALFUNCTION TROUBLE SHOOTING 1 TV button malfunction Button malfunction on the TV Replace the Harness between B to Switch Unit Switch Unit Harness Switch Unit change B Board OK NG OK NG ...

Page 66: ...e commander Green LED light at power indicator OK NG Sensor is broken HLR Board B Board OK NG Mechanical ex bezel Green LED blinks at power indicator when using commander near sensor s window Check the Harness between the B Board and the HLR Board Exchange the Harness Exchange the HLR Board Harness OK NG OK OK NG NG ...

Page 67: ...twork on the TV Connection result Local Access Connection result Cable Connection OK NG OK NG Connection result Internet Access Proxy setting NG B Board Check the Ethernet Cable Ethernet Cable Check IP address and Local router setting Wired Set up IP address setting Check Local router DHCP server Auto Manual OK NG ...

Page 68: ...ven No signal Access Point B Board Error Message appear when the Wireless Network is selected USB Dongle NO YES NO YES 3 Internal Wireless Network malfunction Wireless Network on the TV Is the radio field Strength too weak or even No signal Access Point B Board Error Message appear when the Wireless Network is selected Wireless Module Harness NO YES NO YES ...

Page 69: ...ing environment Panel T con How to confirm IR output ex Look IR LED through CCD CMOS camera IR has been output on HEM board during 3D displaying Replace HEM2 board Symptom improvement Check whether there is interception thing between Emitter and glasses No Yes Yes Is 3D glasses power on Power on or Charge battery 3D glasses ...

Page 70: ...o run Skype App Spec USB overload Connect to other USB port B board Insert other Skype unit or USB dongle Skype unit B board Network connected Do network setup Yes No Yes No No OK NG OK NG OK NG Next page Yes 3 10 Skype MALFUNCTION 1 2 Unplug other USB device AC OFF ON TROUBLE SHOOTING ...

Page 71: ...Focus work Sound quality No video Manual Focus work Check Auto Focus area Enough network speed Skype unit Call Skype sound test Far end setting system Move unit away from speaker Skype unit Audio problem Video problem Previous page OK NG Yes No Yes No No Yes Yes NG 3 10 Skype MALFUNCTION 2 2 TROUBLE SHOOTING ...

Page 72: ...o the appropriate USB port Connect to the appropriate port No Yes USB Hub is inserted in between the USB port and HDD USB Hub is not supported Yes No Is the drive size larger than 32GB and Smaller than 2TB Only 32GB 2TB is supported No Yes All the setups and restrictions listed in iManual are cleared Check the iManual No Yes ...

Page 73: ...IGHT_ON DIMMER BACKLIGHT_MON PFC_PWR AC_MON DIMMER_DC TCON ON UARTA LOG UARTC Hotel ECS UARTD PEM_LOG I2CA Hotel_Clock MODE_PEM Reset SIRCS DIMMER2 TL JIG Hotel ECS Temp Sensor Sircs KEY LED Human Sensor Light Sensor STBY_LED POWER_LED TIMER_LED PIC_MUTE_LED REC_LED Light_Sensor_Det Human_Sensor_Det Power_KEY KEY UARTE Temp Sensor SIRCS I2CA X_Hotel_PWR_CTRL I2CA EQSW Temp Sensor Hotel Clock I2CB ...

Page 74: ...4 1 TCON_VCC 1 821 139 11 4 M W P 2 P _ 4 D D O _ L E N A P 3 2 9 2 P _ 4 D D O _ L E N A P C E R _ D E L R L H 9 2 3 5 1 5 1 NC 5 M W P 2 N _ 4 D D O _ L E N A P 2 2 0 3 N _ 4 D D O _ L E N A P E T U M _ C I P _ D E L R L H 0 3 7 6 1 6 1 NC 2 31 HLR GND 6 M W P 2 P _ 3 D D O _ L E N A P 1 2 1 3 P _ 3 D D O _ L E N A P 7 1 7 1 GND 7 M W P 2 N _ 3 D D O _ L E N A P 0 2 2 3 N _ 3 D D O _ L E N A P S...

Page 75: ... 24 1 T CON_VCC CN6001 1 842 569 11 HEADER ASSEMBLY FOR PWB 10P 7 9 AC_OFF_DET 1 8 POWERON 6 7 BL_ERR NC 6 NC NC 5 NC NC 4 NC 8 3 TCON_ON 3 2 PFC_PWR 9 1 GND CN6002 1 1 9 5 5 2 4 8 1 1 1 V 2 1 2 2 V 2 1 r e t t i m E D 3 3 3 D N G V a 3 Except EX720 Model 4 4 D N G GLS_CTR 5 5 GLS_CTRL2 6 6 EMI_FAIL 7 7 8 8 C N 1 821 135 11 CN6704 32 G10A CN6151 46 G5D SJM20 28WLB To B board 100106 T CON_Vcc12V 28...

Page 76: ... 4 1 TCON_VCC 1 821 139 11 4 M W P 2 P _ 4 D D O _ L E N A P 3 2 9 2 P _ 4 D D O _ L E N A P C E R _ D E L R L H 9 2 3 5 1 5 1 NC 5 M W P 2 N _ 4 D D O _ L E N A P 2 2 0 3 N _ 4 D D O _ L E N A P E T U M _ C I P _ D E L R L H 0 3 7 6 1 6 1 NC 6 M W P 2 P _ 3 D D O _ L E N A P 1 2 1 3 P _ 3 D D O _ L E N A P D N G R L H 1 3 2 7 1 7 1 GND 7 M W P 2 N _ 3 D D O _ L E N A P 0 2 2 3 N _ 3 D D O _ L E N...

Page 77: ...W O P 8 CN1002 4 0 0 9 N C R R E _ L B 7 6 0 844 177 01 NC 6 NC 1 774 667 51 JST NC 5 NC TL EX1 Connector FFC FPC 18P SM12B PBVSS TB LF SN 1 1 V 2 1 NC 4 NC N O _ N O C T 3 8 2 2 V 2 1 r e t t i m E D 3 3 3 D N G V a 3 3 2 PFC_PWR Except EX720 Model GND 4 4 9 1 GND 2 0 0 6 N C 5 5 L R T C _ S L G 1 1 9 5 5 2 4 8 1 6 6 2 L R T C _ S L G EMI_FAIL 7 7 8 8 C N 1 821 135 11 CN6704 37 G10A To B board 10...

Page 78: ...ATION BATV Board HLR2 Board Switch Unit G10A Board T CON Switch Unit HLR2 Board BATV Board HMS3 Board HMS3 Board T CON G4B Board LD Board LD Board HEM2 Board HEM2 Board Wireless LAN Card EX721 Only KDL 32EX720 721 KDL 40EX720 721 723 724 Wireless LAN Card EX721 724 Only ...

Page 79: ...uction parts of an assembled part are indicated with a collation number in the remark column Items marked are not stocked since they are seldom required for routine service Some delay should be anticipated when ordering these items IMPORTANT When replacing LCD Panel or Circuit Boards ensure that all Radiation Sheets and Insulation Sheets are in their correct positions in the TV set ...

Page 80: ...97 12 LOUDSPEAKER 3X10CM 3 1 838 271 12 POWER SUPPLY CORD WITH CONN 4 1 458 355 11 WIRELESS LAN CARD EX721 5 4 275 433 02 REAR COVER 32 6 1 754 746 11 ANTENNA EX721 7 1 754 748 11 ANTENNA EX721 8 4 259 168 11 COVER AC M 9 4 267 488 11 STAND HEAD M9 EX720 4 267 491 01 STAND HEAD M9 EX721 10 4 259 177 02 NECK M9 11 4 269 900 04 STAND BASE M2 EX720 4 267 580 03 STAND BASE A M1 EX721 6 ...

Page 81: ... 11 LCD PANEL FDMF315NN01 CMI PANEL 26 4 256 391 01 BRACKET PANEL C 27 4 256 392 02 BRACKET PANEL H 28 4 268 446 01 SHEET INSULATION G10 29 1 474 358 11 STATIC CONVERTER TV G10AV for S LCD PANEL CMI PANEL 1 474 359 11 STATIC CONVERTER TV G10BV for AUO PANEL 30 A 1796 818 A LD_BLK A MOUNT 31 A 1858 621 A BATV COMPE N4 SERVICE EX720 AEP EX721 A 1858 651 A BATV COMPE MHP SERVICE EX720 IT 32 4 258 700...

Page 82: ... 1 838 271 12 POWER SUPPLY CORD WITH CONN 4 1 458 355 11 WIRELESS LAN CARD EX721 724 5 4 275 424 02 REAR COVER 40 6 1 754 746 11 ANTENNA EX721 724 7 1 754 749 11 ANTENNA EX721 724 8 4 259 168 11 COVER AC M 9 4 267 495 11 STAND HEAD ML9 EX720 4 267 498 01 STAND HEAD ML9 EX721 723 724 10 4 259 180 02 NECK ML9 11 4 269 901 04 STAND BASE ML2 EX720 4 267 582 03 STAND BASE A ML1 EX721 724 4 267 558 02 S...

Page 83: ...S LCD PANEL 25 1 811 354 12 LCD PANEL A40V1 AUO PANEL 25 1 811 481 11 LCD PANEL C400HK2 LE1 CHI PANEL 26 4 256 391 01 BRACKET PANEL C 27 4 256 392 02 BRACKET PANEL H 28 4 268 443 02 SHEET INSULATION G4 29 1 474 300 11 STATIC CONVERTER TV G4B 30 A 1796 818 A LD_BLK A MOUNT 31 A 1858 621 A BATV COMPL N4 SERVICE EX720 AEP EX721 A 1858 622 A BATV COMPLN4 MHP SERVICE EX720 IT A 1867 186 A BATV COMPL N4...

Page 84: ...shown 4 262 708 02 CLAMPER CABLE Not shown 4 265 046 21 LABEL BAT V MOLD SIDE Not shown X 2549 819 2 BAG SCREW ASSY M See note on page 85 40 Inches 1 838 849 12 FLEXIBLE FLAT CABLE N1 40S CN2001 BAT V PANEL 1 1 910 801 10 CONNECTOR ASSY 14P CN6801 G4B CN1002 BLK 1 1 910 801 12 CONNECTOR ASSY 28P CN6001 BAT V CN6002 BAT V CN6151 G4B 1 1 910 801 41 FLEXIBLE FLAT CABLE 56 PIN CN11 T CON CN11 LD 1 1 9...

Page 85: ... NL PT 4 269 995 35 MANUAL INSTRUCTION EX720 AEP EX721 EX723 EX724 BG CZ DK FI GR HU IT NO PL RO SE SK TR 4 269 995 46 MANUAL INSTRUCTION EX720 AEP RU UA 4 269 995 54 MANUAL INSTRUCTION EX720 IT 4 269 995 92 MANUAL INSTRUCTION EX720 AEP EX721 CZ GR HU PL SK TR 1 489 475 11 REMOTE COMMANDER RM ED044 EX720 723 1 489 483 11 REMOTE COMMANDER RM ED041 EX721 724 Note The Bag Screw Assy contains the foll...

Page 86: ...723 724 AEP UK 86 END 9 888 458 01 English 2011JL08 Data Made in Japan 2011 10 SONY Corporation Consumer Products Services Group Home Entertainment Business Group Quality Assurance Div Service Promotion Dept Service Sec 1 ...

Page 87: ...hold the cable not to give any tension to the connector and scratch damage for the cable 3 Release the AC cable connector 4 Release the hooks of the COVER AC and remove it AC Cable 2 3 4 AC Cover Note Take care not to cut your hands when releasing the hooks especially on the metal RC Confirm the hooks are not broken before re using the COVER AC If the hooks are broken please replace with a new one...

Page 88: ...e lift Up the minimum Insert plastic part less than 15mm Do not use metal one Take care not to scratch parts Notice 6 6 5 4 3 2 1 PROCEDURE TO REMOVE THE REAR COVER 32 1 Remove all the screws on the Rear Cover and the AC Cover 2 Open the Rear Cover in the order as shown below ...

Page 89: ...roken before re using the COVER AC If the hooks are broken please replace with a new one 3 Open the Rear Cover with the COVER AC and the AC cable attached Note Make sure to hold the cable not to give any tension to the connector and scratch damage for the cable 4 Release the AC cable connector 5 Release the hooks of the COVER AC and remove it ...

Page 90: ... on the Rear Cover and the AC Cover 2 Open the Rear Cover in the order as shown below Note Do not open quickly when hooks 1 5 are locked This hook is automatically released Notice Insert your hand in the place shown in picture Insert your hand below screw hole as shown in picture Open RC slowly with care 1 2 APPENDIX 1 ...

Page 91: ...OVER AC and the AC cable attached Note Make sure to hold the cable not to give any tension to the connector and scratch damage for the cable 4 Release the AC cable connector 5 Release the hooks of the COVER AC and remove it Note Confirm the hooks are not broken before re using the COVER AC If the hooks are broken please replace with a new one ...

Page 92: ...23 724 AEP UK 92 1 1 2 3 4 5 6 4 5 6 APPENDIX 1 PROCEDURE TO ASSEMBLE THE REAR COVER 32 1 Put the Rear Cover from top side 2 Push and confirm the locks in the order as shown below 3 Confirm all the locks are fitting Notice ...

Page 93: ...E TO ASSEMBLE THE REAR COVER 40 1 Put the Rear Cover from top side 2 Push and confirm the locks in the order as shown below 3 Confirm all the locks are fitting 1 1 1 1 1 1 2 3 9 8 7 4 5 6 1 1 1 1 1 1 2 4 7 6 3 5 1 1 1 1 1 1 2 3 6 5 4 37 Inch 40 Inch 46 Inch ...

Page 94: ...re shown on the following pages Pushing hook Put off 1 Take off LED board to assist with tape peel off 2 Put hand between bezel and panel pull panel up and push bezel down as shown in the picture Should pull up metal area should not cell area 3 Moving hands along peeling off tape pull up and push down near the tape as you go along Moving hands step by step APPENDIX 2 1 PROCEDURE TO REMOVE THE LCD ...

Page 95: ... and stick new ones on P N 4 272 200 01 2 EXCHANGING THE DOUBLE SIDED TAPE APPENDIX 2 1 Peel off the double sided tape from the Panel Possibly remains on the Bezel side 2 positions 5x290mm t 0 4 2 positions 5x350mm t 0 4 32 37 2 positions 5x380mm t 0 4 40 46 3 positions 5x290mm t 0 4 32 40 inch 2 Stick double sided tape Peel off separate papers before panel puts on ...

Page 96: ...a Pay attention to the double sided tape put the panel on to the bezel assembly as shown below 3 PUTTING THE PANEL ON TO THE BEZEL 1 Put on upper side 2 Put down Care about positioning rib L R 32 37 40 46 55 60 inch 22 24 26 inch Please lock Panel with hooks of Bezel 2 Lock with hooks of Bezel Putting on Bracket panel 32 37 40 46 55 60 inch 22 24 26 inch Put brackets and confirm fixed by hook APPE...

Reviews: