background image

10

 GB

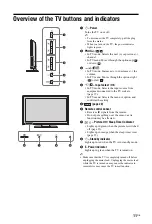
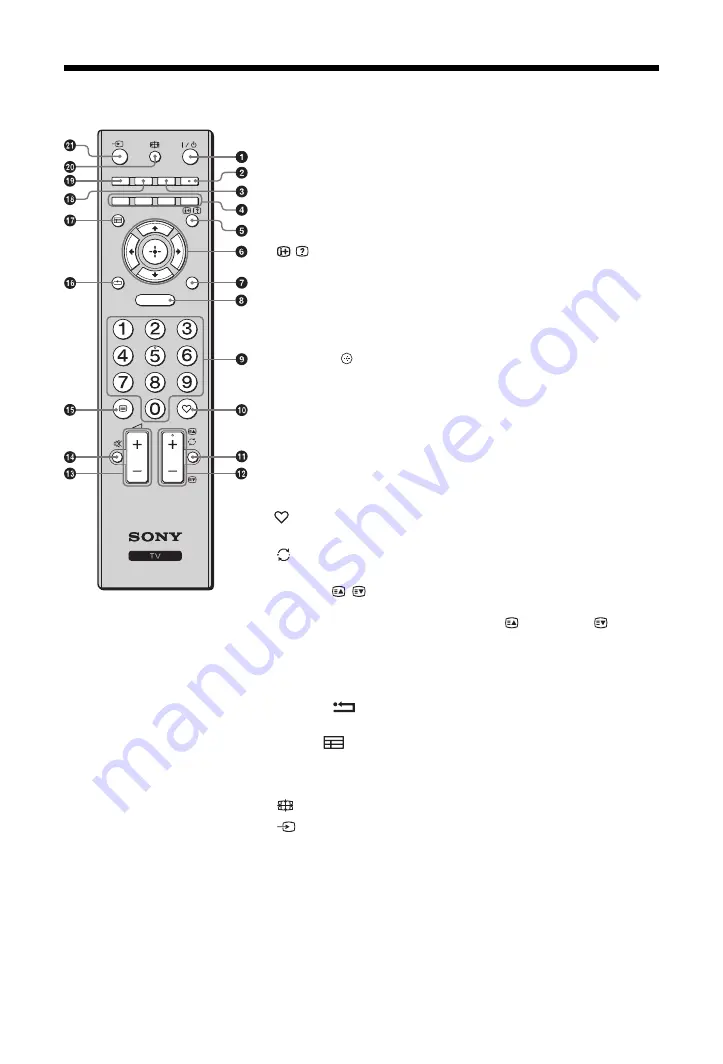
Overview of the remote

1

"/1

 – TV standby

Turns the TV on and off from standby mode.

2

AUDIO

Press to change the dual sound mode (page 22).

3

SCENE – Scene Select (page 13)

4

Coloured buttons (page 13, 15)

5

/  – Info/Text reveal

• In digital mode: Displays brief details of the programme currently being 

watched.

• In analogue mode: Displays information such as current channel number 

and screen format.

• In Text mode (page 13): Reveals hidden information (e.g. answers to a 

quiz).

6

F

/

f

/

G

/

g

/  

7

TOOLS (page 13, 18)

Enables you to access various viewing options and change/make 

adjustments according to the source and screen format.

8

MENU (page 20)

9

Number buttons

• In TV mode: Selects channels. For channel numbers 10 and above, press 

the second and third digit in quick succession.

• In Text mode: Enters the three digit page number to select the page.

0


 – Digital Favourite list

Press to display the Digital Favourite list that you have specified (page 15).

qa

 – Previous channel

Returns to the previous channel watched.

qs

PROG +/-/ /

• In TV mode: Selects the next (+) or previous (-) channel.

• In Text mode (page 13): Selects the next (

) or previous (

) page.

qd

2

 +/- – Volume 

qf

%

 – Mute the sound

qg

/

 – Text (page 13)

qh

RETURN / 

Returns to the previous screen of any displayed menu.

qj

GUIDE / 

 – EPG (Digital Electronic Programme Guide) (page 14)

qk

ANALOG – Analogue mode (page 12)

ql

DIGITAL – Digital mode (page 12)

w;

 – Screen mode (page 13)

wa

 – Input select

Selects the input source from equipment connected to the TV sockets 
(page 17).

z


• The number 5, PROG + and AUDIO buttons have tactile dots. Use the tactile dots 

as references when operating the TV.

RETURN

PROG

TOOLS

AUDIO

SCENE

ANALOG

DIGITAL

GUIDE

MENU

Summary of Contents for Bravia KDL-32P36 Series

Page 1: ...equirements of the EU ecolabelling scheme ES CAT 022 002 At Sony we are constantly rethinking and redesigning in order to create innovative digital entertainment products And we are also constantly rethinking and re evaluating our products processes and our potential impact on the planet Thanks to our results in that direction this product achieved the European Eco label award issued by the Europe...

Page 2: ...roject HDMI the HDMI logo and High Definition Multimedia Interface are trademarks or registered trademarks of HDMI Licensing LLC Manufactured under license from Dolby Laboratories Dolby and the double D symbol are trademarks of Dolby Laboratories The xx that appears on the model name corresponds to two numeric digits related to design or colour variation Introduction Notice for Digital TV function...

Page 3: ...ures from connected equipment 17 Playing Back Photo Music via USB 18 Using control for HDMI 18 Navigating through menus 20 Settings 21 Installing the Accessories Wall Mount Bracket 28 Specifications 30 Troubleshooting 32 Start up Guide 4 Watching TV Using Optional Equipment Using MENU Functions Additional Information Table of Contents for digital channels only Before operating the TV please read S...

Page 4: ... your local authority Handle the remote with care Do not drop or step on it or spill liquid of any kind onto it Do not place the remote in a location near a heat source a place subject to direct sunlight or a damp room 2 Attaching the stand Follow the assembling steps required to place on a TV stand 1 Open the carton box and take out the stand and the screws 2 Place the TV set on the stand Take ca...

Page 5: ...logue TV AV2 outputs to the current screen except PC HDMI Component 1080i 4 Preventing the TV from toppling over 1 Install a wood screw 4 mm in diameter not supplied in the TV stand AV1 AV2 Coaxial cable Connecting an aerial only Connecting an aerial VCR DVD recorder with SCART Scart lead VCR DVD recorder Coaxial cable Coaxial cable Connecting an aerial VCR DVD recorder with HDMI HDMI cable Coaxia...

Page 6: ...e TV for the first time the Language menu appears on the screen When you turn on the TV the power indicator light up in green 3 Press F f to select the language displayed on the menu screens then press 4 Press F f to select the country region in which you will operate the TV then press If the country region which you want to use on the TV does not appear in the list select instead of a country reg...

Page 7: ...o tuning again 2 When the Programme Sorting menu appears on the screen follow the steps of Programme Sorting page 24 If you do not change the order in which the analogue channels are stored on the TV go to next step 3 When the Eco Preset menu appears on the screen if you press Yes the Eco settings are changed to recommended values to reduce power consumption 4 Press MENU to exit The TV has now tun...

Page 8: ...nect the mains lead from the mains socket before working on or moving the TV set Keep the mains lead away from heat sources Unplug the mains plug and clean it regularly If the plug is covered with dust and it picks up moisture its insulation may deteriorate which could result in a fire Notes Do not use the supplied mains lead on any other equipment Do not pinch bend or twist the mains lead excessi...

Page 9: ...ion and or noisy sound may occur Batteries Observe the correct polarity when inserting batteries Do not use different types of batteries together or mix old and new batteries Dispose of batteries in an environmentally friendly way Certain regions may regulate the disposal of batteries Please consult your local authority Handle the remote with care Do not drop or step on it or spill liquid of any k...

Page 10: ...the second and third digit in quick succession In Text mode Enters the three digit page number to select the page 0 Digital Favourite list Press to display the Digital Favourite list that you have specified page 15 qa Previous channel Returns to the previous channel watched qs PROG In TV mode Selects the next or previous channel In Text mode page 13 Selects the next or previous page qd 2 Volume qf...

Page 11: ...page 17 In TV menu Selects the menu or option and confirms the setting 5 page 20 6 Remote control sensor Receives IR signals from the remote Do not put anything over the sensor as its function may be affected 7 Picture Off Sleep Timer indicator Lights up in green when the picture is switched off page 23 Lights up in orange when the sleep timer is set page 23 8 1 Standby indicator Lights up in red ...

Page 12: ...channel using the Digital Electronic Programme Guide EPG see page 14 In digital mode An information banner appears briefly The following icons may be indicated on the banner Additional operations RETURN PROG TOOLS GUIDE MENU AUDIO SCENE ANALOG DIGITAL 3 2 2 3 Radio service Scrambled Subscription service Multiple audio languages available Subtitles available Subtitles available for the hearing impa...

Page 13: ...esired screen format Parts of the top and bottom of the picture may be cut off Depending on the signal some screen formats may not be selectable Some characters and or letters at the top and the bottom of the picture may not be visible in Smart z You can adjust the vertical position of the picture when selecting Smart Zoom 14 9 or Subtitle Press F f to move up or down e g to read subtitles Using t...

Page 14: ...ected a message asking for a PIN code will appear on the screen For details see Parental Lock on page 27 Digital Electronic Programme Guide EPG Select Tune Options Today Previous Next 1 day 15 30 16 00 16 30 17 00 BBC ONE BBC TWO ITV 1 Channel 4 five ITV 2 BBC THREE Teletext BBC FOUR Sky Travel UKTV History More 4 001 002 003 004 005 006 007 009 010 011 012 013 Fri 3 Nov 15 39 To Do this Watch a p...

Page 15: ...your Favourite list for the first time 1 Press to select Yes 2 Press the yellow button to select the Favourite list 3 Press F f G g to select the channel you want to add then press Channels that are stored in the Favourite list are indicated by a symbol 4 Press RETURN to finish setting up Watch a channel 1 Press the yellow button to navigate through your Favourite lists 2 Press F f to select the c...

Page 16: ... B C L H I Video game equipment DVC camcorder Headphones DVD player with component output DVD recorder Decoder VCR Video game equipment DVD player Decoder PC PC HDMI output Blu ray disc player Digital video camera DVD player Hi Fi audio equipment CAM card PC Digital video camera Digital video camera Digital camera USB storage Hi Fi audio equipment with optical audio input ...

Page 17: ...MI IN 3 socket to view photographs or screen images from a PC or digital video camera AV1 AV1 To see the equipment connected to D AV2 AV2 AV2 To see the equipment connected to E PC To see the equipment connected to G z It is recommended to use a PC cable with ferrites like the Connector D sub 15 ref 1 793 504 11 available in Sony Service Centre or equivalent USB To see the equipment connected to J...

Page 18: ...with the extension wav USB Photo Viewer supports FAT16 and FAT32 file systems Up to 300 files per folder are supported Depending on the exact file specifications some files including those modified on a PC cannot be played even if the file format is supported Check the website below for updated information about compatible USB devices http support sony europe com TV compatibility Using control for...

Page 19: ...19GB Using Optional Equipment be sure to also connect the DIGITAL AUDIO OUT OPTICAL socket of the TV and the audio system using an optical audio cable For details see page 17 ...

Page 20: ... equipment connected to your TV To watch the desired external input select the input source then press 6 Photo Music Displays the Photo Music menu page 18 7 Settings Displays the Settings menu where most of the advanced settings and adjustments are performed 1 Press F f to select a menu icon then press 2 Press F f G g to select an option or adjust a setting then press For details about settings se...

Page 21: ...lour intensity Hue Increases or decreases the green tones and red tones z Hue can only be adjusted for an NTSC colour signal e g U S A video tapes Sharpness Sharpens or softens the picture Colour Tone Adjusts the whiteness of the picture Cool Gives the white colours a blue tint Neutral Gives the white colours a neutral tint Warm Gives the white colours a red tint z Warm can not be selected when yo...

Page 22: ...rround sound for stereo programmes only Simulated Stereo Adds a surround like effect to mono programs Off For normal stereo or mono reception Treble Adjusts higher pitched sounds Bass Adjusts lower pitched sounds Balance Emphasizes left or right speaker balance Reset Resets all the Sound Adjustment settings to the factory settings Dual Sound Selects the sound from the speaker for a stereo or bilin...

Page 23: ...ill the display area RGB Centre Adjusts the horizontal picture position so that the picture is in the middle of the screen z This option is only available if an RGB source has been connected to the Scarts connectors AV1 or AV2 on the rear of the TV PC Adjustment Customizes the TV screen as a PC monitor z This option is only available if a PC signal is received Phase Adjusts the screen when a part ...

Page 24: ... Press F f to select the channel you want to move to a new position then press g 2 Press F f to select the new position for your channel then press AV Preset Assigns a name to any equipment connected to the side and rear sockets The name will be displayed briefly on the screen when the equipment is selected 1 Press F f to select the desired input source then press 2 Press F f to select the desired...

Page 25: ...ts programme channels manually 1 Press F f to select System then press 2 Press F f to select one of the following TV broadcast systems then press G B G For western European countries regions I For the United Kingdom D K For eastern European countries regions L For France Depending on the country region selected for Country page 6 this option may not be available Channel 1 Press F f to select Chann...

Page 26: ...e or move to a new position Press the number buttons to enter the known three digit programme number of the broadcast you want 2 Remove or change the order of the digital channels as follows To remove the digital channel Press After a confirmation message appears press G to select Yes then press To change the order of the digital channels Press g then press F f to select the new position for the c...

Page 27: ...lect the age restriction or None for unrestricted watching then press 3 Press RETURN PIN Code To set your PIN for the first time 1 Press the number buttons to enter the new PIN code 2 Press RETURN To change your PIN 1 Press the number buttons to enter your existing PIN code 2 Press the number buttons to enter the new PIN code 3 Press RETURN z PIN code 9999 is always accepted Technical Set up Auto ...

Page 28: ...h the Wall Mount Bracket to properly carry out the installation Refer to Detaching the Table Top Stand from the TV page 7 Refer to TV installation dimensions table page 29 Refer to Screw and Hook locations diagram table page 29 Place the TV on the Table Top Stand when securing the Mounting Hook Sufficient expertise is required for installing this product especially to determine the strength of the...

Page 29: ...V installation dimensions table Model Name Display dimensions Screen centre dimension Length for each mounting angle Angle 0 Angle 20 A B C D E F G H KDL 40S56 P56 P36xx 99 6 61 2 12 2 43 3 15 8 33 8 57 5 47 1 KDL 37S56 P56 P36xx 92 7 57 4 14 43 2 15 6 32 4 54 2 46 8 KDL 32S56 P56 P36xx 80 6 50 7 17 2 42 9 15 3 29 9 48 5 46 6 Screen centre point WARNING Screw and Hook locations diagram table Model...

Page 30: ...ge 31 Analogue audio minijack HDMI 1 only AV3 Video input phono jack AV3 Audio input phono jacks DIGITAL AUDIO OUT OPTICAL Digital optical jack Two channel linear PCM Dolby Digital Audio output Left Right phono jacks PC IN PC Input 15 Dsub see page 31 G 0 7 Vp p 75 ohms non Sync on Green B 0 7 Vp p 75 ohms R 0 7 Vp p 75 ohms H V Sync TTL level PC audio input minijack i Headphones jack USB port CAM...

Page 31: ...al frequency PC Input Signal Reference Chart for HDMI IN 1 2 and 3 Signals Horizontal Pixel Vertical Line Horizontal frequency kHz Vertical frequency Hz Standard VGA 640 480 31 5 60 VGA SVGA 800 600 37 9 60 VESA Guidelines XGA 1024 768 48 4 60 VESA Guidelines WXGA 1280 768 47 4 60 VESA WXGA 1280 768 47 8 60 VESA WXGA 1360 768 47 7 60 VESA SXGA 1280 1024 64 60 VESA UXGA 1600 1200 75 60 VESA HDTV 19...

Page 32: ...rogrammes Select Reset page 22 No colour or irregular colour when viewing a signal from the COMPONENT IN sockets Check the connection of the COMPONENT IN sockets and check if each sockets are firmly seated in their respective sockets Sound No sound but good picture Press 2 or Mute Check if the Speaker is set to TV Speaker page 22 When using HDMI input with Super Audio CD or DVD Audio DIGITAL AUDIO...

Page 33: ......

Page 34: ......

Reviews: