background image

22

GB

Safety 
Information

Installation/Set-up

Install and use the TV set in accordance 
with the instructions below in order to 
avoid any risk of fire, electrical shock or 
damage and/or injuries.

Installation

The TV set should be installed near an 
easily accessible mains socket.

Place the TV set on a stable, level 
surface.

Only qualified service personnel should 
carry out wall installations.

For safety reasons, it is strongly 
recommended that you use Sony 
accessories, including:

Wall-mount bracket:
SU-WL500 (KDL-55NX813, KDL-
46/40NX713 only)
SU-WL700

Wall-hanging bracket:
SU-WH500

TV stand:
SU-B550S (KDL-55NX813)
SU-B460S (KDL-46NX713)
SU-B400S (KDL-40NX713)
SU-52NX1 (KDL-52NX803)
SU-46NX1 (KDL-46NX703)
SU-40NX1 (KDL-40NX803/
40NX703)

Be sure to use the screws supplied with 
the Wall-mount bracket when attaching 
the mounting hooks to the TV set. The 
supplied screws are designed so that they 
are 8 mm to 12 mm in length when 
measured from the attaching surface of 
the mounting hook. 
The diameter and length of the screws 
differ depending on the Wall-mount 
bracket model. 
Use of screws other than those supplied 
may result in internal damage to the TV 
set or cause it to fall, etc.

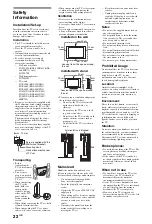
Transporting

Before 
transporting the 
TV set, disconnect 
all cables.

Two or three 
people are needed 
to transport a large 
TV set.

When transporting 
the TV set by 
hand, hold it as 
shown on the 
right. Do not put 
stress on the LCD 
panel and the 
frame around the 
screen.

When lifting or moving the TV set, hold 
it firmly from the bottom.

When transporting the TV set, do not 
subject it to jolts or excessive vibration.

When transporting the TV set for repairs 
or when moving, pack it using the 
original carton and packing material.

Ventilation

Never cover the ventilation holes or 
insert anything in the cabinet.

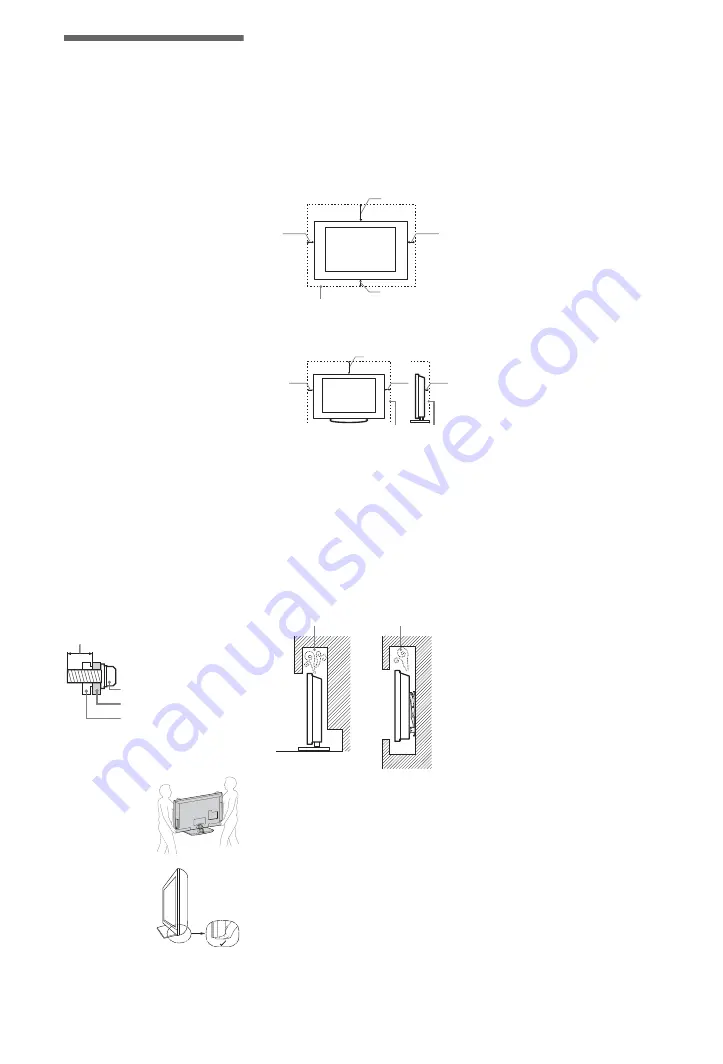
Leave space around the TV set as shown 
below.

It is strongly recommended that you use 
a Sony wall-mount bracket in order to 
provide adequate air-circulation.

Installed on the wall

Installed with stand

To ensure proper ventilation and prevent 
the collection of dirt or dust:

Do not lay the TV set flat, install 
upside down, backwards, or 
sideways.

Do not place the TV set on a shelf, 
rug, bed or in a closet.

Do not cover the TV set with a cloth, 
such as curtains, or items such as 
newspapers, etc.

Do not install the TV set as shown 
below.

Mains lead

Handle the mains lead and socket as 
follows in order to avoid any risk of fire, 
electrical shock or damage and/or injuries:

Use only mains leads supplied by 
Sony, not other suppliers.

Insert the plug fully into the mains 
socket.

Operate the TV set on a 220-240 V AC 
supply only.

When wiring cables, be sure to unplug 
the mains lead for your safety and take 
care not to catch your feet on the 
cables.

Disconnect the mains lead from the 
mains socket before working on or 
moving the TV set.

Keep the mains lead away from heat 
sources.

Unplug the mains plug and clean it 
regularly. If the plug is covered with 
dust and it picks up moisture, its 
insulation may deteriorate, which 
could result in a fire. 

Notes

Do not use the supplied mains lead on 
any other equipment.

Do not pinch, bend, or twist the mains 
lead excessively. The core conductors 
may be exposed or broken.

Do not modify the mains lead.

Do not put anything heavy on the mains 
lead.

Do not pull on the mains lead itself when 
disconnecting the mains lead.

Do not connect too many appliances to 
the same mains socket.

Do not use a poor fitting mains socket.

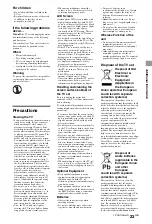
Prohibited Usage

Do not install/use the TV set in locations, 
environments or situations such as those 
listed below, or the TV set may 
malfunction and cause a fire, electrical 
shock, damage and/or injuries.

Location:

Outdoors (in direct sunlight), at the 
seashore, on a ship or other vessel, inside a 
vehicle, in medical institutions, unstable 
locations, near water, rain, moisture or 
smoke.

Environment:

Places that are hot, humid, or excessively 
dusty; where insects may enter; where it 
might be exposed to mechanical vibration, 
near flammable objects (candles, etc). The 
TV set shall not be exposed to dripping or 
splashing and no objects filled with 
liquids, such as vases, shall be placed on 
the TV.

Situation:

Do not use when your hands are wet, with 
the cabinet removed, or with attachments 
not recommended by the manufacturer. 
Disconnect the TV set from mains socket 
and aerial during lightning storms.

Broken pieces:

Do not throw anything at the TV set. The 
screen glass may break by the impact 
and cause serious injury.

If the surface of the TV set cracks, do 
not touch it until you have unplugged the 
mains lead. Otherwise electric shock 
may result.

When not in use

If you will not be using the TV set for 
several days, the TV set should be 
disconnected from the mains for 
environmental and safety reasons. 

As the TV set is not disconnected from 
the mains when the TV set is just turned 
off, pull the plug from the mains to 
disconnect the TV set completely.

However, some TV sets may have 
features that require the TV set to be left 
in standby to work correctly.

Mounting Hook

Hook attachment on rear 
of TV set

Screw (supplied with the 
Wall-mount bracket)

8 mm - 12 mm

30 cm

10 cm

10 cm

10 cm

Leave at least this space around 
the set.

30 cm

10 cm

10 cm

6 cm

Leave at least this space around 
the set.

Air circulation is blocked.

Wall

Wall

Summary of Contents for BRAVIA KDL-40NX703

Page 1: ...4 180 179 16 1 LCD Digital Colour TV Operating Instructions Setting Up Watching TV Additional Information KDL 55NX813 52NX803 46NX713 46NX703 40NX803 40NX713 40NX703 ...

Page 2: ...Interface are trademarks or registered trademarks of HDMI Licensing LLC in the United States and other countries DLNA the DLNA Logo and DLNA CERTIFIED are trademarks service marks or certification marks of the Digital Living Network Alliance DivX is a video file compression technology developed by DivX Inc DivX DivX Certified and associated logos are registered trademarks of DivX Inc and are used ...

Page 3: ...9 Detaching the Table Top Stand from the TV 9 Watching TV To watch programmes 10 To utilise the TV s features 10 To use i Manual 11 Additional Information Troubleshooting 12 Specifications 13 Installing the Accessories Wall Mount Wall Hanging Bracket 16 Safety Information 22 Precautions 23 Operating instructions are built into your BRAVIA TV Refer to To use i Manual for operation page 11 Before op...
Page 4: ...ling screws for Table Top Stand M5 16 4 KDL 40NX803 and KDL 40NX703 only For KDL 55NX813 KDL 46 40NX713 models Hexagon wrench 1 Assembling screws for Table Top Stand 4 KDL 55NX813 KDL 46NX713 only Assembling screws for Table Top Stand 2 KDL 40NX713 only SCART Adaptor 1 Disassembled except for KDL 52NX803 and KDL 46NX703 Refer to the supplied Table Top Stand leaflet to assemble the stand Inserting ...

Page 5: ...l evaporate after the TV has warmed up For KDL 52 40NX803 KDL 46 40NX703 1 Place the TV set on the Table Top Stand 2 Fix the TV to the Table Top Stand according to the arrow marks that guide the screw holes using the supplied screws If using an electric screwdriver set the tightening torque at approximately 1 5 N m 15 kgf cm 3 After all the screws are tightened attach the supplied stand rear cover...
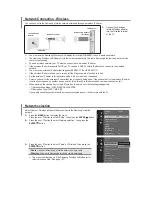
Page 6: ... within the angles shown below To return to 0 reverse the below procedure For KDL 52 40NX803 KDL 46 40NX703 For KDL 55NX813 KDL 46 40NX713 1 4 2 3 Remove screw as shown 6º 0º Install screw into the top screw hole of the Table Top Stand Slide in Lift up and tilt 6º 0º ...
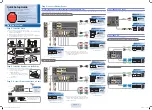
Page 7: ... Angle Type Universal SCART Lead is recommended for this connection For KDL 55NX813 KDL 46 40NX713 Connecting a Set Top Box recorder e g DVD recorder with HDMI For KDL 52 40NX803 after connecting cables install the bottom cover and stand rear cover Set Top Box recorder e g DVD recorder Set Top Box recorder e g DVD recorder SCART adaptor supplied Set Top Box recorder e g DVD recorder ...
Page 8: ...ew hole of the TV For KDL 52 40NX803 KDL 46 40NX703 Use M4 16 screw For KDL 55NX813 KDL 46 40NX713 Use M4 8 screw 3 Tie the wood screw and the machine screw with a strong cord not supplied Bundling the cables Do not bundle the AC power cord mains lead together with other cables For KDL 52 40NX803 KDL 46 40NX703 For KDL 55NX813 KDL 46 40NX713 KDL 52 40NX803 only ...

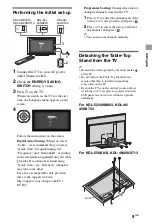
Page 9: ...s refer to the support web site http support sony europe com TV DVBC Programme Sorting Changes the order of analogue channels stored in the TV 1 Press F f to select the channel you want to move to a new position then press 2 Press F f to select the new position for the channel then press You can also tune channels manually Detaching the Table Top Stand from the TV Remove the screws guided by the a...

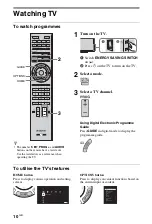
Page 10: ...a tactile dot Use the tactile dots as a reference when operating the TV 1 Turn on the TV 1 Switch ENERGY SAVING SWITCH on z 2 Press 1 on the TV to turn on the TV 2 Select a mode 3 Select a TV channel Using Digital Electronic Programme Guide Press GUIDE in digital mode to display the programme guide GUIDE OPTIONS HOME 2 3 Settings TV System Settings Picture Sound BRAVIA ENGINE 3 PRO Add to Favourit...

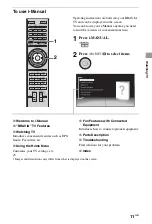
Page 11: ... Equipment Introduces how to connect optional equipment x Parts Description x Troubleshooting Find solutions for your problem x Index Images and illustrations may differ from what is displayed on the screen Operating instructions are built into your BRAVIA TV and can be displayed on the screen You can browse your i Manual anytime you need to find the varieties of convenient functions 1 Press i MAN...

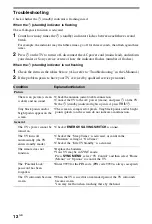
Page 12: ...sound Check the antenna aerial cable connection Connect the TV to the AC power mains and press 1 on the TV If the 1 standby indicator lights up in red press TV 1 Tiny black points and or bright points appear on the screen The screen is composed of pixels Tiny black points and or bright points pixels on the screen do not indicate a malfunction General The TV s power cannot be turned on Check if ENE...

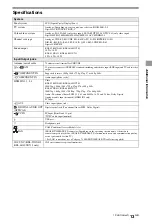
Page 13: ...ts 1080p 1080i 720p 576p 576i 480p 480i COMPONENT IN Audio input phono jacks HDMI IN1 2 3 4 Video KDL 52 40NX803 KDL 46 40NX703 1080 24p 1080p 1080i 720p 576p 576i 480p 480i KDL 55NX813 KDL 46 40NX713 1080 24p 1080p 1080i 720 24p 720p 576p 576i 480p 480i Audio Two channel linear PCM 32 44 1 and 48 kHz 16 20 and 24 bits Dolby Digital Analogue audio input minijack HDMI IN2 only PC Input AV2 Video in...

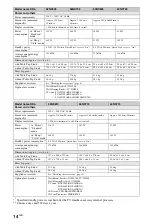
Page 14: ...ies See Checking the accessories page 4 Optional accessories Wall Mount Bracket SU WL700 Wall Hanging Bracket SU WH500 TV stand SU 52NX1 KDL 52NX803 SU 46NX1 KDL 46NX703 SU 40NX1 KDL 40NX803 40NX703 Model name KDL 55NX813 46NX713 40NX713 Power and others Power requirements 220 V 240 V AC 50 Hz Screen size measured diagonally Approx 138 8cm 55 inches Approx 116 8 cm 46 inches Approx 101 6 cm 40 inc...

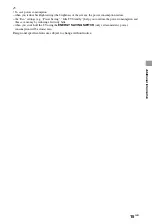
Page 15: ...umption reduce the Eco settings e g Power Saving Idle TV Standby help you to reduce the power consumption and thus save money by reducing electricity bills when you switch off the TV using the ENERGY SAVING SWITCH only certain models power consumption will be almost zero Design and specifications are subject to change without notice ...

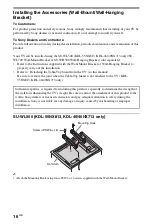
Page 16: ... Bracket or Wall Hanging Bracket to properly carry out the installation Refer to Detaching the Table Top Stand from the TV in this manual Be sure to remove the joint when the Table Top Stand is not attached to the TV KDL 55NX813 KDL 46 40NX713 only SU WL500 KDL 55NX813 KDL 46 40NX713 only Attach the Mounting Hook using four PSW6 16 screws supplied with the Wall Mount Bracket Sufficient expertise i...

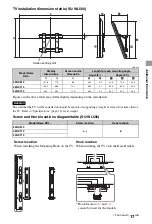
Page 17: ...e SU WL500 Model Name KDL Display dimensions Screen centre dimension Length for each mounting angle Angle 0 Angle 20 A B C D E F G H 55NX813 127 6 77 0 8 6 48 2 9 2 31 8 72 3 49 5 46NX713 108 3 66 0 14 1 48 2 9 1 28 0 62 0 49 5 40NX713 94 4 58 2 17 8 48 2 9 1 25 2 54 7 49 5 Model Name KDL Screw location Hook location 55NX813 e j b 46NX713 40NX713 Screen centre point WARNING Screw location When ins...

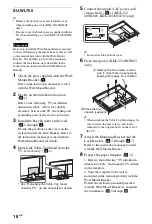
Page 18: ...e Base Bracket Refer to the instruction manual provided with the Wall Mount Bracket for details 4 Detach the Table Top Stand from the TV if necessary 4 1 See Detaching the Table Top Stand from the TV in this manual for details 5 Connect the supplied AC power cord mains lead 5 1 KDL 52 40NX803 KDL 40 46NX703 only Do not attach the bottom cover 6 Place the spacers KDL 52 40NX803 only When attaching ...

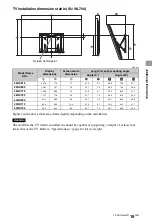
Page 19: ...e 14 for its weight Model Name KDL Display dimensions Screen centre dimension Length for each mounting angle Angle 0 Angle 20 A B C D E F G H 55NX813 127 6 77 0 1 7 41 3 5 2 36 3 72 3 47 1 52NX803 126 1 78 7 1 3 42 1 7 5 38 9 74 5 48 8 46NX713 108 3 66 0 7 2 41 3 5 1 32 5 62 0 47 1 46NX703 112 7 71 6 5 2 42 7 7 5 36 2 67 9 49 3 40NX803 99 4 63 5 8 9 42 1 7 5 33 7 60 2 48 8 40NX713 94 4 58 2 10 9 4...

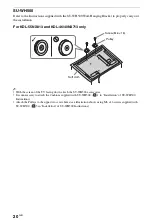
Page 20: ...y With the screen of the TV facing down attach the SU WH500 accessories It is unnecessary to attach the Cushions supplied with SU WH500 3 1 in Installation of SU WH500 Instructions Attach the Pulleys to the upper two screw holes see illustration above using M6 16 screws supplied with SU WH500 3 3 in Installation of SU WH500 Instructions Pulley Screw M6 16 Soft cloth ...

Page 21: ...the Wall Hanging Bracket is millimeters Figures in the above table may differ slightly depending on the installation The wall that the TV will be installed on should be capable of supporting a weight of at least four times that of the TV Refer to Specifications page 14 for its weight Model Name KDL A B C D E 55NX813 127 6 77 0 30 5 70 2 4 7 46NX713 108 3 66 0 25 0 59 2 4 7 40NX713 94 4 58 2 21 7 5...

Page 22: ...lly into the mains socket Operate the TV set on a 220 240 V AC supply only When wiring cables be sure to unplug the mains lead for your safety and take care not to catch your feet on the cables Disconnect the mains lead from the mains socket before working on or moving the TV set Keep the mains lead away from heat sources Unplug the mains plug and clean it regularly If the plug is covered with dus...

Page 23: ...ted to the TV set from mains socket before cleaning To avoid material degradation or screen coating degradation observe the following precautions To remove dust from the screen surface cabinet wipe gently with a soft cloth If dust is persistent wipe with a soft cloth slightly moistened with a diluted mild detergent solution Do not spray water or detergent directly on the TV set It may drip to the ...

Page 24: ...re that the battery will be treated properly hand over the product at end of life to the applicable collection point for the recycling of electrical and electronic equipment For all other batteries please view the section on how to remove the battery from the product safely Hand the battery over to the applicable collection point for the recycling of waste batteries For more detailed information a...

Page 25: ... TV has a digital tuner built in which means it is ready to receive the Freeview signal by simply plugging it into your aerial socket check if you can get digital TV through your aerial now or whether you ll have to wait until switchover at www digitaluk co uk When the TV switchover happens in your area there are at least two occasions when you will need to re tune your TV in order to continue rec...

Page 26: ...Tuning 6 Follow the on screen instructions If you are missing any channels it may be that they are not available in your area or that your aerial needs upgrading If you have any questions please contact Sony on 08705 111 999 or call Digital UK on 0845 6 50 50 50 or visit www digitaluk co uk Calls charged at BT rate of 3p per minute daytime and 1p per minute evenings and weekends Rates may vary for...

Page 27: ......

Page 28: ...4 180 179 16 1 For useful information about Sony products 2010 Sony Corporation ...

Reviews: