background image

3

GB

GB

• Only qualified service personnel should carry out wall 

installations.

• For safety reasons, it is strongly recommended that you use 

Sony accessories, including:

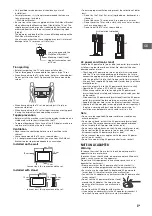
Wall-Mount Bracket

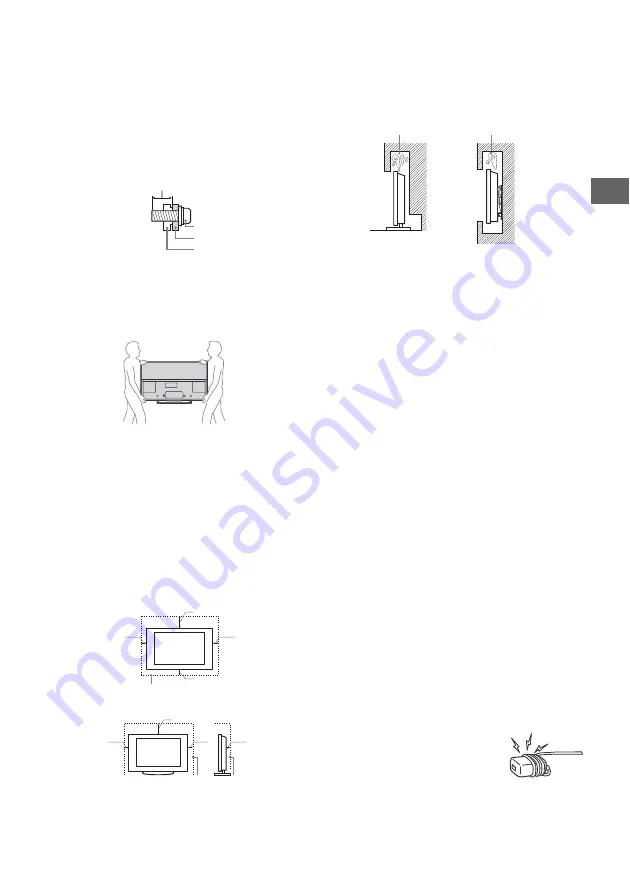
• Be sure to use the screws supplied with the Wall-Mount Bracket 

when attaching the Mounting Hook (Stand) to the TV set. The 
supplied screws are designed as indicated by illustration when 
measured from the attaching surface of the Mounting Hook 
(Stand).
The diameter and length of the screws differ depending on the 
Wall-Mount Bracket model.
Use of screws other than those supplied may result in internal 
damage to the TV set or cause it to fall, etc.

Transporting

• Before transporting the TV set, disconnect all cables.
• Two or three people are needed to transport a large TV set.
• When transporting the TV set by hand, hold it as shown below. 

Do not put stress on the LCD panel and the frame around the 
screen.

• When transporting the TV set, do not subject it to jolts or 

excessive vibration.

• When transporting the TV set for repairs or when moving, pack 

it using the original carton and packing material.

Topple prevention

• Before install the machine screw, lay the display face down on a 

stable work surface that is larger than the TV. 

• To prevent damaging the surface of the LCD display, make sure 

to place a soft cloth on the work surface.

Ventilation

• Never cover the ventilation holes or insert anything in the 

cabinet.

• Leave space around the TV set as shown below.
• It is strongly recommended that you use a Sony Wall-Mount 

Bracket in order to provide adequate air-circulation.

Installed on the wall

Installed with stand

• To ensure proper ventilation and prevent the collection of dirt or 

dust:

Do not lay the TV set flat, install upside down, backwards, or 
sideways.

Do not place the TV set on a shelf, rug, bed or in a closet.

Do not cover the TV set with a cloth, such as curtains, or items 
such as newspapers, etc.

Do not install the TV set as shown below.

AC power cord (mains lead)

Handle the AC power cord (mains lead) and outlet (mains socket) 
as follows in order to avoid any risk of fire, electrical shock or 
damage and/or injuries:

The shape of AC power plug (mains plug), which is supplied 
with the TV set, varies depending on the regions. Be sure to 
connect the appropriate supplied AC power cord (mains lead) 
with the plug that fits into the AC power outlet (mains socket).

Use only Sony supplied AC power cords (mains lead), not those 
of other brands.

Insert the plug fully into the AC power outlet (mains socket).

Operate the TV set on a 110–240 V AC supply only.

When wiring cables, be sure to unplug the AC power cord 
(mains lead) for your safety and take care not to catch your feet 
on the cables.

Disconnect the AC power cord (mains lead) from the AC power 
outlet (mains socket) before working on or moving the TV set.

Keep the AC power cord (mains lead) away from heat sources.

Unplug the AC power plug (mains plug) and clean it regularly. If 
the plug is covered with dust and it picks up moisture, its 
insulation may deteriorate, which could result in a fire. 

Note

• Do not use the supplied AC power cord (mains lead) on any 

other equipment.

• Do not pinch, bend, or twist the AC power cord (mains lead) 

excessively. The core conductors may be exposed or broken.

• Do not modify the AC power cord (mains lead).
• Do not put anything heavy on the AC power cord (mains lead).
• Do not pull on the AC power cord (mains lead) itself when 

disconnecting the AC power cord (mains lead).

• Do not connect too many appliances to the same AC power 

outlet (mains socket).

• Do not use a poor fitting AC power outlet (mains socket).

NOTE ON AC ADAPTER

Warning

To reduce the risk of fire or electric shock, do not expose this 
apparatus to rain or moisture.
To prevent fire or shock hazard, do not place objects filled with 
liquids, such as vases, on the apparatus.
Do not install this equipment in a confined space, such as a 
bookshelf or similar unit.
• Please ensure that the AC power outlet (mains socket) is 

installed near the equipment and shall be easily accessible.

• Be sure to use the supplied AC adapter and AC power cord 

(mains lead). Otherwise it may cause a malfunction.

• Connect the AC adapter to an easily accessible AC power outlet 

(mains socket).

• Do not coil the AC power cord (mains lead) 

around the AC adapter. The core wire may 
be cut and/or it may cause a malfunction 
of the TV. 

• Do not touch the AC adapter with wet hands.
• If you notice an abnormality in the AC adapter, disconnect it 

from the AC power outlet (mains socket) immediately.

Screw (supplied with the 
Wall-Mount Bracket)

Mounting Hook (Stand)

Hook attachment on rear 
of TV set

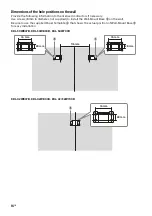
7 mm

30 cm

10 cm

10 cm

10 cm

Leave at least this space around the set.

30 cm

10 cm

10 cm

Leave at least this space around the set.

6 cm

Air circulation is blocked.

Wall

Wall

Summary of Contents for Bravia KDL-42W800B

Page 1: ...KDL 50W807B 50W800B 50W700B 42W807B 42W800B 42W700B KDL 32W700B Television Reference Guide ...

Page 2: ... Guide Picture Sound Eco setting can slightly change the power consumption Depending upon such changed settings e g Shop mode the power consumption may vary which possibly could exceed the stated energy rating To reset the TV to ENERGY RATING qualified settings complete the initial set up procedure in Auto Start up under the settings menu IMPORTANT INFORMATION If a television is not positioned in ...

Page 3: ...er cord mains lead with the plug that fits into the AC power outlet mains socket Use only Sony supplied AC power cords mains lead not those of other brands Insert the plug fully into the AC power outlet mains socket Operate the TV set on a 110 240 V AC supply only When wiring cables be sure to unplug the AC power cord mains lead for your safety and take care not to catch your feet on the cables Di...

Page 4: ... have unplugged the AC power cord mains lead Otherwise electric shock may result When not in use If you will not be using the TV set for several days the TV set should be disconnected from the AC power mains for environmental and safety reasons As the TV set is not disconnected from the AC power mains when the TV set is just turned off pull the plug from the AC power outlet mains socket to disconn...

Page 5: ...precision technology and 99 99 or more of the pixels are effective black dots may appear or bright points of light red blue or green may appear constantly on the LCD screen This is a structural property of the LCD screen and is not a malfunction Do not push or scratch the front filter or place objects on top of this TV set The image may be uneven or the LCD screen may be damaged If this TV set is ...

Page 6: ...oper disposal help prevent potential negative consequences hazards to the environment and human health which could otherwise be caused by inappropriate waste disposal including improper handling accidental breakage damage and or improper recycling of e waste The recycling of materials will help to conserve natural resources For more detailed information about recycling of this product please conta...

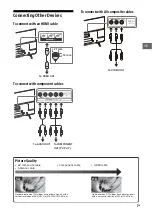
Page 7: ...m 12 mm To AUDIO OUT To COMPONENT OUT PR PB Y To VIDEO OUT SD HD Picture Quality AV composite cable Antenna cable Component cable HDMI cable Standard definition SD videos have picture signals with a vertical resolution of 480 NTSC or 576 PAL SECAM lines High definition HD videos have picture signals with a vertical resolution of 720 or 1 080 lines ...

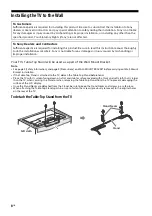
Page 8: ... place When attaching the Table Top Stand again be sure to fasten the screws previously removed to the original holes on the rear of the TV To detach the Table Top Stand from the TV To Customers Sufficient expertise is required for installing this product Be sure to subcontract the installation to Sony dealers or licensed contractors and pay special attention to safety during the installation Sony...

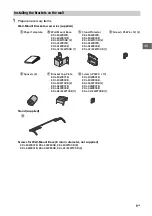
Page 9: ...on the wall A Paper Template B Wall Mount Base KDL 50W807B KDL 50W800B KDL 50W700B 2 KDL 42W807B KDL 42W800B KDL 42 32W700B 1 C Stand Protector KDL 50W807B KDL 50W800B KDL 50W700B 2 KDL 42W807B KDL 42W800B KDL 42 32W700B 1 D Screw PSW 6 12 2 E Spacers 2 F Bracket Cap Plate KDL 50W807B KDL 50W800B KDL 50W700B 2 KDL 42W807B KDL 42W800B KDL 42 32W700B 1 G Screw PSW 4 10 KDL 50W807B KDL 50W800B KDL 50...

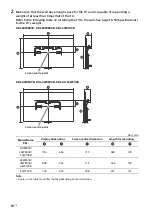
Page 10: ...ations for the TV s weight KDL 50W807B KDL 50W800B KDL 50W700B KDL 42W807B KDL 42W800B KDL 42 32W700B Unit mm Note Figures in the table may differ slightly depending on the installation Model Name KDL Display dimensions Screen centre dimension Length for mounting 50W807B 50W800B 50W700B 1 116 656 130 469 118 42W807B 42W800B 42W700B 958 563 175 465 118 32W700B 729 433 188 413 113 Screen centre poin...

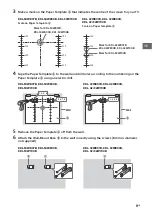
Page 11: ...100 150 200 250 100 150 200 250 KDL 50W807B KDL 50W800B KDL 50W700B Scale on Paper Template A KDL 42W807B KDL 42W800B KDL 42 32W700B Scale on Paper Template A Mark for KDL 32W700B Mark for KDL 42W807B KDL 42W800B KDL 42W700B Mark for KDL 50W807B KDL 50W800B KDL 50W700B 30 1 2 3 4 10 0 50 100 150 200 250 300 350 30 5 6 7 8 20 10 0 50 100 150 200 250 300 350 1 2 3 4 20 5 6 7 8 30 1 2 3 4 20 10 0 50 ...

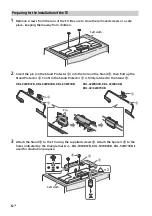
Page 12: ...otector C Confirm the Stand Protector C is firmly latched to the Stand H 3 Attach the Stand H to the TV using the supplied screws D Attach the Spacers E to the holes indicated by the triangle marks f KDL 50W807B KDL 50W800B KDL 50W700B is used for illustration purpose Preparing for the installation of the TV Soft cloth H C H C KDL 50W807B KDL 50W800B KDL 50W700B KDL 42W807B KDL 42W800B KDL 42 32W7...

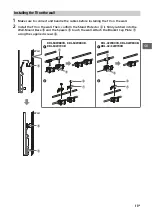
Page 13: ...l Then confirm the Stand Protector C is firmly latched into the Wall Mount Base B and the Spacers E touch the wall Attach the Bracket Cap Plate F using the supplied screws G Installing the TV on the wall B 1 2 1 2 G C C B B F G F B E Wall KDL 50W807B KDL 50W800B KDL 50W700B KDL 42W807B KDL 42W800B KDL 42 32W700B Wall ...

Page 14: ...se screws 8 mm in diameter not supplied to install the Wall Mount Base B on the wall Be sure to use the supplied Paper Template A that shows the actual position of Wall Mount Base B for easy installation KDL 50W807B KDL 50W800B KDL 50W700B KDL 42W807B KDL 42W800B KDL 42 32W700B B B 176 mm 76 mm 76 mm 28 mm 28 mm B 28 mm 76 mm ...

Page 15: ...trol does not function Replace the batteries Your TV may be in SYNC mode Press SYNC MENU select TV Control and then select Home Menu or Options to control the TV The Parental Lock password has been forgotten Enter 9999 for the PIN code PIN code 9999 is always accepted The TV surrounds become warm When the TV is used for an extended period the TV surrounds become warm You may feel hot when touching...

Page 16: ...7B KDL 50W800B KDL 42W807B KDL 42W800B Video 1080p 30 50 60 Hz 1080 24p 1080i 50 60 Hz 720p 30 50 60 Hz 720 24p 576p 576i 480p 480i PC Formats Audio 5 1 channel linear PCM 32 44 1 and 48 kHz 16 20 and 24 bits Dolby Digital ARC Audio Return Channel HDMI IN 2 only MHL common with HDMI IN 1 KDL 50W807B KDL 50W800B KDL 42W807B KDL 42W800B only Video 2D 1080p 30 Hz 1080 24p 1080i 50 60 Hz 720p 30 50 60...

Page 17: ...B 958 600 170 mm KDL 42W800B 958 600 170 mm KDL 42W700B 958 600 170 mm KDL 32W700B 729 465 141 mm without Table Top Stand KDL 50W807B 1 116 656 64 mm KDL 50W800B 1 116 656 64 mm KDL 50W700B 1 116 656 64 mm KDL 42W807B 958 563 64 mm KDL 42W800B 958 563 64 mm KDL 42W700B 958 563 64 mm KDL 32W700B 729 433 64 mm Mass Approx with Table Top Stand KDL 50W807B 14 8 kg KDL 50W800B 14 8 kg KDL 50W700B 14 8 ...

Page 18: ...ote in the United States and or other countries Opera Devices SDK from Opera Software ASA Copyright 1995 2014 Opera Software ASA All rights reserved Wi Fi Wi Fi Direct and Miracast are trademarks or registered trademarks of Wi Fi Alliance Sony Entertainment Network logo and Sony Entertainment Network are trademarks of Sony Corporation MHL Mobile High Definition Link and the MHL Logo are trademarks...

Page 19: ......

Page 20: ... 2014 Sony Corporation Printed in Malaysia 4 488 786 14 1 Customer Support and Contact ...

Reviews: