background image

© 2011 Sony Corporation   Printed in Malaysia

Customer support

Instructions on “Installing the Wall-Mount Bracket” are 
not supplied in the form of a separate leaflet with this TV. 
These installation instructions are included within this 
TV’s instructions manual.

Summary of Contents for BRAVIA KLV-22EX310

Page 1: ...4 288 090 11 3 LCD Colour TV Operating Instructions Start up Guide Operating the TV Using Optional Equipment Using Menu Functions Additional Information KLV 42EX410 32EX310 22EX310 ...

Page 2: ...ured under license from Dolby Laboratories Dolby and the double D symbol are trademarks of Dolby Laboratories DivX DivX Certified and associated logos are trademarks of DivX Inc and are used under license ABOUT DIVX VIDEO DivX is a digital video format created by DivX Inc This is an official DivX Certified device that plays DivX video Visit divx com for more information and software tools to conve...

Page 3: ...onnecting optional equipment 13 Viewing pictures from the connected equipment 15 Viewing Twin Picture 16 Viewing PIP Picture in Picture 16 Using Menu Functions Navigating through menus 17 Using the Favourites 17 Playing back photo music video via USB 18 Listening to the FM Radio 21 Using BRAVIA Sync with Control for HDMI 22 Settings adjustment 23 Picture 23 Sound 24 Screen 26 Channel Set up 28 Par...

Page 4: ...tand leaflet to assemble the stand To insert batteries into the remote 1 Attaching the stand Refer to the supplied stand leaflet for proper attachment For best picture quality do not expose the screen to direct illumination or sunlight B KLV 42EX410 KLV 32EX310 B KLV 22EX310 Fix the TV to the stand according to the arrow marks that guide the screw holes using the supplied screws This TV is very he...

Page 5: ...ing over KLV 42EX410 KLV 32EX310 only 1 Install a wood screw 4 mm in diameter not supplied in the TV stand 2 Install a machine screw M4 10 not supplied into the screw hole of the TV 3 Tie the wood screw and the machine screw with a strong cord not supplied Connecting an antenna cable and VCR Antenna cable Antenna cable Antenna cable AV cable VCR ...

Page 6: ...annels manually page 28 Language options vary depending on model KLV 42EX410 KLV 32EX310 KLV 22EX310 The shapes of AC power plug and AC power outlet differ depending on the region When the TV is in standby mode the 1 standby indicator on the TV front panel is red press 1 on the remote to turn on the TV the power indicator will light green 3 Follow the instructions on the screen Location Select Hom...

Page 7: ...ing the viewing angle of the TV KLV 42EX410 KLV 32EX310 only This TV can be adjusted within the angles shown below When adjusting the angle hold the stand with one hand to avoid having the stand slip or TV tip over Detaching the stand from the TV Do not remove the stand for any reason other than to wall mount the TV B KLV 42EX410 KLV 32EX310 B KLV 22EX310 20 20 20 20 ...

Page 8: ...AC power outlet Use only Sony supplied AC power cords not those of other brands Insert the plug fully into the AC power outlet Operate the TV set on a 110 240 V AC supply only When wiring cables be sure to unplug the AC power cord for your safety and take care not to catch your feet on the cables Disconnect the AC power cord from the AC power outlet before working on or moving the TV set Keep the ...

Page 9: ... on top of this TV set The image may be uneven or the LCD screen may be damaged If this TV set is used in a cold place a smear may occur in the picture or the picture may become dark This does not indicate a failure These phenomena disappear as the temperature rises Ghosting may occur when still pictures are displayed continuously It may disappear after a few moments The screen and cabinet get war...

Page 10: ...le options are greyed out Auto Delivers optimum picture and sound quality which is automatically set according to input source There may not be any effect depending on the connected equipment General Current user settings Photo Delivers picture that reproduces the texture and colour of a printed photo Music Delivers dynamic and clear sound effects like at a concert Cinema Delivers theatre like pic...

Page 11: ...tting menus The listed options vary depending on the current input and content qk Coloured buttons When the coloured buttons are available an operation guide appears on the screen ql Wide Mode Changes the picture size Press repeatedly to select the desired wide mode page 11 w PROG CH Selects the next or previous channel In Text mode Selects the next or previous page wa Previous channel Returns to ...

Page 12: ...Light sensor Receives IR signals from the remote Senses room light level and adjusts the screen brightness accordingly Do not put anything over the sensor doing so may affect its function 7 Picture Off Timer indicator Lights up in green when you select Picture Off page 32 Lights up in amber when you set the timer page 30 8 1 Standby indicator Lights up in red when the TV is in standby mode 9 Power...

Page 13: ...ur TV B For KLV 42EX410 KLV 32EX310 G F E D C B A Digital still camera PC HDMI output Hometheatre system Blu ray Disc player Video game equipment DVD player with component output Camcorder PC DVD player VCR S VHS Hi8 DVC camcorder Audio system DVD player with HDMI output Camcorder USB storage media Hi Fi audio equipment Headphones Continued ...

Page 14: ...PC HDMI output Hometheatre system Blu ray Disc player Video game equipment DVD player with component output Camcorder PC DVD player VCR S VHS Hi8 DVC camcorder Audio system DVD player with HDMI output Camcorder USB storage media Hi Fi audio equipment Headphones ...

Page 15: ...or 1 Component or Video 1 Connect to the component jacks and the audio jacks For better picture quality component connection is recommended if your DVD player has a component video output When using the component video jack as the video jack 1 select Video 1 in the Video 1 Component Input menu page 30 You cannot use the component video jack and the video jack 1 at the same time E PC IN PC Connect ...

Page 16: ... Options menu Viewing PIP Picture in Picture You can view two pictures in PC input mode on the screen simultaneously Connect a PC page 13 and make sure that images from a PC appear on the screen page 15 1 Press Two pictures are displayed simultaneously 2 In sub window you can select the TV channel or video input by pressing OPTIONS and select Sub window To return to single picture mode Press RETUR...

Page 17: ...the Auto Tuning When you continue to add items beyond the 10th item the bottom item in the list will be automatically removed from the Favourite list The HOME button allows you to access a variety of TV settings USB media files and FM Radio mode 1 Press HOME on the TV or remote 2 Press F f to select an option then press 3 Follow the instructions on the screen 4 To exit the menu press HOME Menu Des...

Page 18: ...te z If a video file has subtitles they can be displayed by pressing the green button during DivX playback To use playback options Press the coloured buttons to display a list that contains shortcuts to some setting menus The listed options vary depending on the current input and content Photo Slideshow Effect Selects an effect for a slideshow Slideshow Speed Selects the slideshow duration Shuffle...

Page 19: ...a on the USB device observe the following Do not turn off the TV or connected USB device Do not disconnect the USB cable Do not remove the USB device The data on the USB device may be damaged Sony will not be held liable for any damage to or loss of data on the recording media due to a malfunction of any connected devices or the TV The file name and folder name may not display correctly in some ca...

Page 20: ...P3 WMA v8 DivX 3 11 XviD MPEG 4 SP ASP VC 1 mp4 mov 3gp MP4 H 264 BP MP HP MPEG1 Layer1 2 MP3 MPEG2 AAC MPEG4 AAC MPEG4 HE AAC MPEG 4 SP ASP H 263 mkv MKV H 264 BP MP HP PCM MPEG1 Layer1 2 MP3 MPEG2 AAC 2ch MPEG4 AAC 2ch MPEG4 HE AAC 2ch Dolby Digital 2ch WMA v8 MPEG 4 SP ASP WMV v9 DivX 3 11 4 x 5 1 VC 1 mpg mpeg vob PS MPEG1 MPEG1 Layer1 2 MP3 Dolby Digital 2ch MPEG2 MP ts m2ts TS MPEG2 MP MPEG1...

Page 21: ...en to non preset stations 1 Access to FM Radio mode 2 Press F f to manually search for the desired FM radio station It will search and stop when found the next available station You can also tune FM frequency for the desired FM radio station by pressing G g The available radio frequency is only for temporary listening pleasure and cannot be stored in the memory If the message Please set up FM Radi...

Page 22: ...hen the equipment starts to play If you turn on a connected audio system while the TV is on the sound output switches from the TV speaker to the audio system Adjusts the volume 2 and mutes the sound of a connected audio system You can operate the connected Sony equipment that has the BRAVIA Sync logo by the TV remote Possible operations with BRAVIA Sync buttons see page 10 Refer to the instruction...

Page 23: ...e backlight Picture Increases or decreases picture contrast Brightness Brightens or darkens the picture Colour Increases or decreases colour intensity Hue Increases or decreases the green tones and red tones When viewing TV programme or video input Hue is only available for NTSC colour system Sharpness Sharpens or softens the picture Colour Temperature Adjusts the whiteness of the picture Cool Giv...

Page 24: ...or video input Picture Optimisation Allows you to enhance the picture to your preferred settings Crisp For a sharper image with more visible noise Smooth For a softer image with less visible noise Sound Sound Mode Sets a sound mode The options that can be selected differ depending on the Scene Select settings Dynamic Enhances treble and bass Recommended for home entertainment Standard For standard...

Page 25: ...o for mono channel if available If the signal is very weak the sound becomes monaural automatically If the stereo sound is noisy when receiving a NICAM programme select Mono The sound becomes monaural but the noise is reduced The Dual Sound setting is memorized for each programme position You cannot listen to stereo broadcast sound when Mono is selected z If you select other equipment connected to...

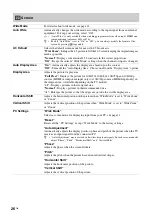
Page 26: ...and 1080 60p sources HDMI or component input only or 1080 24p sources HDMI input only in the original size Available depending on the TV model 1 Displays pictures in their original size Normal Displays pictures in their recommended size 1 Enlarges the picture so that the edges are outside the visible display area Horizontal Shift Adjusts the horizontal position of the picture when Wide Mode is set...

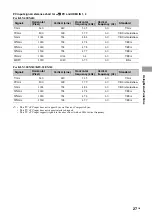
Page 27: ...l Line Horizontal frequency kHz Vertical frequency Hz Standard VGA 640 480 31 5 60 VGA SVGA 800 600 37 9 60 VESA Guidelines XGA 1024 768 48 4 60 VESA Guidelines WXGA 1280 768 47 4 60 VESA WXGA 1280 768 47 8 60 VESA WXGA 1360 768 47 7 60 VESA SXGA 1280 1024 64 60 VESA HDTV 1920 1080 67 5 60 EIA Signals Horizontal Pixel Vertical Line Horizontal frequency kHz Vertical frequency Hz Standard VGA 640 48...

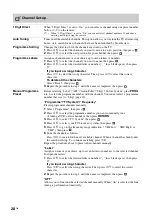
Page 28: ...nual Programme Preset Before selecting Label AFT Audio Filter Skip Colour System press PROG to select the programme number with the channel You cannot select a programme number that is set to Skip page 29 Programme TV System Frequency Presets programme channels manually 1 Select Programme then press 2 Press F f to select the programme number you want to manually tune if tuning a VCR select channel...

Page 29: ...ations Searching stops automatically when a station is tuned in If the station has a noisy sound you may be able to improve the sound quality by pressing G g Press to store the FM radio station You may edit the FM radio station label Press F f to select alphanumeric characters for the label then press Repeat steps 1 to 2 to preset other FM radio stations To enable this feature access to FM Radio m...

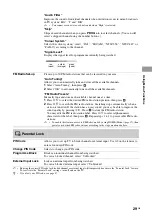
Page 30: ...isplayed briefly on the screen when the equipment is selected 1 Press F f to select the desired input source then press 2 Press F f to select the desired option below then press Equipment labels Uses one of the preset labels to assign a name to connected equipment Edit Creates your own label Follow steps 2 to 3 of Programme Labels page 28 Skip Skips an unnecessary input source Colour System Select...

Page 31: ...ol to operate the connected equipment Normal For basic operations such as navigation buttons up down left or right etc Tuning Keys For basic operations and operation of channel related buttons such as PROG or 0 9 etc Useful when you control a tuner or set top box etc via the remote control Menu Keys For basic operations and operation of the HOME OPTIONS buttons Useful when you select menus of a BD...

Page 32: ...ed off and the Picture Off indicator on the TV front panel lights up in green The sound remains unchanged Idle TV Standby Turns the TV off after it has been kept idle for the preset length of time Light Sensor Optimises the picture settings according to the ambient lighting PC Power Management Switches the TV to standby mode when the TV receives no signal from the PC input source for 30 seconds ...

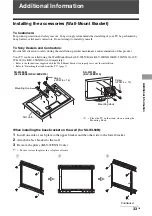
Page 33: ...410 KLV 32EX310 or SU WL100 for KLV 22EX310 sold separately Refer to the Instructions supplied with the Wall Mount Bracket to properly carry out the installation Refer to Detaching the stand from the TV page 7 When installing the base bracket on the wall for SU WL50B 1 Install one side of each plate to the upper bracket and the other side to the lower bracket 2 Attach the base bracket to the wall ...

Page 34: ...trength of the wall for withstanding the TV s weight Be sure to entrust the attachment of these products to the wall to Sony dealers or licensed contractors and pay adequate attention to safety during the installation Sony is not liable for any damage or injury caused by mishandling or improper installation TV installation dimensions table Model name Display dimensions Screen centre dimension Leng...

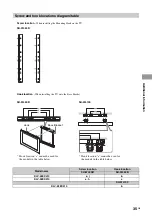
Page 35: ...cation Hook location SU WL50B SU WL50B KLV 42EX410 e j b KLV 32EX310 e h c SU WL100 KLV 22EX310 b SU WL50B Hook location a cannot be used for the models in the table below b a c b c b a a c a b c c b a Hook Base Bracket Hook location When installing the TV onto the Base Bracket b a SU WL100 Hook location a cannot be used for the models in the table below ...

Page 36: ...nection Keep the antenna cable away from other connecting cables Picture or sound noise when viewing a TV channel Adjust AFT Automatic Fine Tuning to obtain better picture reception page 28 Some tiny black points and or bright points appear on the screen The picture of a display unit is composed of pixels Tiny black points and or bright points pixels on the screen do not indicate a malfunction Pic...

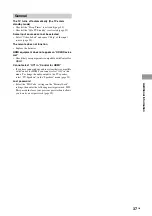
Page 37: ...not appear on HDMI Device List Check that your equipment is compatible with Control for HDMI Cannot select Off in Control for HDMI If you have connected any audio system that is compatible with Control for HDMI you cannot select Off in this menu To change the audio output to the TV speaker select TV Speakers in the Speakers menu page 25 Lost password Select the PIN Code settings on the Parental Lo...

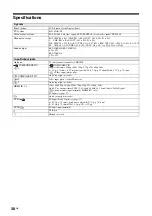
Page 38: ...ohm external terminal for VHF UHF COMPONENT IN 1 COMPONENT IN Supported formats 1080p 1080i 720p 576p 576i 480p 480i Y 1 Vp p 75 ohms 0 3V negative sync PB CB 0 7 Vp p 75 ohms PR CR 0 7 Vp p 75 ohms 1 Video input phono jack COMPONENT IN Audio input phono jacks 2 Video input phono jacks Monitor out 2 Audio input phono jacks HDMI IN 1 2 Video 1080 24p 1080p 1080i 720p 576p 576i 480p 480i Audio Two c...

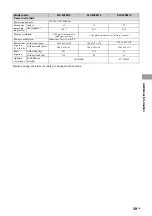
Page 39: ...32 22 cm Approx 106 7 80 0 54 8 Display resolution 1 920 pixels horizontal 1 080 lines vertical 1 366 pixels horizontal 768 lines vertical Power consumption Indicated on the rear of the TV Dimensions Approx w h d with stand mm 989 642 250 756 511 230 524 362 190 without stand mm 989 612 46 756 481 46 524 346 42 Mass Approx with stand kg 16 1 11 4 4 7 without stand kg 13 2 8 9 4 1 Optional accessor...

Page 40: ...ted in Malaysia Customer support Instructions on Installing the Wall Mount Bracket are not supplied in the form of a separate leaflet with this TV These installation instructions are included within this TV s instructions manual ...

Reviews: