background image

Summary of Contents for BRAVlA KDL-32XBR4

Page 1: ...Operating Instructions KDL 32XBR4 KDL 40D3000 BRAVlA 2007 Sony Corporation ...

Page 2: ...nd suilable kn tile vollage where you use it The plug is designed for sal_ty purposes tit fit into the wall outlet only one way If you am unable to insert tile plug tully into the outlet contact your dealer If any lktuid or solid object sllould tall inside the cabinet unplug the TV innnediately and have it checked by qualified service personnel bek re operating it fllrther If you will not be using...

Page 3: ...26 How to Use P P and PIP Features 27 To display a picture in the Sub Window 27 To change channels in the Sub Window 27 To exit from P P and PIP 27 Adjust TV Settings 28 _ Watching TV 28 _Access the equipment connected to your TV 28 Navigating through TV Home Menu on XMB 29 TV Settings Descriptions 30 Product Support 30 _ Clock Timers Settings 30 e_ Picture Settings 30 b Sound Settings 32 e_ Scree...

Page 4: ...power cord from being walked on or g o _ N NN_ wnen connecun_ comes oe _ure ro unplug ine _ l_ power cord wr your pinched particularly at plugs convenience sateT receptacles and tile point where they exit from the Take care nm m caTch your t_ t on the cables It may dmnage tile TV set apparatus Electric shock P_ l 1 Onlv use attachments accessories specified by the Do not touch the A i p d or tile ...

Page 5: ...nes Belbre cargving die TV disconnect all cables Carrying tim large size TV l_qun_s two or more people V1 When you carry the TV place your hand as illvstrated and hold ir securely Do not put stress on the LCD panel When carrying do not subject tile TV to sh cks or vibration or excessive torce When lifting or mowng the TV hold it firmly trom the bottom Place your pahn directly tlnaerneath but do no...

Page 6: ...n To prevent fire keep flmnmablc objects or open flame e g candles away from the TV INSTALLATION Wall mount installation requires tile use of a _ WMI Mount Bracket When mstalhng or _ ing the TV using a Wall Mount _ 11 2_ Bracket be _ ure to use qualified contractors lfnot properly d during installati j _ _I A removal from the Wal Mount Bracket the L_Lz_ L_ 5 FV may tall and cause serious ilajury O...

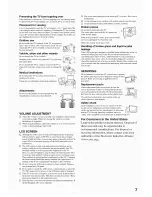
Page 7: ...t into your eyes or mouth Should either contact your eyes or lrlouth rinse tale contacted area thoroughly with water and consult your doctor SERVICI NG D not attempt to service tile TV yourself since opening the cabinet inoy expose you lo clangeroLIS VOltage or otllei llazards Rel r all servicing ro qualitied service personnel Replacement parts When replacement parts are required be sure file serv...

Page 8: ...ck Setup Guide enclosed separately illustrates how to connect other optional equipment _i _i Picture Quality and Aspect Ratio You can enjoy crisp clear images smooth movement and high impact visuals from 1080 HD signals When you compare a high definition signal to a standard analog signal you will notice a big difference The 1080 HD signals provide more than twice the vertical resolution of the st...

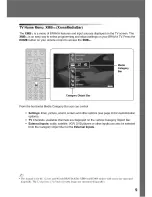
Page 9: ...dia Category Bar you can control Settings timer picture sound screen and other options see page 30 for customization options TV Channels available channels are displayed on the vertical Category Object Bar External Inputs cable satellite VCR DVD players or other inputs can also be selected from the Category Object Bar for the External Inputs This manual is for the 32 class and 40 inch BRAVIA KDL X...

Page 10: ......

Page 11: ...st the length by pulling the support belt toward you while holding the Table Top Stand Be sure to take measures to prevent the TV from toppling over and causing injury The supplied wood screw may not be used depending on the type of TV stand In this case or when the securing strength is not enough use commercial screws l s to 3 1 _ inch 3 to 4 ram diameter to fit to the TV stand Consult your deale...

Page 12: ...e to store the removed screws and Table Top Stand in a safe place until you are ready to reattach the Table Top Stand Keep the screws away from small children For bracket installation refer to the instruction guide provided by the Wall Mount Bracket model for your TV Sufficient expertise is required in installing this TV especially to determine the strength of the wall for withstanding the TV s we...

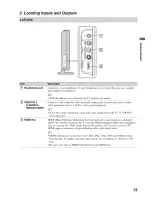
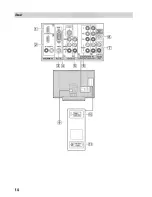
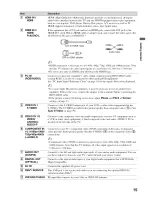
Page 13: ...equipment connect its audio output jack to the TV s L MONO audio input jack HDMI High Definition Multimedia Interface provides an uncompressed all digital audio video interface between this TV and any HDMI eqnipped audio video equipment such as a set top box DVD player Blu ray Disc player A V receiver as well as PC HDMI supports enhanced or high definition video plus digital audio HDMI connection ...

Page 14: ... v _iiii _ _i VO _ _ VAR FP 14 ...

Page 15: ...able If the picture is noisy flickering or not clear adjust Phase and Pitch of Screen settings on page 33 Connects to the S VIDEO output jack of your VCR or other video equipment that has S VIDEO The S VIDEO provides better picture quality than composite video _ See Auto S Video on page 39 VIDEO IN 1 3 VIDEO L MONO AUDIO R Connects to the composite video and audio output jacks on your A V equipmen...

Page 16: ...ohm coaxial cable _ _ Rear of TV VHF UHF CABLE input Use an optional A B RF switch not supplied to switch between tile cable and over the air antenna programming as indicated below A B RF switch Cable _ _ _ Rear of TV Antenna _ _ LL_ VHF UHF CABLE input Be sure to set the Cable setting to On or Off in the Channel settings lbr the type of input signal you choose see page 35 You can also enjoy high ...

Page 17: ... HDMI jack connect the DV jack to the HDMI IN 3 with DVI to HDM cable or adapter jack and connect the audio jack to the AUDIO IN L R jacks of HDMI IN 3 For details see page 15 g Shown with Component Connection Rear of TV AUDIO R red _ AUDIO L white _ PR red _ PB blue Y green Component video cable CATV Satellite antenna cable HD cable box _ HD satellite box I J Audio cable 17 ...

Page 18: ... PC to the TV set the output signal from the PC according to the chart below VGA 640 x 480 31 5 60 VC A 640 x 480 37 5 75 VESA 720 x 400 31 5 70 VGA T SVGA 8 I I x 6 10 37 9 60 VESA Guidelines 800 x 600 46 9 75 VESA XGA 11124 x 768 48 4 0 VESA Guidelines I 124 x 768 56 5 7 1 VESA 1024 x 768 60 0 75 VESA WXGA 1280 x 768 47 4 0 VESA 1280 x 768 47 8 0 VESA 1360 x 768 47 7 60 VESA This TV s PC input d...

Page 19: ...der A V Receiver Home Theater 1 VIDEO Headphones Camcorder ci 0 c_ VHF UHF CABLE Blu ray DVD Digital Digital Disc Player player satellite cable box PS3 receiver Audio Personal system computer Refer to the Quick Setup Guide supplied when connecting other equipment to your TV 19 ...

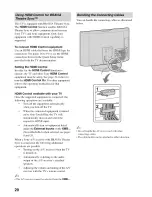
Page 20: ...ith your TV Once the supported equipment is connected the following operations are available Turn off the equipment automatically when you turn off the TV When the connected equipment is turned on by One Touch Play the TV will automatically turn on and select the respective HDMI input Automatically turn on equipment listed under the External Inputs on the XMB x_ XrossMediaBar when selected see pag...

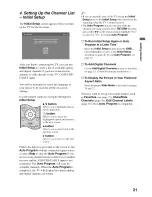
Page 21: ...and the VHF UHF CABLE input is not connected The Auto Program will scan for available channels When the Auto Program is completed the TV will display how many analog and digital channels are found If you accidentally turn off the TV during the Initial Setup process the Initial Setup will restart from the beginning when the TV is turned back on The Auto Program may be canceled while the channels ar...

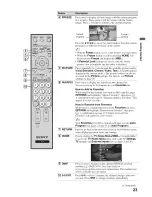
Page 22: ...On Screen Display will time out in a few seconds or press again to immediately turn off the display You can also set the display to show minimal information See Info Banner on page 40 SLEEP Press repeatedly until the TV displays the time in minutes Off 15rain 30rain 45rain 60rain 90rain or 120rain that you want the TV to remain on before shutting oft To cancel Sleep Timer press SLEEP repeatedly un...

Page 23: ...How to Add to Favorites While tuned to the channel you want to add to the list press OPTIONS and highlight Add to Favorites then press A confirmation message of Channel added to Favorites will appear for a few seconds RETURN HOME How to Remove from Favorites While tuned to a channel that exists in the Favorites list press OPTIONS and highlight Remove from Favorites then press A confirmation messag...

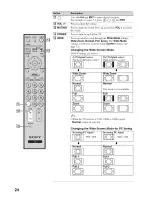
Page 24: ...The Wide Mode settings can be also accessed in the Screen settings see page 32 Changing the Wide Screen Mode For PC timing see below 4 3 Original source 16 9 Original source Standard definition source High definition source Wide Zoom Wide Zoom Normal Normal This mode is not available Full Full Zoom Zoom When the TV receives a 720p 1080i or 1080p signal Normal cannot be selected Changing the Wide S...

Page 25: ... Sound See page 32 _ P P or PiP See page 27 Audio Swap See page 27 Exit P P or Exit PIP See page 27 Motion Enhancer See page 34 Speakers See page 35 Add to Favorites See page 23 Remove from Favorites MTS See page 35 Alternate Audio See page 35 Digital Rating See page 37 Screen See page 32 Press to turn on and off the Closed Captions CC To change or customize the CC Display see page 36 Press to jmn...

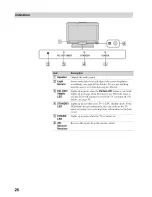
Page 26: ...ivated TIMER Lights up in orange when the timer is set When the timer is LED set this LED will remain lit even if the TV is turned oft For details see page 30 STANDBY Lights up in red when your TV is in PC standby mode If the LED LED blinks in red continuously this may indicate the TV needs servicing see contacting Sony information on the back cover POWER Lights up in green when the TV is turned o...

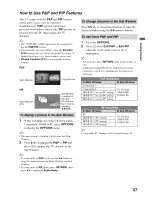
Page 27: ...y also press RETURN while in this feature to exit Additional compatible device with television tuner required to watch two sinmltaneous live television programs PIP Main Window PC Sub Window Location of the Sub Window can moved by pressing 4 1 While watching one of the following inputs Component HDMI or PC press OPTIONS to display the OPTIONS menu The input you are watching will become the Main Wi...

Page 28: ...available options vary depending on the situations and conditions applied Unawfilable options are grayed out or not displayed _ Watching TV Select a channel TV You can also select a TV channel using the number 0 9 or CH 1 buttons qsee remote control section pages 23 and 25_ _ Access the equipment connected to your TV External Watch a movie play a game record a program o1 work on your PC Inputs Ass...

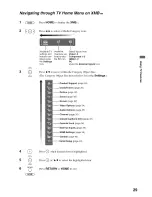
Page 29: ...r the TV icon HDMI 1 3 the Settings PC icon under the External Inputs icon Press i l to move within tile Category Object Bin The Category Object Bar shown below is for the Settings pport page 30 page 30 page 30 page 32 page 32 Options page 34 ptions page 35 page 35 Captions CO page 36 Lock page 36 Inputs page 39 Settings page 39 page 40 p page 40 Press when desired item is highlighted Press or 11 ...

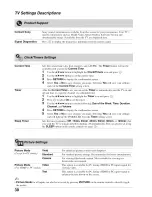
Page 30: ...e Timer icon and press 2 Press to select On to set the timer 3 Use the t l button to set the following Day of the Week Time Duration Channel and Volume 4 Press RETURN to display the confirmation screen 5 Select Yes or No to save changes you made Selecting Yes will save your settings and will light lip the TIMER LED Exit the Timer setting screen Sets the time in minutes Off 15rain 30min 45min 60min...

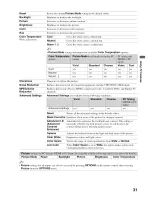
Page 31: ...F UHF CABLE input Reduces the mosaic effect in MPEG compressed video Useful for DVDs and Digital TV channels Advanced Settings are available t_r the following conditions ii Advanced Settings n a yes yes n a Reset Resets all the advanced settings to the default values Black Corrector Enhances black areas of the picture for stronger contrast Advanced C E Automatically optimizes the backlight and con...

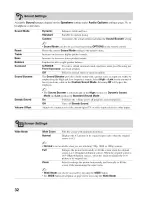
Page 32: ...you desire while in the Custom Sound Mode Selecting Off will bypass the emphasis The Sound Booster is automatically in the High position for Dynamic Sound Mode and Low position for Standard Sound Mode Steady Sound On Stabilizes the vohnne across all programs and commercials Off Turns off Steady Sound Volume Offset Adjusts tile volume level of tile current input TV or _ideo input relative to other ...

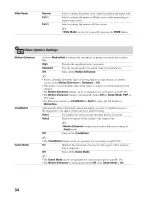
Page 33: ...as channels and inputs are changed set 4 3 Default to Off Normal Displays the picture in its original size 1 2 Enlarges the pictnre to hide the edge of the pictnre Adjust the Vertical positioning by pressing the 11411 buttons Press the 14 buttons to adjust the Horizontal positioning Screen Position option is available tbr standard definition signals only Vertical adjnstment is a _ailable only when...

Page 34: ...the mode has been changed The Motion Enhancer feature can be set separately for each input except PC IN The Motion Enhancer feature is automatically turned Off t_r Game Mode P P or a PC input For fihn based content set CineMotion to Auto1 to enjoy the full benefit of Motionflow Automatically detects fihn based content and applies a re_ erse 3 2 pulldown process Moving pictures will appear cleaner ...

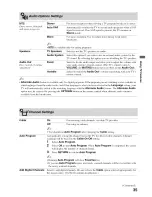
Page 35: ... you are watching is also available in other languages t_om the audio tracks and if that language is what you have selected in the Language setting your TV will automatically switch to the matching language with the Alternate Audio feature The Alternate Audio option may be accessed by pressing the OPTIONS button on the remote control when alternate andio stream is available from the broadcaster Ca...

Page 36: ...tion for the basic analog EIA 608 closed caption options CC1 CC2 Displays a printed version of the dialogue or sound effects of a CC3 CC4 program Should be set to CC1 for most programs Text1 Text2 Displays network station information presented using either half or Text3 Text4 the whole screen if available Digital CC Select this option for both analog EIA 608 and digital EIA 708 closed caption opti...

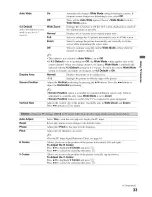
Page 37: ...details If you are not familiar with the parental guideline rating system you should select Child Youth or Young Adult to help simplify the rating selection To set more specific ratings select Custom Digital Rating Off Turn Digital Rating oft No programs containing digital ratings are Available o_d3 in U S A blocked from viewing where advanced rating _ Custom Select to customize the Parental Lock ...

Page 38: ... suggested TV 14 Parents strongly cautioned TV MA Mature audience only Content Based Ratings FV Fantasy violence D Suggestive dialogue L Strong language S Sexual situations V Violence To ensure maximum blocking capability set the Age Based Ratings For Country selection of Canada English Rating C All children C8 Chiktren 8 years and okter G General programming PG Parental guidance 14 Viewers 14 and...

Page 39: ... to connect the S VIDEO cable instead of the composite video cable for auto video detection If you are using the composite video cable set the setting to Off The Off setting will disable the auto detect and allows composite connection HDMI inputs of this TV will recognize and communicate with other Sony equipment equipped with H DMI Control HDMIControl On Off feature allows your TV to communicate ...

Page 40: ...or measures the room brightness which allows the TV to automatically adjust the backlight brightness based on the picture settings and the ambient room light conditions Be sure not to put anything around the sensor as its fimction may be affected see page 26 In low light the range of the backlight control is reduced when the Light Sensor is set to On On Automatically enters to standby mode when th...

Page 41: ... the optional video equipment and the TV sources Press INPUT on the remote control see page 25 Press HOME on the remote control Select your desired input from the External Inputs list Poor picture The quality of the images is Picture quality depends on the signal content See Quick Setup Guide not as good as what I saw at supplied to display the best possible picture for that signal the store Doubl...

Page 42: ... settings see page 32 Check the Auto Wide option in the Screen settings see page 33 Suddenly the picture gets The picture gets smaller during the commercials this is clue to the method the smaller provider broadcasts their contents When HD content channels switch to SD defnition content commercials the picture may be small with a black border Black box on screen You have selected a text option and...

Page 43: ...ed response time between the controller and the actual video Lost password Select the Password settings on the Parental Lock settings then enter the following master password 4357 The master password clears your previous password and allows you to enter a new password see page 37 How to reset the TV to factory Turn on the TV While holding clown tl on the remote control press POWER settings on the ...

Page 44: ...b 15 pin analog RGB 0 7 Vp p 75 ohms positive See the PC Input Signal Rel_rence Cllart on page 18 PC AUDIO INPUT Stereo inilli jack 5 g II Vrll S 1 kilollln Headphones Stereo inhli jack hnpedallce 16 t bills Power and others Power requirement Power consulnption ill use in standby Screen size inches measured diagonally Display resolution horizontal x vertical Speaker Full range 2 Dimensions with st...

Page 45: ... 25 L Label inputs 39 Language 40 Light Sensor Described 26 Setting 40 M Motion Enhancer 34 Movie Rating 38 MPEG Noise Reduction 31 NITS 35 MUTING button 24 N Noise Reduction 31 O OPTIONS button 25 P p p 27 Password 37 PC IN jack described 15 PC Power Management 40 Phase 33 PIC OFF TIMER LED 26 Picture 31 PICTURE button 23 Picture Mode 30 PIP 27 Pitch 33 POWER button 24 POWER LED 26 Power Saving 4...

Page 46: ...perating your television Contact Sony Customer Support at http llwww sony comltvsupport or to speak with a support representative United States 1 800 222 SONY 7669 Canada 1 677 699 SONY 7669 Sony will work to resolve your questions more quickly than your retailer or place of purchase Please Do Not Return the Product to the Store http www sony net Printed in U S A 3212313121 ...

Reviews: