w
U
z
«
z
w
I-
Z
«
~
o(j
~
u
w
I
U
U
o
o
0:
W
CL
M
When the tape becomes
or loose near the
T-tension
arm assemrirv. first the
of the air
is
to section 3-14). Next, the tension
of the T-tension
arm is
UUIU0l-'-'U
(steps 3 to 7 of this
,'~"_Ln
..'ll'.
If the tension arm may not be
the tension
arm
assern ntv.
B.
etc.) composmz
the T-tension
3-41 have been
confirm
the
accordmz
to section 3-24-2.
As the sequence
for replacement
of the tension
roller components
is not
shown, refer to
the
view in section
when replacement
tape
C.
is recurred.
Take care that no excessive force acts on the notcntiometer.
For the tension
prepare
a tension
adiustmcnt
tool
No. J-6043-120-A)
and a
voltmeter.
1.
Pull out the connector
CN004 from
board.
2.
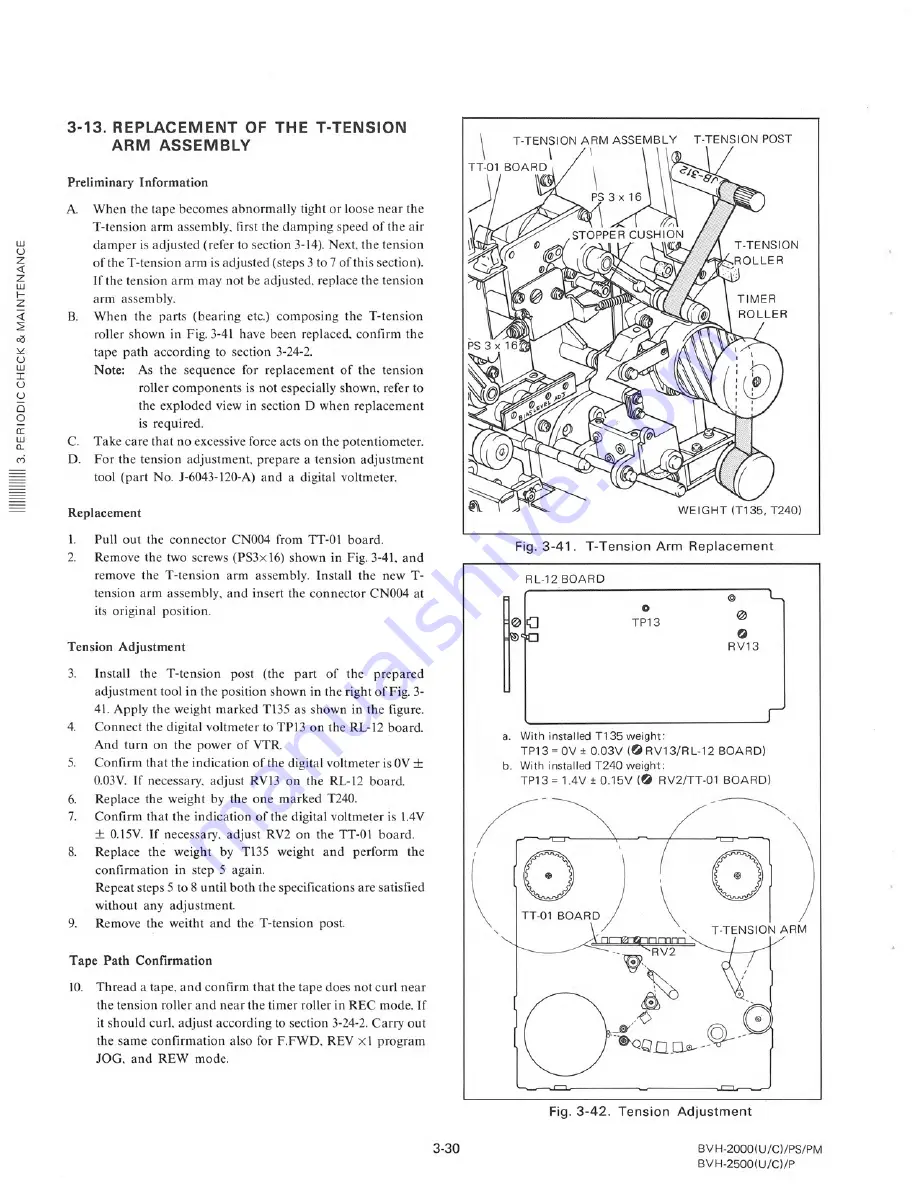
Remove the two screws (PS3x 16) shown in
and
remove
the T -tension
arm
the new
and insert the connector
CN004 at
its
3.
Install
post
(the
part
of the
the
shown in the
41.
marked T135 as shown
Connect
the
voltmeter to
on the
And turn on the power of
Confirm that the indication
of the
0.03V. If necessary,
the
the one marked
Confirm
that the indication
of the
4.
5.
6.
7.
8.
9.
confirmation
in step 5
steps 5 to 8 until both
without
any adtustment,
Remove the
and the
I
-re n
crrvn
post.
specmcations
are satisfied
10,
Thread a tape, and confirm that the tape does
curl near
the tension roller and
the
roller in
mode.
it should curl,
to section 3-24-2.
out
the same confirmation
also for
X
1 program
JOG, and
mode.
T-TENSION
ARM ASSEMBLY
T-TENSION
POST
\
RL-12 BOARD
@
TP13
RV13
a. With installed T135
TP13
OV ± O.03V
b. With installed T240
TP13
1.4V±O.15V
RV2/TT-01
BOARD)
o
T-TENSION
ARM
BVH-2000(U/C)/PS/PM
BVH-2500(U/C)/P
Summary of Contents for BVH-2000
Page 1: ...he handles available panels are optional Iy ...
Page 4: ......
Page 11: ......
Page 43: ......
Page 45: ......
Page 46: ......
Page 73: ......
Page 87: ......
Page 91: ......
Page 92: ......
Page 105: ......
Page 106: ......
Page 114: ......
Page 117: ......
Page 118: ......
Page 119: ......
Page 120: ......
Page 121: ......
Page 122: ......
Page 123: ......
Page 124: ......
Page 139: ......
Page 141: ......
Page 149: ......
Page 150: ......
Page 155: ......
Page 161: ......
Page 163: ......
Page 179: ......
Page 181: ...ARM 1 C C C ilr l I ...
Page 185: ......
Page 191: ......
Page 195: ......
Page 201: ......
Page 203: ......
Page 219: ......
Page 221: ......
Page 223: ......
Page 224: ......
Page 225: ......
Page 226: ......
Page 227: ......
Page 228: ......
Page 229: ......
Page 239: ......
Page 245: ......
Page 250: ...z o i a o LL Z BVH 2000 U C PS PM BVH 2180 U C PS PM ...
Page 257: ......
Page 259: ......
Page 265: ......
Page 269: ......
Page 305: ......
Page 323: ......
Page 344: ......
Page 370: ...15 ...
Page 371: ......
Page 375: ......
Page 388: ...of Standard Load for Output Check POWER UNIT 1 Standard for Variable a w o a 0 ...
Page 396: ...CN921 8 1 Spec CN921 8 5 Spec hoard BVH 2000 U C PS PM BVH 2500 U C P on ON 100 OFF 5 ...
Page 401: ......
Page 435: ......
Page 449: ......
Page 452: ......
Page 462: ......
Page 471: ......
Page 476: ......
Page 480: ......
Page 482: ... o w o ...
Page 484: ......
Page 492: ......
Page 494: ...80 U C ...
Page 496: ......
Page 497: ......
Page 498: ...14 2 BVH 2000 U C PS PM BVH 2500 U C P 80 U C PS PM w l j j Capstan Ree Servo Check ...
Page 500: ...lel pin 3 12 0 01 Vdc RVl TP5 EQ 02 NG Edge Can nectar Pin 21 B A B R138 w I U U ...
Page 504: ......
Page 505: ...BVH 2000 U C 3 673 996 22 Volume 1 1985 Printed in Japan 1985 4 09 ...


