3-29
BVW-55 P2
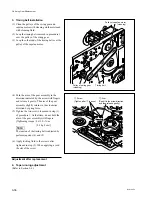
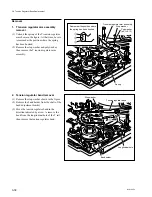
2. Cleaning roller replacement
(1) Remove the CR cap, and then lift the clean-
ing roller out.
(2) Put a new cleaning roller into the shaft in the
direction indicated by the figure.
(3) Push a new CR cap into the shaft and push
the spacer as far as it will go while supporting
the arm by finger.
3. VH cleaner assembly installation
(1) Install the VH cleaner assembly with the two
screws.
[Tightening torque: 9
x
10
_
2
N
.
m
{0.9 kgf
.
cm}]
3-6. Video Head Cleaner Replacement
CR cap
CR cap
Wide
Narrow
Cleaning roller
Cleaning roller
VH cleaner assembly
Arm
PWH1.4
x
3.5
VH cleaner assembly
Summary of Contents for BVW-55
Page 4: ......
Page 8: ......
Page 50: ...1 40 BVW 55 1 2 3 4 5 6 7 8 9 d l s d l 1 15 Fixtures and Adjustment Equipment List ...
Page 58: ......
Page 106: ......
Page 116: ......
Page 130: ......
Page 148: ......
Page 154: ......
Page 158: ......
Page 169: ...1 9 BVW 55 P2 1 2 Fixtures and Adjustment Equipment List 1 2 3 4 5 6 7 8 9 d l s d l ...
Page 176: ......
Page 272: ......
Page 384: ......
Page 392: ......
Page 396: ...1 2 BVW 55 ...
Page 666: ......
Page 705: ......
Page 752: ......
Page 780: ......
Page 805: ......
Page 848: ......
Page 856: ......
Page 870: ......
Page 884: ......
Page 904: ......
Page 909: ...5 27 b BVW 55 5 27 b CN101 CN301 CN302 CN303 CN901 MB 838 B SIDE SUFFIX 12 MB 838 MB 838 ...
Page 911: ...5 27 a BVW 55 5 27 a CN101 CN301 CN302 CN303 CN901 MB 838 B SIDE SUFFIX 11 MB 838 MB 838 ...
Page 940: ......


