3-58
BVW-55 P2
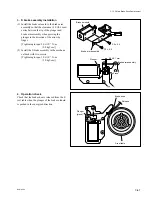
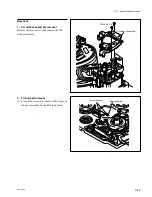
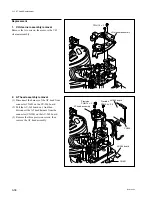
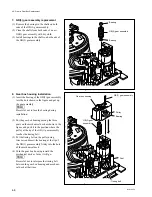
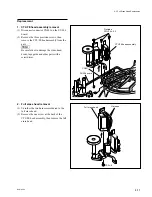
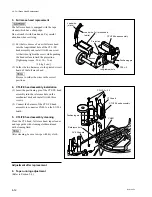
4. AT head assembly installation
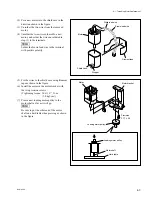
(1) Align the boss of the AT head assembly with
the hole of the mechanical deck and install it
with three screws.
(2) Connect the harness (shorter) of the AT head
to connector CN601 on the SV-206 board.
(3) Connect the harness (longer) of the AT head
to connector CN300 on the AU-262 board.
(4) Clean the AT head surface with cleaning
cloth moistened with cleaning fluid.
5. VH clearner assembly installation
(1) Install the VH clearner assembly with two
screws.
[Tightening torque: 9
x
10
_
2
N
.
m
{0.9 kgf
.
cm}]
(2) Confirm that the gear of the VH clearner
assembly is engaged with the gear of the gear
box when the manual eject knob is pushed
down.
3-15. AT Head Replacement
CN300
CN601
PWH1.4
x
3.5
PWH1.4
x
3.5
SV-206 board
AU-262 board
AT head assembly
PWH1.4
x
3.5
VH cleaner assembly
Summary of Contents for BVW-55
Page 4: ......
Page 8: ......
Page 50: ...1 40 BVW 55 1 2 3 4 5 6 7 8 9 d l s d l 1 15 Fixtures and Adjustment Equipment List ...
Page 58: ......
Page 106: ......
Page 116: ......
Page 130: ......
Page 148: ......
Page 154: ......
Page 158: ......
Page 169: ...1 9 BVW 55 P2 1 2 Fixtures and Adjustment Equipment List 1 2 3 4 5 6 7 8 9 d l s d l ...
Page 176: ......
Page 272: ......
Page 384: ......
Page 392: ......
Page 396: ...1 2 BVW 55 ...
Page 666: ......
Page 705: ......
Page 752: ......
Page 780: ......
Page 805: ......
Page 848: ......
Page 856: ......
Page 870: ......
Page 884: ......
Page 904: ......
Page 909: ...5 27 b BVW 55 5 27 b CN101 CN301 CN302 CN303 CN901 MB 838 B SIDE SUFFIX 12 MB 838 MB 838 ...
Page 911: ...5 27 a BVW 55 5 27 a CN101 CN301 CN302 CN303 CN901 MB 838 B SIDE SUFFIX 11 MB 838 MB 838 ...
Page 940: ......


