5-35
BVW-55 P2
Check procedure
5. Turn the power on
6. Play back the alignment tape
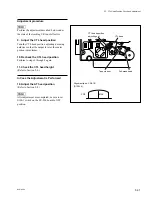
Play back the 1 kHz, 0 VU signal portion (8:00 to
10:00) on the CR8-1A.
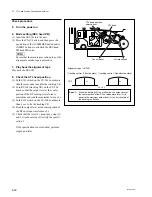
7. Check the AT head height
(1) Check that both levels in CH-1 and CH-2
decrease when portion A of the tape shown in
the figure is pressed down.
If both levels increase, perform step 8.
(2) Check that both levels in CH-1 and CH-2
decrease when portion B of the tape is pushed
up.
If both levels increase, perform step 9.
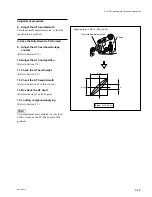
5-9. AT Head Height Check and Adjustment
.
Alignment tape : CR8-1A (8:00 to 10:00)
Spec. : The portion C widens when pressing down and pushing up the
alignment tape.
CH-1
AT head
CH-2
C
<Audio output waveform>
T3 guide
A
B
Tape
Summary of Contents for BVW-55
Page 4: ......
Page 8: ......
Page 50: ...1 40 BVW 55 1 2 3 4 5 6 7 8 9 d l s d l 1 15 Fixtures and Adjustment Equipment List ...
Page 58: ......
Page 106: ......
Page 116: ......
Page 130: ......
Page 148: ......
Page 154: ......
Page 158: ......
Page 169: ...1 9 BVW 55 P2 1 2 Fixtures and Adjustment Equipment List 1 2 3 4 5 6 7 8 9 d l s d l ...
Page 176: ......
Page 272: ......
Page 384: ......
Page 392: ......
Page 396: ...1 2 BVW 55 ...
Page 666: ......
Page 705: ......
Page 752: ......
Page 780: ......
Page 805: ......
Page 848: ......
Page 856: ......
Page 870: ......
Page 884: ......
Page 904: ......
Page 909: ...5 27 b BVW 55 5 27 b CN101 CN301 CN302 CN303 CN901 MB 838 B SIDE SUFFIX 12 MB 838 MB 838 ...
Page 911: ...5 27 a BVW 55 5 27 a CN101 CN301 CN302 CN303 CN901 MB 838 B SIDE SUFFIX 11 MB 838 MB 838 ...
Page 940: ......


