background image

17

Installing the Drive Unit into the Computer

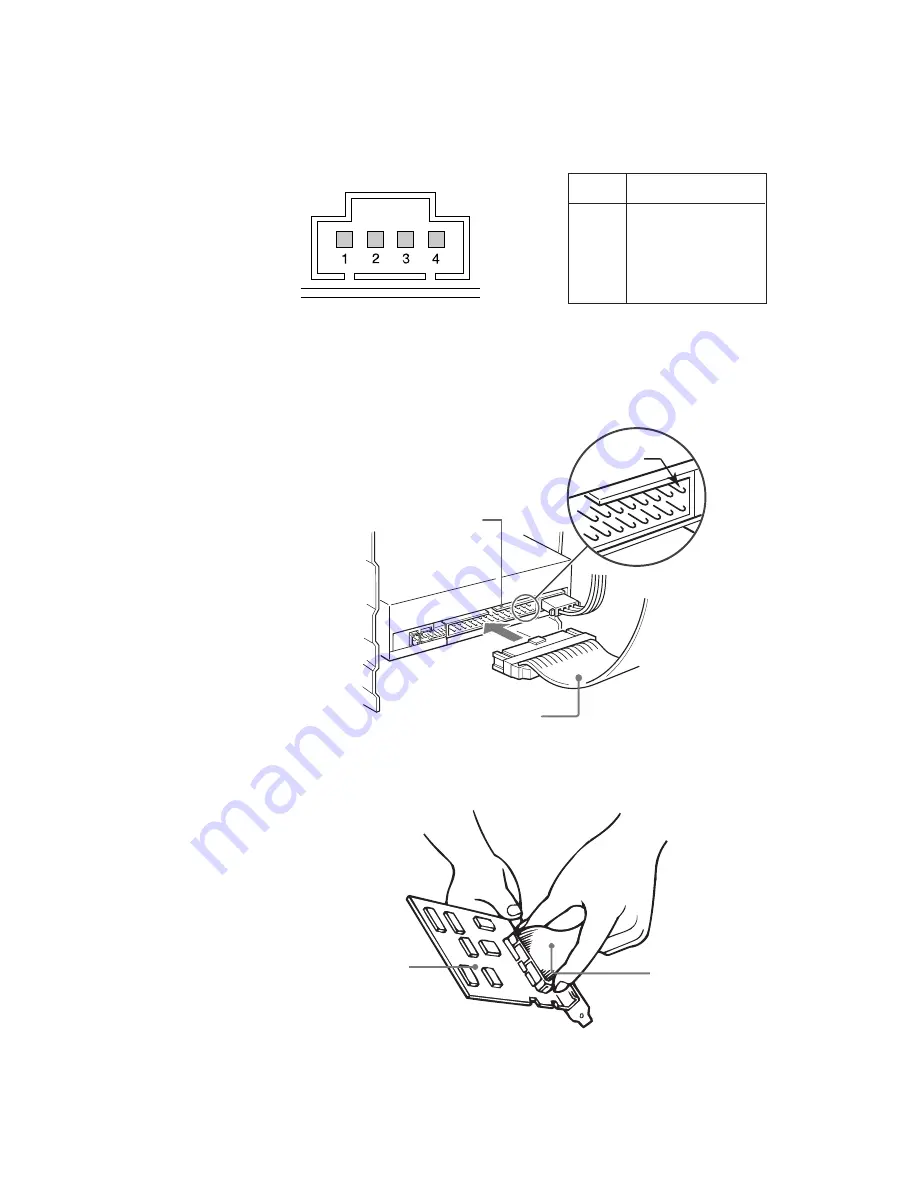
AUDIO OUT connector

The pin assignment is as f

ollo ws:

INTERFACE CONNECTOR

1

Firmly insert one end of the interface cable into the INTER-
FACE CONNECTOR.

2

Attach the other end of the cable to the host adapter.

pin

Audio Signal

1

R signal

2

ground

3

ground

4

L signal

INTERFACE
CONNECTOR

INTERFACE cable

Pin 1

INTERFACE cable

Host adapter

Summary of Contents for CDU711

Page 1: ...CDU711 CD ROM Drive Unit User s Guide 1997 by Sony Corporation Printed in Japan CDU711 CD ROM Drive Unit User s Guide 3 861 825 11 1 ...

Page 2: ...th the following mark When you use this unit as an audio CD player use compact discs with the following mark This label is located on the top of the drive Dieser Aufkleber befindet sich an der Oberseite des Gehäuses CAUTION INVISIBLE LASER RADIATION WHEN OPEN DO NOT STARE INTO BEAM OR VIEW DIRECTLY WITH OPTICAL INSTRUMENTS VORSICHT UNSICHTBARE LASERSTRAHLUNG WENN ABDECKUNG GEÖFFNET NICHT IN DEN ST...

Page 3: ...and on the user is encouraged to try to correct the interference by one or more of the following measures Reorient or relocate the receiving antenna Increase the separation between the equipment and receiver Connect the equipment into an outlet on a circuit different from that to which the receiver is connected Consult the dealer or an experienced radio TV technician for help This CD ROM Drive Uni...

Page 4: ...Corporation IBM PC PC XT and PC AT are registered trademarks of International Business Machines Corporation HP Vectra is a registered trademark of the Hewlett Packard Company Molex is a registered trademark of Molex Inc AMP is a registered trademark of AMP Inc ...

Page 5: ...Drive in Your Computer 11 Preparation 11 Setting the Jumpers 12 Opening the Computer 13 Preparing a Space for the Drive 14 Mounting the Drive 15 Connecting the Drive 16 Mounting the Host Adapter 18 Reassembling the Computer 19 Installing the Software Driver 20 How to Install 20 Operating the Drive 21 Starting the Drive 21 Ejecting the Disc 23 How to Use the Disc Locks 24 Specifications 26 ...

Page 6: ...amecasing Supported disc formats ReadsdatafromCD ROM CD ROMXA CD IandCD IReady formatdiscs andfromCD EXTRAandCDTEXTdiscs ReadsdatafromCD BRIDGEformatdiscsincludingPHOTO CD ReadsstandardCD DigitalAudioencodeddiscs ReadsVideoCDdiscs Performance Supportsquadruple 8timesandMax 32timesspeedoperations withrealtimeerrorcorrection Fastaccesstimeensuringreliablehigh speeddataaccess Audio Outputs16 bitdigit...

Page 7: ...dataonaCD ROM discdependsonthetypeandf ormatofthetar getdata Seethe manualsuppliedwithyourCD ROMdiscforinstructions Example of System Setup TousetheCD R OMdriveunit thef ollowingcomponentsare required Computer IBMPC PC XT PC AT HPVectra orequivalent IDEhostadapter ATAcompliant Floppydiskdrive IDE interface cable 40 40 pin flat cable Software Devicedriver Utilities Thefollowingisanexampleofsystemse...

Page 8: ...olsthevolumelevelofsoundoutputfromtheheadphones jack 2 4 4 4 4 4Busy indicator Thisamberindicatorlightsorflashestoindicateoneofthe followingunitconditions Steadylit TOC tableofcontents read seekdataread oraudioplaybackinprogress Flashing Drawerinmotion 5 5 5 5 5Emergency eject hole Usedtoopenthediscdrawermanuallywhenneithertheeject button 6 norasoftwarecommandworks Insertapointed object suchasapap...

Page 9: ...analogaudiosignals 3 3 3 3 3Configuration Jumpers Seepage12fordetails 4 4 4 4 4INTERFACE CONNECTOR IDE bus ConnecttoIDEhostadapterusingaconnectingcable 5 5 5 5 5DC INPUT power in connector Connecttothepowersupplyofthehostcomputer Location and Function of Parts and Controls Pin 1 ...

Page 10: ...ingthedrivetosuddenchangesintemperatureas condensationmayformonthelensinsidethedrive Shouldthe surroundingtemperaturesuddenlyrisewhilethedriveisturned on stopusingthedriveandleavethepoweronatleastonehour beforeoperatingitorturningitoff Operatingthedrive immediatelyafterasuddenincreaseintemperaturemayresultina malfunction Transportation Closethediscdrawerbeforemovingthedrive Keeptheoriginalpackingm...

Page 11: ...CDU711directl ytothePC sIDEpor t consulty our PCmanufacturerforinstruction Preparation Y ouneedthef ollowingpar tsandtools thesearenotsuppliedwith thedrive Aflat bladescrewdriver Fourscrews3mmindiameterand6mminlength Twomountingrailsifyourcomputerhasmountingtracks Unplugthecomputeranddisconnectthecablesattachedtotheback togiveyourselfmoreroomtowork Donotturnonthepowerofthe computerbeforecompleting...

Page 12: ...hentheCDU711isdaisy chainedwithaHardDiskDriveonan IDECard settheHardDiskDriveasMASTERandtheCDU711 asSLAVE IftheCDU711istheonlydeviceconnectedtotheIDECard set theCDU711asMASTER However itshouldbenotedthatsomeper sonalcomputer sma yuse CSELinlieuofthef oresaidMASTER SLA VEselection Inthis case remo vethee xistingjumper sfr omMASTERandSLA VE and setajumperonCSEL WhentheCSELsignaloftheinterface connec...

Page 13: ... 1 Ifyourcomputerhasitsrearsidecoveredbyaplasticpanel attachedwithplastichookpad pullitoff 2 Removethecovermountingscrews 3 Removethecoverofthecomputer Remove the plastic panel Computer Rear plastic panel Cover mounting screw Remove the screws Remove the computer cover ...

Page 14: ...ethescrewsandbracketssecuringthefloppydiskdrive andthelowerdrivebayblankingplate 2 Disconnectthefloppydiskdrive 3 Removethefloppydiskdriveandtheblankingplate Floppy disk drive Lower dirve bay blanking plate Remove the screws and brackets Floppy disk drive Floppy disk drive Blanking plate ...

Page 15: ...er Mounting the Drive Ifmountingrailsarenecessar y attac hthemtothedriveinthesame wayasyourfloppydiskdriveandslidethedriveintothelower driveba y Ifmountingrailsarenotrequirediny oursystem scre w thedriveinplace Slide the drive into the lower bay ...

Page 16: ...tor Thepinassignmentisasfollows Aftermatchingthebevelededges inserttheplugofthepower supplycabletotheDCINPUTconnectorandpushitfirmlyinplace Caution Improperconnectionmaydamagethedriveandvoidthe warranty Installing the Drive Unit into the Computer INTERFACE CONNECTOR DC INPUT connector AUDIO OUT connector 5 V DC 12 V DC GND DC INPUT connector Power supply cable 4 pin connection cable ...

Page 17: ...gnmentisasf ollo ws INTERFACE CONNECTOR 1 FirmlyinsertoneendoftheinterfacecableintotheINTER FACECONNECTOR 2 Attachtheotherendofthecabletothehostadapter pin Audio Signal 1 R signal 2 ground 3 ground 4 L signal INTERFACE CONNECTOR INTERFACE cable Pin 1 INTERFACE cable Host adapter ...

Page 18: ...the Host Adapter Installthehostadapterinoneoftheavailablesystemexpansion slotsofy ourcomputer Refertotheoperatinginstructionsinc luded withthehostadapterforcompleteinstructionsoninstallationand settings Install the host adapter in one of the expansion slots ...

Page 19: ...hedrivessothattheydonotprotrude abovethepowersupplymodule 5 Aftercheckingthefollowingpoints slidethecomputer scover onandfastenthecovermountingscrewsatthebackofthe computer Aretheconnectionsbetweenthedriveandcomputercorrect Arethejumperssettotheappropriatepositions 6 Remounttherearplasticpanelandreferbacktotheproper installationsectionifyouanswered no toeitherofthe questionsabove Reinstall the flo...

Page 20: ...ofyourharddiskdrive C DOS AlthoughMSCDEXisinc ludedinthemostup to date MS DOS ver 6 2 youma yneedtoobtainthesoftwarefr omy our PCdealerifyoudonothaveit TheinstallerwillautomaticallyloadMSCDEXviathe AUTOEXEC B ATfileandinstallstheDe viceDriverviathe CONFIG SYSfile ifMSCDEXisalreadyinDriveC DOS How to Install AttheDOSPr omptA DriveAactive A Loadthedisketteintotheflopp ydiskDriveA andtype install A i...

Page 21: ...startthedriveandejectadisc Starting the Drive 1 Turnonthepowerofyourcomputer 2 Presstheejectbutton Thedrawercomesoutautomatically 3 Placeadiscinthedrawerwithitslabelsideup Press the eject button Place a disc with its label side up Operating the Drive ...

Page 22: ...nstructionsprovided withtheapplicationsoftwareyouareusing Note Thebusyindicatorstayslitinamberif thediscisnotproperlyplacedontheloadingtray amalfunctionoccurs Ineithercase ejectthediscandplaceitintheloadingtrayagain makingsurethatitsitspr operl yinthetra y Ifdoingthisdoesnot solvethepr ob lemandtheb usyindicatorstillremainslitinamber consultyourdealerorqualifiedservicepersonnel Caution Donotf orci...

Page 23: ... manually in an emergency Y oucanopenthedra werman uallywhenitfailstocomeoutb y meansoftheejectb uttonorsoftwarecommands Todothis follow theprocedurebelow 1 Turnoffthepowerofyourcomputer 2 Insertapointedobject suchasapaperclip intotheemergency ejectholeandpush Afterremovingadiscfromthedriveunit consultyourdealeror qualifiedservicepersonnel Press the eject button Approx 40 mm Operating the Drive ...

Page 24: ...driveisusedinhorizontalposition youdonotneedto lockthedisc Locking and unlocking Allofthefourlocksaresetintheunlockedposition facing outwar d whenthedriveisshippedfr omthefactor y Tosettheloc k inthelockedposition turnitwithyourfingersuntilyouhearaclick sothatitfacesinward Disc locks locked unlocked to lock to unlock Operating the Drive ...

Page 25: ...ntothe lockedposition andlea vethediscloc kAintheunloc kedposition B C D A When the drive s left side is down Tofacilitatedischandling setthediscloc ksA CandDintothe lockedposition andleavethedisclockBintheunlockedposition D A C B Top side Right side Top side Left side Operating the Drive ...

Page 26: ...peed 2000min 1 rpm 4 9 CAV 4000min 1 rpm 8 18 CAV 7000min 1 rpm 14 32 CAV Drive performance Datatransferrate Sustainedrate 600 1350kb ytes 4 9 CAV 1200 2700kb ytes 8 18 CAV 2100 4800kb ytes 14 32 CAV Burstrate 16 7Mbytes s mode4 IOCHANNELREADYsupported 16 7Mb ytes s Multiw ordDMAmode2 33 3Mbytes s UltraDMA Accesstime Randomstr oke 80ms typical 14 32 CAV Reliability Readerr orrate inc ludesretr y w...

Page 27: ... 0 90kg 2lb Power requirement V olta ge 5 V 5 DC and 12 V 10 DC Current TrayOpen Close 5 V DC 1100 mA 12 VDC 1100mA SeekingandSpinUp Down 5 V DC 1300 mA 12 V DC 1800 mA Hold Trac kState 5 V DC 1300 mA 12 V DC 750 mA Standby Sleep 5 V DC 150mA 12 V DC 20mA Connectors INTERFACECONNECT OR withDCINPUTconnector AMP179376 1orequivalent AUDIOOUTconnector Molex5046 04Aorequivalent Laser Type Semiconductor...

Page 28: ...ceed6 0mmfr omthe surfaceofthesidepanelsorthebottomplate 5 1 2 17 8 31 8 79 25 47 5 139 7 10 1 32 1 32 21 9 7 8 13 32 0 5 0 4 1 11 16 41 4 5 111 16 42 3 203 8 146 5 3 4 7 32 148 5 7 8 Unit mm inch 4 M3 Mounting screws 4 on each side 4 M3 Mounting screws Specifications ...

Reviews: