background image

15

Accesorios suministrados: 

Control remoto de tarjeta: RM-X151
Componentes de instalación y conexiones 
(1 juego)

Es posible que su distribuidor no comercialice 
algunos de los accesorios que figuran en la lista 
anterior. Pídale información detallada.

El diseño y las especificaciones están sujetos a 
cambios sin previo aviso.

Solución de problemas

La siguiente lista de comprobación le ayudará a 
solucionar los problemas que puedan producirse con 
la unidad.
Antes de consultarla, revise los procedimientos de 
conexión y de funcionamiento.

Generales

La unidad no recibe alimentación.

• Revise la conexión o el fusible.
• Si la unidad está apagada y la pantalla desaparece, no 

se puede operar con el control remoto.

t

Encienda la unidad.

La antena motorizada no se extiende.

La antena motorizada no dispone de una caja de relé.

No se emite el sonido.

• La función ATT está activada.
• La posición del control de equilibrio “FAD” no está 

ajustada para un sistema de 2 altavoces.

No se escuchan pitidos.

• El sonido de los pitidos está cancelado (página 10).
• Se encuentra conectado un amplificador de potencia 

opcional y no está usando el amplificador integrado.

El contenido de la memoria se borró.

Se desconectó el cable de fuente de alimentación o la 
batería, o no están conectados correctamente.

Las emisoras almacenadas y la hora correcta 
se borraron.
El fusible se fundió.
Se escucha ruido cuando se cambia la 
posición de la llave de encendido.

Los cables no se conectaron de forma correcta al 
conector de alimentación auxiliar del automóvil.

Durante la reproducción o la recepción, el 
modo demostración se inicia.

Si no se realiza ninguna operación durante 5 minutos y 
la opción “DEMO-ON” está ajustada, se iniciará el 
modo de demostración.

t

Ajuste “DEMO-OFF” (página 10).

Las indicaciones desaparecen de la pantalla o 
no aparecen en ella.

• El atenuador está ajustado en “DIMMER-ON” 

(página 10).

• La pantalla se apaga si mantiene presionado 

(SOURCE/OFF)

.

t

Presione 

(SOURCE/OFF)

 en la unidad hasta que 

se ilumine la pantalla.

• Los conectores están sucios (página 13).

La función de desconexión automática no 
funciona.

La unidad está encendida. La función de desconexión 
automática se activa después de apagar la unidad.

t

Apague la unidad.

continúa en la página siguiente 

t

Summary of Contents for CDX-GT25MPW - Fm/am Compact Disc Player

Page 1: ...rs in the spaces provided below Refer to these numbers whenever you call upon your Sony dealer regarding this product Model No CDX GT25MPW Serial No To cancel the demonstration DEMO display see page 4 Para cancelar la pantalla de demostración DEMO consulte la página 4 ES US 4 191 888 11 1 CDX GT25MPW 2010 Sony Corporation FM AM Compact Disc Player ...

Page 2: ... the receiver is connected Consult the dealer or an experienced radio TV technician for help You are cautioned that any changes or modifications not expressly approved in this manual could void your authority to operate this equipment Warning if your car s ignition has no ACC position Be sure to set the Auto Off function page 10 The unit will shut off completely and automatically in the set time a...

Page 3: ... the stored stations 8 Tuning automatically 8 RDS 8 Overview 8 Selecting PTY 8 Setting CT 9 CD Display items 9 Repeat and shuffle play 9 Other functions Changing the sound settings 10 Adjusting the sound characteristics BAL FAD SUB 10 Customizing the equalizer curve EQ3 10 Adjusting setup items SET 10 Using optional equipment 11 Auxiliary audio equipment 11 Additional Information Precautions 12 No...

Page 4: ...ing the card remote commander Remove the insulation film Tip For how to replace the battery see page 13 Setting the clock The clock uses a 12 hour digital indication 1 Press and hold the select button The setup display appears 2 Rotate the control dial until CLOCK ADJ appears then press it The hour indication flashes 3 Rotate the control dial to set the hour and minute To move the digital indicati...

Page 5: ...d hold SOURCE OFF The unit is turned off 2 Press then pull it off towards you Notes Do not drop or put excessive pressure on the front panel and display window Do not subject the front panel to heat high temperature or moisture Avoid leaving it in a parked car or on a dashboard rear tray Attaching the front panel Engage part A of the front panel with part B of the unit as illustrated and push the ...

Page 6: ...ly press then press again within about 1 second and hold reverse fast forward a track press and hold B EQ3 equalizer button page 10 To select an equalizer type XPLOD VOCAL EDGE CRUISE SPACE GRAVITY CUSTOM or OFF C SOURCE OFF button Press to turn on the power change the source Radio CD AUX Press for 1 second to turn off the power Press for more than 2 seconds to turn off the power and the display d...

Page 7: ...ons from the unit Remove the insulation film before use page 4 qh OFF button To turn off the power stop the source qj SOURCE button To turn on the power change the source Radio CD AUX qk buttons To control radio CD the same as SEEK on the unit Setup sound setting etc can be operated by ql DSPL display button To change display items w VOL volume button To adjust volume wa ATT attenuate button To at...

Page 8: ...p If you know the frequency of the station you want to listen to press and hold SEEK to locate the approximate frequency then press SEEK repeatedly to fine adjust to the desired frequency manual tuning RDS Overview FM stations with Radio Data System RDS service send inaudible digital information along with the regular radio program signal Display items While receiving the RDS station is displayed ...

Page 9: ...e page 12 Repeat and shuffle play 1 During playback press 3 REP or 4 SHUF repeatedly until the desired setting appears When an MP3 WMA is played To return to normal play mode select OFF or SHUF OFF NEWS News INFORM Information SPORTS Sports TALK Talk ROCK Rock CLS ROCK Classic Rock ADLT HIT Adult Hits SOFT RCK Soft Rock TOP 40 Top 40 COUNTRY Country OLDIES Oldies SOFT Soft NOSTALGA Nostalgia JAZZ ...

Page 10: ...splay returns to normal reception play mode Tip Other equalizer types are also adjustable Adjusting setup items SET 1 Press and hold the select button The setup display appears 2 Rotate the control dial until the desired item appears then press it 3 Rotate the control dial to select the setting then press it The setting is complete 4 Press BACK The display returns to normal reception play mode For...

Page 11: ...g the volume level Be sure to adjust the volume for each connected audio device before playback 1 Turn down the volume on the unit 2 Press SOURCE OFF repeatedly until AUX appears FRONT IN appears 3 Start playback of the portable audio device at a moderate volume 4 Set your usual listening volume on the unit 5 Press the select button repeatedly until AUX appears and rotate the control dial to adjus...

Page 12: ...sc begins with a CD DA session it is recognized as a CD DA disc and other sessions are not played back Discs that this unit CANNOT play CD R CD RW of poor recording quality CD R CD RW recorded with an incompatible recording device CD R CD RW which is finalized incorrectly CD R CD RW other than those recorded in music CD format or MP3 format conforming to ISO9660 Level 1 Level 2 Joliet Romeo or mul...

Page 13: ...may occur Fuse replacement When replacing the fuse be sure to use one matching the amperage rating stated on the original fuse If the fuse blows check the power connection and replace the fuse If the fuse blows again after replacement there may be an internal malfunction In such a case consult your nearest Sony dealer Cleaning the connectors The unit may not function properly if the connectors bet...

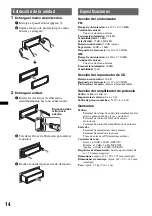
Page 14: ...CD Player section Signal to noise ratio 120 dB Frequency response 10 20 000 Hz Wow and flutter Below measurable limit Power amplifier section Output Speaker outputs Speaker impedance 4 8 ohms Maximum power output 52 W 4 at 4 ohms General Outputs Audio outputs terminal sub rear switchable Power antenna aerial relay control terminal Power amplifier control terminal Inputs Remote controller input ter...

Page 15: ...aker system No beep sound The beep sound is canceled page 10 An optional power amplifier is connected and you are not using the built in amplifier The contents of the memory have been erased The power supply lead or battery has been disconnected or it is not connected properly Stored stations and correct time are erased The fuse has blown Makes noise when the position of the ignition is switched T...

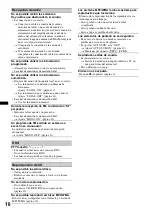
Page 16: ... An FM program broadcast in stereo is heard in monaural The unit is in monaural reception mode tSet MONO OFF page 10 RDS PTY displays The current station is not an RDS station RDS data has not been received The station does not specify the program type CD playback The disc cannot be loaded Another disc is already loaded The disc has been forcibly inserted upside down or in the wrong way The disc d...

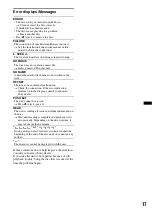
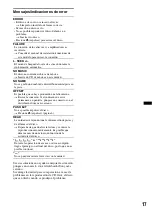
Page 17: ...ction L SEEK The local seek mode is on during automatic tuning NO MUSIC The disc does not contain a music file tInsert a music CD in this unit NO NAME A disc album artist track name is not written in the track OFFSET There may be an internal malfunction tCheck the connection If the error indication remains on in the display consult your nearest Sony dealer PUSH EJT The disc cannot be ejected tPres...

Page 18: ... en el tablero del automóvil por razones de seguridad Para realizar la instalación y las conexiones consulte el manual de instalación y de conexiones suministrado Windows Media es una marca comercial registrada o una marca comercial de Microsoft Corporation en los EE UU y otros países Este producto está protegido por los derechos de propiedad intelectual de Microsoft Corporation Queda prohibido el...

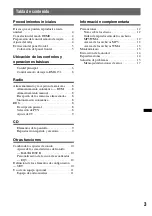
Page 19: ...n automática 8 RDS 8 Descripción general 8 Selección de PTY 8 Ajuste de CT 9 CD Elementos de la pantalla 9 Reproducción repetida y aleatoria 9 Otras funciones Cambio de los ajustes de sonido 10 Ajuste de las características del sonido BAL FAD SUB 10 Personalización de la curva de ecualizador EQ3 10 Definición de los elementos de configuración SET 10 Uso de un equipo opcional 11 Equipo de audio aux...

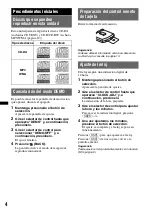
Page 20: ...a Retire la lámina de aislamiento Sugerencia Si desea obtener información adicional sobre cómo sustituir la pila consulte la página 13 Ajuste del reloj El reloj emplea una indicación digital de 12 horas 1 Mantenga presionado el botón de selección Aparecerá la pantalla de ajustes 2 Gire el selector de control hasta que aparezca CLOCK ADJ y a continuación presiónelo La indicación de la hora parpadea...

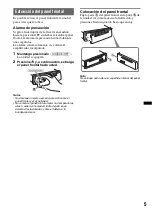
Page 21: ...E OFF La unidad se apagará 2 Presione y a continuación extraiga el panel frontal hacia usted Notas No deje caer ni ejerza excesiva presión sobre el panel frontal y el visualizador No someta el panel frontal al calor ni a temperaturas altas o excesiva humedad Evite dejarlo en un automóvil estacionado o sobre el tablero o la bandeja posterior Colocación del panel frontal Fije la parte A del panel fr...

Page 22: ...ir pistas presionar para omitir pistas en forma continua presionar y volver a presionar al cabo de 1 segundo y mantener presionado para retroceder o avanzar una pista rápidamente mantener presionado B Botón EQ3 ecualizador página 10 Para seleccionar el tipo de ecualizador XPLOD VOCAL EDGE CRUISE SPACE GRAVITY CUSTOM u OFF C Botón SOURCE OFF Presione para encender la unidad cambiar la fuente Radio ...

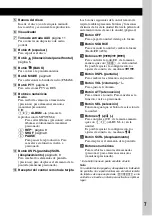
Page 23: ... botones y funciones distintos de los de la unidad Retire la película de aislamiento antes de usar la unidad página 4 qh Botón OFF Para apagar la unidad detenga la fuente qj Botón SOURCE Para encender la unidad cambie la fuente Radio CD AUX qk Botones Para controlar la radio CD de la misma manera que con SEEK en la unidad Es posible ajustar la configuración los ajustes de sonido etc mediante ql Bo...

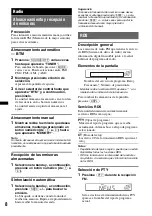
Page 24: ...una emisora Repita este procedimiento hasta recibir la emisora deseada Sugerencia Si conoce la frecuencia de la emisora que desea escuchar mantenga presionado SEEK para localizar la frecuencia aproximada y a continuación presione SEEK varias veces para ajustar la frecuencia deseada con mayor precisión sintonización manual RDS Descripción general Las emisoras de radio FM que tienen el servicio de R...

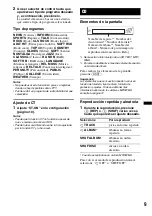
Page 25: ...justes Si desea obtener más información acerca de los archivos MP3 WMA consulte la página 12 Reproducción repetida y aleatoria 1 Durante la reproducción presione 3 REP o 4 SHUF varias veces hasta que aparezca el ajuste deseado Cuando se reproduce un archivo MP3 WMA Para volver al modo de reproducción normal seleccione OFF o SHUF OFF NEWS Noticias INFORM Información SPORTS Deportes TALK Conversació...

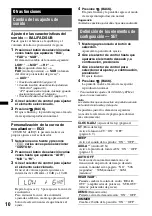
Page 26: ...de ecualizador ajustada en fábrica mantenga presionado el botón de selección antes de que finalice el ajuste 4 Presione BACK El ajuste finaliza y la pantalla regresa al modo de recepción reproducción normal Sugerencia También es posible ajustar otros tipos de ecualizador Definición de los elementos de configuración SET 1 Mantenga presionado el botón de selección Aparecerá la pantalla de ajustes 2 ...

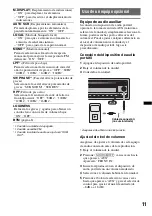
Page 27: ...n habitual en la unidad 5 Presione el botón de selección varias veces hasta que aparezca AUX y gire el selector de control para ajustar el nivel de entrada de 8 dB a 18 dB M DISPLAY Desplazamiento de indicaciones ON para desplazar los elementos OFF para desactivar el desplazamiento de indicaciones AUTO SCR Desplazamiento automático Permite desplazarse por los elementos de la pantalla automáticamen...

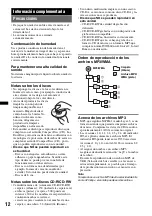
Page 28: ...a Si lo intenta puede dañar la unidad Discos de 8 cm Notas sobre los discos CD R CD RW Cantidad máxima de solamente CD R CD RW carpetas álbumes 150 incluida la carpeta raíz archivos pistas y carpetas 300 puede ser inferior a 300 si los nombres de carpeta archivo contienen muchos caracteres caracteres para visualizar en el nombre de una carpeta o un archivo 32 Joliet 64 Romeo Si un disco multisesió...

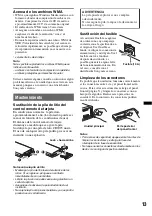
Page 29: ... la pila de litio Mantenga la pila de litio fuera del alcance de los niños Si se ingiriese póngase en contacto inmediatamente con un médico Limpie la pila con un paño seco para garantizar un contacto óptimo Asegúrese de observar la polaridad correcta al instalarla No sujete la pila con pinzas metálicas ya que podría producirse un cortocircuito Sustitución del fusible Al sustituir el fusible asegúr...

Page 30: ...ermedia 25 kHz Sensibilidad 26 µV Sección del reproductor de CD Relación señal ruido 120 dB Respuesta de frecuencia de 10 a 20 000 Hz Fluctuación y trémolo inferior al límite medible Sección del amplificador de potencia Salida Salidas de altavoz Impedancia de altavoz de 4 a 8 Ω Salida de potencia máxima 52 W 4 a 4 Ω Generales Salidas Terminal de salidas de audio intercambiable entre altavoz potenc...

Page 31: ... cancelado página 10 Se encuentra conectado un amplificador de potencia opcional y no está usando el amplificador integrado El contenido de la memoria se borró Se desconectó el cable de fuente de alimentación o la batería o no están conectados correctamente Las emisoras almacenadas y la hora correcta se borraron El fusible se fundió Se escucha ruido cuando se cambia la posición de la llave de ence...

Page 32: ...do débil tAjuste MONO ON página 11 Un programa de FM emitido en estéreo se escucha en monoaural La unidad se encuentra en el modo de recepción monoaural tAjuste MONO OFF página 11 RDS PTY muestra La emisora actual no es una emisora RDS No se recibieron datos RDS La emisora no especifica el tipo de programa Reproducción de CD No es posible insertar el disco Ya hay un disco insertado El disco se ins...

Page 33: ...e búsqueda local está activado durante la sintonización automática NO MUSIC El disco no contiene archivos de música tInserte un CD de música en esta unidad NO NAME No se grabó un nombre de disco álbum artista pista en la pista OFFSET Es posible que se haya producido una falla interna tRevise la conexión Si el indicador de error permanece en pantalla póngase en contacto con el distribuidor Sony más...

Page 34: ......

Page 35: ......

Page 36: ... Thailand http www sony net If you have any questions problems regarding this product try the following 1 Read Troubleshooting in these Operating Instructions 2 Please contact U S A only Call 1 800 222 7669 URL http www SONY com ...

Reviews: