background image

10

Playing tracks in various 
modes

You can listen to tracks repeatedly (repeat 
play) or in random order (shuffle play).

1

During playback, press 




(

)  or 



 (SHUF) repeatedly until the 

desired play mode appears.

Repeat play

Shuffle play

* When  an  MP3/WMA  is  played.

Sound Settings and 
Setup Menu

Customizing the equalizer 
curve — EQ3

“CUSTOM” of EQ3 allows you to make 
your own equalizer settings.

1

During reception/playback, press 



 repeatedly to select 

“CUSTOM,” then press 

 (BACK).

2

Press 



.

3

Rotate the control dial until “SOUND” 
appears, then press it.

4

Rotate the control dial until “EQ3 
LOW,” “EQ3 MID” or “EQ3 HIGH” 
appears, then press it.

5

Rotate the control dial to adjust the 
selected item, then press it.

The volume level is adjustable in 1 dB 
steps, from –10 dB to +10 dB.

Repeat steps 4 and 5 to adjust the 
equalizer curve.
To restore the factory-set equalizer 
curve, press and hold 



 before 

the setting is complete.

6

Press 

 (BACK) twice.

The display returns to normal reception/
play mode.

Select

To play

 TRACK

track repeatedly.

 ALBUM

*

album repeatedly.

 OFF

track in normal order 
(Normal play).

Select

To play

SHUF ALBUM

*

album in random 
order.

SHUF DISC

disc in random order.

SHUF OFF

track in normal order 
(Normal play).

Summary of Contents for CDX-GT320MP

Page 1: ...FM AM tuning step see page 4 To cancel the demonstration DEMO display see page 4 Para cambiar el paso de sintonización de FM AM consulta la página 4 Para cancelar la pantalla de demostración DEMO consulte la página 4 Operating Instructions GB Manual de instrucciones ES ...

Page 2: ...each time you turn the ignition off Be sure to install this unit in the dashboard of the car for safety For installation and connections see the supplied installation connections manual Windows Media is either a registered trademark or trademark of Microsoft Corporation in the United States and or other countries This product contains technology subject to certain intellectual property rights of M...

Page 3: ...Location of controls 6 Main unit 6 RM X201 Remote commander 6 Radio 8 Storing and receiving stations 8 RDS 8 CD 9 Playing a disc 9 Playing tracks in various modes 10 Sound Settings and Setup Menu 10 Adjusting setup items 11 Using optional equipment 12 Auxiliary audio equipment 12 Additional Information 13 Precautions 13 Maintenance 14 Specifications 15 Troubleshooting 16 ...

Page 4: ...MHz AM 9 kHz 531 kHz 540 kHz 549 kHz AM 10 kHz 530 kHz 540 kHz 550 kHz Canceling the DEMO mode You can cancel the demonstration display which appears while this unit is turned off 1 Press rotate the control dial until DISPLAY appears then press it 2 Rotate the control dial until DEMO appears then press it 3 Rotate the control dial to select DEMO OFF then press it The setting is complete 4 Press BA...

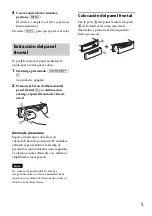
Page 5: ...ion switch to the OFF position without detaching the front panel the caution alarm will sound for a few seconds The alarm will only sound if the built in amplifier is used Note Do not subject the front panel to heat high temperature or moisture Avoid leaving it in a parked car or on a dashboard rear tray Attaching the front panel Engage part of the front panel with part of the unit as illustrated ...

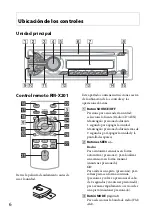
Page 6: ...adio CD AUX Press and hold for 1 second to turn off the power Press and hold for more than 2 seconds to turn off the power and the display disappears SEEK buttons Radio To tune in stations automatically press find a station manually press and hold CD To skip a track press skip tracks continuously press then press again within about 2 seconds and hold reverse fast forward a track press and hold MOD...

Page 7: ... 8 9 To change display items press scroll a display item press and hold AUX input jack page 12 OFF button To turn off the power stop the source SOURCE button Press to turn on the power select the source Radio CD AUX buttons To control radio CD the same as on the unit Setup items can be operated by ENTER button To apply a setting PTY Program Type button VOL Volume button ATT Attenuate button To att...

Page 8: ...mber button to until MEMORY appears Receiving the stored stations 1 Select the band then press a number button to Tuning automatically 1 Select the band then press to search for the station Scanning stops when the unit receives a station Repeat this procedure until the desired station is received Tip If you know the frequency of the station you want to listen to press and hold to locate the approx...

Page 9: ...label side up Playback starts automatically To eject the disc press Note Corresponding codec is MP3 mp3 and WMA wma Changing display items Press Displayed items may differ depending on the disc type recording format and settings NEWS News AFFAIRS Current Affairs INFO Information SPORT Sports EDUCATE Education DRAMA Drama CULTURE Culture SCIENCE Science VARIED Varied POP M Pop Music ROCK M Rock Mus...

Page 10: ...ial until SOUND appears then press it 4 Rotate the control dial until EQ3 LOW EQ3 MID or EQ3 HIGH appears then press it 5 Rotate the control dial to adjust the selected item then press it The volume level is adjustable in 1 dB steps from 10 dB to 10 dB Repeat steps 4 and 5 to adjust the equalizer curve To restore the factory set equalizer curve press and hold before the setting is complete 6 Press...

Page 11: ...ep sound ON OFF AUTO OFF Shuts off automatically after a desired time when the unit is turned off NO 30S Seconds 30M Minutes 60M Minutes AUX A 1 AUX Audio Activates the AUX source display ON OFF page 12 REAR SUB 1 Switches the audio output REAR OUT power amplifier SUB OUT subwoofer CT Clock Time Activates the CT function ON OFF page 9 BTM 3 page 8 EQ3 LOW 1 page 10 EQ3 MID 1 page 10 EQ3 HIGH 1 pag...

Page 12: ...ly until AUX appears 3 Start playback of the portable audio device at a moderate volume 4 Set your usual listening volume on the unit 5 Adjust the input level page 12 HPF High Pass Filter Selects the front rear speaker cut off frequency OFF 80Hz 100Hz 120Hz 140Hz 160Hz AUX VOL 3 AUX Volume Level Adjusts the volume level for each connected auxiliary equipment 18 dB 0 dB 8 dB This setting negates th...

Page 13: ...ded with copyright protection technologies do not conform to the Compact Disc CD standard therefore these discs may not be playable by this unit Discs that this unit CANNOT play Discs with labels stickers or sticky tape or paper attached Doing so may cause a malfunction or may ruin the disc Discs with non standard shapes e g heart square star Attempting to do so may damage the unit 8 cm 3 1 4 in d...

Page 14: ...of the following WMA files is not supported lossless compression copyright protected If you have any questions or problems concerning your unit that are not covered in this manual consult your nearest Sony dealer Maintenance Replacing the lithium battery of the remote commander When the battery becomes weak the range of the remote commander becomes shorter Replace the battery with a new CR2025 lit...

Page 15: ...entine models 9 124 5 kHz or 9 115 5 kHz 4 5 kHz at 9 kHz step 9 115 kHz or 9 125 kHz 5 kHz at 10 kHz step For Argentine models 9 115 kHz or 9 125 kHz 5 kHz Sensitivity 26 μV CD Player section Signal to noise ratio 120 dB Frequency response 10 20 000 Hz Wow and flutter Below measurable limit Power amplifier section Output Speaker outputs Speaker impedance 4 8 ohms Maximum power output 52 W 4 at 4 ...

Page 16: ...s accessory power connector During playback or reception demonstration mode starts If no operation is performed for 5 minutes with DEMO ON set demonstration mode starts Set DEMO OFF page 12 The display disappears from does not appear in the display window The dimmer is set to DIMMER ON page 12 The display disappears if you press and hold Press on the unit until the display appears The connectors a...

Page 17: ...ss and hold SCRL The sound skips Installation is not correct Install the unit at an angle of less than 45 in a sturdy part of the car Defective or dirty disc The disc will not eject Press eject page 6 Error displays Messages ERROR The disc is dirty or inserted upside down Clean or insert the disc correctly A blank disc has been inserted The disc cannot play due to a problem Insert another disc Pre...

Page 18: ...played with the unit If these solutions do not help improve the situation consult your nearest Sony dealer If you take the unit to be repaired because of CD playback trouble bring the disc that was used at the time the problem began ...

Page 19: ......

Page 20: ...icrosoft Corporation en los EE UU y otros países Este producto contiene tecnología sujeta a ciertos derechos de propiedad intelectual de Microsoft La utilización o distribución de esta tecnología fuera de este producto está prohibida sin la licencia s apropiada de Microsoft Tecnología de codificación de audio MPEG Layer 3 y patentes bajo licencia de Fraunhofer IIS y Thomson Nota sobre la pila de l...

Page 21: ...6 Unidad principal 6 Control remoto RM X201 6 Radio 8 Almacenamiento y recepción de emisoras 8 RDS 9 CD 10 Reproducción de un disco 10 Reproducción de pistas en varios modos 11 Ajustes de sonido y menú de configuración 11 Ajuste de los elementos de configuración 12 Uso de equipo opcional 14 Equipo de audio auxiliar 14 Información complementaria 15 Precauciones 15 Mantenimiento 16 Especificaciones ...

Page 22: ...5 MHz 87 6 MHz 87 7 MHz FM 200 kHz 87 5 MHz 87 7 MHz 87 9 MHz AM 9 kHz 531 kHz 540 kHz 549 kHz AM 10 kHz 530 kHz 540 kHz 550 kHz Cancelación del modo DEMO Puede cancelar la pantalla de demostración que aparece mientras la unidad está apagada 1 Presione y gire el selector de control hasta que aparezca DISPLAY luego presiónelo 2 Gire el selector de control hasta que aparezca DEMO y a continuación pr...

Page 23: ...cia usted Alarma de precaución Si gira el interruptor de la llave de encendido hasta la posición OFF sin haber extraído el panel frontal la alarma de precaución sonará durante unos segundos La alarma sonará solamente si se utiliza el amplificador incorporado Nota No someta el panel frontal al calor ni a temperaturas altas o excesiva humedad Evite dejarlo en un automóvil estacionado o sobre el tabl...

Page 24: ...e 1 segundo para apagar la unidad Manténgalo presionado durante más de 2 segundos para apagar la unidad y la pantalla desaparece Botones SEEK Radio Para sintonizar emisoras en forma automática presionar para localizar una emisora en forma manual mantener presionado CD Para saltear una pista presionar para saltear pistas en forma continua presionar y volver a presionar al cabo de 2 segundos y mante...

Page 25: ...nado Repetir página 11 SHUF página 11 PAUSE Para pausar la reproducción Presiónelo nuevamente para reanudar la reproducción Botón DSPL Pantalla SCRL Desplazamiento página 9 10 Para cambiar los elementos de pantalla presionar para desplazar un elemento de la pantalla mantener presionado Toma de entrada AUX página 14 Botón OFF Para apagar la alimentación para detener la fuente Botón SOURCE Presione ...

Page 26: ...te de paso de sintonización se borrarán las estaciones almacenadas Si reemplaza la batería del automóvil o se cambian las conexiones el ajuste del paso de sintonización se borra y deberá configurarlo de nuevo Precaución Para sintonizar emisoras mientras maneja utilice la función BTM Memoria de la mejor sintonía para evitar accidentes Almacenamiento automático BTM 1 Presione varias veces hasta que ...

Page 27: ... RDS no funcionará si la intensidad de la señal es muy débil o si la emisora que sintonizó no transmite datos RDS Cambio de elementos de pantalla Presione Selección de PTY Tipos de programa Usar PTY para mostrar o buscar el tipo de programa deseado 1 Presione durante la recepción de FM Si la estación está transmitiendo datos PTY aparece el nombre del tipo de programa actual 2 Gire el selector de c...

Page 28: ... emisora RDS CD Reproducción de un disco Esta unidad permite reproducir discos CD DA incluidos CD TEXT y CD R CD RW archivos MP3 WMA página 16 1 Inserte el disco con la etiqueta orientada hacia arriba La reproducción se inicia automáticamente Para expulsar el disco presione Nota Los códecs correspondientes son MP3 mp3 y WMA wma Cambio de elementos de pantalla Presione Es posible que los elementos ...

Page 29: ...zca SOUND y a continuación presiónelo 4 Gire el selector de control hasta que aparezca EQ3 LOW EQ3 MID o EQ3 HIGH y a continuación presiónelo 5 Gire el selector de control para ajustar el elemento seleccionado y a continuación presiónelo El nivel de volumen puede ajustarse en intervalos de 1 dB entre 10 dB y 10 dB Repita los pasos 4 y 5 para ajustar la curva de ecualizador Para restaurar la curva ...

Page 30: ...juste del reloj página 4 TUNER STP 1 2 Intervalo de sintonización página 4 CAUT ALM 1 Alarma de precaución Activa la alarma de precaución ON OFF página 5 BEEP Activa el sonido de los pitidos ON OFF AUTO OFF Desconecta la alimentación automáticamente una vez transcurrido un período de tiempo deseado cuando la unidad está apagada NO 30S segundos 30M minutos 60M minutos AUX A 1 Audio AUX Activa la vi...

Page 31: ...avoz frontal posterior OFF 80Hz 100Hz 120Hz 140Hz 160Hz AUX VOL 3 Nivel de volumen AUX Ajusta el nivel de volumen de cada equipo auxiliar conectado 18 dB 0 dB 8 dB Este ajuste elimina la necesidad de ajustar el nivel de volumen entre fuentes DEMO Demostración Activa la demostración ON OFF BLK OUT Desactivación de la pantalla Permite desactivar la iluminación de una fuente automáticamente por ejemp...

Page 32: ...aje el volumen de la unidad 3 Conecte el dispositivo de audio portátil a la unidad con un cable de conexión no suministrado Asegúrese de utilizar una clavija recta Ajuste del nivel de volumen Asegúrese de ajustar el volumen de cada equipo de audio conectado antes de la reproducción 1 Baje el volumen de la unidad 2 Presione varias veces hasta que aparezca AUX 3 Inicie la reproducción en el disposit...

Page 33: ...umplen con el estándar Compact disc CD Los DualDisc y otros discos de música codificados con tecnologías de protección de derechos de autor no cumplen el estándar Compact disc CD por lo que no podrán reproducirse con esta unidad Discos que NO se pueden reproducir en esta unidad Discos con etiquetas autoadhesivos o cinta adhesiva o papeles adheridos Si utiliza este tipo de discos puede provocar una...

Page 34: ... estándar de compresión de archivos de música Comprime los datos de CD de audio a aproximadamente 1 22 de su tamaño original El indicador de WMA tiene 63 caracteres Al asignar un nombre a un archivo WMA asegúrese de añadir la extensión wma al nombre del archivo Durante la reproducción de un archivo WMA de VBR Velocidad de bits variable o al avanzar o retroceder rápidamente es posible que el tiempo...

Page 35: ...8 0 MHz a intervalos de 100 kHz 87 5 107 9 MHz a intervalos de 200 kHz Para los modelos argentinos de 87 5 a 107 9 MHz Paso de sintonización de FM para los modelos no argentinos 50 kHz 100 kHz 200 kHz conmutables Terminal de antena conector de antena externa Frecuencia intermedia 25 kHz Sensibilidad útil 8 dBf Selectividad 75 dB a 400 kHz Relación señal ruido 80 dB estéreo Separación 50 dB a 1 kHz...

Page 36: ... a cambios sin previo aviso Solución de problemas La siguiente lista de comprobación le ayudará a solucionar los problemas que puedan producirse con la unidad Antes de consultarla revise los procedimientos de conexión y de funcionamiento Para obtener más detalles acerca de cómo utilizar el fusible y cómo retirar la unidad del tablero consulte el manual de instalación y de conexiones suministrado c...

Page 37: ...eguridad no realice la operación de reinicio mientras maneja Recepción de radio No es posible recibir las emisoras Hay ruidos que obstaculizan el sonido La conexión no es correcta Conecte un cable de REM OUT rayas azules blancas o un cable de fuente de alimentación auxiliar rojo al cable de fuente de alimentación del amplificador de señal de la antena del automóvil solamente cuando el automóvil te...

Page 38: ... el disco FAILURE La conexión de los altavoces y amplificadores es incorrecta Consulte el manual de instalación y de conexiones de este modelo para revisar la conexión NO MUSIC El disco no contiene archivos de música Inserte un CD de música en esta unidad NO NAME No se grabó un nombre de disco álbum artista pista en la pista OFFSET Es posible que se haya producido una falla interna Revise la conex...

Page 39: ......

Page 40: ... 2012 Sony Corporation Printed in Thailand http www sony net ...

Reviews: