background image

2

CDX-GT41UW/GT410U/GT460U/GT460US

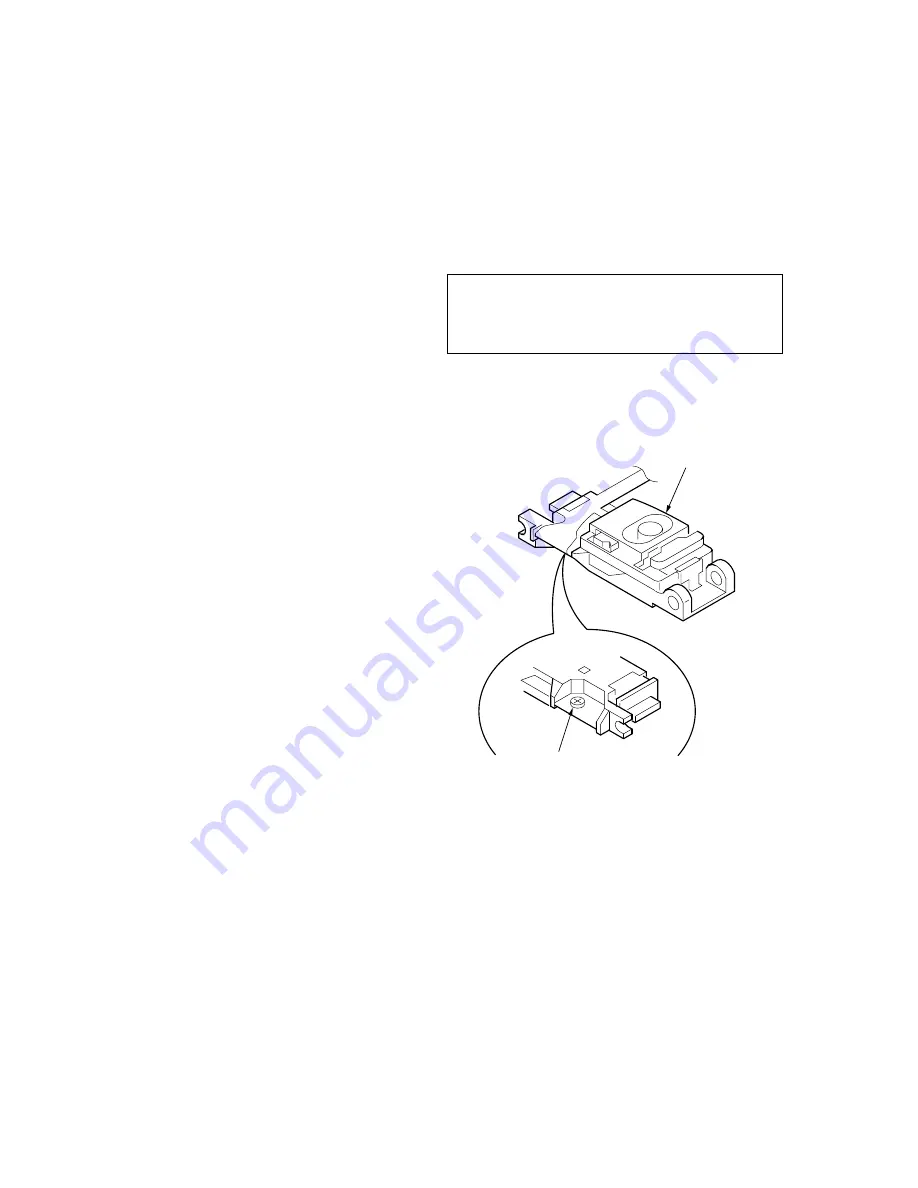
NOTES ON HANDLING THE OPTICAL PICK-UP BLOCK
OR BASE UNIT

The laser diode in the optical pick-up block may suffer electrostatic
breakdown because of the potential difference generated by the
charged electrostatic load, etc. on clothing and the human body.
During repair, pay attention to electrostatic breakdown and also use
the procedure in the printed matter which is included in the repair
parts.
The flexible board is easily damaged and should be handled with
care.

NOTES ON LASER DIODE EMISSION CHECK

The laser beam on this model is concentrated so as to be focused on
the disc reflective surface by the objective lens in the optical pick-
up block. Therefore, when checking the laser diode emission,
observe from more than 30 cm away from the objective lens.

If the optical pick-up block is defective, please replace the whole
optical pick-up block.
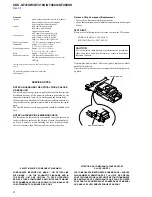
Never turn the semi-fixed resistor located at the side of optical pick-
up block.

SERVICE NOTES

CAUTION

Use of controls or adjustments or performance of procedures
other than those specified herein may result in hazardous
radiation exposure.

General

Outputs

Audio outputs terminal (sub/rear switchable)
Power antenna relay control terminal
Power amplifier control terminal

Inputs

BUS control input terminal
BUS audio input terminal
Antenna input terminal
AUX input jack (stereo mini jack)

Tone controls

Low: ±10 dB at 60 Hz (XPLOD)
Mid: ±10 dB at 1 kHz (XPLOD)
High: ±10 dB at 10 kHz (XPLOD)

Power requirements

12 V DC car battery (negative ground)

Dimensions

Approx. 178 

×

 50 

×

 179 mm

(7

 1/8


×

 2 

×

 7

 1/8

 in.) (w/h/d)

Mounting dimensions

Approx. 182 

×

 53 

×

 162 mm

(7

 1/4


×

 2

 1/8


×

 6

 1/2

 in.) (w/h/d)

Mass

Approx. 1.2 kg (2 lb. 11 oz.)

Supplied accessories

Card remote commander: RM-X151
Parts for installation and connections (1 set)
USB cap

Design and specifications are subject to change without
notice.

US and foreign patents licensed from Dolby
Laboratories.

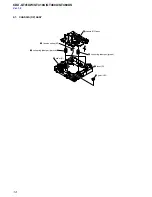
optical pick-up

semi-fixed resistor

Notes on Chip Component Replacement

• Never reuse a disconnected chip component.
• Notice that the minus side of a tantalum capacitor may be damaged

by heat.

TEST DISCS

Please use the following test discs for the check on the CD section.

YDES-18 (Part No. 3-702-101-01)
PATD-012 (Part No. 4-225-203-01)

SAFETY-RELATED  COMPONENT  WARNING!!

COMPONENTS  IDENTIFIED  BY  MARK  

0

  OR  DOTTED  LINE

WITH  MARK  

0

  ON  THE  SCHEMATIC  DIAGRAMS  AND  IN

THE  PARTS  LIST  ARE  CRITICAL  TO  SAFE  OPERATION.
REPLACE  THESE  COMPONENTS  WITH  SONY  PARTS  WHOSE
PART  NUMBERS  APPEAR  AS  SHOWN  IN  THIS  MANUAL  OR
IN  SUPPLEMENTS  PUBLISHED  BY  SONY.

ATTENTION AU COMPOSANT AYANT RAPPORT

 À LA SÉCURITÉ!!

LES COMPOSANTS IDENTIFIÉS PAR UNE MARQUE 

0

 SUR LES

DIAGRAMMES SCHÉMATIQUES ET LA LISTE  DES PIÈCES
SONT CRITIQUES POUR LA SÉCURITÉ DE FONCTIONNEMENT.
NE REMPLACER CES COMPOSANTS QUE PAR DES PIÈCES
SONY DONT LES NUMÉROS SONT DONNÉS DANS CE MANUEL
OU DANS LES SUPPLÉMENTS PUBLIÉS PAR SONY.

Ver. 1.1

Summary of Contents for CDX-GT410U - Fm/am Compact Disk Player

Page 1: ... 35 dB at 1 kHz Frequency response 30 15 000 Hz AM Tuning range GT41UW GT410U 530 1 710 kHz GT460U GT460US 531 1 602 kHz at 9 kHz step 530 1 710 kHz at 10 kHz step AM tuning interval GT460U GT460US 9 kHz 10 kHz switchable Antenna terminal External antenna connector Intermediate frequency 10 7 MHz 450 kHz Sensitivity 30 µV USB player section Interface USB Full speed Maximum current 500 mA Power amp...

Page 2: ...nal AUX input jack stereo mini jack Tone controls Low 10 dB at 60 Hz XPLOD Mid 10 dB at 1 kHz XPLOD High 10 dB at 10 kHz XPLOD Power requirements 12 V DC car battery negative ground Dimensions Approx 178 50 179 mm 7 1 8 2 7 1 8 in w h d Mounting dimensions Approx 182 53 162 mm 7 1 4 2 1 8 6 1 2 in w h d Mass Approx 1 2 kg 2 lb 11 oz Supplied accessories Card remote commander RM X151 Parts for inst...

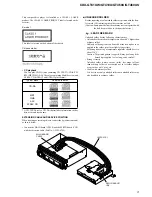
Page 3: ...ne to flow than ordinary solder so use caution not to let solder bridges occur such as on IC pins etc Usable with ordinary solder It is best to use only unleaded solder but unleaded solder may also be added to ordinary solder SERVO BOARD CN2 MAIN BOARD CN350 J 2502 076 1 EXTENSION CABLE AND SERVICE POSITION When repairing or servicing this set connect the jig extension cable as shown below Connect...

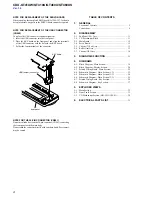
Page 4: ... Section 32 5 2 Front Panel Section 33 5 3 CD Mechanism Section MG 101U 188 Q 34 6 ELECTRICAL PARTS LIST 35 NOTE FOR REPLACEMENT OF THE USB CONNECTOR CN902 To replace the USB connector requires alignment 1 Insert the USB connector into the front panel 2 Place the KEY board on the front panel and align the terminals of the USB connector with the holes in the KEY board 3 Solder the four terminals of...

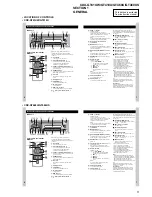
Page 5: ...g the USB terminal G use the supplied USB cap to prevent dust or dirt entering Keep the USB cap out of the reach of children to prevent accidental swallowing 6 Location of controls and basic operations Main unit Card remote commander RM X151 Refer to the pages listed for details The corresponding buttons on the card remote commander control the same functions as those on the unit A OFF button To p...

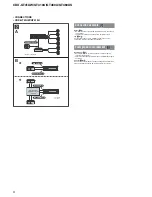
Page 6: ...masse avant de raccorder l amplificateur L alarme est émise uniquement lorsque l amplificateur intégré est utilisé Conseil 2 B Dans le cas du raccordement de deux changeurs de CD MD ou plus le sélecteur de source XA C40 non fourni est requis Connection example Notes 2 A Be sure to connect the ground earth lead before connecting the amplifier The alarm will only sound if the built in amplifier is u...

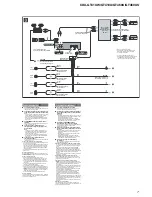
Page 7: ...o the 12 V power terminal which is energized at all times Be sure to connect the black ground earth lead to a metal surface of the car first Remarques sur les câbles de commande et d alimentation Le câble de commande d antenne électrique bleu fournit une alimentation de 12 V CC lorsque vous mettez la radio sous tension Lorsque votre voiture est équipée d une antenne FM AM intégrée dans la vitre ar...

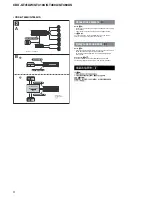
Page 8: ...ng the amplifier The alarm will only sound if the built in amplifier is used Tip 2 B For connecting two or more CD MD changers the source selector XA C40 not supplied is necessary Ejemplo de conexiones Notas 2 A Asegúrese de conectar primero el cable de conexión a masa antes de realizar la conexión del amplificador La alarma sonará únicamente si se utiliza el amplificador incorporado Sugerencia 2 ...

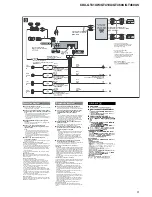
Page 9: ...nly passive speakers Connecting active speakers with built in amplifiers to the speaker terminals may damage the unit To avoid a malfunction do not use the built in speaker leads installed in your car if the unit shares a common negative lead for the right and left speakers Do not connect the unit s speaker leads to each other Note on connection If speaker and amplifier are not connected correctly...

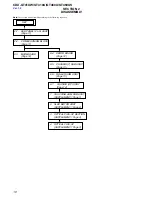
Page 10: ... Page 11 2 2 CD MECHANISM BLOCK Page 11 SET 2 3 MAIN BOARD Page 12 2 5 CHASSIS T SUB ASSY Page 13 2 6 ROLLER ARM ASSY Page 13 2 7 CHASSIS OP ASSY Page 14 2 4 SERVO BOARD Page 12 1 CHUCKING ARM SUB ASSY SUPPLEMENT 1 Page 1 2 SLED MOTOR ASSY SUPPLEMENT 1 Page 2 3 OPTICAL PICK UP SECTION SUPPLEMENT 1 Page 3 4 OPTICAL PICK UP SUPPLEMENT 1 Page 3 Ver 1 2 ...

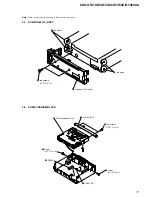
Page 11: ...Follow the disassembly procedure in the numerical order given 2 1 SUB PANEL FL ASSY 2 two claws 3 two claws 4 sub panel FL U assy 1 two screws PTT 2 6 6 4 CN350 5 CN352 3P 3 1 screw PTT 2 6 6 2 screw PTT 2 6 6 6 two screws PTT 2 6 4 7 bracket CD 8 CD mechanism block ...

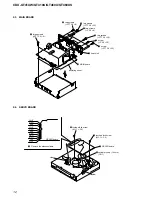
Page 12: ...TT 2 6 10 7 screw P 2 6 10 9 heat sink 5 two screws P 2 6 8 4 two screws PTT 2 6 10 6 two screws PTT 2 6 10 1 three screws BTT 2 6 5 5 SERVO board SERVO board claw claw 3 toothed lock screw M 1 7 2 5 2 toothed lock screw M 1 7 2 5 1 Remove the eleven solders GRY YEL BLU ORG RED BLK RED WHT BLK RED WHT 4 optical pick up 16 core CN1 ...

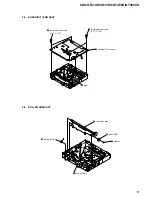
Page 13: ...10U GT460U GT460US 2 6 ROLLER ARM ASSY 2 5 CHASSIS T SUB ASSY 4 chassis T sub assy 3 claw 1 two precision screws P 1 7 2 2 2 two precision screws P 1 7 2 2 3 washer 4 gear RA1 5 roller arm assy 1 spring RAL 2 spring RAR ...

Page 14: ...14 CDX GT41UW GT410U GT460U GT460US 2 7 CHASSIS OP ASSY Ver 1 2 7 coil spring damper natural 8 coil spring damper green 6 chassis OP assy 5 1 tension spring KF 2 gear LE1 3 lever D 4 slider R ...

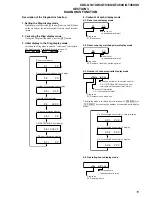
Page 15: ...he number of connected units display mode 4 4 Operating hours display mode Reset count in hexadecimal format Diag code 01 Reset count 0 1 X X Reset count in hexadecimal format Diag code 02 Number of resets by watchdog timer 0 2 X X Show the number of connected units for CD C MD C and XM respectively from the rightmost in hexadecimal format Recency of information 1 3 1 represents the latest Diag co...

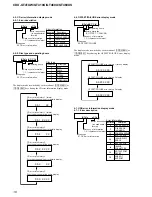
Page 16: ...ay CD error info history 2 Error description plus error details display CD error info history 1 latest Disc type plus operating hours display 0 5 1 X X X X 0 5 2 X X 0 5 2 X X X X 0 5 3 X X 0 5 3 X X X X 0 5 1 X X Operating hours Recency of information 1 3 1 represents the latest Diag code 06 OFFSET FAILURE Error description 0 OFFSET 1 FAILURE 0 6 1 X X X X X OFFSET FAILURE error history 1 latest ...

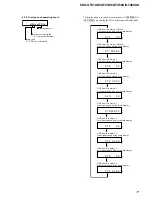
Page 17: ...rs display USB error info history 2 Error description plus error details display USB error info history 1 latest Disc type plus operating hours display 0 7 1 X X X X X 0 7 2 X X 0 7 2 X X X X 0 7 3 X X 0 7 3 X X X X X 0 7 1 X X USB error info history 5 Disc type plus operating hours display USB error info history 5 Error description plus error details display USB error info history 4 Disc type plu...

Page 18: ...18 CDX GT41UW GT410U GT460U GT460US MEMO ...

Page 19: ...100 ATT 33 I2C SCK 34 I2C SIO 96 BUIN 97 TESTIN 12 IN FL FL FL RL RL FR FR RR RR AMP REM ANT REM ACC TEST 11 IN RL 23 OUT RL 25 OUT FL MUTE Q432 AUDIO OUT REAR SUB MUTE CONTROL SWITCH Q491 492 60 UNISI 54 UNISO 58 UNISCK 59 BUSON 88 SYSRST 12 B U C 11 DATA OUT 10 DATA IN 8 CLK IN 9 BUS IN 13 RST RESET 3 5 6 8 4 2 3 1 BATT CLK 4 DATA I O 1 BUS ON 2 RST SYSRST 99 ACCIN ACCESSORY CHECK Q702 BATT BATT...

Page 20: ...1 18 432MHz 12 14 10 3G D503 17 18 6 42 1 2 44 45 2G DIO PANEL B BU 3 3V KEY MATRIX 80 79 XOUT XIN X502 32 768kHz 10 FSW IN 91 USB OVER 92 USB ON 90 DD ON 75 FSW OUT LSW901 902 S901 904 906 915 VOLUME PUSH SELECT RE901 ROTARY ENCODER REMOTE CONTROL SIGNAL RECEIVER IC971 RESET IC602 PANEL B BATT PANEL B LED841 847 850 857 861 864 LSW901 902 LED941 947 950 957 961 963 LSW901 902 IN OUT USB D USB D 4...

Page 21: ...ground under no signal detuned conditions no mark FM AM CD PLAY Impossible to measure Voltages are taken with a VOM Input impedance 10 MΩ Voltage variations may be noted due to normal production tolerances Waveforms are taken with a oscilloscope Voltage variations may be noted due to normal production tolerances Circled numbers refer to waveforms Signal path J CD PLAY F FM f AM L AUX Caution Patte...

Page 22: ...24 R540 R510 R526 JC1 R951 R952 C319 R961 R302 C157 D102 D101 D104 D103 C905 C891 C892 C921 C924 JC911 R150 R354 JC11 L501 R913 I C 5 0 1 R802 R803 R591 L804 L805 R592 R593 Q401 Q402 JC401 Q411 Q412 R411 R493 R916 R915 R914 R403 R404 D152 D151 CHASSIS R926 R927 R536 R550 R595 R596 R597 R598 R599 R156 R157 R158 D156 JC10 R800 C706 C707 D706 D707 JC705 C158 C159 C953 C493 C494 TU1 TUNER UNIT JW1 JW2...

Page 23: ... C703 C705 C704 L300 C319 C318 C317 C325 C301 C302 C444 C424 C330 C304 C454 C434 C305 C307 C309 JC939 JC940 R615 JC31 JC30 JC29 L902 L901 C308 JC12 C312 C320 C314 C313 C316 C315 C681 C682 C683 IC681 IC602 R961 R493 JC8 JC1 R705 R709 R707 R612 R607 R606 JC21 JC22 R611 R616 R602 R601 IC300 IC601 JC33 JC32 F901 Q702 Q605 CNJ400 TH400 JC910 JC19 D302 D301 D304 D303 D305 D306 D307 D308 D309 D310 D311 D...

Page 24: ...953 R150 C406 C407 Q401 Q402 Q411 Q460 Q470 Q412 C426 C423 C445 C443 C473 C472 C484 JC4 C463 C462 C452 C432 C413 C414 C905 C362 C361 JC943 C6 C3 C8 C157 JC926 L818 C921 CN352 L805 R152 R151 L151 JC927 C924 JC923 L804 C818 JC928 JC930 JC929 JC931 R913 J1 R5 R4 R2 R3 C15 JC5 JC11 R354 R920 JC401 R411 R156 R158 R157 R485 JC942 JC941 C7 R6 R7 L4 R558 R61 C151 C153 C152 R154 C820 R912 JC920 JC921 JC922...

Page 25: ... R927 R595 CN350 R507 R545 S501 JC902 JC903 C415 L406 L405 C892 C804 C402 C419 C412 C507 C508 C510 JC14 C519 C512 C501 C513 R672 JC913 R526 R556 R559 C504 R916 R914 R915 R544 JC911 R671 C516 C515 R521 R522 JC932 JC933 JC934 R517 JC935 JC936 JC938 JC23 R673 C502 C514 JC16 R505 R504 R596 R598 JC24 JC914 R570 R529 JC912 C509 R674 R519 JC17 R536 JC38 R546 R802 R803 JC811 C815 C816 R891 R819 R820 C814 ...

Page 26: ...3 C974 R977 R853 R953 LSW902 S915 LSW901 LED844 S901 S911 S912 S913 S914 LED954 LED855 LED955 1 2 3 4 CN902 ORG RED FB901 FB903 FB902 BRN ORG RED BRN R989 C981 R988 C982 R901 C992 C975 D906 D953 D904 D903 R971 R888 R889 R887 C976 R978 R984 R983 C979 R850 R950 R910 CN901 Q882 Q881 Q883 R911 FB907 FB906 C991 R849 R949 R951 R851 R912 R952 R852 R914 R915 R962 R848 R948 R946 R846 R845 R945 R944 R844 R9...

Page 27: ... FB904 C905 FB902 FB901 FB903 S901 S902 S903 S904 LSW901 2 2 LSW902 2 2 S907 S908 S909 S910 S911 S912 S913 S914 S915 S906 R922 R921 C974 C975 C976 C977 C979 C982 C981 Q991 Q992 C992 C991 IC971 R971 FB906 FB907 R905 R882 R887 R888 R889 R994 R993 R995 LSW901 1 2 LSW902 1 2 R863 R864 FL901 RE901 CN901 CN902 J901 LED941 LED942 LED943 LED843 LED945 LED842 LED841 LED944 LED946 LED844 LED947 LED845 LED84...

Page 28: ...FR BEEP PGND2 VP1 STB PGND1 RST CRES AUDIO8 3V GND PANEL B CBU FL RL RR VP FR I2 C BUS IC601 BA8271F E2 MAIN Board 1 3 1 2 3 4 5 6 7 8 9 10 14 13 12 11 BUS ON SWITCH RESET SWITCH BATTERY SWITCH BUS ON RST BATT CLK VREF GND VCC RESET BUS ON CLK IN BU IN DATA IN DATA OUT DATA IC401 BD3442FS E2 MAIN Board 2 3 1 2 BUS RCH 100k 100k 100k 100k 100k 100k 250k 250k 250k BUS LCH TU RCH 3 4 TU LCH 5 CD RCH ...

Page 29: ...ard 3 3 1 2 3 4 5 CURRENT LIMIT THERMAL PROTECTION OVERVOLTAGE PROTECTION BANDGAP REFERENCE VIN CONTROL VOUT VADJ GND IC803 BD9778HFP MAIN Board 3 3 1 2 3 4 5 CURRENT LIMIT PWM COMPARATOR ERROR AMP L OFF H ON VREF VIN TSD OSC VIN SW PB GND INV 6 RT 7 EN VREF SOFT START ON OFF LATCH DRIVER RESET ...

Page 30: ...C5 Power supply pin 3 3 V 24 EEP SIO I O EEPROM bus serial data signal input output 25 EEP CKO O EEPROM bus serial clock signal output 26 RDS ON O RDS Radio Data System on signal output Tuner on L Not used in this set 27 MC RX I Mechanism microcomputer comunication signal input RX 28 MC TX O Mechanism microcomputer comunication signal output TX 29 30 NCO O Not used Open 31 RE IN0 I Rotary encoder ...

Page 31: ...signal output 32 768 kHz 81 VSS1 Ground pin 82 OSCIN I High speed operation clock signal input 18 432 MHz 83 OSCOUT O High speed operation clock signal output 18 432 MHz 84 VCC3 Power supply pin 3 3 V 85 CYRIL SEL I Cyril correspondence discrimination signal input L No correspondence 86 DEMOSEL I DEMO select signal input H DEMO on L DEMO off 87 NCO O Not used Open 88 SYSRST O System reset signal o...

Page 32: ... Description Remark NOTE The mechanical parts with no reference number in the exploded views are not supplied Items marked are not stocked since they are seldom required for routine service Some delay should be anticipated when ordering these items XX and X mean standardized parts so they may have some difference from the original one Color Indication of Appearance Parts Example KNOB BALANCE WHITE...

Page 33: ...SV ASSY FRONT GT41UW 53 X 2149 763 1 PANEL SV ASSY FRONT GT410U 54 X 2149 353 1 KNOB VOL SV ASSY 55 2 693 599 01 SPRING RELEASE 56 2 686 937 02 PANEL FL U BACK 57 3 250 543 21 SCREW B P TITE M2 58 X 2149 228 2 CASE ASSY for FRONT PANEL EXCEPT US 59 2 686 941 01 HOLDER USB 60 X 2176 322 1 CAP USB ASSY 61 3 251 320 01 EMBLEM NO 2 5 SONY CN902 1 820 877 11 CONNECTOR USB SOCKET USB FL901 1 519 909 12 ...

Page 34: ...HED LOCK 107 A 1206 357 A SERVO BOARD COMPLETE 7 7 627 000 08 SCREW PRECISION P 1 7X2 2 TYPE3 Ref No Part No Description Remark Ref No Part No Description Remark 5 3 CD MECHANISM SECTION MG 101U 188 Q NOTE Refer to SUPPLEMENT 1 for disassembly of OPTICAL PICK UP not supplied 7 7 not supplied not supplied not supplied not supplied not supplied not supplied not supplied not supplied not supplied not...

Page 35: ...ED SML 310PTT86 3 REP LED854 8 719 078 21 LED SML 310PTT86 4 SHUF LED855 8 719 078 21 LED SML 310PTT86 5 LED856 8 719 078 21 LED SML 310PTT86 6 PAUSE LED857 8 719 078 21 LED SML 310PTT86 SCRL LED861 8 719 078 21 LED SML 310PTT86 RING ILLUMINATION LED862 8 719 078 21 LED SML 310PTT86 RING ILLUMINATION LED863 8 719 078 21 LED SML 310PTT86 RING ILLUMINATION LED864 8 719 078 21 LED SML 310PTT86 RING I...

Page 36: ...METAL CHIP 1K 5 1 10W R909 1 216 822 11 METAL CHIP 1 2K 5 1 10W R910 1 216 823 11 METAL CHIP 1 5K 5 1 10W R911 1 216 824 11 METAL CHIP 1 8K 5 1 10W R912 1 216 825 11 METAL CHIP 2 2K 5 1 10W R913 1 216 827 11 METAL CHIP 3 3K 5 1 10W R914 1 216 828 11 METAL CHIP 3 9K 5 1 10W R915 1 216 830 11 METAL CHIP 5 6K 5 1 10W R921 1 216 295 11 SHORT CHIP 0 R922 1 216 295 11 SHORT CHIP 0 R941 1 216 813 11 META...

Page 37: ...124 233 11 ELECT 10uF 20 16V C412 1 162 970 11 CERAMIC CHIP 0 01uF 10 25V C413 1 163 251 11 CERAMIC CHIP 100PF 5 50V C414 1 163 251 11 CERAMIC CHIP 100PF 5 50V C415 1 162 970 11 CERAMIC CHIP 0 01uF 10 25V C417 1 162 970 11 CERAMIC CHIP 0 01uF 10 25V C418 1 162 964 11 CERAMIC CHIP 0 001uF 10 50V C419 1 162 964 11 CERAMIC CHIP 0 001uF 10 50V C421 1 126 964 11 ELECT 10uF 20 50V C423 1 165 908 11 CERA...

Page 38: ...19 977 12 DIODE DTZ6 8B D110 8 719 977 12 DIODE DTZ6 8B D111 8 719 977 12 DIODE DTZ6 8B D112 8 719 977 12 DIODE DTZ6 8B D113 8 719 977 12 DIODE DTZ6 8B D151 1 805 043 11 ABSORBER CHIP SURGE D152 1 805 043 11 ABSORBER CHIP SURGE D153 8 719 057 80 DIODE MA8180 M TX D156 8 719 977 12 DIODE DTZ6 8B D301 6 500 522 01 DIODE 10EDB40 TA1B2 D302 6 500 522 01 DIODE 10EDB40 TA1B2 D303 6 500 522 01 DIODE 10ED...

Page 39: ...RT CHIP 0 COIL L1 1 216 295 11 SHORT CHIP 0 L4 1 216 864 11 SHORT CHIP 0 L151 1 500 245 11 INDUCTOR FERRITE BEAD L300 1 456 617 11 COIL CHOKE L401 1 216 864 11 SHORT CHIP 0 L402 1 216 295 11 SHORT CHIP 0 L403 1 216 295 11 SHORT CHIP 0 L405 1 469 876 11 INDUCTOR FERRITE BEAD L406 1 500 245 11 INDUCTOR FERRITE BEAD L407 1 216 864 11 SHORT CHIP 0 L409 1 469 844 11 INDUCTOR 2 2uH L410 1 216 864 11 SHO...

Page 40: ... METAL CHIP 100K 5 1 10W R529 1 216 809 11 METAL CHIP 100 5 1 10W R531 1 216 841 11 METAL CHIP 47K 5 1 10W R532 1 216 845 11 METAL CHIP 100K 5 1 10W Ref No Part No Description Remark R533 1 216 845 11 METAL CHIP 100K 5 1 10W R534 1 216 833 11 METAL CHIP 10K 5 1 10W R536 1 216 845 11 METAL CHIP 100K 5 1 10W R537 1 216 845 11 METAL CHIP 100K 5 1 10W GT460U GT460US R538 1 216 845 11 METAL CHIP 100K 5...

Page 41: ...K 5 1 10W R925 1 216 864 11 SHORT CHIP 0 R926 1 216 864 11 SHORT CHIP 0 R927 1 216 864 11 SHORT CHIP 0 R951 1 216 797 11 METAL CHIP 10 5 1 10W R952 1 216 797 11 METAL CHIP 10 5 1 10W R961 1 216 864 11 SHORT CHIP 0 SWITCH S103 1 786 826 11 SWITCH TACTILE RESET S501 1 571 478 11 SWITCH SLIDE FREQUENCY SELECT GT460U GT460US THERMISTOR POSITIVE TH400 1 803 350 21 THERMISTOR POSITIVE TUNER UNIT TU1 A 3...

Page 42: ... COLLAR 1DIN for Maruti Suzuki GT460US IND 153 3 246 471 01 KEY FRAME 154 X 3381 154 1 SCREW ASSY BS4 FITTING GT460U GT460US 155 3 349 410 11 BUSHING GT460U GT460US 156 3 934 325 01 SCREW K 5X8 TAPPING 157 1 833 100 11 CORD WITH CONNECTOR POWER EXCEPT GT460US IND 157 1 833 762 11 CONNECTION CORD FOR AUTOMOBILE POWER for Maruti Suzuki GT460US IND 151 154 152 155 157 153 2 156 4 Ver 1 2 ...

Page 43: ...L PICK UP added DISASSEMBLY 1 CHUCKING ARM SUB ASSY US Model Canadian Model CDX GT41UW GT410U E Model CDX GT460U GT460US Chinese Model CDX GT460U 3 chucking arm sub assy 2 1 spring Note Have this portion receive the chassis Note Have this portion receive the chassis Note Be careful not to touch the turn table CDX GT41UW GT410U GT460U GT460US ...

Page 44: ...nd stand turn table 2 three serration screws M 2 3 three serration screws M 2 3 Note Place the stand with care not to touch the turn table Note Never remove these parts since they were adjusted Note for Assembly Note Take care to prevent the chassis from being bent when tightening the three machine screws ...

Page 45: ... section There is space at the end of the leaf spring sub guide to avoid contact with the slide 1 pan tapping screw M 1 4 2 5 2 leaf spring sub guide 3 leaf spring OP 5 optical pick up 4 lead screw assy Notes for Assembly Prevent the end of the leaf spring sub guide from being in contact with the OP slide base Prevent the end of the leaf spring sub guide from being in contact with the OP slide bas...

Page 46: ...sion at the upper on the revised page allows you to jump to the next revised page Ver Date Description of Revision 1 0 2006 11 New 1 1 2007 01 Indian model addition to CDX GT460U 1 2 2007 03 Change of MARUTI SUZUKI model from CDX GT460U to CDX GT460US Notes for removal of the OPTICAL PICK UP added SUPPLEMENT 1 ECN ECC05660 ENG 07003 ...

Reviews: