background image

15

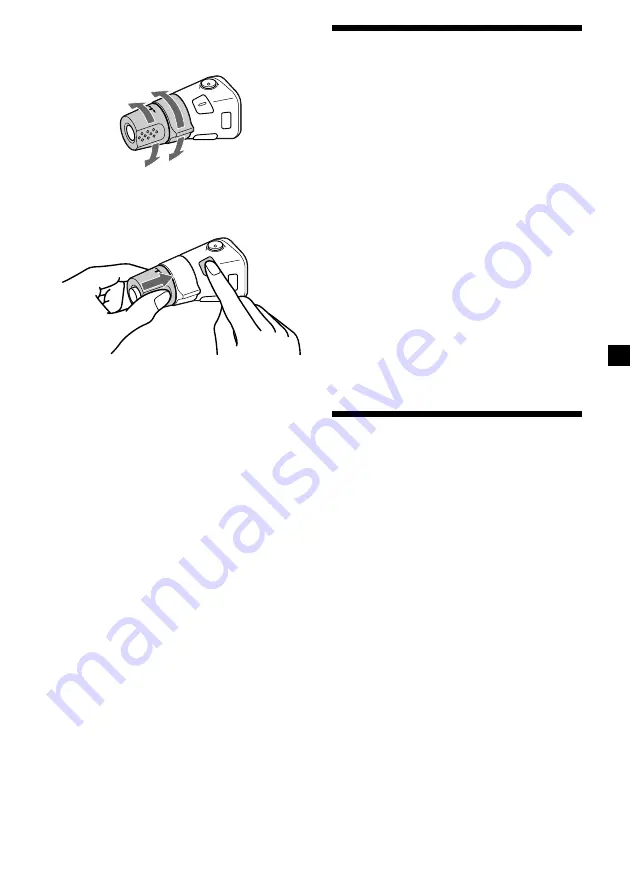
Changing the operative direction

The operative direction of controls is factory-
set as shown below.

If you need to mount the rotary commander on
the right hand side of the steering column, you
can reverse the operative direction.

Press 

(SOUND)

 for 2 seconds while

pushing the VOL control.

To increase

To decrease

Adjusting the sound
characteristics

You can adjust the bass, treble, balance, and
fader.
The bass and treble levels can be stored
independently for each source.

1

Select the item you want to adjust by
pressing 

(SOUND)

 repeatedly.

Each time you press 

(SOUND)

, the item

changes as follows:

BAS (bass) 

t

 TRE (treble) 

t

BAL (left-right) 

t

 FAD (front-rear)

2

Adjust the selected item by pressing
either side of 

(SEEK)

.

When adjusting with the rotary
commander, press 

(SOUND)

 and rotate the

VOL control.

Note
Adjust within 3 seconds after selecting the item.

Quickly attenuating the
sound

(With the rotary commander or the card
remote commander)

Press 

(ATT)

 on the rotary commander or

card remote commander.

After “ATT-ON” momentarily appears, the
“ATT” appears in the display.

To restore the previous volume level, press

(ATT)

 again.

Summary of Contents for CDX-L600X - Fm/am Compact Disc Player

Page 1: ...n connections manual En ce qui concerne l installation et les connexions consulter le manuel d installation raccordement fourni Owner s Record The model and serial numbers are located on the bottom of the unit Record these numbers in the space provided below Refer to these numbers whenever you call upon your Sony dealer regarding this product Model No CDX L600X Serial No FR ...

Page 2: ...y energy and if not installed and used in accordance with the instructions may cause harmful interference to radio communications However there is no guarantee that interference will not occur in a particular installation If this equipment does cause harmful interference to radio or television reception which can be determined by turning the equipment off and on the user is encouraged to try to co...

Page 3: ...ning Memory BTM 11 Receiving the stored stations 11 Storing only the desired stations 12 Storing station names Station Memo 12 Locating a station by name List up 13 Other Functions Using the rotary commander 14 Adjusting the sound characteristics 15 Quickly attenuating the sound 15 Changing the sound and display settings Menu 16 Selecting the sound position My Best sound Position MBP 17 Setting th...

Page 4: ...OUND button 15 17 qd SOURCE Power on Radio CD button 8 9 11 12 17 CDX L600X Refer to the pages listed for details During Playback During radio reception During menu mode MENU qf ENTER button 13 9 11 12 13 16 18 qg MODE button 11 12 qh DSPL display mode change button 10 13 qj Number buttons 1 REP 10 2 SHUF 10 11 12 Warning when installing in a car without an ACC accessory position on the ignition k...

Page 5: ...s it cannot be operated with the card remote commander unless SOURCE on the unit is pressed or a disc is inserted to activate the unit first Tip Refer to Replacing the lithium battery for details on how to replace the batteries page 19 SEEK to select rightwards PRESET to select upwards PRESET to select downwards qk PRESET buttons 11 13 9 11 12 13 16 18 ql SEEK buttons 15 9 11 12 9 12 16 18 RADIO R...

Page 6: ...ft drinks onto the unit or discs Notes on discs To keep the disc clean do not touch the surface Handle the disc by its edge Keep your discs in their cases or disc magazines when not in use Do not subject the discs to heat high temperature Avoid leaving them in parked cars or on dashboards rear trays Do not attach labels or use discs with sticky ink residue Such discs may stop spinning when used ca...

Page 7: ...contents RESET button Notes on CD R CD RW discs You can play CD Rs recordable CDs CD RWs rewritable CDs designed for audio use on this unit Look for these marks to distinguish CD Rs CD RWs for audio use These marks denote that a disc is not for audio use Some CD Rs CD RWs depending on the equipment used for its recording or the condition of the disc may not play on this unit You cannot play a CD R...

Page 8: ...ry drain 2 Press OPEN then slide the front panel to the right and gently pull out the left end of the front panel Notes If you detach the panel while the unit is still turned on the power will turn off automatically to prevent the speakers from being damaged Do not drop or put excessive pressure on the front panel and its display window Do not subject the front panel to heat high temperature or mo...

Page 9: ...ng is completed the display returns to normal play mode Tip When D INFO mode is set to ON the time is always displayed page 16 CD Player Playing a disc 1 Press OPEN and insert the disc labeled side up 2 Close the front panel Playback starts automatically If a disc is already inserted press SOURCE repeatedly until CD appears to start playback To Press Stop playback OFF Eject the disc OPEN then Z Sk...

Page 10: ...es Some characters cannot be displayed For some CD TEXT discs with very many characters information may not scroll This unit cannot display the artist name for each track of a CD TEXT disc Playing tracks repeatedly Repeat Play The current track will repeat itself when it reaches the end During playback press 1 REP repeatedly until REP 1 appears in the display Repeat Play starts To return to normal...

Page 11: ...order they are stored in the memory Preset Search function If preset tuning does not work Press either side of SEEK to search for the station automatic tuning Scanning stops when the unit receives a station Repeat until the desired station is received Tips If automatic tuning stops too frequently turn on the Local Seek to limit seek to stations with stronger signals see Changing the sound and disp...

Page 12: ...emo You can assign a name to each radio station and store it in memory The name of the station currently tuned in appears in the display You can assign a name using up to 8 characters for a station Storing the station names 1 Tune in a station whose name you want to store 2 Press MENU then press either side of PRESET repeatedly until NAMEEDIT appears 3 Press ENTER 4 Enter the characters 1 Press th...

Page 13: ...her side of PRESET repeatedly until NAME DEL appears 2 Press ENTER 3 Press either side of PRESET repeatedly to select the station whose name you want to erase 4 Press ENTER for 2 seconds The name is erased Repeat steps 3 to 4 if you want to erase other names 5 Press MENU twice The unit returns to normal radio reception mode Note If you have already erased all of the station names NO DATA appears i...

Page 14: ...rst attach the appropriate label depending on how you want to mount the rotary commander The rotary commander works by pressing buttons and or rotating controls SOUND DSPL MODE SOUND DSPL MODE By pressing buttons OFF Press To SOURCE Change source radio CD MODE Change radio band ATT Attenuate sound OFF Stop playback or radio reception SOUND Adjust the sound menu DSPL Change the display item If your...

Page 15: ...ly for each source 1 Select the item you want to adjust by pressing SOUND repeatedly Each time you press SOUND the item changes as follows BAS bass t TRE treble t BAL left right t FAD front rear 2 Adjust the selected item by pressing either side of SEEK When adjusting with the rotary commander press SOUND and rotate the VOL control Note Adjust within 3 seconds after selecting the item Quickly atte...

Page 16: ...ll all automatically displayed names exceeding 8 characters When Auto scroll is set to off and the disc track name is changed the disc track name does not scroll SND Sound LOUD Loudness to enjoy bass and treble even at low volumes The bass and treble will be reinforced P M Play Mode LOCAL ON OFF Local seek mode page 11 Select ON to only tune into stations with stronger signals MONO ON OFF Monaural...

Page 17: ... sound characteristics on page 15 Notes When the BAL balance or FAD fader in Adjusting the sound characteristics page 15 is adjusted the MBP setting returns to OFF When MBP is set to OFF the BAL and FAD setting is activated Display window MBP A MBP B MBP OFF Right 4dB 0 0 Left 0 4dB 0 Front 0 0 0 Rear 4dB 4dB 0 Balance Level Fader Level Setting the equalizer You can select an equalizer curve for s...

Page 18: ...en the effect setting is complete the normal playback mode appears Additional Information Maintenance Fuse replacement When replacing the fuse be sure to use one matching the amperage rating stated on the original fuse If the fuse blows check the power connection and replace the fuse If the fuse blows again after replacement there may be an internal malfunction In such a case consult your nearest ...

Page 19: ... with any metal device Replacing the lithium battery Under normal conditions batteries will last approximately 1 year The service life may be shorter depending on the conditions of use When the battery becomes weak the range of the card remote commander becomes shorter Replace the battery with a new CR2025 lithium battery x side up Notes on lithium battery Keep the lithium battery out of the reach...

Page 20: ...ection Outputs Speaker outputs sure seal connectors Speaker impedance 4 8 ohms Maximum power output 52 W 4 at 4 ohms General Outputs Audio outputs Power antenna relay control lead Power amplifier control lead Input Telephone ATT control lead Tone controls Bass 10 dB at 62 Hz Treble 10 dB at 16 kHz Loudness 8 dB at 100 Hz 2 dB at 10 kHz Power requirements 12 V DC car battery negative ground Dimensi...

Page 21: ...e checklist below check the connection and operating procedures General No sound Rotate the volume control dial clockwise to adjust the volume Cancel the ATT function Set the fader control to the center position for a 2 speaker system The contents of the memory have been erased The RESET button has been pressed t Store again into the memory The power cord or battery has been disconnected The power...

Page 22: ...to the monaural reception mode page 16 A program broadcast in stereo is heard in monaural The unit is in monaural reception mode t Cancel monaural reception mode page 16 Interference occurs during FM reception The wide mode is selected t Set the IF mode to IF AUTO page 16 Error displays Messages Error displays The following indications will flash for about 5 seconds and an alarm sound will be hear...

Page 23: ...23 ...

Page 24: ...oires ci dessous Informations CD TEXT affichées lorsqu un disque CD TEXT est reproduit Accessoires de commande fournis Télécommande à carte RM X114 Accessoires de commande optionnels Satellite de commande RM X4S Un disque CD TEXT est un CD audio qui comprend des informations telles que le titre du disque le nom de l artiste et les titres des plages Ces informations sont enregistrées sur le disque ...

Page 25: ...d BTM 11 Réception des stations stockées 11 Mémorisation des stations de votre choix uniquement 12 Mémorisation de noms de stations Mémorisation des stations 12 Localisation d une station par son nom Répertoire 13 Autres fonctions Utilisation du satellite de commande 14 Réglage des caractéristiques du son 15 Mise en sourdine rapide du son 15 Modification des réglages du son et de l affichage Menu ...

Page 26: ...sous tension Radio CD 8 9 11 12 17 CDX L600X Référez vous aux pages indiquées pour plus de détails En cours de lecture En cours de réception radio En mode menu MENU qf Touche ENTER 13 9 11 12 13 16 18 qg Touche MODE 11 12 qh Touche DSPL changement de mode d affichage 10 13 qj Touches numériques 1 REP 10 2 SHUF 10 11 12 Avertissement en cas d installation dans une voiture dont le contact ne comport...

Page 27: ...f si la touche SOURCE de l appareil est enfoncée ou si un disque est inséré dans le lecteur pour activer l appareil Conseil Reportez vous au paragraphe Remplacement de la pile au lithium pour obtenir des informations détaillées sur le remplacement de la pile page 19 SEEK pour sélectionner vers la droite PRESET pour sélectionner vers le haut PRESET pour sélectionner vers le bas qk Touches PRESET 11...

Page 28: ...n de nettoyage disponible dans le commerce Essuyez chaque disque en partant du centre vers l extérieur N utilisez pas de solvants tels que la benzine les diluants les produits de nettoyage vendus dans le commerce ou les sprays antistatiques destinés aux disques analogiques Précautions Si votre voiture est restée garée en plein soleil laissez refroidir l appareil avant de l utiliser Les antennes él...

Page 29: ...é pour l enregistrement ou l état du disque Vous ne pouvez pas lire de disques CD R CD RW non finalisés Processus nécessaire pour qu un disque CD R CD RW puisse être lu sur un lecteur CD audio Préparation Réinitialisation de l appareil Avant la première mise en service de l appareil ou après avoir remplacé la batterie de la voiture vous devez réinitialiser l appareil Retirez la façade et appuyez s...

Page 30: ...r la batterie 2 Appuyez sur OPEN puis faites glisser la façade vers la droite et dégagez doucement son côté gauche Remarques Si vous retirez la façade alors que l appareil est toujours sous tension l alimentation est coupée automatiquement de manière à éviter d endommager les haut parleurs N exercez pas de pression excessive sur la façade ni sur la fenêtre d affichage N exposez pas la façade à la ...

Page 31: ... revient au mode de lecture normal Conseil Lorsque le mode D INFO est sur ON l heure est toujours affichée page 16 Lecteur CD Lecture d un disque 1 Appuyez sur OPEN et introduisez le disque avec l étiquette vers le haut 2 Refermez la façade La lecture démarre automatiquement Si un disque se trouve déjà dans l appareil appuyez plusieurs fois sur SOURCE jusqu à ce que CD apparaisse pour démarrer la ...

Page 32: ...que la piste les titres préenregistrés du nouveau disque de la nouvelle piste sont automatiquement affichés si la fonction de défilement automatique Auto Scroll est réglée sur ON les noms dépassant 8 caractères défileront dans la fenêtre d affichage page 16 Rubriques affichables Source de musique Horloge Fonction Rubriques affichables Nom du disque 1 nom de l artiste 2 Titre de la piste 1 Temps de...

Page 33: ...st mémorisée Conseil Appuyez sur l un des côtés de PRESET pour capter les stations dans l ordre de leur présence en mémoire Fonction de recherche de présélection Si la syntonisation de la station présélectionnée ne fonctionne pas Appuyez sur l un des côtés de SEEK pour rechercher la station syntonisation automatique Le balayage s arrête lorsque l appareil capte une station Recommencez jusqu à ce q...

Page 34: ...tapes 1 et 2 pour introduire le titre en entier 5 Appuyez sur ENTER Conseil Pour écouter en permanence des émissions FM stéréo en stéréo vous pouvez modifier le réglage IF AUTO et élargir la réception des signaux de fréquence voir Modification des réglages du son et de l affichage page 16 Notez que ce réglage peut produire certaines interférences Mémorisation des stations de votre choix uniquement...

Page 35: ... de PRESET jusqu à ce que l indication NAME DEL apparaisse 2 Appuyez sur ENTER 3 Appuyez plusieurs fois de suite sur l un des côtés de PRESET pour sélectionner le nom de la station que vous souhaitez effacer 4 Appuyez sur ENTER pendant 2 secondes Le titre est effacé Recommencez les étapes 3 et 4 si vous souhaitez effacer d autres noms 5 Appuyez deux fois sur MENU L appareil revient en mode de réce...

Page 36: ...uyez et tournez la commande pour Recevoir des stations mémorisées SOUND DSPL MODE SOUND DSPL MODE Faites tourner la commande VOL pour régler le volume Autres fonctions Vous pouvez commander l appareil au moyen d un satellite de commande en option Utilisation du satellite de commande Apposez tout d abord l étiquette appropriée suivant la position de montage du satellite de commande Le satellite de ...

Page 37: ...tionnez le paramètre que vous voulez régler en appuyant plusieurs fois de suite sur SOUND Chaque fois que vous appuyez sur SOUND les paramètres changent selon la séquence suivante BAS graves t TRE aigus t BAL balance gauche droite t FAD balance avant arrière 2 Réglez l option sélectionnée en appuyant sur l un des côtés de SEEK Lors du réglage à l aide du satellite de commande appuyez sur SOUND et ...

Page 38: ...ous les noms affichés composés de plus de 8 caractères Lorsque le défilement automatique est réglé sur off et que le nom du disque de la piste est modifié celui ci ne défile pas SND Son LOUD Loudness pour profiter des graves et des aigus même à faible volume Les graves et les aigus sont renforcés P M mode de lecture LOCAL ON OFF mode de recherche local page 11 Sélectionnez ON pour syntoniser uniqu...

Page 39: ...age des caractéristiques du son page 15 Remarques Lorsque BAL balance ou FAD fader son réglés dans Réglage des caractéristiques du son page 15 le réglage MBP passe sur OFF Lorsque MBP est réglé sur OFF les réglages BAL et FAD sont activés Fenêtre d affichage MBP A MBP B MBP OFF Droite 4dB 0 0 Gauche 0 4dB 0 Niveau de la balance Niveau de la balance avant arrière Avant 0 0 0 Arrière 4dB 4dB 0 Régla...

Page 40: ...NU Lorsque le réglage de l effet est terminé le mode de lecture normale apparaît Informations complémentaires Entretien Remplacement du fusible En cas de remplacement du fusible veillez à utiliser un fusible dont l intensité correspond à celle inscrite sur le fusible Si le fusible grille vérifiez le branchement de l alimentation et remplacez le fusible Si le fusible grille une nouvelle fois après ...

Page 41: ... consultez immédiatement un médecin Nettoyez la pile au moyen d un chiffon sec pour assurer un contact optimal Veillez à respecter les polarités correctes lors de la mise en place de la pile Ne saisissez pas la pile avec des pinces métalliques car cela risque de provoquer un court circuit AVERTISSEMENT Si vous ne manipulez pas la pile correctement elle risque d exploser Il est interdit de la recha...

Page 42: ...arleurs 4 8 ohms Puissance utile maximum 52 W 4 à 4 ohms Caractéristiques générales Sorties Sorties audio Fil de commande de relais d antenne électrique Fil de commande d amplificateur de puissance Entrée Fil de commande de mise en sourdine du téléphone Commandes de tonalité Graves 10 dB à 62 Hz Aigus 10 dB à 16 kHz Intensité sonore 8 dB à 100 Hz 2 dB à 10 kHz Puissance de raccordement Batterie de...

Page 43: ...it lorsque la clé de contact est en position ON ACC ou OFF Les fils ne sont pas raccordés correctement au connecteur d alimentation de l accessoire de la voiture L appareil n est pas alimenté Vérifiez le raccordement Si tout est en ordre vérifiez le fusible La voiture ne possède pas de position ACC t Appuyez sur SOURCE ou insérez un disque pour mettre l appareil sous tension L appareil est aliment...

Page 44: ...ion monaural page 16 Une émission de programme stéréo est captée en monaural L appareil est en mode de réception monaural t Désactivez le mode de réception monaural page 16 Des interférences se produisent en cours de réception FM Le mode large est sélectionné t Réglez le mode IF sur IF AUTO page 16 Affichages d erreur Messages Affichages d erreur Les indications suivantes clignotent pendant enviro...

Reviews: