16
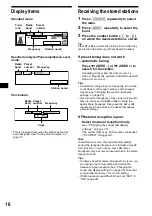
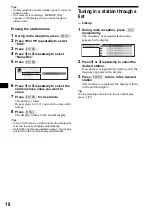
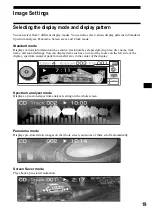
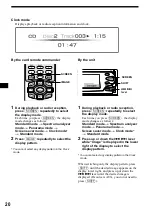
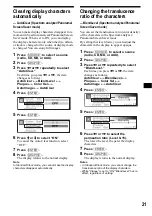
Display items
Standard mode
:
Spectrum analyzer/Panorama/Screen saver
mode:
Clock mode:
*
This is displayed only when the station name has
been assigned. See “Storing station names” on
page 17.
Receiving the stored stations
1
Press
(SOURCE)
repeatedly to select
the radio.
2
Press
(MODE)
repeatedly to select the
band.
3
Press the number button (
(1)
to
(6)
)
on which the desired station is stored.
Tip
Press
M
or
m
to receive the stations in the order they
are stored in the memory (Preset Search function).
If preset tuning does not work
— Automatic tuning
Press
<
(SEEK –) or
,
(SEEK +) to
search for the station.
Scanning stops when the unit receives a
station. Repeat the operation until the desired
station is received.
Tips
• If automatic tuning stops too frequently, turn on the
Local Seek to limit seek to stations with stronger
signals (see “Changing the sound and display
settings” on page 25).
• If you know the frequency of the station you want to
listen to, press and hold
<
or
,
to locate the
approximate frequency, then press the
<
or
,
repeatedly to fine adjust to the desired frequency
(manual tuning).
If FM stereo reception is poor
Select monaural reception mode
(see “Changing the sound and display
settings” on page 25).
The sound improves, but becomes monaural
(“STEREO” disappears).
Note
If interference occurs, this unit will automatically
narrow the reception frequency to eliminate noise (IF
Auto function). In such cases, some FM stereo
broadcasts may become monaural while in the stereo
reception mode.
Tips
• To always hear FM stereo broadcasts in stereo, you
can change the IF Auto setting and widen the
frequency signal reception (see “Changing the
sound and display settings” on page 25). Note that
some interference may occur in this setting.
• If FM broadcasts are difficult to hear, set “DSO” to
“OFF” (page 26).
Radio
band
Preset
number
Frequency
Station name
*
Tuner
icon
Radio
band
Preset
number
Frequency
Station name
*
Radio
band
Preset
number
Frequency
Clock

