CDX-T67
3
3
c
c
2
1
4
3
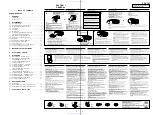
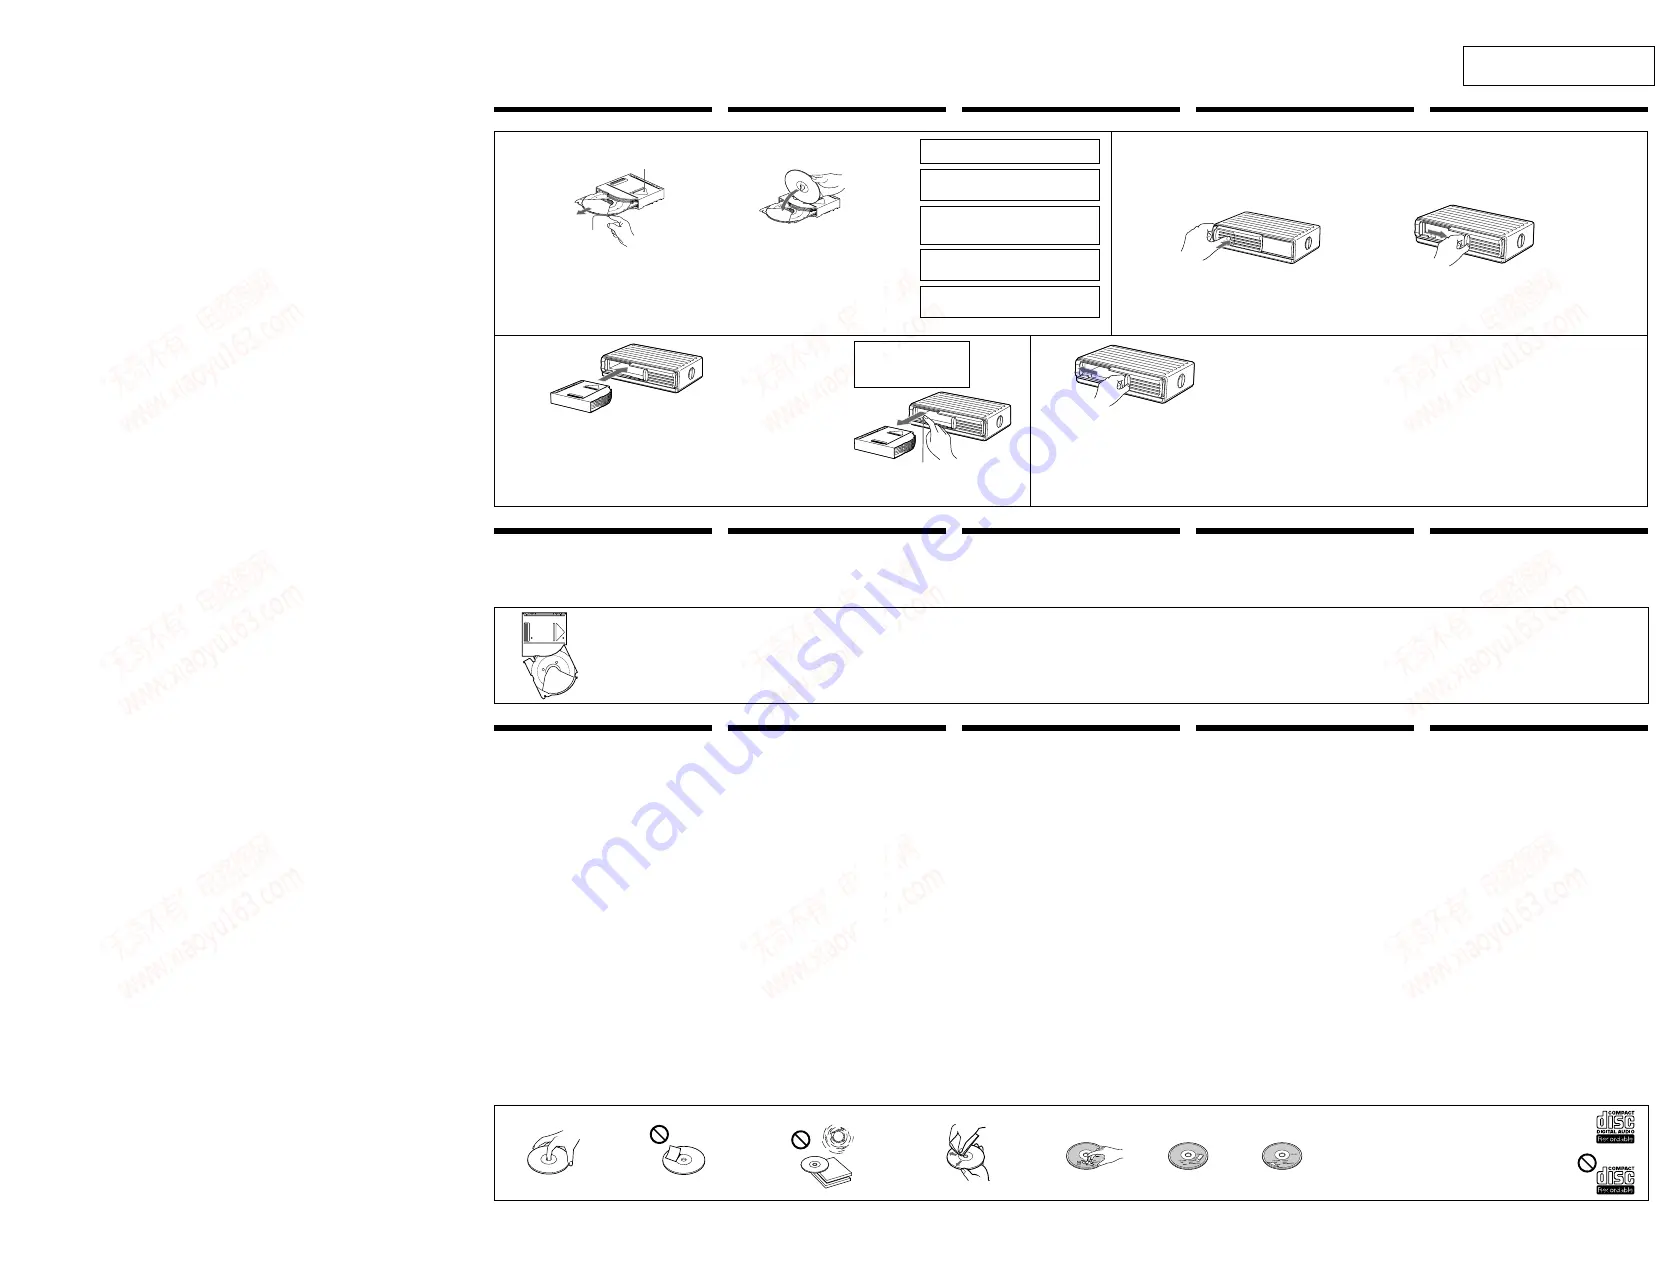
Een disc inbrengen
Einlegen von CDs
Insertion d un disque
6 discs, one in each tray
6 disques, un par plateau
Insgesamt 6 CDs (eine in jedem Fach)
6 discs, één per lade
6 dischi, uno in ciascun comparto
To remove
Retrait
Herausnehmen des CD-Magazins
Verwijderen
Per estrarre
If the disc magazine does not lock properly
Take out the magazine, and after pressing the
Z
(EJECT) button, reinsert it.
Si vous ne pouvez pas fermer le chargeur de disques
Sortez le chargeur et, après avoir appuyé sur la touche
Z
(EJECT), réinsérez-le.
Wenn sich das CD-Magazin nicht richtig verriegeln läßt
Nehmen Sie das Magazin heraus, drücken Sie die
Z
(EJECT)-Taste, und setzen Sie das Magazin dann wieder ein.
Als het disc-magazijn niet soepel op zijn plaats vastklikt
Verwijder het disc-magazijn, druk op de
Z
(EJECT) toets en breng vervolgens het disc-magazijn opnieuw in.
Se il contenitore dischi non si blocca in posizione correttamente
Estrarlo e, dopo aver premuto il tasto
Z
(EJECT), reinserirlo.
Use the unit with the door closed completely
Otherwise, foreign matter may enter the unit and contaminate the
lenses inside the changer.
Note
When a disc magazine is inserted into the CD changer or the reset
button of the connected car audio is pressed, the unit will
automatically be activated and read the information on the CDs.
When the information on all the CDs in the disc magazine has been
read, the unit will automatically stop operation.
Opmerkingen betreffende het disc-magazijn
• Laat het magazijn niet achter op plaatsen waar dit blootgesteld wordt aan
vocht of aan hoge temperaturen, zoals op het dashboard van een auto of op
de hoedenplank, waar het magazijn in de volle zon staat.
• Steek niet meer dan één enkele disc in een uitsparing, anders kunnen zowel
de CD-wisselaar als de compact discs beschadigd worden.
• Laat het apparaat niet vallen en stel het niet bloot aan hevige trillingen of
schokken.
Inserimento di un disco
Slide open
Coulissez pour ouvrir
Öffnen
Openschuiven
Aprire facendo scorrere lo sportello
Push the label printed “PUSH” to unlock the door.
Appuyez sur l’étiquette portant l’inscription “PUSH”
pour déverrouiller la porte.
Drücken Sie auf die mit „PUSH“ gekennzeichnete
Stelle, um den Deckel zu entriegeln.
Druk op het label met de vermelding “PUSH” om de
klep te ontgrendelen.
Per sbloccare il coperchio, premere in corrispondenza
della dicitura “Push”.
Disc magazine
Chargeur de disques
CD-Magazin
Disc-magazijn
Contenitore dischi
Remarques sur le chargeur de disques
• Ne pas laisser le chargeur de disques dans un endroit très chaud ou très
humide comme sur le tableau de bord ou sur la plage arrière d’une voiture
où il serait en plein soleil.
• Ne pas insérer plus d’un disque à la fois sur le plateau, sinon le changeur et
les disques risquent d’être endommagés.
• Ne pas laisser tomber le chargeur de disques ni le cogner.
Hinweise zum CD-Magazin
• Halten Sie das Magazin von hohen Temperaturen und Feuchtigkeit fern.
Lassen Sie es nicht auf dem Armaturenbrett, auf der Heckablage usw. liegen,
wo es direktem Sonnenlicht ausgesetzt ist.
• Versuchen Sie nicht, mehr als eine CD in ein Fach einzulegen. Andernfalls
können der Wechsler und die CDs beschädigt werden.
• Lassen Sie das Magazin nicht fallen, und schützen Sie es vor Stößen.
Note sul contenitore dischi
• Non lasciare il contenitore dischi in luoghi con temperature elevate o molto
umidi, come sul cruscotto o sul ripiano posteriore di un’auto dove il
contenitore potrebbe essere esposto alla luce solare diretta.
• Non inserire più di un disco alla volta in ciascun comparto, diversamente il
cambia CD e i dischi saranno danneggiati.
• Non lasciar cadere il contenitore dischi e non sottoporlo a urti violenti.
Lorsque le plateau sort
En principe, les plateaux ne sortent pas du chargeur. Toutefois, s’ils
sortent du chargeur, il est facile de les réinsérer.
Avec la portion découpée du plateau vous faisant face, insérer le
coin droit du plateau dans la fente, puis enfoncer le coin gauche
jusqu’au déclic.
Remarque
Ne pas insérer le plateau à l’envers ou dans le mauvais sens.
Als de houder uitsteekt
Normaal gezien steken de houders niet uit het magazijn. Als ze er toch
zouden zijn uitgetrokken, kan u ze er makkelijk weer insteken.
Met de uitsparing in de houder naar u toe gericht, brengt u de
rechterhoek van de houder in de gleuf en drukt dan de linkerhoek
erin tot u een klik hoort.
Opmerking
De houder niet omgekeerd of in de verkeerde richting inbrengen.
Tab
Languette
Lasche
Lipje
Linguetta
Labeled surface up
Etiquette vers le haut
Mit der beschrifteten Seite nach oben
Etiket naar boven
Con l’etichetta rivolta verso l’alto
Utilisez le magasin à disques fourni ou un magasin à disques
XA-T7. Vous ne pouvez pas utiliser de magasin à disques
XA-T6 avec cet appareil. L’utilisation d’un autre type de
magasin à disques risque de provoquer un dysfonctionnement.
Verwenden Sie das mitgelieferte CD-Magazin oder das CD-
Magazin XA-T7. Das CD-Magazin XA-T6 kann nicht zusammen
mit diesem Gerät eingesetzt werden. Wird ein anderes als das
empfohlene CD-Magazin verwendet, kann es zu
Fehlfunktionen kommen.
Gebruik het meegeleverde disc-magazijn of het disc-magazijn
XA-T7. Het disc-magazijn XA-T6 kan niet met dit toestel
worden gebruikt. Het gebruik van een ander magazijn kan
defecten veroorzaken.
Utilizzare il contenitore dischi in dotazione o il contenitore
dischi XA-T7. Il contenitore dischi XA-T6 non può essere
utilizzato con questo apparecchio. Se si utilizza qualsiasi altro
contenitore, potrebbero sorgere problemi di funzionamento.
With the arrow side facing up
Avec la partie fléchée tournée vers le haut
Mit dem Pfeil nach oben
Met het pijltje naar boven
Con il lato della freccia rivolto verso l’alto
Push
Z
(EJECT) button down
Appuyez sur la touche
Z
(EJECT)
Drücken Sie die Taste
Z
(EJECT) nach unten.
Druk de
Z
(EJECT) knop in.
Premere il tasto
Z
(EJECT).
Inserting a disc
Use the supplied disc magazine or the disc magazine XA-T7.
The disc magazine XA-T6 can not be used with this unit. If you
use any other magazine, it may cause a malfunction.
Utilisez cet appareil avec la fenêtre complètement fermée
Sinon, des corps étrangers pourraient pénétrer dans l’appareil et
encrasser les lentilles dans le lecteur.
Remarque
Quand un chargeur de disques est inséré dans le changeur de CD ou
si la touche de réinitialisation de l’autoradio raccordé est
enclenchée, l’appareil se met automatiquement en marche et
reproduit les CD. Lorsque tous les CD du chargeur ont été
reproduits, l’appareil s’arrête automatiquement.
Verwenden Sie das Gerät nur mit vollständig geschlossener
Klappe
Halten Sie die Klappe des Geräts stets geschlossen, damit keine
Fremdkörper eindringen und die Linsen im Wechsler nicht
verschmutzen können.
Hinweis
Wenn Sie ein CD-Magazin in den CD-Wechsler einsetzen oder die
Rücksetztaste an der angeschlossenen Audio-Anlage in Ihrem Auto
drücken, schaltet sich das Gerät automatisch ein und beginnt, die
Daten auf den CDs zu lesen. Nachdem die Informationen auf allen
CDs im CD-Wechsler gelesen wurden, stoppt das Gerät automatisch.
Gebruik het toestel met volledig gesloten klep
Anders zou er stof of vuil in het apparaat terecht kunnen komen,
met als gevolg vervuilde lenzen en storingen in de werking.
Opmerking
Wanneer een disc-magazijn in de compact disc-wisselaar wordt
geplaatst of de terugsteltoets van de uitleesvenster-eenheid wordt
ingedrukt, zal het apparaat automatisch ingeschakeld worden,
waarna de informatie van de compact discs gelezen wordt. Nadat
alle informatie gelezen is, zal het apparaat weer automatisch in de
stopstand komen te staan.
Utilizzare l’apparecchio con lo sportello chiuso
Diversamente oggetti estranei potrebbero penetrare
nell’apparecchio e contaminare le lenti all’interno del cambia CD.
Nota
Quando un contenitore dischi è inserito nel cambia CD o viene
premuto il pulsante di azzeramento dell’autostereo collegato,
l’apparecchio si accende automaticamente e legge le informazioni
dei dischi. Quando le informazioni di tutti i dischi inseriti nel
contenitore dischi sono state lette, l’apparecchio si ferma
automaticamente .
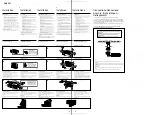
Notes on the disc magazine
• Do not leave the disc magazine in locations with high temperatures and high
humidity such as on a car dashboard or in the rear window where the disc
magazine will be subjected to direct sunlight.
• Do not place more than one disc at a time onto one tray, otherwise the
changer and the discs may be damaged.
• Do not drop the disc magazine or subject it to a violent shock.
When the tray comes out
Normally, the trays will not come out of the magazine. However, if
they are pulled out of the magazine, it is easy to re-insert them.
With the cut-away portion of the tray facing you, insert the right
corner of the tray in the slot, then push in the left corner until it
clicks.
Note
Do not insert the tray upside down or in the wrong direction.
Wenn sich ein Fach gel st hat
Normalerweise können sich die Fächer nicht vom Magazin lösen.
Werden sie jedoch aus dem Magazin herausgezogen, lassen sie sich
mühelos wieder anbringen.
Hierbei muß die Aussparung des Fachs auf Sie weisen. Setzen Sie
dann die rechte Ecke des Fachs in den Einschub ein, und drücken
Sie danach die linke Ecke an, bis das Fach mit einem Klicken
einrastet.
Hinweis
Versuchen Sie nicht, das Fach mit der falschen Seite nach oben oder
verkehrt herum einzusetzen.
Quando il comparto fuoriesce
Di solito, i comparti non fuoriescono dal contenitore; se ciò dovesse
avvenire, è facile reinserirli.
Con la parte del comparto tagliata rivolta in avanti, inserire
l’angolo destro del comparto nell’alloggiamento, quindi inserire
l’angolo sinistro fino a farlo scattare in posizione.
Nota
Non inserire il vassoio capovolto o nella direzione errata.
Hinweise zum Umgang mit CDs
Eine verschmutzte oder beschädigte CD kann Tonaussetzer verursachen. Um
optimale Klangqualität sicherzustellen, beachten Sie folgendes:
• Damit die CD sauber bleibt, fassen Sie sie immer am Rand an, und
berühren Sie nicht die Seite ohne Beschriftung. (Abb.
A
)
• Kleben Sie weder Papier noch Klebeband auf die CD. (Abb.
B
)
• Bewahren Sie CDs in ihrer Hülle oder in den CD-Magazinen auf, wenn
sie nicht abgespielt werden.
Schützen Sie die CD vor Sonnenlicht und Wärmequellen wie
Warmluftauslässen. Lassen Sie sie nicht in einem Auto liegen, das direkt
in der Sonne geparkt ist, da die Temperatur im Wageninneren sehr hoch
ansteigen kann. (Abb.
C
)
• Reinigen Sie die CDs vor dem Abspielen mit einem handelsüblichen
Reinigungstuch. Wischen Sie dabei von der Mitte nach außen. (Abb.
D
)
Verwenden Sie keine Lösungsmittel wie Benzin oder Verdünner und keine
handelsüblichen Reinigungsmittel oder Antistatik-Sprays für Schallplatten.
• CDs mit ungewöhnlichen Formen, zum Beispiel herz- oder sternförmige
oder quadratische CDs, können Sie mit diesem Gerät nicht abspielen.
Falls Sie es doch versuchen, kann das Gerät beschädigt werden.
Verwenden Sie solche CDs nicht.
• Single-CDs (8-cm-CDs) können nicht wiedergegeben werden.
Hinweise zu CDs
Wenn Sie die unten aufgeführten CDs verwenden, können
Klebstoffrückstände dazu führen, daß die CD sich nicht mehr dreht, oder
Fehlfunktionen oder Schäden an der CD verursachen.
Verwenden Sie keine gebraucht gekauften oder Leih-CDs mit klebrigen
Rückständen auf der Oberfläche (z. B. von abgelösten Aufklebern, von Tinte
oder von Klebstoff, der unter den Aufklebern hervorquillt).
• Klebstoffrückstände. Tinte klebt. (Abb.
E
)
Verwenden Sie keine Leih-CDs mit alten Etiketten, die sich abzulösen
beginnen.
• Aufkleber, die sich zu lösen beginnen und Klebstoffrückstände
hinterlassen. (Abb.
F
)
Verwenden Sie keine CDs, an denen Etiketten oder Aufkleber angebracht
sind.
• Angebrachte Etiketten. (Abb.
G
)
Hinweise zu CD-Rs/CD-RWs
• Mit diesem Gerät können Sie CD-Rs (beschreibbare CDs) wiedergeben
lassen, die für den Einsatz als Tondatenträger konzipiert sind. (Abb.
H
)
• Je nach dem Aufnahmegerät, mit dem die CD-R bespielt wurde, oder
dem Zustand der CD-R selbst können einige CD-Rs mit diesem Gerät
möglicherweise nicht wiedergegeben werden.
• Eine noch nicht abgeschlossene CD-R kann nicht wiedergegeben
werden
*
.
• Eine CD-RW (wiederbeschreibbare CD) kann mit diesem Gerät nicht
wiedergegeben werden.
*
Damit eine bespielte CD-R auf einem Audio-CD-Player wiedergegeben werden
kann, ist ein spezieller Prozeß erforderlich.
Opmerkingen bij het omgaan met discs
Bij het afspelen van een vuile of beschadigde disc kan het geluid regelmatig
wegvallen. Voor het verzekeren van een goede geluidsweergave dient u als
volgt met discs om te gaan.
• Pak een compact disc altijd bij de rand vast, houd hem proper en raak
het oppervlak (behalve het label) niet aan. (afb.
A
)
• Plak geen papier of plakband op een compact disc. (afb.
B
)
• Bewaar uw discs in hun doosje of disc-magazijn wanneer u ze niet
gebruikt.
Stel compact discs niet bloot aan direkt zonlicht of warmeluchtkanalen.
Laat ze niet liggen in een geparkeerde auto in de volle zon, aangezien
de temperatuur hierin bijzonder hoog kan oplopen. (afb.
C
)
• Maak een disc voor het afspelen altijd schoon met een in de handel
verkrijgbare doek. Wrijf van binnen naar buiten toe. (afb.
D
)
Gebruik geen solventen zoals benzine, thinner en in de handel verkrijgbare
reinigingsmiddelen of antistatische sprays voor grammofoonplaten.
• Discs met afwijkende vormen (b.v. hart, vierkant, ster) kunnen niet met
deze dit toestel worden afgespeeld. Indien u dat toch doet, kan het
toestel worden beschadigd. Gebruik geen dergelijke discs.
• U kunt geen 8cm CD’s afspelen.
Opmerkingen bij discs
Indien u de discs behandelt zoals hieronder beschreven, kunnen kleverige
resten de disc doen stoppen waardoor het toestel defect of uw discs
beschadigd kunnen raken.
Gebruik geen gebruikte of gehuurde CD’s met kleverig oppervlak
(bijvoorbeeld afkomstig van stickers of inkt of lijm die van onder de stickers
komt).
• Lijmresten. Kleverige inkt. (afb.
E
)
Gebruik geen gehuurde CD’s met oude labels die loskomen.
• Stickers die loskomen laten kleverige resten achter. (afb.
F
)
Gebruik geen discs waarop stickers zijn gekleefd.
• Vastgekleefde labels. (afb.
G
)
Opmerkingen bij CD-R/CD-RW discs
• Audio CD-R’s (opneembare CD’s) kunnen met dit toestel worden
afgespeeld. (fig.
H
)
• Sommige CD-R’s (afhankelijk van de opname-apparatuur of de staat van
de disc) kunnen niet met dit toestel worden afgespeeld.
• U kunt geen CD-R afspelen die niet is gefinaliseerd
*
.
• Met dit toestel kunnen geen CD-RW’s (herschrijfbare CD’s) worden
afgespeeld.
*
Proces dat nodig is om een opgenomen CD-R disc af te spelen met een CD-
speler.
Note sulla manipolazione dei dischi
Un disco sporco o difettoso può causare cadute di suono durante la
riproduzione. Per poter ascoltare un suono ottimale, trattare i dischi come
indicato.
• Prendere i dischi per il bordo e, per tenerli puliti, non toccare la
superficie senza etichetta. (fig.
A
)
• Non attaccare carta o nastro adesivo sul disco. (fig.
B
)
• Quando non vengono utilizzati, conservare i dischi nelle apposite
custodie.
Non esporre i dischi alla luce solare diretta o a fonti di calore come
condotti di aria calda. Non lasciarli in veicoli parcheggiati al sole dove
può verificarsi un considerevole aumento della temperatura. (fig.
C
)
• Prima della riproduzione, pulire i CD con un panno di pulizia disponibile
in commercio. Pulire ogni CD dal centro verso l’esterno. (fig.
D
)
Non utilizzare solventi quali benzene, acquaragia o detersivi reperibili in
commercio, né spray antistatici per dischi analogici.
• Non è possibile riprodurre CD con forme irregolari (ad esempio a forma
di cuore, di quadrato, di stella) su questo lettore. Non utilizzare tali
dischi onde evitare di danneggiare il lettore.
• Non è possibile riprodurre CD da 8 cm.
Note sui dischi
I residui di colla presenti sui dischi indicati di seguito potrebbero causare
l’arresto del disco stesso e problemi di funzionamento dell’apparecchio o
danneggiare i dischi stessi.
Non utilizzare dischi di seconda mano o presi a noleggio che presentano
residui di colla sulla superficie, ad esempio residui di etichette o inchiostro
rimossi oppure residui di colla che fuoriescono dalle etichette.
• Residui di colla. Residui di inchiostro. (fig.
E
)
Non utilizzare dischi presi a noleggio con etichette vecchie che cominciano a
staccarsi.
• Etichette che cominciano a staccarsi, lasciando residui di colla. (fig.
F
)
Non utilizzare dischi su cui siano applicati etichette o adesivi.
• Etichette applicate. (fig.
G
)
Note sui CD-R/CD-RW
• Con il presente apparecchio è possibile riprodurre CD-R (CD registrabili)
progettati per l’utilizzo audio. (fig.
H
)
• In base alle condizioni dell’apparecchio di registrazione o del CD-R
stesso, alcuni CD-R potrebbero non essere riprodotti su questo
apparecchio.
• Non è possibile riprodurre CD-R non finalizzati
*
.
• Con il presente apparecchio è possibile riprodurre CD-RW (CD
riscrivibili).
*
Operazione necessaria per la riproduzione di un CD-R registrato su lettore CD
audio.
Remarques sur la manipulation des disques
Un disque sale ou défectueux peut provoquer des pertes de son à la lecture.
Manipuler le disque comme suit pour obtenir un son optimal.
• Manipuler le disque par son arête et le maintenir dans un état propre,
ne pas le toucher sur la surface non imprimée. (fig.
A
)
• Ne pas coller de papier ou de bande adhésive sur le disque. (fig.
B
)
• Conservez vos disques dans leurs boîtiers ou des pochettes de
rangement lorsqu’ils ne sont pas utilisés.
Ne pas laisser les disques en plein soleil ou près d’une source de chaleur
comme des conduits d’air chaud. Ne pas laisser les disques dans une
voiture garée en plein soleil car la température de l’habitacle risque
d’augmenter considérablement. (fig.
C
)
• Avant la lecture, nettoyez les disques avec un chiffon de nettoyage
disponible dans le commerce. Essuyez chaque disque en partant du
centre vers l’extérieur. (fig.
D
)
N’utilisez pas de solvants tels que la benzine, du diluant, des produits de
nettoyage vendus dans le commerce ou des sprays antistatiques destinés aux
disques analogiques.
• Les disques de formes non standard (par exemple en forme de cœur, de
carré ou d’étoile) ne peuvent pas être lus sur cet appareil. Vous risquez
d’endommager votre appareil si vous essayez de le faire. N’utilisez pas
de tels disques.
• La lecture de CD de 8 cm n’est pas possible.
Remarques sur les disques
Si vous utilisez les disques décrits ci-dessous, le résidu adhésif risque de
provoquer l’arrêt de la rotation du disque et d’entraîner un
dysfonctionnement ou d’endommager vos disques.
N’utilisez pas de CD de seconde main ou de location qui présentent des
résidus adhésifs à la surface (par exemple d’étiquettes décollées ou d’encre, de
colle dépassant de l’étiquette).
• Résidus de colle. L’encre colle. (fig.
E
)
N’utilisez pas de CD de location avec d’anciennes étiquettes qui
commencent à se décoller.
• Les étiquettes qui commencent à se décoller laissent des résidus
adhésifs. (fig.
F
)
N’utilisez pas vos disques avec des étiquettes ou des autocollants apposés
dessus.
• Les étiquettes sont fixées. (fig.
G
)
Remarques sur les disques CD-R/CD-RW
• Vous pouvez écouter avec cet appareil des CD-R (CD enregistrables)
conçus pour une utilisation audio. (fig.
H
)
• Certains CD-R (en fonction des conditions de l’équipement
d’enregistrement ou du disque) risquent de ne pas être lus avec cet
appareil.
• Vous ne pouvez pas lire de disques CD-R non finalisés
*
.
• Vous ne pouvez pas lire de CD-RW (CD réinscriptibles) avec cet appareil.
*
Un processus nécessaire à la lecture des disques CD-R enregistrés sur le lecteur
de CD audio.
Notes on handling discs
A dirty or defective disc may cause sound drop-outs during playback. To
enjoy optimum sound, handle the disc as follows.
• Handle the disc by its edge, and to keep the disc clean, do not touch the
unlabeled surface. (fig.
A
)
• Do not stick paper or tape on the disc. (fig.
B
)
• Keep your discs in their cases or disc magazines when not in use.
Do not expose discs to direct sunlight or heat sources such as hot air-
ducts. Do not leave discs in a car parked in direct sunlight where there
can be a considerable rise in the temperature inside the car. (fig.
C
)
• Before playing, clean the discs with a commercially available cleaning
cloth. Wipe each disc from the centre out. (fig.
D
)
Do not use solvents such as benzine, thinner, commercially available
cleaners, or antistatic spray intended for analog discs.
• Discs with non-standard shapes (e.g., heart, square, star) cannot be
played on this unit. Attempting to do so may damage the unit. Do not
use such discs.
• You cannot play 8cm CDs.
Notes on discs
If you use the discs explained below, the sticky residue can cause the disc to
stop spinning and may cause malfunction or ruin your discs.
Do not use second-hand or rental CDs that have a sticky residue on the surface
(for example from peeled-off stickers or from ink, or glue leaking from under
the stickers).
• There are paste residue. Ink is sticky. (fig.
E
)
Do not use rental CDs with old labels that are beginning to peel off.
• Stickers that are beginning to peel away, leaving a sticky residue.
(fig.
F
)
Do not use your discs with labels or stickers attached.
• Labels are attached. (fig.
G
)
Notes on CD-R/CD-RW discs
• You can play CD-Rs (recordable CDs) designed for audio use on this
unit. (fig.
H
)
• Some CD-Rs (depending on the equipment used for its recording or the
condition of the disc) may not play on this unit.
• You cannot play a CD-R that is not finalized
*
.
• You cannot play CD-RWs (rewritable CDs) on this unit.
*
A process necessary for a recorded CD-R disc to be played on the audio CD
player.
A
G
B
C
D
E
F
This way
Oui
Richtig
Juist
Cosi
Not this way
Non
Falsch
Fout
Non cosi
Not this way
Non
Falsch
Fout
Non cosi
This way
Oui
Richtig
Juist
Cosi
H
Look for this mark to distinguish CD-Rs for audio use.
Ce symbole permet de distinguer les CD-R conçus pour une utilisation audio.
Für den Einsatz als Tondatenträger konzipierte CD-Rs sind mit dieser
Markierung gekennzeichnet.
Audio CD-R’s zijn hieraan te herkennen.
Ricercare questo simbolo per distinguere i CD-R per utilizzo audio.
This mark denotes that a disc is not for audio use.
Ce symbole indique qu’un disque n’est pas conçu pour une utilisation audio.
Nicht für den Einsatz als Tondatenträger geeignete CD-Rs sind mit dieser
Markierung gekennzeichnet.
Dit geeft aan dat een disc niet geschikt is voor audiotoepassingen.
Questo simbolo indica che il disco non è destinato all’utilizzo audio.
Note
To prevent injury, do not insert your hand in the CD changer.
Remarque
Pour éviter toute blessure, ne pas introduire la main dans le changeur de CD.
Hinweis
Um Verletzungen zu vermeiden, greifen Sie mit der Hand nicht in den CD-
Wechsler.
Opmerking
Steek uw hand niet in de CD-wisselaar om verwondingen te voorkomen.
Nota
Per evitare danni alla persona, non inserire le mani nel cambia CD.
Note
You cannot play an 8cm CD on this unit.
If you use the single adaptor, it may cause a malfunction.
Remarque
Il est impossible de lire un CD de 8 cm sur cet appareil.
Si vous utilisez l’adaptateur unique, il peut provoquer un
dysfonctionnement.
Hinweis
Mit diesem Gerät können Sie keine Single-CDs (8-cm-CDs)
wiedergeben lassen.
Wenn Sie einen Single-CD-Adapter verwenden, kann es zu
Fehlfunktionen
kommen.
Opmerking
U kunt geen 8 cm CD afspelen met dit toestel.
Door gebruik te maken van een single adapter kan het
toestel defect raken.
Nota
Con il presente apparecchio, non è possibile riprodurre CD
da 8cm.
Se viene utilizzato l’adattatore singolo, è possibile che si
verifichino problemi di funzionamento.
SECTION 1
GENERAL
This section is extracted from
instruction manual.
TABLE OF CONTENTS
SERVICING NOTES
..........................................................
2
1.
GENERAL
Installation .......................................................................
4
Connections .....................................................................
4
2.
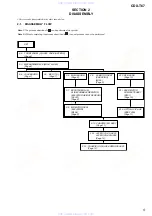
DISASSEMBLY
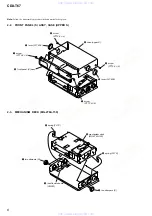
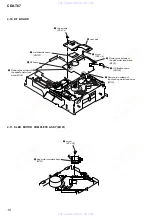
2-1. Disassembly Flow ...........................................................
5
2-2. Front Panel (S) Assy, Case (Upper S) ............................
6
2-3. Mechanism Deck (MG-276A-159) ................................
6
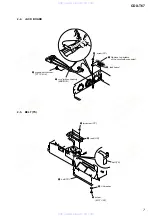
2-4. Jack Board .......................................................................
7
2-5. Belt (TS) ..........................................................................
7
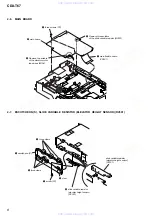
2-6. Main Board ......................................................................
8
2-7. Escutcheon (S), Slide Variable Resistor
(Elevator Height Sensor) (RV301) .................................
8
2-8. MD Motor Assy (Elevator) (M104) ................................
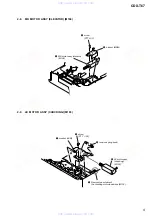
9
2-9. LE Motor Assy (Chucking) (M103) ...............................
9
2-10. RF Board ......................................................................... 10
2-11. Sled Motor Complete Assy (M101) ............................... 10
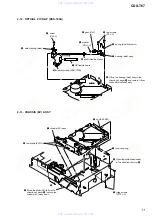
2-12. Optical Pick-up (KSS-720A) .......................................... 11
2-13. Chassis (EV) Assy ........................................................... 11
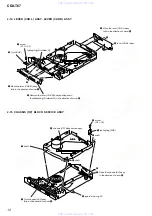
2-14. Lever (CHK.L) Assy, Lever (CHK.R) Assy ................... 12
2-15. Chassis (OP) Block Service Assy ................................... 12
3.
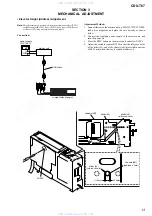
MECHANICAL ADJUSTMENT
.......................... 13
4.
ELECTRICAL CHECK
.......................................... 14
5.
DIAGRAMS
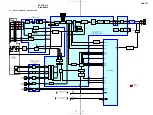
5-1. Block Diagram – SERVO Section – .............................. 17
5-2. Block Diagram – BUS CONTROL/
POWER SUPPLY Section – ........................................... 18
5-3. Note for Printed Wiring Boards and
Schematic Diagrams ....................................................... 19
5-4. Printed Wiring Boards – RF Board – ............................ 20
5-5. Schematic Diagram – RF Board – ................................. 21
5-6. Printed Wiring Boards
– MAIN Board (Component Side) – .............................. 22
5-7. Printed Wiring Board
– MAIN Board (Conductor Side) – ................................ 23
5-8. Schematic Diagram – MAIN Board (1/2) – .................. 24
5-9. Schematic Diagram – MAIN Board (2/2) – .................. 25
5-10. Printed Wiring Boards – JACK Board – ........................ 26
5-11. Schematic Diagram – JACK Board – ............................. 26
5-12. IC Pin Function Description ........................................... 30
6-1. Case Section .................................................................... 33
6-2. Mechanism Deck Section-1 (MG-276A-159) ................ 34
6-3. Mechanism Deck Section-2 (MG-276A-159) ................ 35
............................... 36
w w w . x i a o y u 1 6 3 . c o m
Q Q 3 7 6 3 1 5 1 5 0
9
9
2
8
9
4
2
9
8
T E L
1 3 9 4 2 2 9 6 5 1 3
9
9
2
8
9
4
2
9
8
0
5
1
5
1
3
6
7
3
Q
Q
TEL 13942296513 QQ 376315150 892498299
TEL 13942296513 QQ 376315150 892498299


