background image

GB

FR

CLM-FHD5

4-572-803-

11

(1)

Clip-on LCD
Monitor
Moniteur LCD avec
attache clip

Operating Instructions

Mode d’emploi

Accessory Shoe

Summary of Contents for CLM-FHD5

Page 1: ...GB FR CLM FHD5 4 572 803 11 1 Clip on LCD Monitor Moniteur LCD avec attache clip Operating Instructions Mode d emploi Accessory Shoe ...

Page 2: ...not expose the unit to rain or moisture 2 do not place objects filled with liquids such as vases on the apparatus CAUTION Replace the battery with the specified type only Otherwise fire or injury may result Do not expose the batteries to excessive heat such as sunshine fire or the like Excessive sound pressure from earphones and headphones can cause hearing loss ...

Page 3: ...nto your outlet consult an electrician for replacement of the obsolete outlet Protect the power cord from being walked on or pinched particularly at plugs convenience receptacles and the point where they exit from the apparatus Only use attachments accessories specified by the manufacturer Use only with the cart stand tripod bracket or table specified by the manufacturer or sold with the apparatus...

Page 4: ...t installed and used in accordance with the instructions may cause harmful interference to radio communications However there is no guarantee that interference will not occur in a particular installation If this equipment does cause harmful interference to radio or television reception which can be determined by turning the equipment off and on the user is encouraged to try to correct the interfer...

Page 5: ...otice for the customers in the countries applying EU Directives Manufacturer Sony Corporation 1 7 1 Konan Minato ku Tokyo 108 0075 Japan For EU product compliance Sony Deutschland GmbH Hedelfinger Strasse 61 70327 Stuttgart Germany ...

Page 6: ...t for the recycling of electrical and electronic equipment By ensuring this product is disposed of correctly you will help prevent potential negative consequences for the environment and human health which could otherwise be caused by inappropriate waste handling of this product The recycling of materials will help to conserve natural resources For more detailed information about recycling of this...

Page 7: ... Adjusting the direction of the screen 15 Attaching the sun shade hood 16 Using the monitor Using the monitor 18 Enlarging images 18 Setting with the menu 19 Peaking 23 False Color 24 Video Level Marker 26 Seeing the S Log image in natural brightness S Log Disp Assist 27 TV display area Marker display 28 Others Troubleshooting 29 Precaution 31 Specifications 33 Table of contents GB ...

Page 8: ... 22 MENU button 19 ZOOM SELECT button Enlarge button 18 For MENU display Enter button 19 Battery pack terminal Battery release lever Headphone jack You can connect headphones with a 3 5 mm stereo mini jack to listen to sound No sound comes from the speaker when headphones are connected HDMI Type A DC IN jack Tripod receptacle Identifying the parts ...

Page 9: ... proof splash proof or waterproof Do not place this unit in the following locations Regardless of whether this unit is in use or in storage do not place it in any of the following locations Doing so may lead to a malfunction Placing this unit in locations subject to direct sunlight such as on dashboards or near a heater may cause this unit to deform or malfunction Locations with excessive vibratio...

Page 10: ... Carrying pouch 1 Set of printed documentation Attaching the battery The Sony rechargeable battery packs M series V series W series not supplied can be used with this unit You cannot use other battery packs because this unit will not work properly with them Notes When using NP QM71D NP QM91D NP FV100 or NP FV100A attach the camera to a tripod first Battery Adapter When using a rechargeable battery...

Page 11: ...t Push the battery in gently then slide it in the direction illustrated while still pushing There is a click as the battery is fixed into place If sliding the battery diagonally it may not be fixed To remove the battery Slide the battery in the direction illustrated while sliding the battery release lever in the direction illustrated The battery pack comes away from this unit When removing the bat...

Page 12: ...hen you use fully charged batteries It may differ depending on operating and environmental conditions To check the remaining battery power You can check the remaining battery power with the power lamp color etc Power lamp Green lit Battery level is enough Red lit Battery level is low Red flashing rapidly Batteries have run out The power to this unit automatically turns off about 10 seconds later T...

Page 13: ...n Use the nearby wall outlet wall socket when using the AC adaptor If any trouble occurs while this unit is in use unplug it from the wall outlet wall socket to disconnect the power Attaching to the camera Connect the shoe adaptor to this unit and then attach it to the camera Note Do not attach a shoe adaptor except for this unit 1 Insert the tripod screw of the shoe adaptor into the tripod recept...

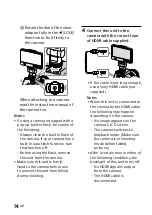
Page 14: ... firmly fixed to the camera before use to prevent this unit from falling during shooting 4 Connect this unit to the camera with the correct type of HDMI cable supplied If the cable is not long enough use a Sony HDMI cable not supplied Notes When this unit is connected to the camera by the HDMI cable the following may happen depending on the camera No image appears on the camera s LCD screen The ca...

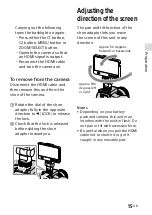
Page 15: ...aptor fully in the opposite direction to LOCK to release the lock Check that the lock is released before sliding the shoe adaptor toward you Adjusting the direction of the screen The pan and tilt function of the shoe adaptor lets you move the screen of this unit in any direction Approx 90 degrees forwards or backwards Approx 180 degrees left or right Notes Depending on your battery pack and camera...

Page 16: ...s in the outer frame of this unit and attach Fit the right part of the panel first and then press in the left part of the panel 2 Open the sun shade hood as illustrated Top panel Side panel To close the sun shade hood Close the sun shade hood according to the procedure as illustrated To remove the sun shade hood Pull the left part of the sun shade hood frame towards you to remove it ...

Page 17: ...spring into the middle groove along the side of the frame and fit the projections of the side panel into the top and bottom grooves along the side of the frame Notes The side panels only open if the projecting end of the spring is placed correctly into the groove If the panels do not open reattach the spring so that its projecting end is in the groove If the top panel comes away from the frame Fit...

Page 18: ...on you can turn off the power by pressing and holding the power button Notes If the image resolution is 1 920 1 080 or lower the image is automatically enlarged Auto zoom function The aspect ratio of this unit is 16 9 Images that have other aspect ratios may be displayed with black stripes Image example 3 2 Enlarging images You can enlarge the part of the displayed image 1 Press the center of the ...

Page 19: ...ding on the magnification or the kind of input signal the enlargeable range may be limited When using 6 the enlargeable range is limited in all input signals When using 3 the enlargeable range is limited in input signal of 1080 24p The enlargeable range The non enlargeable range The illustration is only a representation Setting with the menu You can set the simple settings such as sound volume or ...

Page 20: ... appears 4 Press of the ZOOM SELECT button to select the desired setup detail or the desired setting 5 Press the center of the ZOOM SELECT button The desired setting is saved and returns to the MENU Note If you press the MENU button before step 5 the setting is canceled Pressing the MENU button will hide the MENU if it is displayed Preview function You can check the effect before saving the settin...

Page 21: ...e Settings 0 low to 100 high Default 30 Brightness Settings 0 dark to 100 bright Default 50 Contrast Settings 0 soft to 100 sharp Default 50 Color tone Phase hue Settings 0 green to 100 violet Default 50 Backlight Settings 0 dark to 5 bright Default 5 Color temperature Adjusting white balance of the screen Settings 9300K 7200K 6500K Default 6500K S Log Disp Assist ON OFF Page 27 Settings OFF ON De...

Page 22: ...htness Page 21 Contrast Page 21 Color tone Phase hue Page 21 Backlight Page 21 Default Settings Peaking C1 False Color C2 S Log Disp Assist Type Page 27 You can choose the type of S Log Disp Assist Settings S Log2 S Log3 Default S Log2 S Log Disp Assist Gain Adjustment Page 27 You can choose the gain adjustment settings of S Log Disp Assist Settings 2 1 0 1 2 Default 0 The unit is applicable to th...

Page 23: ...his unit Turn on the power to this unit while pressing and holding the center of the ZOOM SELECT button Turn on the power Pressing and holding Peaking This function displays the whole image in black and white and the focused parts in color This makes it easier to check which parts are actually in focus whatever the shooting conditions 1 Register PEAK in the C1 button or C2 button of this unit In t...

Page 24: ... is not a malfunction False Color You can check the level of the input image to this unit in color 1 Register FC in the C1 button or C2 button of this unit FC is registered as the C2 button by default If FC is not registered register it by pressing Advanced Settings C1 or C2 Page 22 2 Press the button which FC is registered Pressing the same button as in step 2 or the MENU button again will return...

Page 25: ...Log Disp Assist Type S Log2 S Log2 Gain Adjustment 2 1 0 1 2 Red 109 or more 98 or more 85 or more 72 or more 60 or more Yellow 91 109 78 98 66 85 53 72 41 60 Pink 62 63 49 52 38 40 28 29 19 21 Green 49 52 37 40 27 30 19 21 12 14 Blue 3 15 3 10 3 7 3 5 3 4 Violet 3 or less Measure Chart 3 Level of color and signal for False Color S Log Disp Assist Type S Log3 S Log3 Gain Adjustment 2 1 0 1 2 Red 9...

Page 26: ...60 50 Video signal level At higher settings the green level gets redder IRE 99 70 1 75 65 Example Setting 70 Red Gray Green Gray Blue 3 Press the C1 or C2 button which VLM is registered in the step 1 The video level is displayed in colors on the LCD screen of this unit Pressing the same button in step 3 or the MENU button again will return the display to the normal screen Notes When using VLM S Lo...

Page 27: ...ns are not for operating the camera connected to this unit The color displayed in S Log Disp Assist is simply transformed The following settings can be changed while the image is displayed in S Log Disp Assist Set the curve in S Log Disp Assist S Log Disp Assist Type Press the MENU button and then choose Advanced Settings S Log Type Choose S Log2 or S Log3 Set the brightness in S Log Disp Assist S...

Page 28: ...ct either one to suit your TV s playback conditions Settings 80 16 9 90 16 9 80 4 3 90 4 3 16 9 4 3 The outer marker is 90 and the inner marker is 80 Notes The setting of this unit is only for displaying images on the monitor and does not affect the original images themselves When displaying MENU and using the following functions the marker display will disappear False Color Peaking Video Level Ma...

Page 29: ...ge 13 The battery not supplied comes off Attach it correctly Page 11 No image appears on the screen of this unit The camera is in power save mode Carry out some camera function such as half pressing the shutter button to leave power save mode The HDMI cable is disconnected Reconnect it properly Page 14 Check the instruction manual of your camera for the display settings of the camera No image appe...

Page 30: ...d For details check the instruction manual of your camera Cannot record Depending on your camera it may switch to playback mode when connected to this unit Switch the camera to shooting mode before taking pictures The screen is difficult to see Use the sun shade hood to block sunlight Page 16 If the screen is dark see Backlight Page 21 to adjust the screen brightness Black stripes appear on the sc...

Page 31: ...l lines or a residual image may appear on the screen This is not a malfunction When the monitor becomes warm the screen returns to normal If a fixed picture or a still picture is displayed for a long time an image may remain on the screen and be superimposed as a ghosting image Precaution The screen and the cabinet become warm during operation This is not a malfunction The LCD panel fitted to this...

Page 32: ...the screen surface On cleaning the cabinet Clean the cabinet gently with a soft dry cloth Use of alcohol benzene thinner or insecticide may damage the finish of the cabinet or remove the indications on the cabinet Do not use these chemicals If you rub on the cabinet with a stained cloth the cabinet may be scratched If the cabinet is in contact with a rubber or vinyl resin product for a long period...

Page 33: ... Sony V series battery NP FV50 NP FV70 NP FV100 Specifications DC 7 4 V Sony V series battery NP FV100A DC 7 6 V AC PW10AM Power consumption Approx 5 5 W Dimensions Approx w h d 139 mm 100 mm 23 1 mm 5 1 2 in 4 in 15 16 in Excluding projecting parts Mass Approx 270 g main unit only 9 6 oz Operating temperature Approx 0 C to 40 C 32 F to 104 F Storage temperature Approx 20 C to 60 C 4 F to 140 F Ac...

Page 34: ...ressive 16 9 4 3 640x480 60p 525 480 60 Progressive 4 3 575 50i PAL 625 575 25 2 1 interlace 16 9 4 3 576 50p 625 576 50 Progressive 16 9 4 3 720 50p 750 720 50 Progressive 16 9 720 60p 750 720 60 Progressive 16 9 1080 50i 1 125 1 080 25 2 1 interlace 16 9 1080 60i 1 125 1 080 30 2 1 interlace 16 9 1080 24p 1 125 1 080 24 Progressive 16 9 1080 50p 1 125 1 080 50 Progressive 16 9 1080 60p 1 125 1 0...

Page 35: ... l humidité 2 ne placez pas d objets remplis de liquides vases etc sur l appareil ATTENTION Remplacez la batterie par une batterie correspondant au type spécifié uniquement Sinon vous risquez de provoquer un incendie ou des blessures N exposez pas les piles à une chaleur excessive notamment aux rayons directs du soleil à une flamme etc Une pression sonore excessive des écouteurs ou du casque peut ...

Page 36: ...fiche avec terre a deux lames et une broche La lame la plus large et la broche servent de dispositif de sécurité Si la fiche fournie ne s insère pas dans la prise électrique consulter un électricien pour faire remplacer la prise obsolète Protéger le cordon d alimentation particulièrement au niveau des fiches des prises de courant et de la sortie du câble de l appareil pour qu il ne soit pas piétin...

Page 37: ...onçus pour fournir une protection raisonnable contre les interférences nuisibles dans un environnement résidentiel L appareil génère utilise et peut émettre des fréquences radio s il n est pas installé et utilisé conformément aux instructions il pourrait provoquer des interférences nuisibles aux communications radio Cependant il n est pas possible de garantir que des interférences ne seront pas pr...

Page 38: ...eurs des pays appliquant les Directives UE Fabricant Sony Corporation 1 7 1 Konan Minato ku Tokyo 108 0075 Japon Pour toute question relative à la conformité des produits dans l UE Sony Deutschland GmbH Hedelfinger Strasse 61 70327 Stuttgart Allemagne ...

Page 39: ...r le recyclage des équipements électriques et électroniques En vous assurant que ce produit sont mis au rebut de façon appropriée vous participez activement à la prévention des conséquences négatives que leur mauvais traitement pourrait provoquer sur l environnement et sur la santé humaine Le recyclage des matériaux contribue par ailleurs à la préservation des ressources naturelles Pour toute info...

Page 40: ...l photo 13 Réglage de la direction de l écran 16 Fixation du parasoleil 16 Utilisation du moniteur Utilisation du moniteur 19 Agrandissement des images 19 Réglage avec le menu 20 Écrêtage 24 Couleur incorrecte 25 Repère du niveau vidéo 27 Aperçu de l image S Log avec une luminosité naturelle S Log Disp Assist 28 Zone d affichage TV Affichage de repères 29 Autres Dépannage 30 Précautions 32 Spécifi...

Page 41: ...on MENU 20 Bouton ZOOM SELECT Bouton d agrandissement 18 Pour afficher le MENU Bouton OK 19 Prise de batterie Bouton de libération de la batterie Prise de casque Vous pouvez y raccorder un casque pourvu d une miniprise stéréo de 3 5 mm pour écouter le son Aucun son n est émis par le haut parleur lorsqu un casque est raccordé HDMI Type A Prise DC IN Douille de trépied Identification des éléments ...

Page 42: ... Cet appareil n est pas étanche à la poussière aux éclaboussures d eau ou à l eau Ne rangez pas cet appareil aux endroits suivants Cet appareil ne doit être ni utilisé ni rangé aux endroits suivants Il risquerait sinon de tomber en panne endroits exposés à la lumière directe du soleil par exemple sur le tableau de bord d une voiture ou près d un appareil de chauffage où l appareil risquerait de se...

Page 43: ...cuments imprimés Fixation de la batterie Les batteries rechargeables Sony des séries M V et W non fournies peuvent être utilisées sur cet appareil Vous ne pouvez pas utiliser d autres batteries qui ne permettent pas à cet appareil de fonctionner correctement Remarques Lorsque la batterie NP QM71D NP QM91D NP FV100 ou NP FV100A est utilisée fixez d abord l appareil photo sur un trépied Adaptateur d...

Page 44: ...a batterie puis faites la glisser dans le sens illustré tout en continuant de pousser Un clic est audible lorsque la batterie se met en place La batterie risque de ne pas être fixée correctement si elle est poussée de biais Pour retirer la batterie Faites glisser la batterie dans le sens illustré tout en poussant le bouton de libération de la batterie dans le sens illustré La batterie se détache d...

Page 45: ...tièrement chargées Elle peut varier selon les conditions de fonctionnement ou les conditions ambiantes Pour vérifier la charge de la batterie Vous pouvez vérifier la charge de la batterie d après la couleur du témoin d alimentation Témoin d alimentation Vert allumé La charge de la batterie est suffisante Rouge allumé La charge de la batterie est faible Rouge clignotement rapide La batterie est déc...

Page 46: ...er un dysfonctionnement Utilisez une prise murale proche lorsque vous utilisez cet appareil Si un problème devait se produire pendant l utilisation de cet appareil débranchez celui ci de la prise murale pour le mettre hors tension Fixation sur l appareil photo Posez l adaptateur de griffe porte accessoire sur cet appareil puis fixez le à l appareil photo Remarque Ne fixez d adaptateur de griffe po...

Page 47: ...prêtez attention aux points suivants Fermez toujours le flash intégré de l appareil photo Si votre appareil photo a une fonction de flash automatique désactivez la Avant d utiliser le flash retirez cet appareil de l appareil photo Assurez vous que cet appareil est bien fixé à l appareil photo avant de l utiliser pour éviter qu il ne tombe pendant la prise de vue 4 Raccordez cet appareil à l appare...

Page 48: ...age Appuyez sur le bouton C1 C2 MENU ou ZOOM SELECT Faites les opérations nécessaires pour qu un signal HDMI soit émis de l appareil photo Rebranchez le câble HDMI et allumez l appareil photo Pour retirer cet appareil de l appareil photo Débranchez le câble HDMI puis retirez cet appareil de la griffe porte accessoire de l appareil photo Tournez la molette de verrouillage de l adaptateur de griffe ...

Page 49: ...anneau supérieur Panneau latéral Réglage de la direction de l écran Le fonctionnement horizontal et vertical de l adaptateur de griffe porte accessoire permet de tourner l écran de cet appareil dans toutes les directions Environ 90 degrés vers l avant ou l arrière Environ 180 degrés vers la gauche ou la droite Remarques Selon la batterie et l appareil photo utilisés cet appareil peut gêner le flas...

Page 50: ... parasoleil vers vous pour le retirer Si les panneaux du parasoleil se détachent du cadre Les panneaux supérieur et latéraux peuvent se détacher du cadre pour éviter qu ils ne se brisent si vous exercez une force dessus Si les panneaux latéraux se détachent du cadre Retirez le panneau supérieur Fixez les panneaux latéraux Suite page suivante ...

Page 51: ...adre Remarques Les panneaux latéraux ne s ouvrent que si l extrémité du ressort faisant saillie est placée correctement dans le renfoncement Si les panneaux ne s ouvrent pas rattachez le ressort de sorte que l extrémité faisant saillie soit dans le renfoncement Si le panneau supérieur se détache du cadre Insérez la saillie du panneau supérieur dans le renfoncement sur le haut du cadre comme illust...

Page 52: ...dre en appuyant sur le bouton d alimentation Remarques Si la résolution d image est inférieure ou égale à 1 920 1 080 l image est automatiquement agrandie fonction de zoom automatique Le format de cet appareil est 16 9 Les images utilisant un autre format risquent de s afficher avec des bandes noires Exemple d image 3 2 Agrandissement des images Vous pouvez agrandir la partie de l image affichée 1...

Page 53: ...le type de signal d entrée la plage d agrandissement peut être restreinte Avec 6 la plage d agrandissement est limitée dans tous les signaux d entrée Avec 3 la plage d agrandissement est limitée dans le signal d entrée de 1080 24p La plage agrandissable La plage non agrandissable L illustration n est qu une représentation Réglage avec le menu Vous pouvez régler les réglages simples tels que le vol...

Page 54: ... sur du bouton ZOOM SELECT pour sélectionner le réglage voulu ou ses détails 5 Appuyez au milieu du bouton ZOOM SELECT Le réglage voulu est enregistré et vous revenez au MENU Remarque Si vous appuyez sur le bouton MENU avant l étape 5 le réglage est annulé L appui sur le bouton MENU masque le MENU si ce dernier est affiché Fonction de prévisualisation Vous pouvez vérifier l effet avant d enregistr...

Page 55: ... à 100 élevé Par défaut 30 Luminosité Réglages 0 sombre à 100 lumineux Par défaut 50 Contraste Réglages 0 doux à 100 net Par défaut 50 Tonalité couleur Phase teinte Réglages 0 vert à 100 violet Par défaut 50 Rétroéclairage Réglages 0 sombre à 5 lumineux Par défaut 5 Température des couleurs réglage de la balance des blancs de l écran Réglages 9300K 7200K 6500K Par défaut 6500K S Log Disp Assist ON...

Page 56: ...ste Page 22 Tonalité couleur Phase teinte Page 22 Rétroéclairage Page 22 Réglages par défaut Écrêtage C1 Couleur incorrecte C2 S Log Disp Assist Type Page 28 Vous pouvez choisir le type de mode S Log Disp Assist Réglages S Log2 S Log3 Par défaut S Log2 Compensation de gain S Log Disp Assist Page 28 Vous pouvez choisir les réglages de compensation de gain du mode S Log Disp Assist Réglages 2 1 0 1 ...

Page 57: ... Éteignez cet appareil Éteignez cet appareil tout en appuyant au milieu du bouton ZOOM SELECT Allumez Appuyez Écrêtage Cette fonction permet d afficher toute l image en noir et blanc et les parties nettes en couleur Elle permet de savoir rapidement quelles sont les parties nettes quelles que soient les conditions de la prise de vue 1 Mémorisez PEAK dans le bouton C1 ou C2 de cet appareil Par défau...

Page 58: ...e Vous pouvez vérifier le niveau de l image entrante dans cet appareil en couleur 1 Mémorisez FC dans le bouton C1 ou C2 de cet appareil FC est mémorisé dans le bouton C2 par défaut Si FC n est pas mémorisé mémorisez le en appuyant sur Réglages avancés C1 ou C2 Page 23 2 Appuyez sur le bouton dans lequel FC est mémorisé L appui sur le même bouton dans l étape 2 ou le bouton MENU permet à l écran d...

Page 59: ... S Log2 Compensation de gain 2 1 0 1 2 Rouge 109 ou plus 98 ou plus 85 ou plus 72 ou plus 60 ou plus Jaune 91 109 78 98 66 85 53 72 41 60 Rose 62 63 49 52 38 40 28 29 19 21 Vert 49 52 37 40 27 30 19 21 12 14 Bleu 3 15 3 10 3 7 3 5 3 4 Violet 3 ou moins Mesure Tableau 3 Niveau de couleur et signal pour la couleur incorrecte S Log Disp Assist Type S Log3 S Log3 Compensation de gain 2 1 0 1 2 Rouge 9...

Page 60: ...70 60 50 Niveau de signal vidéo Avec des réglages plus élevés le niveau de vert tire plus vers le rouge IRE 99 70 1 75 65 Exemple Réglage 70 Rouge Gris Vert Gris Bleu 3 Appuyez sur le bouton C1 ou C2 dans lequel VLM a été mémorisé à l étape 1 Le niveau vidéo s affiche en couleur à l écran LCD de cet appareil L appui sur le même bouton dans l étape 3 ou le bouton MENU permet à l écran de revenir à ...

Page 61: ...l appareil photo raccordé à cet appareil La couleur affichée en mode S Log Disp Assist est simplement transformée Les réglages suivants peuvent être modifiés pendant l affichage de l image en mode S Log Disp Assist Règle la courbe en mode S Log Disp Assist S Log Disp Assist Type Appuyez sur le bouton MENU puis choisissez Réglages avancés S Log Type Choisissez S Log2 ou S Log3 Règle la luminosité e...

Page 62: ...ectionner l une ou l autre selon le format de lecture sur le téléviseur Réglages 80 16 9 90 16 9 80 4 3 90 4 3 16 9 4 3 Le repère extérieur correspond à 90 et le repère intérieur correspond à 80 Remarques Le réglage de cet appareil n est destiné que pour les images affichées sur l écran et n affecte pas les images réelles Lors de l affichage du MENU et à l utilisation des fonctions suivantes l écr...

Page 63: ...ge 13 La batterie non fournie se libère Installez la correctement Page 11 Aucune image n apparaît sur l écran de cet appareil L appareil photo est en mode d économie d énergie Activez une fonction d appareil photo par exemple appuyez sur le déclencheur pour quitter le mode d économie d énergie Le câble HDMI est débranché Rebranchez le correctement Page 14 Reportez vous au mode d emploi de l appare...

Page 64: ...vous au mode d emploi de votre appareil photo Impossible d enregistrer Certains appareils photo basculent en mode de lecture lorsqu ils sont raccordés à cet appareil Mettez l appareil photo en mode de prise de vue avant la prise de vue L écran est difficile à voir Utilisez le parasoleil pour bloquer la lumière du soleil Page 16 Si l écran est sombre reportez vous à la section Rétroéclairage Page 2...

Page 65: ...ge résiduelle peuvent apparaître sur l écran Il ne s agit pas d une défectuosité Lorsque le moniteur devient chaud l écran redevient normal Précautions Si une image fixe ou si une photo est affichée pendant un certain temps une image peut rester sur l écran et être superposée comme image fantôme L écran et le coffret peuvent devenir chauds en cours d utilisation Il ne s agit pas d une défectuosité...

Page 66: ...uent d endommager la surface de l écran Nettoyage du coffret Nettoyez doucement le coffret avec un chiffon sec et doux L alcool le benzène et les diluants ou insecticides peuvent endommager la finition du coffret ou effacer les marques sur le coffret N utilisez pas ces produits chimiques Le coffret peut être rayé si vous le frottez avec un chiffon sale La finition du coffret peut se détériorer ou ...

Page 67: ...atteries de la série V de Sony NP FV50 NP FV70 NP FV100 Spécifications 7 4 V CC Batteries de la série V de Sony NP FV100A 7 6 V CC AC PW10AM Consommation Environ 5 5 W Dimensions environ l h p 139 mm 100 mm 23 1 mm 5 1 2 po 4 po 15 16 po parties saillantes non comprises Poids Environ 270 g appareil uniquement 9 6 oz Température de fonctionnement Environ 0 C à 40 C 32 F à 104 F Température d entrep...

Page 68: ...83 60 Progressive 16 9 4 3 640x480 60p 525 480 60 Progressive 4 3 575 50i PAL 625 575 25 2 1 interlacée 16 9 4 3 576 50p 625 576 50 Progressive 16 9 4 3 720 50p 750 720 50 Progressive 16 9 720 60p 750 720 60 Progressive 16 9 1080 50i 1 125 1 080 25 2 1 interlacée 16 9 1080 60i 1 125 1 080 30 2 1 interlacée 16 9 1080 24p 1 125 1 080 24 Progressive 16 9 1080 50p 1 125 1 080 50 Progressive 16 9 1080 ...

Page 69: ... 2015 Sony Corporation Printed in China ...

Reviews: