background image

DISPLAY UNIT

CLX101ASA

SERVICE MANUAL
1st Edition (Revised 2)

Summary of Contents for CLX101ASA

Page 1: ...DISPLAY UNIT CLX101ASA SERVICE MANUAL 1st Edition Revised 2 ...

Page 2: ...Ce manual est destiné uniquement aux personnes compétentes en charge de l entretien Afin de réduire les risques de décharge électrique d incendie ou de blessure n effectuer que les réparations indiquées dans le mode d emploi à moins d être qualifié pour en effectuer d autres Pour toute réparation faire appel à une personne compétente uniquement 安全のために 周辺機器を接続する際は 過大電圧を 持つ可能性があるコネクターを以下のポートに接続し ないで...

Page 3: ...tem Error 3 6 E 3 2 5 Cell Trouble Without Power System Error 3 6 E 3 2 6 Temperature Error 3 7 E 3 2 7 Display Unit System Error 3 8 E 3 3 Error Indication 3 9 E 3 3 1 Error Indication by Indicator 3 9 E 3 3 2 Error Indication on Display Control Software 3 11 E 3 3 3 Error Indication on Color Uniformity Alignment Software 3 11 E 3 3 4 Error Code List 3 12 E 3 3 5 Warning Code List 3 17 E 4 Replac...

Page 4: ...e Parts 7 1 Notes on Repair Parts 7 1 7 2 Exploded Views 7 2 Cover 7 2 Main Board 7 4 Cell Base and Joint Unit 7 6 Harness 7 8 7 3 Packing Materials Supplied Accessories 7 9 8 Frame Wiring Frame Wiring 8 1 Revision History ...

Page 5: ... Manual available on request CLF102AKA Service Manual available on request This manual describes the information on the premise of providing the block level service such as service overview troubleshooting replacement of parts software update circuit description and spare parts of the display controller Manual for Color Uniformity Alignment Software available on request This manual describes the i...

Page 6: ......

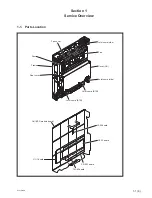
Page 7: ...1 Service Overview 1 1 Parts Location UC 1 board TM 62 board UP 13 board PS 903 board Cell LED module board Joint coma side Joint coma BTM Frame Fan cover Cover GU Rear cover UI 24 board Fan Fan Joint coma side Joint coma BTM ...

Page 8: ...formation PS 903 TH001 1 804 045 11 Thermistor UC 1 TH2501 1 803 353 21 Positive characteristic thermistor Holding current 0 14 A 20dC TH2502 1 803 353 21 Positive characteristic thermistor Holding current 0 14 A 20dC UP 13 TH001 1 803 615 21 Positive characteristic thermistor Holding current 0 50 A 20dC TH002 1 771 845 21 Positive characteristic thermistor Holding current 0 20 A 20dC TH003 1 802 ...

Page 9: ... Board 1 3 1 PS 903 Board Ref No Color Name Function D1011 Green 16V Lit A voltage of 16 V is output Off A voltage of 16 V is not output D2004 Orange 12V Lit A voltage of 12 V is output Off A voltage of 12 V is not output PS 903 board side A D2004 D1011 ...

Page 10: ...16V_RDY_STATUS is High Display unit is in power ON state Off 16V_RDY_STATUS is Low Display unit is in standby mode D2517 Green 16V_RDY Lit 16V_RDY is High Display unit is in power ON state Off 16V_RDY is Low Display unit is in standby mode D2518 Green VDD1 Lit The voltage VDD1 is output It is output even with one system Off The voltage VDD1 is not output D2519 Green VDD2 Lit The voltage VDD2 is ou...

Page 11: ...07 to D3010 Red Lit During system setup The power is standby state _ Off The picture is displayed normally The power is not supplied _ Blink _ System error System warning UI 24 board side B D3010 D3009 D3008 D3007 D3001 D3002 D3003 D3004 D3005 D3006 Connector on the side A ...

Page 12: ...rmally Off VDD1_10 and VDD2_10 do not supply the power to the cell 11 D1610 Cell driving power supply output 12 Lit VDD1_9 and VDD2_9 are supplying the power to the cell 12 normally Off VDD1_9 and VDD2_9 do not supply the power to the cell 12 D1611 Cell driving power supply output 4 Lit VDD1_1 and VDD2_1 are supplying the power to the cell 4 normally Off VDD1_1 and VDD2_1 do not supply the power t...

Page 13: ...uctive surface of the flexible flat cable is not contaminated Flexible flat cable on the UC 1 board Prepare the following tool for disconnecting the flexible flat cable FFC remover Part number 4 689 815 01 Disconnecting 1 Insert the FFC remover between the lock and the flexible flat cable and then lower the FFC remover in the direction of the arrow A to open the lock 2 Remove the flexible flat cab...

Page 14: ...ble flat cable on the skew Do not overlap the flexible flat cable on the guides on the left and right sides Flexible flat cable on the cell Connecting 1 Raise the lock in the direction of the arrow A 2 Insert the flexible flat cable as far as it will go 3 Lower the lock Flexible flat cable Guide OK NG Guide Guide Guide NG NG ...

Page 15: ... Uniformity Alignment Software contact your local Sony Service Center _ Fall prevention tape T4082S made by Dexerials is recommended Attaching cell temporally in cell assembly replacement The four tapes with 80 mm length are required _ Digital caliper Resolution 0 01 mm or less Measuring the thickness of cell in cell assembly replacement 1 6 Lead free Solder All boards mounted in this unit use lea...

Page 16: ...mpletely Defective pixels The panel fitted to this unit is manufactured with high precision technology giving a functioning pixel ratio of at least 99 99 Thus a very small proportion of pixels may be stuck either always off black always on red green or blue or flashing In addition such stuck pixels may appear spontaneously over a long period of use due to the physical characteristics of the organi...

Page 17: ...mber of pcs Replacement period PS 903 board A 2117 217 B 1 20 000 hours However when the operating time does not reach 20 000 hours at the point of three years of use replace it at that point Fan 1 855 395 12 2 20 000 hours However when the operating time does not reach 20 000 hours at the point of three years of use replace it at that point How to check 20 000 hours You can check 20 000 hours on ...

Page 18: ... is very dirty use ethyl alcohol nearly 100 Do not use other solvent other than the ethyl alcohol For the contamination of joint portion use the anti static air blaster that is commercially available 2 2 2 Air Intake Hole Exhaust Hole Fan Clean the dust adhered to the air intake holes and exhaust holes and around the fans periodically The recommended timing of cleaning is once a year Fan Fan Exhau...

Page 19: ...with the display controller incorporated in the system 3 1 First Step When a Trouble Occurs Take a picture or a video of the trouble s screen display Fill out information on the trouble in the Field Quality Information System Form E Mail the picture or the video and the Field Quality Information System Form to your local Sony Service Center ...

Page 20: ... light in green Is a test pattern displayed correctly in the System Settings Screen of the Display Control Software Check the connection of the cables of the display unit Does the cell have the following malfunctions Flashing line Black line Disappearing part of cell Always on pixel or flashing pixel more than specifications Go to Section 3 2 3 Yes Go to A No Yes Do the POWER indicators of all dis...

Page 21: ... symptom improved No No Yes Yes End A D Go to Section 3 2 2 Cables to be checked Connection between display unit and display controller Connection between display units with each other Is No Signal displayed in Input Signal Status on the Input Settings screen of the Display Control Software A trouble in a display controller Refer to Section 3 Troubleshooting in the Service Manual of the display co...

Page 22: ...s the status indicator of unit disappear Yes Does the indicator D2004 2 on the PS 903 board disappear Replace the PS 903 board Replace the UC 1 board The reading writing of the data is also necessary 3 No No Does the status indicator of unit light in yellow or red No No Go to Section 3 2 4 No Go to Section 3 2 6 Go to Section 3 2 7 End End End 1 Cables to be checked Connection between display unit...

Page 23: ...board 2 Refer to the Manual for Color Uniformity Alignment Software Section 3 2 3 Refer to the Manual for Color Uniformity Alignment Software Section 3 3 End Yes No Yes No Check the connection of the harness between the cell and signal board 1 and then connect it correctly or replace it Check points Flexible Flat Cable FFC terminal surface is not broken FFC is connected correctly not skew insertio...

Page 24: ...ode displayed on the Color Uniformity Alignment Software and refer to 3 3 4 Error Code List in this manual 2 Refer to the Manual for Color Uniformity Alignment Software Section 3 2 3 Refer to the Manual for Color Uniformity Alignment Software Section 3 3 End Yes Is the symptom improved End End Yes Yes Is the symptom improved Replace the cell The reading writing of the data is also necessary 5 No N...

Page 25: ...hen the displayed error code is 110 or 310 the error is eliminated Is the displayed error code 315 or 316 Yes No No No Yes Replace the cell The reading writing of the data is also necessary 1 Is the displayed error code 113 or 313 Yes Replace the UC 1 board The reading writing of the data is also necessary 2 1 Refer to the Manual for Color Uniformity Alignment Software Section 3 2 2 Refer to the M...

Page 26: ...played on the Display Control Software 102 121 The following error code is displayed on the Display Control Software 104 Is the following connection communication error code displayed on the Color Uniformity Alignment Software ŶƑ 1 Check the connection of the harness between the cell and signal board 3 and between the UC 1 board and TM 62 board and then connect it correctly or replace it Check poi...

Page 27: ...ndicator When an abnormality occurs in the display unit the status indicator blinks When the status indicator starts blinking identify the error warning from the Display Unit Information screen of the Display Control Software Refer to Section 3 3 2 Status indicator ...

Page 28: ...ication error has occurred The LAN cable is abnormal The video signal is not input correctly Red Three times The temperature error has occurred The temperature of the UC 1 board exceeds the upper limit The ambient temperature exceeds the upper limit The cell temperature exceeds the upper limit Red Four times An error has occurred in the UC 1 board UP 13 board cell An error has occurred in the wiri...

Page 29: ...ould be resolved as soon as possible 3 3 3 Error Indication on Color Uniformity Alignment Software Color Uniformity Alignment Software enables you to obtain more detailed error information than Display Control Software For details on how to display the error information refer to the Manual for Color Uniformity Alignment Software An error occurred A warning occurred Position of display unit Error c...

Page 30: ...e or the fan is not blocked Lower the temperature around the array Replace the cell 113 31 113 34 113 11 113 14 1 2 3 4 5 6 7 8 9 0 Front view 113 11 Symptom Cause Temperature of the cell of 1 shown in the figure on the left in the top line and first from the left viewed from the front is abnormal Remedy Check if the air intake hole or the fan is not blocked Lower the temperature around the array ...

Page 31: ...from the left viewed from the front is abnormal Remedy Check if the air intake hole or the fan is not blocked Lower the temperature around the array Replace the specified cell 113 31 Symptom Cause Temperature of the cell of 9 shown in the figure on the left in the bottom line and first from the left viewed from the front is abnormal Remedy Check if the air intake hole or the fan is not blocked Low...

Page 32: ...ormality other than 121 11 to 121 15 was detected in the UC 1 board Remedy Replace the UC 1 board 122 _ Symptom Cause The UP 13 board or cell 1 to 12 is abnormal Remedy Replace the UP 13 board Replace the cell Replace the UC 1 board 122 31 122 34 122 11 122 14 1 2 3 4 5 6 7 8 9 0 Front view 122 11 Symptom Cause The UP 13 board or the power supply of the cell of 1 shown in the figure on the left in...

Page 33: ...e on the left in the middle line and fourth from the left viewed from the front is abnormal Remedy Replace the UP 13 board Replace the specified cell Replace the UC 1 board 122 31 Symptom Cause The UP 13 board or the power supply of the cell of 9 shown in the figure on the left in the bottom line and first from the left viewed from the front is abnormal Remedy Replace the UP 13 board Replace the s...

Page 34: ...l is pulled out or broken Remedy Check if the cable is not loosened or pulled out Check if there is any breaking of cable 130 21 Symptom Cause A communication between the display controller and the display unit is abnormal Remedy Check if the LAN cable is not loosened or pulled out Check if there is any breaking of LAN cable Once change the connection of a port UNIT OUTPUT on the display controlle...

Page 35: ...e of the cell of 1 shown in the figure on the left in the top line and first from the left viewed from the front is abnormal Remedy Check if the air intake hole or the fan is not blocked Lower the temperature around the array Check the temperature of the cell If the temperature is abnormal replace the specified cell 313 12 Symptom Cause Temperature of the cell of 2 shown in the figure on the left ...

Page 36: ... the air intake hole or the fan is not blocked Lower the temperature around the array Check the temperature of the cell If the temperature is abnormal replace the specified cell 313 31 Symptom Cause Temperature of the cell of 9 shown in the figure on the left in the bottom line and first from the left viewed from the front is abnormal Remedy Check if the air intake hole or the fan is not blocked L...

Page 37: ...replace the fan For details on the check method of the operating time refer to Display unit information in 6 5 Main Screen in the Installation Manual 315 13 Symptom Cause The fan performance on the right side when viewed from rear is degraded Remedy Check if the air intake hole or the fan is not blocked Check the operating time of the display unit If the operating time reaches the replacement peri...

Page 38: ... temperature is not abnormal If it is abnormal replace the UP 13 board Connection Communication 330 _ Symptom Cause A communication error has occurred The LAN cable is abnormal The video signal is not input correctly The communication block on the UC 1 board is defective Remedy Replace the LAN cable Replace the UC 1 board Check if the video signal format that has been input from the display contro...

Page 39: ... 340 340 00 Symptom Cause During system update of the display unit Remedy Warning code will disappear when the update is correctly complete 350 350 00 Symptom Cause During operation in recovery mode Remedy Warning code will disappear when the display unit operates in normal mode ...

Page 40: ......

Page 41: ...fore Replacement 4 1 1 Guide of Removal Start of removal TM 62 board Rear cover assembly UI 24 board UP 13 board UC 1 board Cell LED module board Fan PS 903 board Viewing the schematic diagram Removal of parts Replacement of parts UP 13 board and UC 1 board integrated block ...

Page 42: ...hed to the rear cover When the screw that secures the cover is loosened the screw drops from the cover Even though the screw that secures the cover is loosened the screw is retained without dropping from the cover Rear cover Rear cover Rear cover Screw captivating measure has been taken Rear cover Screw captivating measure has not been taken The cylindrical parts are attached to the twelve screw h...

Page 43: ... 6 0 1 N m PSW3 x 8 except for cell assembly 0 6 0 1 N m PSW3 x 8 for cell assembly 0 8 0 1 N m B3 x 10 0 6 0 1 N m PSW3 x 30 0 6 0 1 N m M4 x 8 1 2 0 1 N m Hexagonal bolt M5 x 14 3 0 0 3 N m When using the torque driver with the notation of cN m interpret it as follows Example 0 8 N m 80 cN m ...

Page 44: ...ts Refer to Section 4 1 2 1 Remove the two screws PSW3 x 8 Or loosen the two screws B3 x 10 with drop prevention 2 Open the fan cover in the direction of the arrow then disconnect the two harnesses from the relay connector Screws In this illustration the screw captivating measure has not been taken Relay connector Harnesses Fan cover ...

Page 45: ...A 3 Remove the four screws then remove the two fans 4 To install reverse the removal procedure n When attaching the fans attach them in the direction as shown in the picture Fans PSW3 30 PSW3 30 Label sides Harnesses ...

Page 46: ... 1 2 1 Remove the three screws PSW3 x 8 Or loosen the three screws B3 x 10 with drop prevention 2 Open the cover GU in the direction of the arrow then disconnect the three harnesses from the connectors CN101 CN1001 and CN2002 on the PS 903 board Screws In this illustration the screw captivating measure has not been taken CN2002 CN1001 PS 903 board CN101 Cover GU ...

Page 47: ...4 7 E CLX101ASA 3 Remove the five screws 4 Remove the hook then remove the PS 903 board 5 To install reverse the removal procedure PS 903 board Cover GU PSW4 8 PSW4 8 Hook PS 903 board ...

Page 48: ...e screw captivating measure has been taken or not in the rear parts Refer to Section 4 1 2 A part of the rear cover assembly is easily deformed Do not hold the blocks shown in the figure Do not hold these blocks In this illustration the screw captivating measure has not been taken ...

Page 49: ... cover assembly as shown in the picture 3 Disconnect the three harnesses from the connectors CN001 and CN002 on the UP 13 board and connector CN1501 on the UC 1 board UC 1 board Harnesses UP 13 board CN002 CN001 CN1501 Rear cover assembly Screws Screws Screws Screws In this illustration the screw captivating measure has not been taken ...

Page 50: ...the display unit being repaired 5 To install reverse the removal procedure Rear cover assembly Rear cover assembly Rear cover assembly When hanging the hook on the handle lower of the display unit being repaired In this illustration the screw captivating measure has not been taken In the case of hanging the hook on the handle lower of the display unit being repaired In the case of hanging the hook...

Page 51: ...move the rear cover assembly Refer to Section 4 5 2 Disconnect the harness from the connector CN001 on the TM 62 board 3 Remove the screws then remove the TM 62 board 4 To install reverse the removal procedure TM 62 board Harness CN001 PSW3 8 TM 62 board ...

Page 52: ...efer to Section 4 5 2 Disconnect the harness from the connector CN100 on the UI 24 board 3 Remove the two screws then remove the UI bracket 4 Remove the UI 24 board from the UI bracket 5 To install reverse the removal procedure UI 24 board CN100 Harness PSW3 8 UI bracket UI 24 board ...

Page 53: ...r to Section 4 5 2 Disconnect the eight harnesses from the connectors CN101 CN102 and CN1501 to CN1506 on the UP 13 board 3 Remove the four screws then remove the UP 13 board CN1501 CN1502 CN1505 CN102 CN101 CN1503 CN1504 CN1506 Harnesses Harness Harnesses UP 13 board PSW3 8 UP 13 board ...

Page 54: ...e lifted because the harness is pulled When installing the harness into the connector CN101 push in both sides of the plug of the har ness Fully fitted position After installing the UP 13 board check that either or both sides of the plug of the harness connected to the connector CN1507 on the UC 1 board are not lifted Plug Plug CN101 CN1507 Harness Wiring diagram UC 1 board UP 13 board CN101 Plug ...

Page 55: ...rocedure 1 Remove the rear cover assembly Refer to Section 4 5 2 Disconnect the twelve flexible flat cables from the connectors CN7501 to CN7506 and CN8001 to CN8006 on the UC 1 board n For disconnecting connecting the flexible flat cable refer to Section 1 4 Flexible flat cables TOP Flexible flat cables BTM UC 1 board CN7501 CN7502 CN7503 CN7504 CN7505 CN7506 CN8001 CN8002 CN8003 CN8004 CN8005 CN...

Page 56: ...nect the ten harnesses from the connectors CN8501 to CN8503 CN8507 to CN8510 CN8515 CN8517 and CN2509 on the UC 1 board Harnesses Harnesses Harnesses Harnesses UC 1 board CN1501 CN1502 CN1505 CN1503 CN1504 CN1506 CN8501 CN8515 CN8503 CN2509 CN8517 CN8507 CN8508 CN8509 CN8510 CN8502 Harnesses Harnesses UP 13 board ...

Page 57: ...the connectors CN1507 and CN1509 on the UC 1 board 7 Remove the four screws then remove the UP 13 board 8 Remove the four screws then remove the UP bracket 9 Peel off the radiation sheet FPGA UP 13 board and UC 1 board integrated block PSW 3 8 UC 1 board Radiation sheet FPGA Harnesses UP 13 board UP bracket CN1507 CN1509 PSW 3 8 PSW 3 8 ...

Page 58: ...ause the harness is pulled When installing the harness into the connector CN1507 push in both sides of the plug of the harness Fully fitted position After installing the UC 1 board check that either or both sides of the plug of the harness connected to the connector CN101 on the UP 13 board are not lifted Procedure after replacement Write the data to the UC 1 board Operate the Color Uniformity Ali...

Page 59: ...he display unit by using Color Uniformity Alignment Software The 12 cell assemblies constitute one display unit In this section the cell assemblies are called upper cell assembly middle cell assembly and lower cell assembly depending on the position they are installed When replacing the middle cell assembly or lower cell assembly place the UC 1 board in the service position Refer to Preparation on...

Page 60: ...the four harnesses from the connectors CN2509 CN8503 CN8515 and CN8517 and four flexible flat cables from the connectors CN8003 to CN8006 on the UC 1 board n For disconnecting connecting the flexible flat cable refer to Section 1 4 Harnesses Harnesses Harnesses UC 1 board CN8515 CN8503 CN2509 CN8517 CN8003 CN8004 CN8005 CN1505 CN8006 CN1502 UP 13 board Flexible flat cables ...

Page 61: ...4 21 E CLX101ASA 3 Remove the six screws 4 Open the UC 1 board in the direction of the arrow then secure it with the support plate PSW 3 8 Support plate UC 1 board Secure by hanging on the hook ...

Page 62: ... 5 Hexagonal bit subtense 3 Bit for 2 mm Bit for 2 6 mm Bit for 3 mm 1 Tightening for M3 screws X 2593 980 1 Guide pin 2 Guide and support for cell assembly Two guide pins are required for cell assembly replacement 4 689 815 01 FFC remover 1 Removing the flexible flat cable on UC 1 board _ Color Uniformity Alignment Soft ware _ Writing the data For obtaining Color Uniformity Alignment Soft ware co...

Page 63: ...4 23 E CLX101ASA How to open the package 1 Open the box and take the accessories out of the box Flexible flat cable X shim Y shim Box Z shim t0 04 Z shim t0 08 Z shim t0 12 Z shim t0 20 USB memory ...

Page 64: ...4 24 E CLX101ASA 2 Open the inner lid and take the cell assembly RP out of the box Cell assembly RP Inner lid ...

Page 65: ...4 25 E CLX101ASA 3 Remove the four cushions 4 Remove the lower tray Cell assembly RP Cushion Cushion Cushion Cushion Lower tray Upper tray ...

Page 66: ... for repair from the upper tray n Remove the cell assembly for repair on the soft sheet When placing the cell assembly on the table Place it on the lower tray removed in step 4 in How to open the package PSW 3 8 Washers Upper tray Cell assembly for repair Lower tray Cell assembly for repair ...

Page 67: ...embly to be replaced then push the cell assembly with guide pins toward the front side of display unit Tighten the screws of the cell assembly for repair Connect the harnesses Install the rear cover assembly Attach the Z shims to the cell assembly for repair to match the thickness of cell assembly for repair to that of the removed cell assembly Connect the flexible flat cables to the cell assembly...

Page 68: ...nit Y shim Insert the shim into the clearance bend it and then attach it to the next cell Insert the shim into the clearance bend it and then attach it to the next cell Y shim X shim Cell end reference 0 to 3 mm Cell end reference 1 to 4 mm Cell end reference 0 to 3 mm Cell assembly to be replaced Y shim X shim X shim Cell end reference 1 to 4 mm ...

Page 69: ...aration described above 4 Disconnect the two harnesses from the cell assembly 5 Disconnect the flexible flat cable connected to the removed cell assembly from the connector on the UC 1 board n For disconnecting connecting the flexible flat cable refer to Section 1 4 6 When replacing the upper cell assembly remove the cable clamps Harnesses UC 1 board Cell assembly Flexible flat cable Cable clamp C...

Page 70: ...4 30 E CLX101ASA 7 Remove the two screws 8 Rotate the grips A of the two guide pins as far as they will go PSW 3 8 Cell assembly Guide pins Inserting position Grip A Grip B ...

Page 71: ...4 31 E CLX101ASA 9 Insert the two guide pins into the two screw holes then rotate the grips B to attach them n Do not rotate the grips A Cell assembly Grips A Grips B Guide pins ...

Page 72: ...With the grip B in one hand rotate the grip A with the other hand in the direction of the arrow to secure each guide pin to the cell assembly 11 Remove the four screws PSW 3 8 Cell assembly Grips A Grip B Grip B Guide pins ...

Page 73: ...e cell assembly from the front side of panel in the direction of the arrow 2 14 Remove the guide pins t Place the cell assembly on the lower tray Refer to When placing the cell assembly on the table in this section Front side of panel Front side of panel Cell assembly Cell assembly Guide pin Guide pins 1 1 2 Guide pins Frame hole of display unit Groove ...

Page 74: ...of the cell assembly for repair t Copy the following entry sheet and note the values 2 5 1 4 3 6 Thickness of removed cell assembly Thickness of cell assembly for repair Difference 1 Thickness of removed cell assembly Thickness of cell assembly for repair Difference 2 Thickness of removed cell assembly Thickness of cell assembly for repair Difference 3 Thickness of removed cell assembly Thickness ...

Page 75: ...im 4 types 0 04 0 08 0 12 0 2 0 0 021 to 0 060 0 to 0 020 1 1 0 061 to 0 100 1 1 0 101 to 0 140 1 1 0 141 to 0 180 1 1 2 0 181 to 0 220 1 1 0 221 to 0 260 1 1 2 0 261 to 0 300 1 1 2 0 301 to 0 340 1 1 2 0 341 to 0 380 1 1 1 3 0 381 to 0 420 2 2 0 421 to 0 460 1 2 3 0 461 to 0 500 1 2 3 0 501 to 0 540 1 2 3 0 541 to 0 580 1 1 2 4 0 581 to 0 620 3 3 0 621 to 0 660 1 3 4 0 661 to 0 700 1 3 4 0 701 to...

Page 76: ...ower tray of the cell assembly RP Check that there is no dirt such as dust and oil on the surface to which the tape is affixed Push the Z shims to the opposite side of the screw holes and attach them t When attaching two or more shims to one screw hole you can attach them in any order Lower tray Cell assembly for repair Tape Z shim Screw hole ...

Page 77: ...ect the appropriate flexible flat cable Flexible flat cable of the same length as that of the removed cell assembly Flexible flat cable of the same direction as that of the removed cell assembly t For details on how to connect the flexible flat cable refer to Section 1 4 Insulation surface Flexible flat cable supplied with cell assembly RP Cell assembly for repair Lower tray Cell UC 1 board Line i...

Page 78: ...e pins are in the inserting position attach the guide pins to the cell assembly for repair 21 Insert the cell assembly for repair into the position in which it is installed Cell assembly for repair Lower tray Guide pins Front side of panel Cell assembly for repair ...

Page 79: ...mbly for repair as shown in the figure For the cell assembly at the lowest in the array or at the side end in the array refer to the next page n Make sure that the cell assembly for repair does not overlap with the next cell assemblies Display unit Fall prevention tapes ...

Page 80: ... cell assembly at a position Display unit Display unit Display unit Display unit Do not attach the fall prevention tape to the cell assembly s part which is not in contact to other cell assemblies Do not attach the fall prevention tape to the side edge of the cell assembly Cell assembly for repair Cell assembly for repair Cell assembly for repair Secure the cell assembly with the fall prevention t...

Page 81: ...rrow 1 rotate the grips A in the direction of the arrow 2 to secure the cell assembly for repair 24 Tighten the four screws of the cell assembly for repair 25 Remove the two guide pins PSW 3 8 Cell assembly for repair Grips A Grip B 1 2 Grip B Guide pins Cell assembly for repair Guide pins ...

Page 82: ...4 42 E CLX101ASA 26 Attach the two screws to the holes from which the guide pins have been removed PSW 3 8 Cell assembly for repair ...

Page 83: ...29 Remove the fall prevention tapes X shims and Y shims Procedure after replacement Write the data in the USB memory supplied with the cell assembly for repair to the display unit Refer to the Manual for Color Uniformity Alignment Software For obtaining Color Uniformity Alignment Software and its manual contact your local Sony Service Center Display unit Fall prevention tapes X shim Y shim Y shim ...

Page 84: ......

Page 85: ...1ASA Section 5 Software Update The software of display unit is updated using the display controller For details on the update procedure refer to the Service Manual of the display controller CLF101AKA or CLF102AKA ...

Page 86: ......

Page 87: ...deo signal and control signal are transmitted to the display unit in the later stage through the category 7 cable 6 3 Board Functions 6 3 1 Board Functions Board name Function name Function PS 903 AC Power Supply Power supply for unit drive 12 V DC 16 V DC TM 62 Temperature Sensor Surrounding temperature sensor UC 1 System Control Video Signal Processing Unit input 1 pc Unit output 1 pc Picture co...

Page 88: ...ll board driving The UP 13 board constitutes twelve power supply circuits and supplies power independently for each cell The UP 13 board also supplies power to the fan 6 3 4 PS 903 Board The PS 903 board is an AC DC power supply board used for power supply to the display unit An input voltage is 200 V AC to 240 V AC An output voltage is 12 0 V DC and 16 0 V DC 6 3 5 UI 24 Board The UI 24 board is ...

Page 89: ...y and improvement 3 Stock of Parts Parts marked with o at SP Supply Code column of the spare parts list may not be stocked Therefore the delivery date will be delayed 4 Harness Harnesses with no part number are not registered as spare parts Section 7 Spare Parts 7 1 補修部品注意事項 1 安全重要部品 警告 印のついた部品は安全性を維持するために重要 な部品です したがって 交換する時は必ず指定 の部品を使ってください 2 部品の共通化 ソニーから供給する補修用部品は セットに使われて いるものと異なることがあります これは部品...

Page 90: ...6 20 17 18 11 7 6 K3 10 K3 10 If the captive screw is not used 1 refer to the next page If the captive screw is not used 1 refer to the next page If the captive screw is not used 1 refer to the next page To UC 1 board A A To UP 13 board 1 To check whether the captive screw is used or not refer to Section 4 1 2 ...

Page 91: ... 576 11 s RIVET 11 4 098 147 41 s CLAMP 12 X 2595 250 1 s COVER REAR ASSY 13 X 2595 252 1 s COVER FAN ASSY 14 X 2595 251 1 s COVER GU ASSY 15 4 585 902 01 s PLATE TALLY 16 16 16 14 1 1 1 13 12 In the case that the captive screw is not used 1 If the captive screw is not used in the parts before replacement replace the three parts No 12 to No 14 at the same time No Part No SP Description 16 2 580 59...

Page 92: ...101ASA Main Board 104 103 102 107 107 107 107 105 106 111 110 108 109 112 106 106 105 105 106 105 101 112 112 112 112 112 112 113 To PS 903 board To PS 903 board A E I J K L I J K L F G H E F G H B C D A B C D ...

Page 93: ...LETE PC 105 1 849 845 11 s CABLE FLEXIBLE FLAT DS TOP 106 1 849 846 11 s CABLE FLEXIBLE FLAT DS MID 107 1 849 847 11 s CABLE FLEXIBLE FLAT DS BTM 108 1 971 247 11 s HARNESS UC UP SYS_30P 30 01 109 1 971 248 11 s HARNESS UC UP SYS_50P 40 01 110 1 971 252 13 s HARNESS UC TM UI 01 111 3 225 496 01 o CLAMP FLAT CLAMP 45 112 2 580 593 01 s SCREW PSW M3X8 113 4 588 771 01 s SHEET RADIATION FPGA ...

Page 94: ...and Joint Unit 207 209 205 205 202 202 202 202 202 205 207 205 207 207 208 202 201 210 1 2 3 4 5 6 7 8 9 0 204 203 203 203 203 204 204 204 K4 10 K4 10 208 208 View on arrow A View on arrow B View on arrow B A B PSW3 6 PSW 3 6 ...

Page 95: ...l Sony Service Center 202 2 580 593 01 s SCREW PSW M3X8 203 4 098 147 31 s CLAMP 204 4 098 147 41 s CLAMP 205 4 579 773 01 s CAM JOINT 207 4 587 753 11 s HEXAGON BOLT M5X14 208 2 580 592 01 s SCREW PSW M3X8 209 4 724 170 01 s COMA JOINT SIDE 210 4 724 169 01 s COMA JOINT BTM 7 682 262 09 s SCREW K 4X10 7 682 947 09 s SCREW PSW 3X6 ...

Page 96: ...ss 301 303 303 302 302 303 301 301 301 UC 1 Board Clamp UP 13 Board Top side No Part No SP Description 301 1 971 244 12 s HARNESS UC PWG TOP 01 302 1 971 245 12 s HARNESS UC PWG BTM 01 303 1 971 246 12 s HARNESS UC REF 01 ...

Page 97: ...7 9 CLX101ASA 7 3 Packing Materials Supplied Accessories PACKING MATERIALS SUPPLIED ACCESSORIES Ref No or Q ty Part No SP Description 3pcs 4 262 708 04 s CLAMPER CABLE ...

Page 98: ......

Page 99: ...2 CN1001 CN2002 CN101 CN103 CN104 CN102 J1001 J1002 IN OUT Cell No Front side view CN001 CN100 UC PWG TOP 01 UC PWG TOP 01 UC PWG TOP 01 UC REF 01 UC REF 01 UC REF 01 UP PS PNL 140 01 UC TM UI 01 CN002 Fan 2 AC OUT AC IN HARNESS OUTLET FFC FPC 64P BTM 1 2 3 4 5 6 7 8 9 10 11 12 CN103 CN104 CN102 CN103 CN104 CN102 CN103 CN104 CN102 CN103 CN104 CN102 CN103 CN104 CN102 CN103 CN104 CN102 CN103 CN104 C...

Page 100: ......

Page 101: ...ploded Views Additions 1 7 Precautions on Display Unit Modifications of the exploded view Cell Base and Joint Unit 2018 7 Revised 2 9 976 961 03 Modifications 3 Troubleshooting 4 1 General Information before Replacement 4 2 Tightening Torque 4 3 Replacement of Fan 4 4 Replacement of PS 903 Board 4 5 Removal of Rear Cover Assembly 4 8 Replacement of UP 13 Board 4 9 Replacement of UC 1 Board Additio...

Page 102: ......

Page 103: ......

Page 104: ...Sony Corporation CLX101ASA SY CLX101ASA CN J E 9 976 961 03 Printed in Japan 2018 7 32 2016 ...

Reviews: