4-10 (E)
CLX101ASA
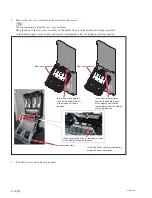
4. Remove the rear cover assembly in the direction of the arrow.
t
You can temporarily place the rear cover assembly.
Hang the hook of the rear cover assembly on the handle (lower) of the display unit being repaired or
on the handle (upper) of the display unit located immediately below the display unit being repaired.
5. To install, reverse the removal procedure.
Rear cover assembly
Rear cover assembly
Rear cover assembly
When hanging the hook on the handle (lower)
of the display unit being repaired
In this illustration, the screw captivating
measure has not been taken.
In the case of hanging the
hook on the handle (lower)
of the display unit being
repaired
In the case of hanging the
hook on the handle (upper)
of the display unit located
immediately below the display
unit being repaired
Summary of Contents for CLX101ASA
Page 1: ...DISPLAY UNIT CLX101ASA SERVICE MANUAL 1st Edition Revised 2 ...
Page 6: ......
Page 40: ......
Page 84: ......
Page 86: ......
Page 98: ......
Page 100: ......
Page 102: ......
Page 103: ......
Page 104: ...Sony Corporation CLX101ASA SY CLX101ASA CN J E 9 976 961 03 Printed in Japan 2018 7 32 2016 ...


