– 15 –
SECTION 2
TEST PROCEDURES
12.
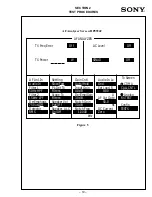
Select the “Traffic Data Mode” field and change the
setting to “Svc Opt 1”, select the "Data Type" field and
select the option "Echo". Select the "Echo Delay" field and
select "2 seconds". This sets up a 2 second delayed return
loop allowing you to hear yourself talk into the Handset.
13.
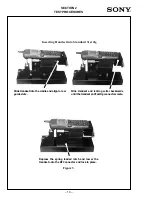
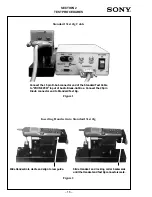
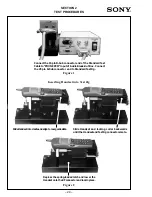
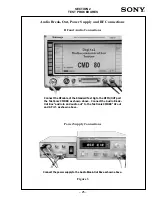
Insert the Standard Test Cable between the Audio Break-
Out Box connector and the base of the SONY CM-Mx300
Handset as shown in Figure 1.
14.
Insert the Handset into the Test Jig as shown in Figure 2.
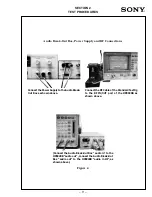
15.
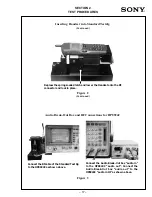
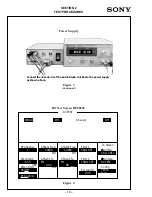
Connect the Audio Break-Out Box and the RF cable of the
Test Jig to the power supply and to the HP8924C/E as
shown in Figure 3.
16.
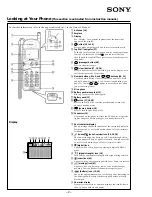
Press the “POWER” key on the Handset and wait for the
Handset to power up. After the Handset has detected the
signal from the HP8924C/E, it will sense that it is in its
Home System and the RSSI indicator will display a
strong signal. The digital system indicator “D” should be
displayed. If the roaming indicator “R” comes on, then
the settings in the HP8924C/E may be wrong. Recheck
the settings if necessary.
17.
Select the “Registration” field in the “CDMA CALL
CONTROL” screen. This automatically attempts
registration of the Handset to the HP8924C/E.
18.
To place a call to the Handset, press the “CALL” key in
the “CDMA CALL CONTROL” area on the front panel of
the HP8924C/E.
19.
When the Handset starts ringing, press the “SEND” key
on the Handset to answer the call. The “Connect”
indicator at the top of the “CDMA CALL CONTROL”
screen will highlight once the call connection has been
established. Make sure that the Audio Break-Out Box
“EXT Audio” switch is set to the “OFF” position.
20.
Talk into the microphone of the Handset. Your speech
will be echoed back to you through the earpiece,
confirming that the audio path of the Handset is working
properly.
21.
Press the “END CALL” key in the “CDMA CALL
CONTROL” area on the front panel of the HP8924C/E to
end the call.
22
Place a call to the HP8924C/E by entering in any
telephone number and pressing the “SEND” key on the
Handset.
23.
If the call goes through, the “Connected” indicator at the
top of the “CDMA CALL CONTROL” screen will be
highlighted.
24.
Talk into the microphone of the Handset. Your speech
will be echoed back to you through the earpiece,
confirming that the audio path of the Handset is working
properly.
25.
Select the “RF Channel” field and change the channel
Setting to another valid CDMA channel. The “Hard
Handoff’ indicator at the top of the “CDMA CALL
CONTROL” screen will be highlighted as the
Handset completes a CDMA handoff
26.
Talk into the microphone of the Handset. Your speech
will be echoed back to you through the earpiece,
confirming that the audio path is working properly
and the handoff is executed properly.
Ending the Tests
27.
Press the “END” key on the Handset to terminate
the call.
28.
Press the “POWER” key to turn the Handset off.
Summary of Contents for CM-Bx200
Page 50: ... 28 ...


