– 20 –
Testing a SONY CM-SX100/CM-BX200 (PCS Only) On a
Tektronix CMD80
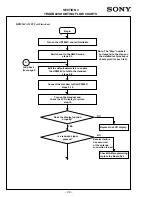
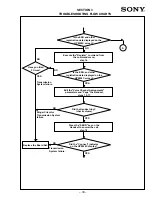
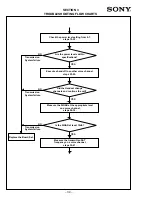
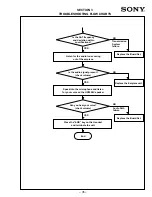
The following pages illustrate how to set up and perform
basic Digital PCS tests on a SONY CM-Sx100/CM-Bx200
Handset. The step-by-step instructions are for those
unfamiliar with the SONY CM-Sx100/CM-Bx200 Handset or
with the Tektronix CMD80 Digital Radiocommunication
Tester. The tests discussed are general tests that can be used to
determine if the Handset is operating properly. They do not
reflect all the tests needed to fully test PCS specification
compliance testing.
Getting Started
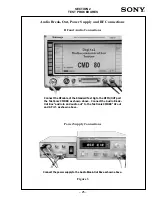
1.
Turn on the Tektronix CMD80 Digital
Radiocommunication Tester by using the power switch
located on the rear panel. The “Standby” LED on the
front panel will come on indicating that the tester is in
the Standby state.
2.
Press the “ON” button located on the lower right corner
of the CMD80’s front panel. The “ON” LED will come
on and the Tester will begin its 60-second initialization
sequence.
3.
The main “Digital Radiocommunication Tester CMD80”
screen will appear after the initialization period is over.
4.
Connect the CM-Sx100/CM-Bx200 Handset to the
Digital Service Tool (DST) and launch the Service
Support Tool software (SST); see the Instruction Guide
for the SST for setup and operation.
5.
Highlight the “Roam List” pull down menu and select
the “Display Phone’s Roam List” field. Record the first
“PCS Channel” under the “Acquisition Records” table
for # 0. Also record the “SID” number under the
“System Records” table for record # 0. These values will
be used to configure the CMD80 Tester. Click “OK” and
exit the program.
6.
Press the “NETWORK” soft key on the CMD80 Tester,
adjust the “VAR” control, and select “US PCS”. Press the
“NETWORK” soft key to accept selection change.
7.
Press the “STANDARDS” soft key to select “J-STD-008”.
8.
Press the “CONFIG MENU” soft key to enter the
configuration menu. Press the “BS SIGNAL CONFIG”
soft key to access the “RF and Traffic Channel” fields.
Enter the PCS channel from the Handset’s “Roaming
List” recorded in step 5.
9.
Press the “CDMA BS PARAMETERS” soft key to access
the BS configuration fields. Press the “SID” soft key and
enter the “SID” value from the Handset’s “Roaming
List” recorded in step 5.
10. Press the “MENU HOME” button on the front of the
panel of the CMD80 to return to the main “Digital
Radiocommunication Tester CMD80 “ screen.
11.
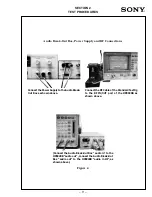
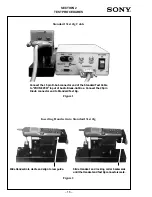
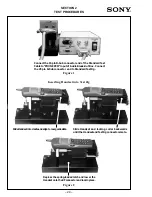
Insert the Standard Test Cable between the Audio Break-
Out Box connector and the base of the Standard Test Jig.
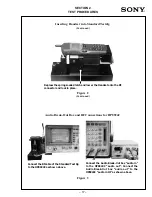
12. Insert the Handset into the Standard Test Jig.
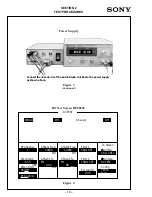
13. Connect the Audio Break-Out Box and the Standard
Test Jig, to the power supply and to the Tektronix
CMD80.
14. Press the “POWER” key on the Handset and wait for
the Handset to power up. Since the CMD80 tester is
not transmitting a digital signal yet, the Handset will
display “looking for service”. This is not a problem.
15. Press the “MANUAL TEST” soft key on the front
panel of the Tektronix CMD80 Tester when the
“Digital Radiocommunication Tester CMD80” screen
is displayed. The Handset will detect the Digital
system signal and switch to it. The Handset will
display a strong RSSI signal, as well as a “Digital”
indicator.
16. The screen on the CMD80 will change to the
“MANUAL TEST Idle/Access” screen after the
Handset has registered successfully on the Digital
System.
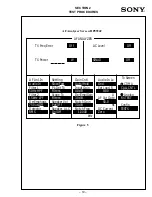
17. Check the “MS Identification” field on the “MANUAL
TEST Idle/Access” screen to see if the ESN and Mobile
ID Numbers were transmitted correctly.
Basic Call Test
18. Enter a telephone number and press the “SEND” key.
The Handset will place a call to the CMD80 Tester and
the tester screen will display “MANUAL TEST call
Established” if the call goes through.
19. Check the “Dialed Number” field on the CMD80 to
see if the telephone number called was transmitted
correctly.
20. Talk into the microphone and listen through the
earpiece for your voice to be echoed back to you.
21. Press the “END” key on the Handset to terminate the
call. The CMD80 screen will change back to the
“MANUAL TEST Idle/Access” screen.
22. Press the “CALL TO MOBILE” soft key on the CMD80
tester that corresponds to the “Voice Loopback” test.
23. Press the “SEND” key on the Handset to answer the
call when the Handset rings. The CMD80 screen will
change to the “MANUAL TEST Call Established”
screen.
24. Talk into the microphone and listen through the
earpiece for your voice to be echoed back to you.
25. Press the “RELEASE CALL” soft key on the CMD80 to
terminate the call. The Tester screen will change back
to the “MANUAL TEST Idle/Access” screen.
Summary of Contents for CM-Bx200
Page 50: ... 28 ...

