background image

CMT-Z100iR/Z100DiR.GB.4-140-444-12(1)

1

GB

Operations

Playing a CD/MP3 disc

Select the CD function.

Press FU/

 repeatedly.

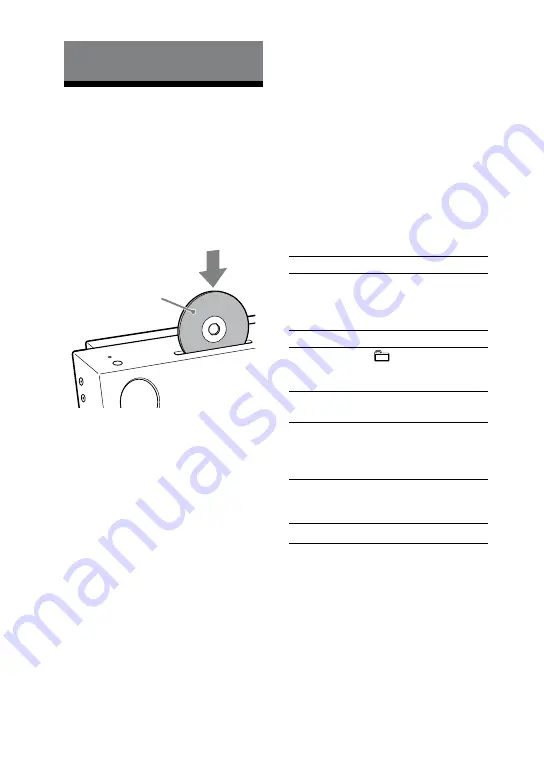
Insert a disc.

Insert a disc in the disc slot with the 

label side facing forward.

Playback starts automatically when 

you insert a disc in the disc slot.

Notes


When you turn on the system, the disc 

is not pulled into the disc slot until 

“No Disc” appears in the display. Do 

not attempt to push in the disc until 

“No Disc” appears.


Do not insert a disc with non-standard 

shapes (e.g., heart, square, star). The 

disc may fall into the system and cause 

irreparable damage.

 When pressing 

 on the unit and then 

reinserting the disc that appears in the disc 

slot, do not simply push in the disc. Remove 

the disc from the disc slot and then reinsert 

it.

 Do not turn off the system with a disc 

halfway inserted in the disc slot. Doing so 

may cause the disc to fall.

 Do not use a disc with tape, seals or paste on 

it as this may cause malfunction.

 When you eject a disc, handle the disc by its 

edge. Do not touch the surface.

 Do not push a disc into the disc slot when the 

system is off. Doing so may cause the system 

to malfunction.

 Do not insert an 8 cm disc with an 

adaptor. Doing so may cause the system to 

malfunction.

 Do not place any object on the disc slot.

Other operations

To

Press

Pause playback

 (or 



 on the 

unit). To resume 

playback, press the 

button again.

Stop playback

.

Select a folder 

on an MP3 

disc

 +/

 repeatedly.

Select a track 

or file

/

.

Find a point in 

a track or file

Hold down 

/

 

during playback, and 

release the button at 

the desired point.

Select Repeat 

Play

REPEAT repeatedly 

until “REP” or “REP1” 

appears.

Eject a disc

 on the unit. 

Insert a disc with 

the label side 

facing forward.

Summary of Contents for CMT-Z100DIR

Page 1: ......

Page 2: ...d off Do not expose batteries or apparatus with battery installed to excessive heat such as sunshine fire or the like Excessive sound pressure from earphones and headphones can cause hearing loss WARNING To prevent injury this apparatus must be securely attached to the floor wall in accordance with the installation instructions CAUTION The use of optical instruments with this product will increase...

Page 3: ...roduct shall not be treated as household waste On certain batteries this symbol might be used in combination with a chemical symbol The chemical symbols for mercury Hg or lead Pb are added if the battery contains more than 0 0005 mercury or 0 004 lead By ensuring these batteries are disposed of correctly you will help prevent potentially negative consequences for the environment and human health w...

Page 4: ...opyright protection technologies are marketed by some record companies Please be aware that among those discs there are some that do not conform to the CD standard and may not be playable by this product Note on copyright protected content The transferred music is limited to private use only Use of the music beyond this limit requires permission of the copyright holders License and Trademark Notic...

Page 5: ...rring music from a disc to a USB device 23 Recording analog audio to a USB device 26 Playing a file of the USB device 28 Creating your own program Program Play 29 Using optional audio components 31 Adjusting the sound 31 Turning off the beep sound 32 Changing the display 32 Using the Timers 34 Additional Information Troubleshooting 37 Messages 43 Precautions 45 Specifications 47 Compatible iPod mo...

Page 6: ...arts and controls This manual mainly explains operations using the remote but the same operations can also be performed using the buttons on the unit having the same or similar names Mainunit Touch sensitive buttons ...

Page 7: ... button page 33 Press to select the display mode DSGX button page 31 Press to select the sound effect Sub display Function name track number volume level and clock are displayed REC TO USB button page 23 27 Press to transfer music from a disc or record the sound from an analog audio source to the connected USB device Press to mark track numbers during recording ENTER button page 15 19 21 24 25 27 ...

Page 8: ...tion buttons play pause button page 16 20 28 Press to start or pause playback of a disc optional USB device or iPod CANCEL stop cancel button page 16 18 20 23 24 25 27 28 Press to stop playback of a disc or optional USB device Press to pause playback of an iPod FUNCTION button page 16 18 20 23 24 25 26 28 29 31 Press to select the function iPod Dock page 14 21 Place an iPod into the iPod Dock to l...

Page 9: ...track or file fast forward button page 16 21 28 Press to find a point in a track or file select folder button page 16 23 25 28 29 Press to select a folder Playback buttons pause button page 16 20 28 Press to pause playback play button page 20 28 30 Press to start playback stop button page 16 18 20 23 24 25 27 28 Press to stop playback of a disc or optional USB device Press to pause playback of an ...

Page 10: ...vice Press to select which memory to read to if the USB device has more than one memory Press to select a menu when using the iPod button page 15 20 21 24 35 Press to select the menu items RETURN button page 21 Press to return to the previous menu when using the iPod ENTER button page 15 19 21 24 25 27 30 35 Press to enter the settings CLEAR button page 30 Press to delete a pre programmed track or...

Page 11: ...ning button page 18 Press to tune in the desired station go back button page 16 21 25 28 29 Press to select a track or file rewind button page 16 21 28 Press to find a point in a track or file select folder button page 16 23 25 28 29 Press to select a folder SLEEP button page 34 Press to set the Sleep Timer DISPLAY button page 15 30 32 Press to change the information on the display ...

Page 12: ...enna FM lead antenna Extend it horizontally Connect brown side 75 ohm coaxial cable with F male type connector not supplied CMT Z100DiR only To DAB external antenna not supplied CMT Z100DiR only DAB lead antenna Extend it horizontally CMT Z100DiR only Connect white side or or or ...

Page 13: ...he system is turned off to preserve your own DAB settings Antennas Find a location and an orientation that provide good reception and then set up the antennas Keep the antennas away from the power cord and the USB cable to avoid picking up noise Tip This system can be installed on the wall using the Wall mount bracket SU WL100 not supplied See Installing the system on the wall page 50 to wall moun...

Page 14: ...station CMT Z100DiR only When you turn on the system for the first time after you purchase the system DAB Automatic Scan starts automatically and creates a list of available services During the DAB Automatic Scan appears Do not press any button on the unit or the remote during DAB Automatic Scan Scanning is interrupted and service list may not be created properly To run the DAB Automatic Scan manu...

Page 15: ...lashes press repeatedly to select CLOCK SET and then press ENTER 3 Set the time Press repeatedly to set the hour and then press ENTER 4 Use the same procedure to set the minutes Note The clock settings are lost when you disconnect the power cord or if a power failure occurs Todisplaytheclockwhenthesystem isoff Press DISPLAY The clock is displayed for about 8 seconds ...

Page 16: ...t Do not turn off the system with a disc halfway inserted in the disc slot Doing so may cause the disc to fall Do not use a disc with tape seals or paste on it as this may cause malfunction When you eject a disc handle the disc by its edge Do not touch the surface Do not push a disc into the disc slot when the system is off Doing so may cause the system to malfunction Do not insert an 8 cm disc wi...

Page 17: ...s on a disc that has MP3 files Folders that have no MP3 files are skipped MP3 files are played back in the order that they are recorded onto the disc The system can only play MP3 files that have a file extension of mp3 Even when file name has the mp3 file extension if the actual file differs playing this file may generate a loud noise which could damage the speaker system and the system may malfun...

Page 18: ...at provides RDS services European model only the service name or station name appears on the display For manual tuning FM AM band only Press TUNING MODE repeatedly until AUTO and PRESET disappear and then press or TUNE on the unit repeatedly to tune in the desired station Notes on DAB stations When tuning in a DAB station it may take a few seconds before you hear any sound Primary service is autom...

Page 19: ...ystem is turned off to preserve your own DAB settings Presetting a radio station Use buttons on the remote to preset stations 1 Tune in the desired station 2 Press TUNER MEMORY to select the tuner memory mode Preset number 3 Press repeatedly to select the desired preset number If another station is already assigned to the selected preset number the station is replaced by the new station 4 Press EN...

Page 20: ...Compatible iPod models with this system page 49 for iPod models that can be connected to this system 1 Select the iPod function Press FUNCTION repeatedly 2 Place the iPod 3 Start playback Press or on the unit Otheroperations You can control your iPod with the following buttons on the remote or unit To Press Pause playback or on the unit Scroll up down the iPod menus You can scroll up or down the i...

Page 21: ...not accept responsibility in the event that data recorded to iPod is lost or damaged when using an iPod with this system To Press Select a track or chapter of audiobook podcast To fast forward or fast rewind hold down the button Choose the selected item ENTER You can choose the selected item much like the center button on the iPod or the touch operation of the iPod touch Find a point in a track or...

Page 22: ...n the USB device it may take a long time to finish reading the USB device When you press REC TO USB to perform transferring or recording the system will carry out a reading process on the connected USB device again Make sure to set the USB device to stand by in order to perform transferring or recording with proper timing With some connected USB devices after an operation is performed there may be...

Page 23: ...SYNC or REC1 MB Free or GB Free free space on the USB device and Push ENTER The USB device stands by for transferring Transferring music from a disc to a USB device You can connect an optional USB device to the USB port on the unit and transfer music from a disc to the USB device You can transfer music from a CD DA disc or MP3 disc only The audio format of files transferred by this system is MP3 T...

Page 24: ...e memory for example internal memory and a memory card you can select which memory to read to and then start transferring 1 Connect the USB device to the USB port 2 Select the USB function Press FUNCTION repeatedly 3 Press TOOL MENU in stop mode The total number of folders appears If an audio file or a folder is selected Erase appears instead Press TOOL MENU repeatedly to select Mem Sel 4 Press EN...

Page 25: ... ENTER The selected audio file or folder is erased Folderandfilegenerationrules When first transferring music to the USB device a MUSIC folder is created directly below the ROOT folder Folders and files are generated within this MUSIC folder as follows CD SYNC1 Music source Folder name File name MP3 Same as the music source2 CD DA CDDA0001 3 TRACK001 4 REC1 Music source Folder name File name MP3 R...

Page 26: ...ss the number of files or folders on the USB device reaches the limit for the number that the system can recognize If the folder to be erased contains non MP3 WMA AAC format files or sub folders these are not erased If a folder or file that you are trying to transfer already exists on the USB device with the same name a sequential number is added after the name without overwriting the original fol...

Page 27: ...the unit at the point you want to add a track mark The system pauses recording for a while and adds track mark showing message New Track No sound is recorded during pause time Note The track numbers are automatically marked when you record more than 60 minutes Folderandfilegenerationrules When first recording the analog audio to the USB device a MUSIC folder is created directly below the ROOT fold...

Page 28: ...nit Otheroperations To Press Pause playback or on the unit To resume playback press the button again Stop playback To resume playback press or on the unit To cancel resume playback press again Select a folder repeatedly Select a file Find a point in a file Hold down during playback and release the button at the desired point Select Repeat Play REPEAT repeatedly until REP or REP1 appears When playi...

Page 29: ...ay are as follows MP3 file extension mp3 WMA file extension wma AAC file extension m4a MP4 file extension 3gp or mp4 Note that even when file names have the above file extensions if the actual files differ playing these files may generate a loud noise which could damage the speaker system and the system may malfunction Creating your own program Program Play Use buttons on the remote to create your...

Page 30: ...m additional tracks or files up to a total of 25 tracks or files 6 To play your program of tracks or files press The program remains available until you remove the disc or the USB device To play the same program again press TocancelProgramPlay Press PLAY MODE repeatedly until PGM disappears while the system is stopped Todeletethelasttrackorfileofthe program Press CLEAR while the system is stopped ...

Page 31: ...wn the volume Press VOLUME 3 Select the AUDIO function Press FUNCTION repeatedly 4 Start playback Start playback of the connected component and adjust its volume 5 Adjust the volume Press VOLUME Adjusting the sound To Press Generate a more dynamic sound Dynamic Sound Generator X tra DSGX Set the sound effect EQ repeatedly to select BASS or TREBLE and then press repeatedly to adjust the level ...

Page 32: ... Check the clock when the system is off DISPLAY when the system is off2 The clock is displayed for 8 seconds 1 For example you can view disc information or the USB device information such as track or file number during normal play track or file name during normal play artist name during normal play album or folder name during normal play total playing time while the player is stopped You can also ...

Page 33: ... display is on The sub display is off DISP MODE3 Both displays are on For your convenience even when the main display is turned off the main display may automatically turn on under certain circumstances The following are examples the main display is turned on for 8 seconds to confirm settings or mode status the main display is turned on until your operation is completed when you perform setting op...

Page 34: ...to 16 characters of ensemble label Using the Timers The system offers three timer functions You cannot activate both the Play Timer and the Rec Timer at the same time If you use either with the Sleep Timer the Sleep Timer has priority Use buttons on the remote to use the timer functions Sleep Timer You can fall asleep to music This function works even if the clock is not set Press SLEEP repeatedly...

Page 35: ... using the Rec Timer Play Timer Press repeatedly until the desired sound source appears and then press ENTER The display shows the timer settings Rec Timer Connect the USB device to the USB port The display shows the timer settings 7 Turn off the system Press The system turns on before the preset time If the system is on at the preset time the Play Timer or the Rec Timer will not be activated Do n...

Page 36: ...on the status of the connected iPod Notes The Play Timer or Rec Timer will not be activated if the system is turned on or if STANDBY flashes in the main display The volume is reduced to minimum during the Rec Timer Tips The Play Timer setting remains as long as the setting is not cancelled manually The Rec Timer is cancelled automatically after the Rec Timer has been activated ...

Page 37: ...h you have not turned on the system Press DISPLAY once while the system is off The demonstration disappears The system does not turn on Is the power cord plugged in There is no sound Is anything blocking the ventilation holes on the top or back of the system The specified station may have temporarily stopped broadcast There is no audio output during Rec Timer The STANDBY indicator remains lit afte...

Page 38: ...rs The function automatically changed to the CD function when you inserted a disc This system will automatically change to the CD function when a disc is inserted The system does not eject the disc and LOCKED appears Contact your Sony dealer or local authorized Sony service facility The system does not eject the disc and Not in Use appears You cannot eject a disc in the following cases When the mu...

Page 39: ... this problem If the problem persists contact your nearest Sony dealer Transferring recording or erase operations stopped partway and automatically changed to the CD function When a disc is inserted this system will stop transferring recording or erasing Transferring or recording music to a USB device results in an error You are using an unsupported USB device Check information on the websites abo...

Page 40: ...ted sound is output Transferring or recording stops before it is finished Over Current appears A problem has been detected with the level of electrical current from the USB port Turn off the system and remove the USB device from the USB port Make sure there is no problem with the USB device If this display pattern persists contact your nearest Sony dealer There is no sound The USB device is not co...

Page 41: ...e websites about compatible USB devices that can be connected to this system page 22 The USB device does not work properly Refer to the USB device operation manual for how to deal with this problem If the problem persists contact your nearest Sony dealer Play does not start Turn off the system and reconnect the USB device then turn on the system Check information on the websites about compatible U...

Page 42: ...o select a different service If you have moved to another area some services frequencies may have changed and you may not be able to tune into your usual broadcast Perform the DAB Automatic Scan procedure to re register the contents of broadcasts Performing this procedure clears all previously stored presets TochangetheAMtuninginterval LatinAmericanmodelonly The AM tuning interval is factory prese...

Page 43: ...ized or an unknown device is connected page 22 Fatal Error The USB device has been disconnected while transferring recording or erasing audio files or folders on the USB device FLDR Full The number of folders on the USB device has reached the maximum LOCKED The system does not eject the disc Contact your nearest Sony dealer No Device The USB device is either not connected stopped or is having a pr...

Page 44: ...ted USB device Push STOP You have pressed PLAY MODE during playback You have pressed the buttons whose operation is only possible when playback is stopped Reading The system is reading information of the disc Some buttons are not available The system is recognizing the USB device REC Error Transferring did not start stopped partway or otherwise could not be performed page 39 Step Full You tried to...

Page 45: ...sed discs with attached seals where the glue extends beyond the seal Discs that have labels printed using ink that feels tacky when touched Notes on discs Before playing wipe the disc with a cleaning cloth from the centre out to the edge Do not clean discs with solvents such as benzine thinner or commercially available cleaners or anti static spray intended for vinyl LPs Do not expose discs to dir...

Page 46: ...tem turned on for about an hour until the moisture evaporates On heat buildup Heat buildup on the unit during operation is normal and is not cause for alarm Do not touch the cabinet if it has been used continuously at a high volume because the cabinet may have become hot Do not obstruct the ventilation holes On the speaker system The speaker system is magnetically shielded and can be installed nea...

Page 47: ...it rate MP3 MPEG 1 Audio Layer 3 32 320 kbps VBR WMA 48 192 kbps AAC 48 320 kbps Sampling frequencies MP3 MPEG 1 Audio Layer 3 32 44 1 48 kHz WMA 44 1 kHz AAC 44 1 kHz USB port Maximum current 500 mA CD player section System Compact disc and digital audio system Laser Diode Properties Emission Duration Continuous Laser Output Less than 1000µW This output is the value measurement at a distance of 2...

Page 48: ...requency Label 174 928 MHz 5A 209 936 MHz 10A 176 640 MHz 5B 211 648 MHz 10B 178 352 MHz 5C 213 360 MHz 10C 180 064 MHz 5D 215 072 MHz 10D 181 936 MHz 6A 216 928 MHz 11A 183 648 MHz 6B 218 640 MHz 11B 185 360 MHz 6C 220 352 MHz 11C 187 072 MHz 6D 222 064 MHz 11D 188 928 MHz 7A 223 936 MHz 12A 190 640 MHz 7B 225 648 MHz 12B 192 352 MHz 7C 227 360 MHz 12C 194 064 MHz 7D 229 072 MHz 12D 195 936 MHz 8...

Page 49: ...e your iPod with the latest software before using it iPod touch 2nd generation iPod nano 4th generation video iPod touch 1st generation iPod nano 3rd generation video iPod classic iPod nano 2nd generation aluminum iPod 5th generation video iPod nano 1st generation iPod 4th generation color display iPod 4th generation iPod mini ...

Page 50: ...tutory Rights if any are not affected To Sony Dealers The following instructions are for Sony Dealers only Be sure to read safety precautions and pay special attention to safety during the installation maintenance and checking this product Before installing the system on the wall Make sure that the wall is strong enough to support the wall mounting The wall should be able to support the weight of ...

Page 51: ...crews that secure the left and right holders to the Base Plate and move the holders to the inner position Firmly secure each holder using the screws removed in the previous procedure Holder Note When using an electric screwdriver set the torque setting to approximately 1 5 N m 15 kgf cm Continued ...

Page 52: ...determine the installation location Allow for suitable clearance between the system ceiling and any protruding wall parts as shown below Unit mm 300 100 100 100 Never install the system set as shown below Air circulation is blocked Wall Air circulation is blocked ...

Page 53: ...hten the screws securely so that they will not become loose Base Plate Secure the Base Plate so that it is level WARNING The screws required for this procedure are not supplied Select screws suitable for the material and structure of the wall If the Base Plate cannot be attached securely enough use additional screws Be sure to confirm that the Base Plate is securely attached to the wall Continued ...

Page 54: ...ove the 2 screws that secure the stand from the system Push the 2 tabs located on the bottom of the stand and pull up the stand to detach from the system Soft cloth Note Do not remove the stand for any reason other than to wall mount the system ...

Page 55: ...h Screw PSW4 12 CAUTION Be sure not to use any screws other than the ones supplied PSW4 12 when securing the Mounting Hook Make sure that the Mounting Hook angle is set at 0 degrees and install the system parallel to the wall Do not adjust the Mounting Hook angle 6 Connect the connecting cable s to the system Connect the connecting cable s to the connectors on the system For details on connecting ...

Page 56: ... onto the Base Plate Determine the holes of the Base Plate for latching the upper hooks of the Mounting Hook Hold the system securely with both hands and gently align it on the wall Holder Base Plate Mounting Hook Mounting Hook ...

Page 57: ... bracket SU WL100 Secure the screws to the angle mark 0 Screw PSW4 12 Note When using an electric screwdriver set the torque setting to approximately 1 5 N m 15 kgf cm WARNING Be sure to tighten both left and right securing screws firmly If you fail to do so the system may fall when it is pushed upward and cause injury Continued ...

Page 58: ... to install completely It may cause the product to fall and result in injury or product damage Also improper placement of the power cord etc may cause fire or electric shock through a short circuit Be sure to confirm the completion of the installation for safety System installation dimensions diagram The diagram below shows the dimensions of the system that is mounted on the Wall mount bracket SU ...

Page 59: ...ommended that you use Sony accessories including Wall mount bracket SU WL100 It is strongly recommended that you use a Sony Wall mount bracket in order to provide adequate air circulation Leave at least this space around the system 10 cm 30 cm 10 cm 10 cm Do not install the system as shown below Air circulation is blocked Wall Air circulation is blocked ...

Page 60: ......

Reviews: