background image

Ta
ble
 of
 

co
nte
n

ts

Op
e

rat

io

S

ear

ch

MENU/Settin

g

Se
ar

ch

In

de
x

57

GB

Rotate

Rotates a still image. Use this to display a horizontal orientation image in vertical orientation.

1

Press the 

 (Playback) button to switch to playback mode.

2

MENU 

t


(Rotate) 

t


z

 on the control button

3

Rotate the image with [ / ] 

t


b

/

B

4

[OK] 

t


z


• You cannot rotate movies or protected still images.
• You may not be able to rotate images shot with other cameras.
• When viewing images on a computer, the image rotation information may not be reflected depending on 

the software.

Notes

Summary of Contents for Cyber-shot 4-166-049-12(1)

Page 1: ... 2010 Sony Corporation 4 166 049 12 1 GB Cyber shot Handbook DSC W320 W330 Table of contents Operation Search MENU Settings Search Index ...

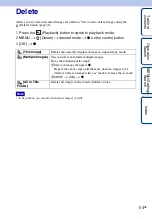
Page 2: ...tion in a listing of MENU Settings items Search for information by keyword Marks and notations used in this handbook Table of contents Operation Search MENU Settings Search Index In this handbook the sequence of operations is shown by arrows t Operate the camera in the order indicated Marks are shown as they appear in the camera s default setting The default setting is indicated by Indicates cauti...

Page 3: ... cool dry place This is to maintain the battery pack functions For details on the usable battery pack see page 101 Carl Zeiss lens The camera is equipped with a Carl Zeiss lens which is capable of reproducing sharp images with excellent contrast The lens for the camera has been produced under a quality assurance system certified by Carl Zeiss in accordance with the quality standards of Carl Zeiss ...

Page 4: ...h Index 4GB The images used in this Handbook The images used as examples in this Handbook are reproduced images and are not actual images shot using this camera On Illustrations Illustrations used in this Handbook are of the DSC W320 unless noted otherwise ...

Page 5: ...tion Search 8 MENU Settings Search 10 Identifying parts 13 List of icons displayed on the screen 14 Using the mode switch 16 Using the internal memory 17 Shooting Zoom 18 DISP Screen Display Settings 19 Flash 20 Smile Shutter 21 Self Timer 22 Viewing Viewing still images 23 Playback zoom 24 Image Index 25 Delete 26 Viewing movies 27 MENU Shooting MENU items Shooting 10 ...

Page 6: ...wing images on a TV 77 Computer Using with your computer 79 Using the software 80 Connecting the camera to the computer 82 Uploading images to a media service 84 Printing Printing still images 86 Troubleshooting Troubleshooting 88 Warning indicators and messages 96 Others Memory Stick Duo media 99 Battery pack 101 Battery charger 102 ...

Page 7: ...Table of contents Operation Search MENU Settings Search Index 7GB Index Index 103 ...

Page 8: ... Portrait 31 Smile Shutter 21 Scene Recognition 45 Face Detection 48 Red Eye Reduction 61 Shooting best shots of your pet Pet 31 Shooting moving objects Movie 16 Burst Settings 37 Shooting without blur SteadyShot 33 High Sensitivity 31 2 second delay self timer 22 ISO 39 Shooting with backlight Forced Flash 20 Scene Recognition 45 DRO 50 Shooting in dark places High Sensitivity 31 Slow Synchro 20 ...

Page 9: ...enlarged images Playback zoom 24 Trimming 53 Editing images Retouch 53 Playing back a series of images in order Slideshow 52 Shooting Viewing with easy to see indicators Easy Mode 34 51 Printing images with the date Using the PMB Picture Motion Browser 80 Changing clock settings Date Time Setting 76 Initializing settings Initialize 66 Printing images Print 86 Viewing on TVs Viewing images on a TV ...

Page 10: ...low indicates a user changeable function while indicates an unchangeable one The icons below indicate the changeable modes Depending on the recording mode function settings may be fixed or limited For details see the page of each item Only the items that are available for each mode are displayed on the screen MENU items Shooting Mode switch REC Mode Menu items REC Mode Scene Selection Easy Mode Im...

Page 11: ...e desired menu item with v V b B on the control button 4 Press z on the center of the control button In the table below indicates a user changeable function while indicates an unchangeable one Only the items that are available for each mode are displayed on the screen MENU items Viewing Menu items Memory card Internal Memory Easy Mode Slideshow Retouch Delete Protect DPOF Print Rotate Select Folde...

Page 12: ...ting Settings appears only when settings have been entered from shooting mode Memory Card Tool appears only when a memory card is inserted in the camera while Internal Memory Tool appears only when a memory card is not inserted Setting items Categories Items Shooting Settings Grid Line Digital Zoom Red Eye Reduction Main Settings Beep Language Setting Function Guide Power Save Initialize Video Out...

Page 13: ...h 16 J Hook for wrist strap K Playback button 23 L Delete button 26 M MENU button 10 N Control button Menu on v V b B z Menu off DISP O Terminal cover P USB A V OUT jack Q Speaker R Tripod receptacle S Access lamp T Memory card slot U Battery eject lever V Battery insertion slot W Battery Memory card cover Using the wrist strap The wrist strap is already attached to the camera at the factory Place...

Page 14: ...ooting still images The icons are limited in Easy Mode When shooting movies When playing back A Display Indication Battery remaining Low battery warning Image size Scene Selection Camera mode Intelligent Auto Adjustment Program Auto SteadyShot Movie Mode Scene Recognition icon White balance Metering Mode Vibration warning Scene Recognition DRO Smile Detection Sensitivity indicator Zoom scaling Pic...

Page 15: ...NEXT Selecting images V VOLUME Adjusting volume Display Indication Recording folder Playback folder 96 Number of recordable images 12 12 Image number Number of images recorded in selected folder 100Min Recordable time Recording Playback Media memory card internal memory Changing folder Red eye reduction Metering mode Flash mode Flash charging White balance ISO400 ISO number Display Indication Self...

Page 16: ...nction Still Image Allows you to shoot still images page 29 30 31 33 You can set the desired still image shooting mode with MENU t REC Mode Movie Allows you to record movies Press the shutter button fully down to start recording and then press the shutter button again to end the recording Mode switch Shutter button MENU button ...

Page 17: ...page 74 You cannot transfer image data on a memory card to the internal memory By making a USB connection between the camera and a computer with the dedicated USB cable you can transfer data stored in the internal memory to a computer However you cannot transfer data on a computer to the internal memory When a memory card is inserted Recording Images are recorded on the memory card Playback Images...

Page 18: ...e image when shooting The camera s optical zoom function can enlarge images up to 4 1 Press the W T zoom button Press the T button to zoom in and the W button to zoom out When the zoom scale exceeds 4 see page 60 You cannot change the zoom scale while shooting a movie Note T button W button ...

Page 19: ... light adjust the screen brightness up However the battery power may decrease faster under such condition Bright Image Only Sets screen brighter and displays only images Bright Exposure Data Playback mode only Sets screen brighter and displays the information Exif data for the recorded image is also displayed Bright Sets screen brighter and displays the information Normal Sets screen to standard b...

Page 20: ...there is backlight On Flash always operates Slow Synchro Flash always operates The shutter speed is slow in a dark place to clearly shoot the background that is out of flash light Off Flash does not operate Notes zWhen the White circular spots appears in flash photos This is caused by particles dust pollen etc floating close to the lens When they are accentuated by the camera s flash they appear a...

Page 21: ...nditions You cannot use the digital zoom function If Movie Mode is selected you cannot use the Smile Shutter function Notes Smile Detection Sensitivity indicator Face Detection frame zHints for better capturing of smiles The shutter operates when any person whose face is being detected smiles You can select the priority subject for face detection with Face Detection To perform smile detection for ...

Page 22: ... Sets the 10 second delay self timer When you press the shutter button the self timer lamp flashes and a beep sounds until the shutter operates To cancel press again 2sec Sets the 2 second delay self timer Note zReducing blurring with the two second self timer Use the 2 second delay self timer to prevent blur of an image The shutter is released 2 seconds after you press the shutter button which re...

Page 23: ...Table of contents Operation Search MENU Settings Search Index 23GB Viewing still images 1 Press the Playback button to switch to playback mode 2 Select an image with the control button ...

Page 24: ...ged to twice the previous size at the center of the image 2 Adjust the position with the control button 3 Change the zoom scale with W T zoom button Press button T to zoom in W side to zoom out Press z to cancel playback zoom Shows the displayed area of the whole image zTo save enlarged images You can save an enlarged image by using the trimming function Press MENU t Retouch t Trimming ...

Page 25: ...tton again to display an index screen with more images 3 To return to the single image screen select an image with the control button then press z When the camera is set to Easy Mode during image index display the LCD screen changes to the single image screen You cannot view images in index mode during Easy Mode Note zDisplaying images of the desired folder Select the left side bar with the contro...

Page 26: ...s Allows you to select and delete multiple images Do as the following after step 2 1Select an image then press z Repeat the above steps until there are no more images to be deleted Select an image with a mark again to release the mark 2MENU t OK t z This Image Deletes the currently displayed image in single image mode Exit Cancels the deletion Note zYou can switch between index and single image mo...

Page 27: ...r cameras Control button Playback feature z Play Pause B Fast forward b Fast rewind V Displays the volume control screen Adjust the volume with v V on the control button then press z Note zOn the movie viewing screen Select the image you want to display using b B on the control button and press z The Playback bar appears you can check a playback position of a movie Playback bar or appears on the m...

Page 28: ...with the setting adjusted automatically page 29 Program Auto Allows you to shoot with the exposure adjusted automatically both the shutter speed and the aperture value page 30 Also you can select various settings using the menu Scene Selection Allows you to shoot with preset settings according to the scene page 31 SteadyShot Allows you to shoot with reduced camera shake or subject blur page 33 ...

Page 29: ...t and displays the corresponding icon and guide on the LCD screen when the scene is recognized For details see page 45 Scene Recognition icon and guide zIf you shoot a still image of a subject that is difficult to focus on The shortest shooting distance is approximately 4 cm 1 5 8 inches W 60 cm 23 5 8 inches T from the lens When the camera cannot focus on the subject automatically the AE AF lock ...

Page 30: ...lows you to shoot with the exposure adjusted automatically both the shutter speed and the aperture value Also you can select various settings using the menu 1 Set the mode switch to Still Image 2 MENU t REC Mode t Program Auto t z on the control button 3 Shoot with the shutter button ...

Page 31: ...ng in the distance Shoots vivid blue sky and flora colors Twilight Portrait Allows you to shoot sharp images of people with the night view in the background without compromising the atmosphere Twilight Allows you to shoot night scenes at far distance without losing the dark atmosphere of the surroundings Gourmet Shifts to Macro mode allowing you to shoot food arrangements in delicious and bright c...

Page 32: ...he table below indicates a user changeable function while indicates an unchangeable one The icons below Flash indicate the available flash modes Some functions are not available depending on the Scene Selection mode 1 Flash for White Balance cannot be selected 2 Off for Face Detection cannot be selected 3 You can use Underwater White Balance instead of White Balance Underwater Allows you to shoot ...

Page 33: ...s those encountered in Twilight Portrait or Twilight mode In such a case shoot with the below tips in mind Camera shake Your hands or body moves while holding the camera and pressing the shutter button and the entire screen is blurred Use a tripod or place the camera on a flat surface to hold the camera steady Shoot with a 2 second delay self timer and stabilize the camera by holding your arms fir...

Page 34: ...ze t z on the control button t desired mode t z Select between Large or Small size Self Timer on the control button t desired mode Select between 10sec or Off mode Flash on the control button t desired mode Select between Auto or Off mode Smile Shutter on the control button Exit Easy Mode MENU t Exit Easy Mode t OK t z on the control button zOn Scene Recognition Scene Recognition operates in Easy ...

Page 35: ...e images can be recorded 1 MENU t Image Size t desired size When you print still images recorded with 16 9 aspect ratio both edges may be cut off When shooting still images Image size Usage guidelines No of images Printing 4320 3240 For prints up to A3 size Less More Fine Rough 3648 2736 2592 1944 For prints from 10 15 cm up to A4 size 640 480 For e mail attachments 4320 2432 For viewing on a high...

Page 36: ...e is made up of a collection of small dots called pixels If it contains a large number of pixels the image becomes large it takes up more memory and the image is displayed in fine detail Image size is shown by the number of pixels Although you cannot see the differences on the screen of the camera the fine detail and data processing time differ when the image is printed or displayed on a computer ...

Page 37: ...tton Burst shooting is not available in Easy Mode Movie Mode or Smile Shutter The flash is set to Off When recording with the self timer a series of a maximum of five images is recorded The recording interval becomes longer depending on the setting for the image size When the battery level is low or when the internal memory or memory card is full the Burst stops Focus White Balance and EV are adju...

Page 38: ...setting In Easy Mode the EV setting cannot be adjusted If you shoot a subject in extremely bright or dark conditions or when you use the flash the exposure adjustment may not be effective Notes zAdjusting the exposure for better looking images Overexposure too much light Whitish image Lower EV setting Correct exposure Higher EV setting Underexposure too little light Darker image ...

Page 39: ... blurring in dark locations or moving subjects by increasing ISO sensitivity select a larger number Note zAdjusting ISO Sensitivity Recommended Exposure Index ISO sensitivity is a speed rating for recording media that incorporates an image sensor that receives light Even when the exposure is the same images differ depending on the ISO sensitivity High ISO sensitivity Records a bright image even in...

Page 40: ...e balance automatically so that the colors appear natural Daylight Adjusts for outdoors conditions on a fine day evening views night scenes neon signs fireworks etc Cloudy Adjusts for a cloudy sky or a shady location Fluorescent White Balance 1 Fluorescent White Balance 2 Fluorescent White Balance 3 Fluorescent White Balance 1 Adjusts for white fluorescent lighting Fluorescent White Balance 2 Adju...

Page 41: ...pending on the color of the water the Underwater White Balance may not work correctly even though you select Underwater 1 or Underwater 2 When flash is On the underwater white balance can only be adjusted to Auto Auto Automatically adjusts color tones underwater so they appear natural Underwater 1 Adjusts for underwater conditions where blue is strong Underwater 2 Adjusts for underwater conditions...

Page 42: ...Focuses on a subject in all ranges of the finder frame automatically When you press the shutter button halfway down in still image shooting mode a green frame is displayed around the area that is in focus When the Face Detection function is active AF operates with priority on faces When Scene Selection is set to Underwater mode focus operation is suited to underwater shooting When focus is achieve...

Page 43: ...ject is centered in the AF range finder and press the shutter button halfway to focus on the subject AF lock 2When the AE AF lock indicator stops flashing and remains on return to the fully composed shot and press the shutter button fully down As long as you do not press the shutter button fully down you can retry the procedure as many times as necessary AF range finder frame AE AF lock indicator ...

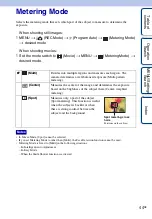
Page 44: ...on cannot be used Metering Mode is fixed to Multi in the following situations In Intelligent Auto Adjustment In Easy Mode When the Smile Shutter function is activated Multi Divides into multiple regions and measures each region The camera determines a well balanced exposure Multi pattern metering Center Measures the center of the image and determines the exposure based on the brightness of the sub...

Page 45: ...the situation Auto When the camera recognizes the scene it switches to the optimal settings and shoots the image Advanced When the camera recognizes the scene it switches to the optimal settings If the camera recognizes Twilight Twilight Portrait Backlight or Backlight Portrait it automatically changes the setting and shoots another image When you shoot two images consecutively the mark on the ico...

Page 46: ...to select the one you like When flash is set to Auto First Image Second Image Shoot in Slow Synchro Shoots with sensitivity increased and shake reduced Shoot in Slow Synchro with the face which the flash strobes on as guide Shoots with sensitivity increased with the face as guide and shake reduced Shoots with the flash Shoots with the brightness and contrast of the background adjusted DRO plus Sho...

Page 47: ...er function for detecting smiles 1 MENU t Smile Detection Sensitivity t desired mode Smiles may not be detected correctly depending on the conditions Smile Detection Sensitivity cannot be adjusted in Easy Mode or Movie Mode Big Smile Detects a big smile Normal Smile Detects a normal smile Slight Smile Detects even a slight smile Notes ...

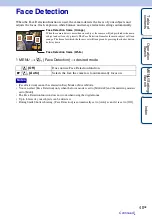
Page 48: ...lti The Face Detection function does not work when using the digital zoom Up to 8 faces of your subjects can be detected During Smile Shutter shooting Face Detection is automatically set to Auto even if it is set to Off Off Does not use Face Detection function Auto Selects the face the camera is to automatically focus on Notes Face Detection frame White Face Detection frame Orange When the camera ...

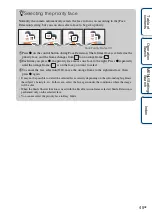
Page 49: ...ority face moves one face to the right Press z repeatedly until the orange frame is on the face you want to select 3To cancel the face selection Off move the orange frame to the rightmost face then press z again It may not be possible to detect the selected face correctly depending on the surrounding brightness the subject s hairstyle etc In this case select the face again under the conditions whe...

Page 50: ...es the difference between light and dark parts of an image 1 MENU t REC Mode t Program Auto t DRO t desired mode Depending on shooting conditions it may not be possible to obtain correction effects Only ISO AUTO or values from ISO 80 to ISO 800 can be set for the ISO value when DRO plus is set Off Does not adjust DRO standard Adjusts the brightness and contrast of the images automatically DRO plus...

Page 51: ...ntrol button The battery charge is used up more quickly because the screen brightness increases automatically The shooting mode also changes to Easy Mode Notes zViewing functions available in Easy Mode In Easy Mode only the deletion function is available Delete button You can delete the currently displayed image Select OK t z MENU button You can delete the currently displayed image with 1 image an...

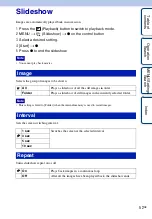
Page 52: ...Selects the group of images to be shown This setting is fixed to Folder when the internal memory is used to record images Sets the screen switching interval Turns slideshow repeat on or off Note Image All Plays a slideshow of all the still images in order Folder Plays a slideshow of still images in the currently selected folder Note Interval 1 sec Switches the screen at the selected interval 3 sec...

Page 53: ...ach mode You cannot retouch the movies Trimming Records the zoomed playback image 1 Press the button T to zoom in and press W to zoom out 2 Set the zoom point with the control button 3 MENU t select an image size to save t z 4 OK t z The quality of trimmed images may deteriorate The image size that you can trim may vary depending on the image Red Eye Correction Corrects the red eye phenomenon caus...

Page 54: ...n the control button 3 OK t z In Easy Mode you can select between 1 image or All This Image Deletes the currently displayed image in single image mode Multiple Images You can select and delete multiple images Do as the following after step 2 1Select an image then press z Repeat the above steps until there are no more images to be deleted Select an image with a mark to release the mark 2MENU t OK t...

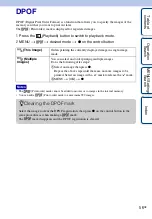
Page 55: ...y displayed image in single image mode Multiple Images You can select and protect multiple images Do as the following after step 2 1Select an image then press z Repeat the above steps until there are no more images to be protected Select an image with a mark to release the mark 2MENU t OK t z zTo cancel the protection Select the image for which you want to cancel protection and unlock it by pressi...

Page 56: ... in the internal memory You can add a Print order mark to a maximum 999 images This Image Orders printing the currently displayed image in single image mode Multiple Images You can select and order printing multiple images Do as the following after step 2 1Select an image then press z Repeat the above steps until there are no more images to be printed Select an image with a mark to release the mar...

Page 57: ...ion 1 Press the Playback button to switch to playback mode 2 MENU t Rotate t z on the control button 3 Rotate the image with t b B 4 OK t z You cannot rotate movies or protected still images You may not be able to rotate images shot with other cameras When viewing images on a computer the image rotation information may not be reflected depending on the software Notes ...

Page 58: ...ch to playback mode 2 MENU t Select Folder t z on the control button 3 Select the folder with b B 4 OK t z This item is not displayed when the internal memory is used to record images Note zViewing images across multiple folders When multiple folders are created the following indicators appear on the first and last images in the folder Moves to the previous folder Moves to the next folder Moves to...

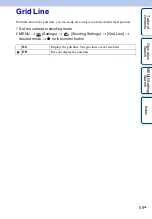
Page 59: ...the grid lines you can easily set a subject in a horizontal vertical position 1 Set the camera to shooting mode 2 MENU t Settings t Shooting Settings t Grid Line t desired mode t z on the control button On Displays the grid lines The grid lines are not recorded Off Does not display the grid lines ...

Page 60: ...ble when the image size is set to 14M or 16 9 11M The Face Detection function does not work when using the digital zoom The supported zoom ratio differs depending on the image size Smart Enlarges the image digitally within the range where the image will not be distorted according to the image size Smart zoom Precision Enlarges all image sizes by the total zoom scale of approximately 8 including th...

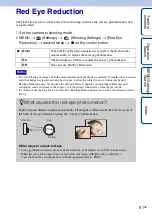
Page 61: ...to the subject or if the subject looked away from the pre strobe If you do not use the Face Detection function Red Eye Reduction does not work even when you select Auto Auto When the Face Detection function is activated the flash strobes automatically to reduce the red eye phenomenon On The flash always strobes to reduce the red eye phenomenon Off Does not use Red Eye Reduction Notes zWhat causes ...

Page 62: ...te the camera 1 MENU t Settings t Main Settings t Beep t desired mode t z on the control button Shutter Turns on the shutter sound when you press the shutter button High Turns on the beep shutter sound when you press the control shutter button If you want to lower the volume select Low Low Off Turns off the beep shutter sound ...

Page 63: ...ion Search MENU Settings Search Index 63GB Language Setting Selects the language to be used in the menu items warnings and messages 1 MENU t Settings t Main Settings t Language Setting t desired mode t z on the control button ...

Page 64: ... Function Guide You can select whether or not the function guide is displayed when you operate the camera 1 MENU t Settings t Main Settings t Function Guide t desired mode t z on the control button On Displays the function guide Off Does not display the function guide ...

Page 65: ...a certain amount of time the camera automatically turns off to prevent wearing down the battery pack Auto Power off 1 MENU t Settings t Main Settings t Power Save t desired mode t z on the control button Stamina The camera turns off after about 1 minute of no operation Standard The camera turns off after about 2 minutes of no operation Off The camera does not turn off automatically ...

Page 66: ...ex 66GB Initialize Initializes the setting to the default setting Even if you execute this function the images are retained 1 MENU t Settings t Main Settings t Initialize t OK t z on the control button Be sure not to turn off the camera while initializing Note ...

Page 67: ...TV color systems differ depending on the country and region To view images on a TV screen check the TV color system of the country or region of use page 78 1 MENU t Settings t Main Settings t Video Out t desired mode t z on the control button NTSC Sets the video output signal to NTSC mode e g for the USA Japan PAL Sets the video output signal to PAL mode e g for Europe China ...

Page 68: ...the Auto setting select Mass Storage When USB Connect is set to PTP MTP you cannot export movies to a computer To export movies to a computer set USB Connect to Auto or Mass Storage Auto The camera recognizes automatically and sets up communication with a computer or PictBridge compliant printer PictBridge Connects the camera to a PictBridge compliant printer PTP MTP When you connect the camera to...

Page 69: ...s to Multi when uploading images to a media service using PMB Portable Multi The images both on the memory card and in the internal memory are displayed Select this setting when you connect the camera to a computer Single When the memory card is inserted into the camera the images on the memory card are displayed when it is not inserted the images in the internal memory are displayed Select this s...

Page 70: ...o format the card using the camera for stable performance of the memory card before shooting Note that formatting permanently erases all data on the memory card and is unrecoverable Save precious data on a computer etc 1 MENU t Settings t Memory Card Tool or Internal Memory Tool t Format t OK t z on the control button Note that formatting permanently erases all data including even protected images...

Page 71: ...t z on the control button This item is not displayed when the internal memory is used to record images When you insert a memory card that was used with other equipment into the camera and shoot images a new folder may be automatically created Up to 4 000 images can be stored in one folder When the folder capacity is exceeded a new folder is automatically created Notes zOn the folders After a new f...

Page 72: ...rently used for recording images 1 MENU t Settings t Memory Card Tool t Change REC Folder 2 Select a folder with b B on the control button 3 OK t z This item is not displayed when the internal memory is used to record images You cannot select the 100 folder as a recording folder You cannot move recorded images to another folder Notes ...

Page 73: ...l button 3 OK t z This item is not displayed when the internal memory is used to record images If you delete the folder set as the recording folder using Delete REC Folder the folder that has the largest folder number is selected as the next recording folder You can delete only empty folders If a folder contains images or files that cannot be played back by the camera first delete these images and...

Page 74: ...es using a battery pack with little remaining charge the battery pack may run out causing copying to fail or possibly corrupting the data Images cannot be copied individually The original images in the internal memory are retained even after copying To delete the contents of the internal memory remove the memory card after copying then format the internal memory Format in Internal Memory Tool A ne...

Page 75: ... on the control button Series Assigns numbers to files in sequence even if the recording folder or the memory card is changed When the replaced memory card contains a file with a number higher than the last assigned number a number one higher than the largest number is assigned Reset Starts from 0001 each time the folder is changed When the recording folder contains a file a number one higher than...

Page 76: ... setting t z on the control button 2 Set the numeric value and desired setting with v V b B on the control button 3 OK t z The camera does not have a feature for superimposing dates on images By using PMB in the CD ROM supplied you can print or save images with the date Date Time Format You can select the date and time display format Date Time You can set the date and time Note ...

Page 77: ...a to the TV with the dedicated A V cable supplied 3 Turn on the TV and set the input 4 Press Playback button to turn on the camera Images shot with the camera appear on the TV Select the desired image with the control button When using the camera abroad it may be necessary to switch the video signal output to match that of your TV system page 67 When output to TV Easy Mode is invalid Viewing image...

Page 78: ...ia Canada Central America Chile Colombia Ecuador Jamaica Japan Korea Mexico Peru Surinam Taiwan the Philippines the U S A Venezuela etc PAL system Australia Austria Belgium China Croatia Czech Republic Denmark Finland Germany Holland Hong Kong Hungary Indonesia Italy Kuwait Malaysia New Zealand Norway Poland Portugal Rumania Singapore Slovak Republic Spain Sweden Switzerland Thailand Turkey United...

Page 79: ... or in a multi boot environment If you connect two or more USB devices to a single computer at the same time some devices including the camera may not operate depending on the types of USB devices you are using Connecting the camera using a USB interface that is compatible with Hi Speed USB USB 2 0 compliant allows advanced transfer high speed transfer as the camera is compatible with Hi Speed USB...

Page 80: ... then click Next 5 Follow the instructions on the screen to complete the installation For the installation connect the camera to the computer during the procedure page 82 When the restarting confirmation message appears restart the computer following the instructions on the screen DirectX may be installed depending on the system environment of your computer 6 Remove the CD ROM after the installati...

Page 81: ...ra Make a USB connection between the camera and your computer click Export t Export Media Files in the Manipulate menu and click Export You can save and print images with the date You can display images stored on a computer by shooting date in a calendar display You can correct Red Eye Reduction etc still images and change the shooting date and time You can create discs with CD or DVD disc writing...

Page 82: ...When the AutoPlay Wizard appears after making a USB connection between the camera and a computer click Open folder to view files t OK t DCIM t copy the desired images to the computer 1 Connect the camera to your Macintosh computer first Double click the newly recognized icon on the desktop t DCIM t the folder where the images you want to import are stored 2 Drag and drop the image files to the har...

Page 83: ...rom the internal memory Turning off the camera 1 Double click the disconnect icon on the tasktray 2 Click USB Mass Storage Device t Stop 3 Confirm the device on the confirmation window then click OK Drag and drop the icon of the memory card or the drive icon to the Trash icon beforehand when you use a Macintosh computer and the camera is disconnected from the computer Deleting the USB connection N...

Page 84: ...unnecessary the next time you use PMB Portable 1 Make a USB connection between the camera and a computer When you connect the camera and your computer the AutoPlay Wizard appears Click to close any unnecessary drives If the desired AutoPlay Wizard does not appear click Computer in Windows XP My Computer t PMBPORTABLE then double click PMBP_Win exe 2 Click PMB Portable In Windows XP click PMB Porta...

Page 85: ...y server In order to use PMB Portable to enjoy the benefits of the image uploading service or other services the services provided by these and other websites you must consent to the following Some websites require registration procedures and or fees to use their services In using such services you must comply with the terms and conditions established by the websites concerned Services may be term...

Page 86: ...page 87 When you print still images shot in 16 9 mode both edges may be cut off Even if you do not have a computer you can print images shot using the camera by connecting the camera directly to a PictBridge compliant printer PictBridge is based on the CIPA standard CIPA Camera Imaging Products Association 1 Insert a sufficiently charged battery pack into the camera 2 Connect the camera to the pri...

Page 87: ...ry card they handle A memory card adaptor sold separately may be necessary Consult your photo printing service shop Before you take image data to a shop always copy back up your data to a disk You cannot set the number of prints If you want to superimpose dates on images consult your photo printing service shop This Image Prints the currently displayed image in single image mode Multiple Images Yo...

Page 88: ...nding on the camera and battery temperature the power may turn off automatically to protect the camera In this case a message is displayed on the LCD screen before the power turns off When Power Save is set to Standard or Stamina if you do not operate the camera for a certain period of time while the power is on the camera turns off automatically to prevent wearing down the battery pack Turn on th...

Page 89: ...inserted into the camera Make sure that the memory card is fully inserted into the camera Check the free capacity of the internal memory or memory card If it is full do one of the following Delete unnecessary images page 26 Change the memory card You cannot record images while charging the flash When recording movies it is recommended that you use the following memory cards Memory Stick PRO Duo me...

Page 90: ...Scene Selection The date and time are not displayed on the LCD screen While shooting the date and time are not displayed They are displayed only during playback Cannot insert dates on images This camera does not have a feature for superimposing dates on images By using PMB you can print or save images with the date page 80 The F value and shutter speed flash when you press and hold the shutter but...

Page 91: ... card is fully inserted into the camera The folder file name has been changed on your computer No guarantees are made for playing back on this camera files containing images which were processed on a computer or images which were shot using other cameras The camera is in USB mode Delete the USB connection page 83 The date and time are not displayed The screen display is set to display images only ...

Page 92: ...ter Connect the camera directly to your computer without passing through a USB hub or other device Cannot import images Connect the camera and your computer correctly making a USB connection page 82 When you shoot images with a memory card formatted by a computer you may not be able to import the images to a computer Shoot using a memory card formatted by the camera page 70 After making a USB conn...

Page 93: ... of the printer Images are printed with both edges cut off Depending on your printer all the edges of the image may be cut off Especially when you print an image shot with the image size set to 16 9 the lateral end of the image may be cut off When printing images using your printer cancel the trimming or borderless settings Consult the printer manufacturer as to whether the printer provides these ...

Page 94: ...es shot using other cameras or images modified with a computer may not be printed Printing is canceled Confirm that you have disconnected the dedicated USB cable before the PictBridge Connecting mark disappears Cannot insert the date or print images in the index mode The printer does not provide these functions Consult the printer manufacturer as to whether the printer provides these functions or ...

Page 95: ...then turn the camera on again Do not attempt to force the lens that has stopped moving The camera becomes warm when you use it for a long time This is not a malfunction The Clock Set screen appears when you turn on the camera Set the date and time again page 76 The internal rechargeable backup battery has discharged Insert a charged battery and set aside for 24 hours or more with the power left of...

Page 96: ...taking out and inserting the memory card several times The internal memory has experienced a format error or an unformatted memory card is inserted Format the internal memory or the memory card page 70 The inserted memory card cannot be used with the camera or the data is damaged Insert a new memory card E 61 ss E 62 ss E 91 ss A camera malfunction has occurred Initialize the camera page 66 then t...

Page 97: ...K position Set the switch to the recording position Read only memory card The camera cannot record or delete images on this memory card No images No images that can be played back have been recorded in the internal memory No images that can be played back have been recorded in this folder of the memory card Folder error A folder with the same first three digit number already exists on the memory c...

Page 98: ...y card of 1 GB or larger Maximum number of images already selected Up to 100 files can be selected when using Multiple Images You can add Print order marks to up to 999 files Cancel the selection The data transmission to the printer may not be completed yet Do not disconnect the dedicated USB cable Processing The printer is canceling the current print job You cannot print until it is finished This...

Page 99: ...mory Stick Duo media while reading or writing data Data may be corrupted in the following cases When the Memory Stick Duo media is removed or the camera is turned off during a read or write operation When the Memory Stick Duo media is used in locations subject to static electricity or electrical noise We recommend backing up important data Do not attach a label on the Memory Stick Duo media itself...

Page 100: ...When using a Memory Stick Duo media inserted into a Memory Stick Duo media Adaptor with a Memory Stick media compliant device make sure that the Memory Stick Duo media Adaptor is inserted facing the correct direction Note that improper use may damage the equipment Do not insert a Memory Stick Duo media Adaptor into a Memory Stick media compliant device without a Memory Stick Duo media attached Doi...

Page 101: ...battery pack to water The battery pack is not water resistant Do not leave the battery pack in extremely hot places such as in a car or under direct sunlight How to store the battery pack Fully discharge the battery pack before storing and store it in a cool dry place To maintain the battery pack s function fully charge the battery pack and then fully discharge it on the camera at least once a yea...

Page 102: ...t the same battery pack into the battery charger securely again When the CHARGE lamp flashes fast again this may indicate a battery error or that a battery pack other than the specified type has been inserted Check that the battery pack is the specified type If the battery pack is the specified type remove the battery pack replace it with a new one or another one and check if the battery charger o...

Page 103: ...etting 76 Delete 26 54 Delete REC Folder 73 Digital Zoom 60 DISP 19 DPOF 56 DRO 50 E Easy Mode Shooting 34 Viewing 51 EV 38 Exposure 38 F Face Detection 48 File Number 75 Flash 20 Focus 42 Folder Changing 72 Creating 71 Deleting 73 Selecting 58 Format 70 Function Guide 64 G Gourmet 31 Grid Line 59 H High Sensitivity 31 I Identifying parts 13 Image Index 25 Image Size 35 Initialize 66 Install 80 In...

Page 104: ...3 Red Eye Reduction 61 Retouch 53 Rotate 57 S Scene Recognition 45 Scene Selection 31 Screen 19 Select Folder 58 Self diagnosis display 96 Self Timer 22 Settings 12 Shooting Movie 16 Still image 29 Slideshow 52 Slow Synchro 20 Smart zoom 60 Smile Detection Sensitivity 47 Smile Shutter 21 Snow 31 Soft Snap 31 Software 80 Spot AF 42 Spot metering 44 SteadyShot 33 T Trimming 53 Troubleshooting 88 TV ...

Reviews: