background image

2-349-242-11(1)

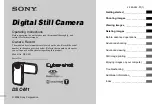
Digital Still Camera

Operating Instructions

Before operating the unit, please read this manual thoroughly, and 
retain it for future reference. 

Owner’s Record

The model and serial numbers are located on the side. Record the serial 
number in the space provided below. Refer to these numbers whenever 
you call upon your Sony dealer regarding this product.

Model No. DSC-M1

Serial No.                                              

DSC-M1

© 2004 Sony Corporation

Getting started

________________________

Shooting images

______________________

Viewing images

_______________________

Deleting images

______________________

Before advanced operations

_____________

Advanced shooting

_____________________

Advanced viewing

______________________

Still image printing

_____________________

Enjoying images on your computer

_________

Troubleshooting

_______________________

Additional information

___________________

Index

_________________________________

Summary of Contents for Cyber-shot DSC-M1

Page 1: ...g this product Model No DSC M1 Serial No DSC M1 2004 Sony Corporation Getting started________________________ Shooting images______________________ Viewing images_______________________ Deleting images ______________________ Before advanced operations_____________ Advanced shooting_____________________ Advanced viewing______________________ Still image printing _____________________ Enjoying image...
Page 2: ...off and on the user is encouraged to try to correct the interference by one or more of the following measures Reorient or relocate the receiving antenna Increase the separation between the equipment and receiver Connect the equipment into an outlet on a circuit different from that to which the receiver is connected Consult the dealer or an experienced radio TV technician for help The supplied inte...

Page 3: ...s For the Customers in the U S A and Canada THIS DEVICE COMPLIES WITH PART 15 OF THE FCC RULES OPERATION IS SUBJECT TO THE FOLLOWING TWO CONDITIONS 1 THIS DEVICE MAY NOT CAUSE HARMFUL INTERFERENCE AND 2 THIS DEVICE MUST ACCEPT ANY INTERFERENCE RECEIVED INCLUDING INTERFERENCE THAT MAY CAUSE UNDESIRED OPERATION THIS CLASS B DIGITAL APPARATUS COMPLIES WITH CANADIAN ICES 003 Notice If static electrici...

Page 4: ...r 99 99 of the pixels are operational for effective use However there may be some tiny black points and or bright points white red blue or green in color that constantly appear on the LCD screen and the LCD finder These points are normal in the manufacturing process and do not affect the recording in any way Be careful when placing the camera near a window or outdoors Exposing the LCD screen the f...

Page 5: ...he camera may not be able to record or play back properly The pictures used in this manual The photographs used as examples of pictures in this manual are reproduced images and are not actual images shot using this camera Carl Zeiss lens This camera is equipped with a Carl Zeiss lens which is capable of reproducing sharp images with excellent contrast The lens for this camera has been produced und...

Page 6: ... Memory Stick Duo with Memory Stick compatible equipment Be sure to insert the Memory Stick Duo into the supplied Memory Stick Duo Adaptor Memory Stick Duo Adaptor On InfoLITHIUM battery pack When using the battery pack for the first time Be sure to charge the supplied NP FT1 battery pack page 14 Recharging The battery pack can be charged even when it has not been completely discharged In addition...

Page 7: ...nited States and or other countries Macintosh Mac OS QuickTime iMac iBook PowerBook Power Mac and eMac are trademarks or registered trademarks of Apple Computer Inc Macromedia and Flash are trademarks or registered trademarks of Macromedia Inc in the United States and or other countries Intel MMX and Pentium are trademarks or registered trademarks of Intel Corporation In addition system and produc...

Page 8: ...ting the date and time on a still image 41 Viewing images on the LCD screen of your camera 43 Viewing images on a TV screen 46 Deleting images 49 Formatting a Memory Stick Duo 51 How to setup and operate your camera 53 Changing the menu settings 53 Changing the items in the Setup screen 54 Deciding the still image quality 54 Creating or selecting a folder 55 Creating a new folder 55 Changing the r...

Page 9: ...single image mode 84 Marking print marks in index mode 85 Copying images to your computer For Windows users 86 Installing the USB driver 87 Connecting the camera to your computer 88 Copying images 89 Viewing the images on your computer 91 Image file storage destinations and file names 92 Viewing image files once copied to a computer with your camera 94 Installing Picture Package 94 Copying images ...

Page 10: ... 7 qa 3 8 qs 4 5 9 qd q qf qg qh qj qk F PHOTO button 30 G HYBRID switch 32 H MENU button 53 113 I Image Size Delete button 24 49 J Control button Menu on v V b B z 20 Menu off 39 38 36 61 K For shooting Zoom W T lever 35 For viewing Playback zoom lever 72 Index lever 45 L RESET button 101 M POWER button 19 N CHG lamp orange 15 REC Recording mode lamp green 19 PLAY Playback mode lamp green 43 O MO...

Page 11: ...d receptacle G Hook for wrist strap Attaching the strap is recommended to prevent dropping the camera page 13 H Microphones I Multi connector J Multi connector cover Use a tripod with a screw length of less than 5 5 mm 7 32 inch You will be unable to firmly secure the camera to tripods having longer screws and may damage the camera ...

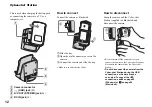
Page 12: ...amera and slide the tray Make sure to slide the tray firmly How to disconnect Grasp the camera and the Cyber shot Station supplied as illustrated and disconnect the camera Be sure to turn off the camera before you connect the camera to the Cyber shot Station or disconnect the camera from the Cyber shot Station Do not disconnect the camera from the Cyber shot Station during the USB connection as th...

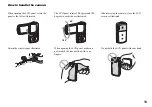
Page 13: ...ch the wrist strap as illustrated The LCD panel rotates 90 degrees and 180 degrees to each side as illustrated When opening the LCD panel make sure not to touch the lens portion with your fingers When carrying the camera close the LCD screen as illustrated Do not hold the LCD panel with your hand 90 180 ...

Page 14: ...Battery insertion slot Facing the V marks on the side of the battery pack in the same direction as the V mark on the battery insertion slot insert the battery pack until it is locked Connect the AC Adaptor supplied to the DC IN jack of the Cyber shot Station supplied Connect the DC plug with the v mark facing up Do not short the DC plug of the AC Adaptor with a metallic object as this may cause ma...

Page 15: ... begins The CHG lamp goes off when charging is completed You can connect the camera to the Cyber shot Station even when the LCD panel on the camera is open When charging is completed remove the camera from the Cyber shot Station Disconnecting the AC Adaptor from the Cyber shot Station Hold the DC plug itself and the Cyber shot Station as illustrated and disconnect the cable 4 Power cord mains lead...

Page 16: ...screen shows the remaining shooting or viewing time In standby mode the battery remaining time for still image shooting is indicated The displayed time remaining may not be correct under certain circumstances or conditions Charging time Approximate time to charge a completely discharged battery pack using the AC Adaptor at a temperature of 25 C 77 F The charging time may become longer under certai...

Page 17: ...ased on CIPA standard CIPA Camera Imaging Products Association Viewing still images2 2 Viewing single images in order at about three second intervals Shooting movies Viewing movies The number of images and the battery life that can be recorded viewed are decreased under the following conditions The surrounding temperature is low The flash is used The camera has been turned on and off many times Th...

Page 18: ...t wall socket After using the AC Adaptor disconnect it both from the multi connector of the camera and from a wall outlet wall socket The set is not disconnected from the AC power source mains as long as it is connected to the wall outlet wall socket even if the set itself has been turned off 1 Multi connector cover AC Adaptor DC plug 2 2 To wall outlet wall socket Power cord mains lead 1 Using yo...

Page 19: ...wer is on When the LCD screen is facing up with the LCD panel closed turning on the power turns the camera to PLAY mode Turning off the power Press POWER again The camera turn off When you turn on your camera for the first time the Clock Set screen appears page 21 Auto power off function If you do not operate the camera for about three minutes during shooting or viewing or when performing Setup th...

Page 20: ...etup item press v V b B on the control button to select the desired item and setting then press z to make the setting 1 Setup 2 FileNumber USBConnect VideoOut ClockSet OK Cancel 2 1 Camera Hybrid Rec Digital Zoom Date Time Red Eye Reduction AF Illuminator Auto Review Normal Off Off Off Auto off SELECT MENU Adjusting the LCD screen You can adjust the angle of the LCD screen to suit your situation A...

Page 21: ...ge 119 which provides the power for saving the time data ever becomes low the Clock Set screen will appear again When this happens reset the date and time by starting from step 2 above Select the year month day hour or minute item you want to set with b B on the control button The item to be set is indicated with v V To change the date and time on the Setup screen select Clock Set in Setup 2 pages...

Page 22: ...hen press z The date and time are entered and the clock starts to keep time To cancel the date and time setting select Cancel with v V b B on the control button then press z 2005 1 1 10 00 AM D M Y M D Y Y M D OK Cancel Clock Set 4 2005 1 1 10 30 AM D M Y M D Y Y M D OK Cancel Clock Set 5 Changing the language setting You can change the screen display like menu items warnings and messages in your ...

Page 23: ...direction and insert it all the way to the connector If the Memory Stick Duo is not inserted correctly you may not be able to record or display images with the Memory Stick Duo And also it may result in malfunction of both the camera and Memory Stick Duo To remove a Memory Stick Duo Push the Memory Stick Duo to pop it out Whenever the access lamp is lit the camera is recording or reading an image ...

Page 24: ...v V The image size is set When the setting is complete press Image Size so that the Image Size setup disappears from the LCD screen The number of images recordable remaining time of the Memory Stick Duo inserted in the camera is indicated on the lower part of the LCD screen The image size selected here is maintained even when the power is turned off 1 MODE 3 2 3M 1M VGA 3 Photo Size 5M 5M 2 3 2 3M...

Page 25: ...e on the right and choose the image size and image quality appropriate to the kind of images you want to shoot Short description of the image size The following illustration shows a brief image using the maximum image size and the minimum one Examples based on image size and image quality Photo size and image quality for still images 1 The factory setting is 5M It is the highest image quality on t...

Page 26: ...hooting situations and the subject Image quality Compression ratio Usage guideline Fine For recording or printing with better image quality Standard For recording a larger number of images Low compression looks better High compression normal Movie size Usage guidelines 640 30fps 1 640 480 For recording a clear and smooth movie 320 30fps 320 240 320 15fps 320 240 For recording a long movie ...

Page 27: ...acity 16MB 32MB 64MB 128MB 256MB 512MB Photo size 5M 4 7 9 14 18 28 37 57 67 103 138 210 3 2 4 7 9 14 18 28 37 57 67 103 138 210 3M 6 8 12 17 25 36 51 72 93 129 191 263 1M 10 12 20 25 41 51 83 102 148 183 302 372 VGA 14 16 29 32 59 65 119 131 216 237 439 483 1 When REC Mode is set to Normal For the number of images that can be saved in Multi Burst see page 66 2 For more information about the image...

Page 28: ...37 indicates 1 hour 10 minutes 37 seconds The maximum recording time is two hours per one recording Recording time can differ from these values according to shooting conditions Playback of movies not recorded with this camera cannot be guaranteed Capacity 16MB 32MB 64MB 128MB 256MB 512MB Movie size 640 30fps 0 00 43 0 01 29 0 02 59 0 05 59 0 10 49 0 22 01 320 30fps 0 02 21 0 04 45 0 09 34 0 19 12 ...

Page 29: ...e lens cover opens when the power is turned on in REC mode In PLAY mode turn to the REC mode with MODE Hold the camera steadily with both hands and position the subject in the center of the focus frame The minimum focal distance to a subject is approx 50 cm 19 3 4 inches To shoot subjects at distances closer than this use the close ups Macro mode page 36 The frame indicated on the LCD screen shows...

Page 30: ...o You can use PHOTO on the side of the LCD screen however you cannot press and hold PHOTO halfway down When operating the camera using a battery pack if you do not operate the camera for a while during recording or playback the camera turns off automatically to prevent wearing down the battery page 19 101 96 60min VGAFINE F2 8 30 3 AE AF lock indicator flashes green t Lights up VGA 101 60min 00 10...

Page 31: ... the menu Still image program shooting Program The necessary adjustments are made automatically like still image auto shooting but you can also change the focus and other adjustments as desired In addition you can also set the desired shooting functions using menus pages 53 and 113 Magnifying glass mode page 67 Twilight mode page 67 Twilight portrait mode page 67 Landscape mode page 67 Snow mode p...

Page 32: ... Multipoint AF Center AF and Spot AF page 57 When Camera is set to Auto in the menu settings the Multipoint AF is automatically selected Hybrid shooting In hybrid shooting the camera records an approximately 5 second movie before shooting a still image and an approximately 3 second movie after the still image The sound is also recorded in movies Using this shooting method you can record the feel o...

Page 33: ...before shooting a still image The shutter sound is recorded even when Beep is set to Off on the Setup screen In hybrid shooting the battery quickly runs low as compared with a normal shooting A pre post movie may become shorter in the following cases Shooting the next image continuously Changing the mode with MODE or the HYBRID switch before or after shooting Status of the LCD screen is directly r...

Page 34: ...5SEC switch to 5SEC In PLAY mode turn to the REC mode with MODE Press MOVIE fully down zzzzz appears on the LCD screen and the z indicator disappears every second To return to the normal recording Set the 5SEC switch to the left position To extend a recording During recording press MOVIE again The recording time is extended by five seconds You cannot stop a recording in the midst of a recording ev...

Page 35: ...the power is turned off Histogram on Image information can also be displayed during still image playback r Indicators off r LCD backlight off r Indicators on VGA 101 00 10 48 96 60min 640 30f VGA 00 10 48 96 101 60min 640 30f Using the zoom feature Slide the zoom lever to choose the desired zoom position for shooting The minimum focal distance to the subject Approx 50 cm 19 3 4 inches from the len...

Page 36: ...e zoom type Optical zoom Digital zoom The AF range finder frame does not appear when using the digital zoom The or indicators flashes and AF operates with priority on subjects located near the center The zoom may stop momentarily on the boundary between the optical zoom and the digital zoom Optical zoom Digital zoom The W side of this line is optical zoom area and the T side is digital zoom area Z...

Page 37: ...y displayed press MENU first so that the menu disappears You cannot use this function when Camera in the menu is set to Magnifying glass mode Twilight mode Landscape mode Fireworks mode and Candle mode In PLAY mode turn to the REC mode with MODE For shooting a photo Center the subject in the frame Press and hold PHOTO halfway down to focus on then press PHOTO fully down For shooting a movie Press ...

Page 38: ...Press V on the control button The self timer indicator appears on the screen When recording with the self timer using a tripod is recommended If the menu is currently displayed press MENU first so that the menu disappears In PLAY mode turn to the REC mode with MODE For shooting a photo Center the subject in the frame Press and hold PHOTO halfway down to focus on then press PHOTO fully down For sho...

Page 39: ...uttons on the side of the LCD screen You cannot press and hold PHOTO on the side of the LCD screen halfway down PHOTO MOVIE Image on the LCD screen Recorded image Selecting a flash mode Press v on the control button repeatedly to select a flash mode Each time you press v the indicator changes as follows No indicator Auto The flash automatically strobes when shooting images in a dark place The fact...

Page 40: ...Eye Reduction to On on the Setup screen page 116 The indicator appears on the LCD screen Red eye reduction takes approximately one second before actually shooting the image so hold the camera firmly to avoid shaking In addition be sure to tell the subject to hold still Red eye reduction may not produce the desired effects depending on individual differences the distance to the subject if the subje...

Page 41: ...e AF illuminator emitter at close range is not recommended Inserting the date and time on a still image Press MENU The menu appears When images are shot with the date and time superimposed the date and time cannot be removed later The date and time is not inserted in Multi Burst mode The date and time do not appear on the LCD screen during shooting instead indicator appears on the LCD screen The a...

Page 42: ...onto the image After the setting has been completed press MENU first so that the menu disappears and shoot the image If you select Date the date is superimposed onto the image in the order selected in Setting the date and time page 21 This setting is maintained even when the power is turned off Day Time Date Off 2 1 Camera Hybrid Rec Digital Zoom Date Time Red Eye Reduction AF Illuminator Auto Rev...

Page 43: ...using b z B on the side of the LCD screen For a detailed description of the indicators see page 125 BACK NEXT VOLUME VGA 60min 10 30PM 2005 1 1 101 0009 9 9 101 SINGLE DISPLAY SINGLE DISPLAY Single single image screen Index nine image screen Index sixteen image screen Viewing single images Turn on the power and turn to the PLAY mode with MODE The playback mode lamp lights up and the last image in ...

Page 44: ...ng order pre movie t still image t post movie To stop playback Press z on the control button again To adjust the volume Press v V on the control button to adjust the volume To advance or rewind the movie Press B cue or b rev on the control button during playback To return to the normal playback press z When playing back a hybrid mode image you cannot use advance rewind pause operations Even if you...

Page 45: ... the index lever to the upper position again The display switches to the index sixteen image screen To display the next previous index screen Press v V b B on the control button to move the yellow frame up down left right Select the desired still image with v V b B on the control button The image in the yellow frame is selected To return to the single image screen Slide the index lever to the lowe...

Page 46: ... to the A V OUT STEREO jack of the Cyber shot Station and the audio video input jacks of the TV If your TV is a monaural type connect the yellow plug of the A V connecting cable to the video input jack and the white or the red plug to the audio input jack on the TV If you connect the white plug the sound is L left signal If you connect the red plug the sound is R right signal When the USB cable is...

Page 47: ...e camera and turn to the PLAY mode with MODE Press b B on the control button to select the desired image When the LCD panel is closed with the LCD screen facing up you can use b B on the side of the LCD screen When using your camera abroad it may be necessary to switch the video output signal to match that of your TV system page 117 3 TV Video switch BACK NEXT VOLUME VGA 10 30PM 2005 1 1 101 0008 ...

Page 48: ...ral America Chile Colombia Ecuador Jamaica Japan Korea Mexico Peru Surinam Taiwan the Philippines the U S A Venezuela etc PAL system Australia Austria Belgium China Czech Republic Denmark Finland Germany Holland Hong Kong Hungary Italy Kuwait Malaysia New Zealand Norway Poland Portugal Singapore Slovak Republic Spain Sweden Switzerland Thailand United Kingdom etc PAL M system Brazil PAL N system A...

Page 49: ...n hybrid mode movies recorded simultaneously are also deleted Select Delete with v on the control button then press z The message Access appears and the image has been deleted To continue and delete other images Display the image to be deleted with b B on the control button Then select Delete with v and press z To cancel deleting Select Exit with V on the control button then press z BACK NEXT VOLU...

Page 50: ...Select an image you want to delete with v V b B on the control button then press z The Delete indicator appears on the selected image At this point the image has not yet been deleted Repeat this step for all of the images you want to delete To cancel a selection select the image then press z on the control button again so that the indicator disappears 1 All In This Folder Delete Select Exit All In...

Page 51: ... cancel deleting select Cancel then press z Formatting a Memory Stick Duo Insert the Memory Stick Duo you want to format into the camera The term formatting means preparing a Memory Stick Duo to record images this process is also called initialization The Memory Stick Duo supplied with your camera and commercially available Memory Stick Duo are already formatted and can be used immediately Operati...

Page 52: ... then press B Select OK with v then press z To cancel the formatting Select Cancel with V on the control button then press z Select OK with v on the control button then press z The message Formatting appears When this message disappears the format is complete 2 Setup Mode 2 1 Memory Stick Tool Format Create REC Folder Change REC Folder OK Cancel 3 Ready Format All data will be erased Cancel OK 60m...

Page 53: ...ter setting an item c Press v V on the control button to select the desired setting The selected setting is enlarged and the setting is entered When the v V b B marks appear with an item There are items that are not displayed on the screen Press v V b B on the control button to display these items To turn off the menu display Press MENU again You cannot select items displayed in gray For a detaile...

Page 54: ...play Press MENU again To return to the menu from the Setup screen Press b on the control button to return to the position enclosed by the frame in step 3 then press b again For a detailed description of the Setup items see page 116 Deciding the still image quality You can select the still image quality from Fine high quality or Standard Before operation Set Camera in the menu to other than Auto pa...

Page 55: ...r is automatically created Creating a new folder a Select Memory Stick Tool with v V Create REC Folder with B v V and OK with B v then press z The creating folder screen appears b Select OK with v then press z A new folder is created with a number one higher than the largest number in the Memory Stick Duo and the folder becomes the recording folder To cancel folder creation Select Cancel in step 1...

Page 56: ...lder with b B and OK with v then press z To cancel changing the recording folder Select Cancel in step 1 or 2 You cannot select the 100 folder as a recording folder page 92 The image is stored in the newly selected folder You cannot move recorded images to a different folder with this camera BACK NEXT Select REC Folder Folder Name No Of Files Created 102 0 102 OK Cancel 2005 1 1 1 05 34 AM 2 2 ...

Page 57: ... subject does not deviate from the range finder frame Before operation Set Camera in the menu to other than Auto pages 53 and 113 a Turn to the REC mode b Press MENU The menu appears c Select 9 Focus with b B then select the desired AF range with v V The focus is adjusted automatically For shooting still images the color of the AF range finder frame changes from white to green when the focus is ad...

Page 58: ...sing AF lock you can capture an image with the correct focus even if the subject is at the edge of the frame You can carry out the AF lock adjustment process before you press PHOTO fully down 60min 101 F3 5 30 VGA FINE 96 60min 101 F3 5 30 VGA FINE 96 AE AF lock indicator AF range finder frame m Setting the distance to the subject Focus preset When shooting an image using a previously set distance...

Page 59: ...nt You can manually adjust the exposure determined by the camera Use this mode when the proper exposure cannot be obtained for example when the contrast difference between light and dark between the subject and the background is extremely large The compensation value can be set in 1 3EV steps in the range from 2 0EV to 2 0EV Before operation Set Camera in the menu to other than Auto pages 53 and 1...

Page 60: ... also appears when the Camera in the menu is set to Auto but you cannot adjust the exposure The histogram also appears when you press while playing back a single image page 43 The histogram does not appear in the following cases When the menu is displayed When using playback zoom When recording or playing back movies appears and the histogram does not appear in the following cases When recording i...

Page 61: ...ges with different exposures to find the brightness that suits your taste m Adjust in the direction m Adjust in the direction Selecting the metering method You can select the metering mode that sets which part of the subject to measure to determine the exposure Multi pattern metering No indicator The image is divided into multiple regions and metering is performed for each region The camera judges...

Page 62: ...es with the exposure shifted Exposure Bracket The Exposure Bracket function records a series of three images with the exposure values automatically shifted This lets you select the image with the appropriate exposure after recording when you are unable to shoot good pictures depending on the brightness of the subject Before operation Set Camera in the menu to other than Auto pages 53 and 113 VGAFI...

Page 63: ...the exposure is manually adjusted page 59 the exposure is shifted based on the adjusted brightness If the subject is too bright or too dark you may be unable to shoot properly with the selected bracket adjustment value You may not be able to shoot images in Exposure Bracket mode depending on the Scene Selection mode page 69 Adjusting color tones White Balance You can set the white balance mode acc...

Page 64: ...ith v V To reactivate auto adjustment Select Auto in step 3 Under fluorescent lights that flicker the white balance adjustment function may not work correctly even though you select Fluorescent When the flash strobes the manual setting is canceled and the image is recorded in Auto except in Flash mode Some settings cannot be selected depending on the Scene Selection mode page 69 Adjusting the flas...

Page 65: ...stops even if you press and hold PHOTO a Turn to the REC mode b Press MENU The menu appears c Select Mode REC Mode with b B then select Speed Burst with v V d Shoot the image When you press and hold down PHOTO the camera records up to four images in succession If you release PHOTO shooting will stop at that point When Recording disappears you can shoot the next image To return to normal mode Selec...

Page 66: ...s images The number of images is listed in Fine Standard order The values for the number of images that can be saved may vary depending on the shooting conditions You cannot use the following functions in Multi Burst mode Flash Inserting the date and time When shooting in hybrid mode you cannot shoot in Multi Burst mode When Camera in the menu is set to Auto frame interval is automatically set to ...

Page 67: ...s enlarged using the digital zoom Twilight mode Allows you to shoot night scenes at far distance without losing the dark atmosphere of the surroundings The shutter speed becomes slower so using a tripod is recommended Twilight portrait mode Suitable for shooting portraits in dark places Allows you to shoot sharp images of people in dark places without losing the dark atmosphere of the surroundings...

Page 68: ...n other bright places The shutter speed becomes faster so images shot in dark places become darker Fireworks mode You can record fire works in all their splendor The focus distance is set to infinity You can change the shutter speed by setting an EV adjustment value page 59 The shutter speed becomes slower so using a tripod is recommended Candle mode You can record parties candle services and othe...

Page 69: ...sh mode is predetermined to make the optimum settings to match the scene See the table below for the function setting of each shooting mode a indicates that the function can be set to your preference 1 When shooting movies you cannot use this item 2 When shooting still images you can select only Auto or Function Macro Flash mode1 AF range finder frame Focus preset Exposure bracket1 White balance S...

Page 70: ...on reduces noise from recorded images providing clear images When the shutter speed is 1 6 second or slower the camera automatically activates the NR slow shutter function and NR is indicated next to the shutter speed indicator Press PHOTO fully down r Then the screen turns black r Finally when Processing disappears the image has been recorded Do not move the camera while Capturing appears To elim...

Page 71: ... Memory Stick Duo When the first or last image in the folder is displayed the following indicators appear on the screen Moves to the previous folder Moves to the next folder Moves to both the previous and next folders Single screen Index nine image screen Index sixteen image screen When no images are stored in the folder No file in this folder appears MODE Control button MENU BACK NEXT Select Fold...

Page 72: ...the desired portion of the image with v V b B v To view more of the top of the image V To view more of the bottom of the image b To view more of the left side of the image B To view more of the right side of the image e Adjust the image size with playback zoom To cancel playback zoom Press z You cannot use playback zoom for movies and Multi Burst images If you slide playback zoom to the side while...

Page 73: ...for checking your images or for presentations etc a Turn to the PLAY mode with MODE b Press MENU The menu appears c Select Slide with b B then press z Set the following items with v V b B Interval Sets the playback interval of still images 3 sec 5 sec 10 sec 30 sec 1 min Image Folder Plays back all images in the selected folder All Plays back all images stored in the Memory Stick Duo Repeat On Pla...

Page 74: ...U The menu appears c Select Rotate with b B then press z d Select with v then rotate the image with b B e Select OK with v V then press z To cancel rotation Select Cancel in step 4 or 5 then press z You cannot rotate protected images and movies and Multi Burst images Even when you rotate an image recorded in Hybrid mode the image is not rotated in Hybrid playback You may not be able to rotate imag...

Page 75: ... z again The playback starts from the frame displayed on the LCD screen Playing back frame by frame a Turn to the PLAY mode with MODE b Select the Multi Burst image with b B The selected Multi Burst image is played back continuously c Press z when the desired frame is displayed Step appears d Advance the frame with b B B A next frame is displayed When you keep and press B the frame advances b A pr...

Page 76: ...e data in the Memory Stick Duo even if images are protected and these images cannot be recovered It may take some time to protect the images In single image mode a Turn to the PLAY mode with MODE b Display the image you want to protect with b B c Press MENU The menu appears d Select Protect with b B then press z The displayed image is protected The protect indicator appears on the image e To conti...

Page 77: ... 4 or select Exit in step 8 then press z To cancel individual protection Select the image to be unprotected with v V b B in step 5 then press z The indicator turns gray Repeat this operation for all images that are to be unprotected Press MENU select OK and then press z To protect all images in the folder Select All In This Folder in step 4 and press z Select On then press z To cancel protection o...

Page 78: ...der as the newest file To cancel resizing Select Cancel in step 5 You cannot change the size of movies or Multi Burst images When you change from a small size to a large size the image quality deteriorates You cannot resize to an image size of 3 2 When you resize a 3 2 image the upper and lower black portions will be displayed on the image ...

Page 79: ...patible printer See the users manual supplied with the printer for details Printing with a computer page 98 You can print images that have been loaded to a computer using the PicturePackage software included on the CD ROM supplied with your camera See the users manual supplied with the printer for the printer operation method Printing at a shop page 84 Just bring the Memory Stick Duo and the Memor...

Page 80: ... When an error notification is received from the connected printer the indicator flashes for approximately five seconds Check the connected printer Single print Index print If you arrange the same image side by side select This image in single image mode then set Index to On page 82 The number of images printed on a single index print differs according to the printer Preparing the camera Set the U...

Page 81: ...he camera you cannot use the PictBridge function Disconnect the USB cable from the Cyber shot Station and set USB Connect to PictBridge page 80 Printing in single image mode When you connect the camera and a printer the print menu appears a Select the desired printing type with v V then press z All In This Folder Prints all the images in the folder DPOF image Prints all the images with the mark pa...

Page 82: ...ot be provided depending on a printer Setting items the printer does not support cannot be displayed c Select Quantity with V select the number of sheets with b B When Index is set to Off the number of sheets of the selected image When Index is set to On the number of sheets of index images When This image is selected in step 1 this is the number of the same image that can be arranged on a single ...

Page 83: ...s all the images in the folder e Set the print setting with v V b B Index Select On to print index images Size Selects the desired paper size Date To insert the date and time on images select Date or Day Time When you select Date for Date setting the date will be inserted in the order set in Setting the date and time page 21 Date function may not be provided depending on a printer f Select Quantit...

Page 84: ...ted beforehand with print marks is convenient when having images printed at a print service shop You cannot mark movies When you mark images shot in Multi Burst mode all the images are printed on one sheet divided into 16 panels You cannot set the number of prints Marking print marks in single image mode a Turn to the PLAY mode with MODE b Display the image you want to mark with b B c Press MENU T...

Page 85: ...ou cannot mark the mark in All In This Folder e Select the image you want to mark with v V b B then press z The green mark appears on the selected image f Repeat step 5 to mark other images g Press MENU h Select OK with B then press z The mark turns white The mark setting is completed To unmark marks Select the images to be unmarked with v V b B in step 5 then press z To unmark all the marks in th...

Page 86: ...are two modes for a USB connection when connecting with a computer Normal and PTP modes The default setting is the Normal mode This section describes the Normal mode as an example For details on the PTP connection see page 117 Communication with your computer When your computer resumes from the suspend or sleep mode communication between your camera and your computer may not recover at the same ti...

Page 87: ... software Picture Package click Picture Package The USB driver will be installed when Picture Package is installed page 94 When the computer is in use shut down all application software before you install the USB driver b Click USB Driver on the title screen The InstallShield Wizard screen appears c Click Next The USB driver installation starts When the installation is completed the screen informs...

Page 88: ...yber shot Station e Connect the USB cable to your computer When using Windows XP the AutoPlay wizard automatically appears on the desktop Proceed to page 90 f Connect the camera to the Cyber shot Station and turn on the camera Make sure to slide the tray firmly USB Mode Normal appears on the LCD screen of the camera When a USB connection is established for the first time your computer automaticall...

Page 89: ...ff the camera For Windows 98 or 98SE users Confirm that the access indicators page 88 on the screen are turned white and carry out only step 5 above Copying images Windows 98 98SE 2000 Me a Double click My Computer then double click Removable Disk The contents of the Memory Stick Duo inserted in your camera appear This section describes an example of copying still images to the My Documents folder...

Page 90: ...ecessary Click the Device Manager tab 3 If Sony DSC is displayed delete it 1 Right click Sony DSC 2 Click Uninstall The Confirm Device Removal screen appears For Windows 98 98SE Me users click Remove 3 Click OK The device is deleted Try the USB driver installation again using the CD ROM page 87 Windows XP Copying images using the Windows XP AutoPlay wizard a Make a USB connection page 88 Click Cop...

Page 91: ...t it Then perform the procedure from step 1 again Viewing the images on your computer a Click Start then click My Documents The My Documents folder contents are displayed This section describes the procedure for viewing copied images in the My Documents folder When not using Windows XP double click My Documents on the desktop b Double click the desired image file The image is displayed For playing...

Page 92: ...ie and image data which was recorded using another camera equipped with the folder creating function When not creating any folders there is only the 101 folder Folder containing movie data which was recorded using your camera except for movie data recorded in hybrid mode When not creating any folder there is only the 101 folder Folder containing movie data etc which was recorded using the camera n...

Page 93: ... its corresponding index image file Folder File name File meaning 101MSDCF to 999MSDCF DSC0ssss JPG Still image files shot in Normal mode page 29 Hybrid mode page 32 Exposure Bracket mode page 62 Speed Burst mode page 65 Multi Burst mode page 66 DSC0ssss MP4 Movie files recorded in simultaneously in hybrid mode page 32 101MNV01 to 999MNV01 M4V0ssss MP4 Movie files recorded in normal mode page 30 M...

Page 94: ...extension for movies is MP4 Do not change the extension b Copy the image file to the Memory Stick Duo folder 1 Right click the image file then click Copy 2 Select and double click the DCIM for photo or MP_ROOT for movie folder from Removable Disk or Sony MemoryStick in My Computer 3 Right click the sssMSDCF for photo or sssMNV01 for movie folder and click Paste sss stands for any number within the...

Page 95: ...bove OS is preinstalled CPU Intel Pentium III 1 GHz or faster is recommended Memory 256 MB or more is recommended a Turn on your computer and insert the CD ROM supplied into the CD ROM drive The installation menu screen appears If you have not yet installed the USB driver page 87 do not connect the camera to the computer before you install the Picture Package software except for Windows XP b Click...

Page 96: ...Folder are displayed h Remove the CD ROM Copying images using Picture Package Connect the camera and your computer with the USB cable Picture Package starts up automatically and the images are copied to the computer automatically After the images are copied Picture Package Viewer starts up and the images copied are displayed Normally Picture Package and Date folders are created inside the My Pictu...

Page 97: ...n the left side of the screen then click Viewing video and pictures on PC in the lower right corner of the screen The screen used for viewing images appears Storing images on a CD R Click Save the images on CD R on the left side of the screen then click Save the images on CD R in the lower right corner of the screen The screen used for storing images on a CD R appears A CD R drive is required to s...

Page 98: ...g images a Perform the procedures described under Viewing images on a computer page 97 to display the list of images b Double click and select the images you want to print from the list c Click the button on the screen The screen used for printing images appears d Click File in the upper left corner of the screen then select Print The printing wizard screen appears e Set the paper size and the num...

Page 99: ...escribes the Normal mode as an example For details on the PTP connection see page 117 Communication with your computer When your computer resumes from the suspend or sleep mode communication between your camera and your computer may not recover at the same time When a USB connector is not provided on your computer When neither a USB connector nor a Memory Stick slot is provided you can copy images...

Page 100: ...you want to copy are stored 4 Drag and drop the image files to the hard disk icon The image files are copied to your hard disk For details on the storage location of the images and file names see page 92 c Viewing the images on your computer 1 Double click the hard disk icon 2 Double click the desired image file in the folder containing the copied files The image file opens To view movies MPEG4 co...

Page 101: ...the camera off page 19 The battery pack cannot be installed Install the battery pack correctly page 14 The CHG lamp flashes when charging a battery pack Install the battery pack correctly page 14 The battery pack has malfunctioned Consult your Sony dealer or local authorized Sony service facility The battery pack is discharged Re insert the AC Adaptor and then charge the battery pack The CHG lamp ...

Page 102: ...nctioned Consult your Sony dealer or local authorized Sony service facility The battery pack is discharged Install a charged battery pack page 14 The battery pack is dead page 121 Replace the battery pack with a new one Properly install the camera to the Cyber shot Station page 12 It is due to open the LCD panel fast Rotate the LCD panel slowly again The power turns off suddenly If you do not oper...

Page 103: ...the LCD backlight with page 35 The image is too bright You are shooting a spotlighted subject in a dark location such as on a stage Adjust the exposure page 59 The brightness of the LCD screen is too bright Adjust the brightness of the LCD backlight page 117 The image is monochrome black and white Set PFX P Effect to the other modes than B W page 70 Vertical streaks appear when you are shooting a ...

Page 104: ...er mode than Magnifying glass mode Twilight mode Landscape mode Fireworks mode or Candle mode for the Scene Selection function page 69 You cannot shoot continuously The capacity of the Memory Stick Duo is full Delete unnecessary images saved in the Memory Stick Duo page 49 or change the Memory Stick Duo The battery pack is discharged so you can shoot only one image Install a charged battery pack p...

Page 105: ... setting pages 54 and 117 The connection is not correct Check the connection page 46 The USB jack is connected Follow the procedure of the note P on page 89 Windows or 1 on page 99 Macintosh and disconnect the USB cable The image cannot be played back on a computer See page 106 Symptom Cause Solution Your camera cannot delete an image The image is protected Cancel the protection page 76 You are us...

Page 106: ...ce page 86 Install the USB driver page 87 Your computer does not properly recognize the device because you connected the camera and your computer with the USB cable before you installed the USB Driver from the supplied CD ROM Delete the erroneously recognized device from your computer page 90 then install the USB driver page 87 You cannot copy images Make a correct USB connection between the camer...

Page 107: ...You cannot format a Memory Stick Duo You are using the Memory Stick Duo with the write protect switch and the switch is set to the LOCK position Set the switch to the recording position page 119 You have formatted a Memory Stick Duo by mistake All the data on the Memory Stick Duo are deleted by formatting You cannot restore them If you are using the Memory Stick Duo with write protect switch we re...

Page 108: ...index print function or not The date may not be inserted in the index mode depending on the printer Consult with the printer manufacturer The paper size you want to print on does not appear Check with the printer manufacturer whether the printer supports the paper size you want to print on is printed on the date inserted part The images that do not have the recording date data cannot be printed wi...

Page 109: ...s not work The built in microcomputer is not working properly Disconnect and then after one minute reconnect all power sources and turn on the camera If this does not work press the RESET button with a fine tipped object then turn the power on again This will clear the date and time settings etc page 101 You cannot identify an indicator on the screen Check the indicator pages 123 to 126 The lens g...

Page 110: ...space The capacity of the Memory Stick Duo is insufficient You cannot record images Delete unnecessary images page 49 Read only memory Your camera cannot record or delete images to this Memory Stick Duo No file in this folder No images have been recorded in this folder Folder error A folder with the same first three digits number already exists in the Memory Stick Duo For example 123MSDCF and 123A...

Page 111: ...tructions supplied with the printer Connect to device You tried to print images before the printer connection was established Connect to a PictBridge compliant printer No printable image You tried to execute DPOF image without checking the mark You tried to execute All In This Folder while selecting the folder that stores only movies You cannot print movies Printer busy Since the printer is busy i...

Page 112: ...even after trying the corrective actions a few times contact your Sony dealer or local authorized Sony service facility Code Cause Countermeasure C 32 ss There is trouble with your camera s hardware Turn the power off and on again page 19 C 13 ss The camera cannot read or write data on the Memory Stick Duo Re insert the Memory Stick Duo several times An unformatted Memory Stick Duo is inserted For...

Page 113: ...ge 58 WB White Bal 1 2 xAuto Sets the white balance page 63 ISO1 400 200 100 xAuto Selects the ISO sensitivity Select a large number when shooting in dark locations or shooting a subject moving at high speed or select a small number to obtain high image quality Note that the image tends to become noisier as the ISO sensitivity number increases P Quality 1 xFine Standard Records images with fine st...

Page 114: ...e adjustment value page 62 This setting cannot be made when Mode REC Mode in the menu is set to other than Exp Brktg Interval 4 1 7 5 1 15 x1 30 Selects the Multi Burst shutter interval page 66 This setting cannot be made when Mode REC Mode in the menu is set to other than Multi Burst Flash Level 5 xNormal Selects the amount of flash light page 64 PFX P Effect 1 B W Sepia xOff Sets the image speci...

Page 115: ...using a PictBridge compliant printer page 80 Slide Interval Image Repeat Start Cancel Sets the slide show interval for still images page 73 Only in single image mode x3 sec 5 sec 10 sec 30 sec 1 min Sets the range of the playback images xFolder All Plays back images repeatedly xOn Off Starts the slide show Cancels the slide show Resize 5M 3M 1M VGA Cancel Changes the recorded still image size page...

Page 116: ...s the red eye phenomenon when using a flash page 40 AF Illuminator xAuto Off Selects whether to emit an AF assist light in the dark Helps when it is hard to focus on the subject under dark lighting page 40 Auto Review On xOff Selects whether to automatically display the recorded image on the LCD screen immediately after shooting a still image When set to On the recorded image is displayed for appr...

Page 117: ...le Number xSeries Reset Assigns numbers to files in sequence even if the Memory Stick Duo is changed or the recording folder is changed Resets the file numbering and starts from 0001 each time the folder is changed When the recording folder contains a file a number one higher than the largest number is assigned USB Connect PictBridge PTP xNormal Connects the camera with a PictBridge compatible pri...

Page 118: ...pe the surface with a dry cloth Do not use the following as this may damage the finish or the casing Chemical products such as thinner benzine alcohol disposable cloth insect repellent or insecticide etc Touch the camera with the above on your hand Contact with rubber or vinyl for a long time On operating temperature Your camera is designed for use between the temperatures of 0 C and 40 C 32 F and...

Page 119: ...tick functions 1 MagicGate Memory Stick Duo and Memory Stick PRO Duo are equipped with MagicGate functions MagicGate is copyright protection technology that uses encryption technology Data recording playback that requires MagicGate functions cannot be performed with this camera 2 Supports high speed data transfer using a parallel interface Memory Stick Duo formatted with a computer is not guarante...

Page 120: ...u insert a Memory Stick Duo into a Memory Stick compliant device without a Memory Stick Duo Adaptor you might not be able to remove it from the device When inserting a Memory Stick Duo into a Memory Stick Duo Adaptor make sure the Memory Stick Duo is inserted facing in the correct direction then insert it all the way in Incorrect insertion may result in a malfunction When using a Memory Stick Duo ...

Page 121: ...e the battery pack from your camera then store it in a dry cool place This is to maintain the battery pack s functions To use the battery pack up on your camera leave the power on in slide show playback mode page 73 until the power goes off Always carry and store the battery pack in the battery case to prevent the battery terminals from becoming dirty or short circuited Battery life The battery li...

Page 122: ...at a 47 kΩ load Output impedance 1 kΩ USB jack B USB connection High Speed USB USB 2 0 High Speed compatible DC IN jack Camera connector x AC LM5 LM5A AC Adaptor Input rating 100 V to 240 V AC 50 60 Hz AC LM5 10 W AC LM5A 11 W Output rating 4 2 V DC 1 5 A Operating temperature 0 C to 40 C 32 F to 104 F Storage temperature 20 C to 60 C 4 F to 140 F Dimensions AC LM5 Approx 47 30 80 mm 1 7 8 1 3 16 ...

Page 123: ...balance 63 Picture effect 70 Date time 41 Sharpness 114 Contrast 114 Saturation 114 ISO number 113 C 32 00 Self diagnosis display 112 Red eye reduction 40 Flash mode 39 Photo size 24 FINE STD Image quality 54 AF illuminator 40 116 BRK Photo recording mode 400 Remaining number of recordable images 27 Menu Guide menu 53 Pressing MENU switches the menu guide menu on off 1 60min 2 0EV 101 400 VGA 00 2...

Page 124: ...r frame 57 Spot metering cross hair 62 Self timer 38 Movie size 24 2 0EV EV level value 59 00 28 25 Maximum recordable time 28 Movie recording mode z AE AF lock 30 58 2000 NR slow shutter 70 500 Shutter speed F4 5 Aperture value 2 0EV EV level value 59 Movie recording 30 zzzzz Movie remaining time 34 00 00 02 Recording time 2 0EV EV level value 59 3 4 5 6 7 ...

Page 125: ...ode playback 44 Change folder 71 Protect 76 PictBridge connecting 80 Print DPOF mark 84 Photo recording mode Not disconnect USB cable 82 Histogram 60 Flash Metering mode 61 White balance 63 500 Shutter speed F4 5 Aperture value 2 0EV EV level value 59 ISO number 113 Recording date time of the playback image 41 Menu Guide menu 53 Pressing MENU switches the menu guide menu on off 1 60min C 32 00 101...

Page 126: ...d folder Movie size 24 Playback Stop 44 00 00 12 Counter 44 Volume 44 C 32 00 Self diagnosis display 112 Playback bar 44 Change folder 71 Movie recording mode Protect 76 Menu Guide menu 53 Pressing MENU switches the menu guide menu on off 1 60min VOL C 32 00 00 00 00 101 12 12 3 640 30f 1 2 4 DPOF 101 VOL 2 3 4 ...

Page 127: ...mpression ratio 26 Contrast 114 Control button 20 Copying images to your computer 89 90 96 99 Cyber shot Station 12 D Daylight 63 DC plug 14 18 Deleting images 49 Digital zoom 36 DPOF 84 E Enlarging an image 72 EV adjustment 59 Exposure Bracket 62 F File names 92 File storage destinations 92 Fireworks mode 68 Flash 64 Flash Level 64 Flash mode 39 Fluorescent 63 Focus 57 Focus preset 58 Folder 55 7...

Page 128: ... viewing time 16 RESET button 101 Resize 77 Rotate 74 S Saturation 114 Scene Selection 67 Screen display 35 123 Self diagnosis display 112 Self timer 38 Sepia 70 Setting date and time 21 117 Setup 54 Sharpness 114 Shooting movies 30 Single screen 43 Slide show 73 Slow synchro 39 Snow mode 68 Speed Burst 65 Spot AF 57 Spot metering 61 Still image auto shooting 29 Superimposing the date and time 41 ...

Page 129: ......

Page 130: ......

Page 131: ......

Page 132: ...per using VOC Volatile Organic Compound free vegetable oil based ink Additional information on this product and answers to frequently asked questions can be found at our Customer Support Website Sony Corporation Printed in China ...

Reviews: