


13
G
e
tti
ng st
ar
te
d
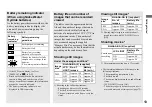
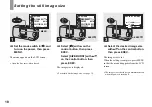
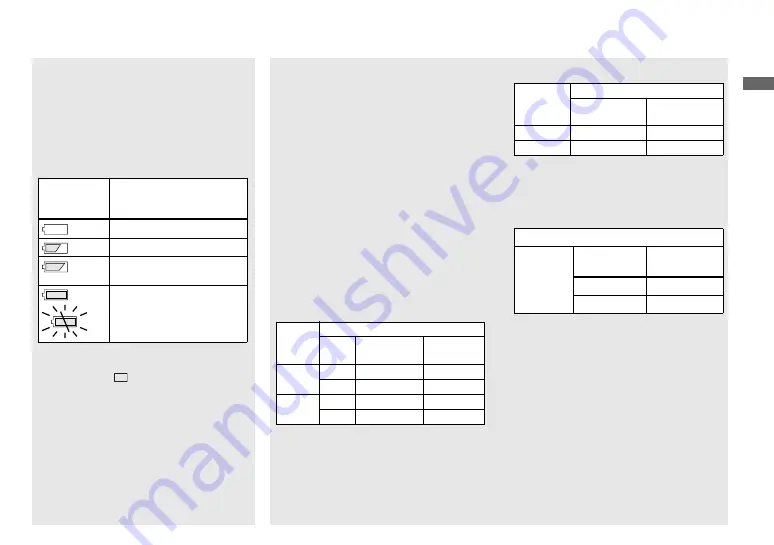
Battery remaining indicator
(When using Nickel-Metal
Hydride batteries)
As the battery power decreases with use, the
battery remaining indicator displays the
amount of power remaining using the
following symbols.
•
If the LCD screen display is off, set
[DISPLAY] in [
] to [ON].
•
Based on the conditions under which the
camera is being used and the state of the
charge, or on the environment, this information
may not be correctly indicated.
•
The battery remaining indicator is not
displayed in USB connecting.
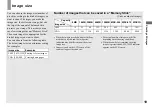
Battery life and number of
images that can be recorded/
viewed
The tables show the approximate battery
life and the number of images that can be
recorded/viewed with fully charged
batteries at a temperature of 25°C (77°F) in
auto adjustment mode. The numbers of
images that can be recorded/viewed take
into account changing the supplied
“Memory Stick” as necessary. Note that the
actual numbers may be less than indicated
depending on the conditions of use.
Shooting still images
Under the average conditions
1)
1) Shooting in the following situations:
– Shooting one time every 30 seconds
– The flash strobes once every two times
– The power turns on and off once every ten
times.
Viewing still images
2)
2) Viewing single images in order at about 3-
second intervals with [LCD LIGHT] set to
[ON]
Shooting movies
3)
3) The maximum shooting time is 15 seconds.
•
The remaining indicator will decrease in the
following situations:
– The surrounding temperature is low
– The flash is used
– The camera has been turned on and off many
times
– [LCD LIGHT] is set to [ON]
– The battery capacity decreases as you use it
more and more and as time passes (page 75).
Battery
remaining
indicator
Battery remaining
guidelines
Sufficient power remaining
Battery half full
Battery low, recording/
playback will stop soon.
Change the batteries for fully
charged ones, or charge these
batteries.
(The warning indicator flashes.)
Image
size
NH-AAA-DA (2) (supplied)
LCD
LIGHT
No. of
images
Battery
life (min.)
2.0M
ON
Approx. 150
Approx. 75
OFF
Approx. 170
Approx. 85
VGA
ON
Approx. 150
Approx. 75
OFF
Approx. 170
Approx. 85
Image
size
NH-AAA-DA (2) (supplied)
No. of
images
Battery life
(min.)
2.0M
Approx. 3000
Approx. 150
VGA
Approx. 3000
Approx. 150
NH-AAA-DA (2) (supplied)
Continuous
recording
LCD LIGHT
Battery life
(min.)
ON
Approx. 80
OFF
Approx. 90


