2-19
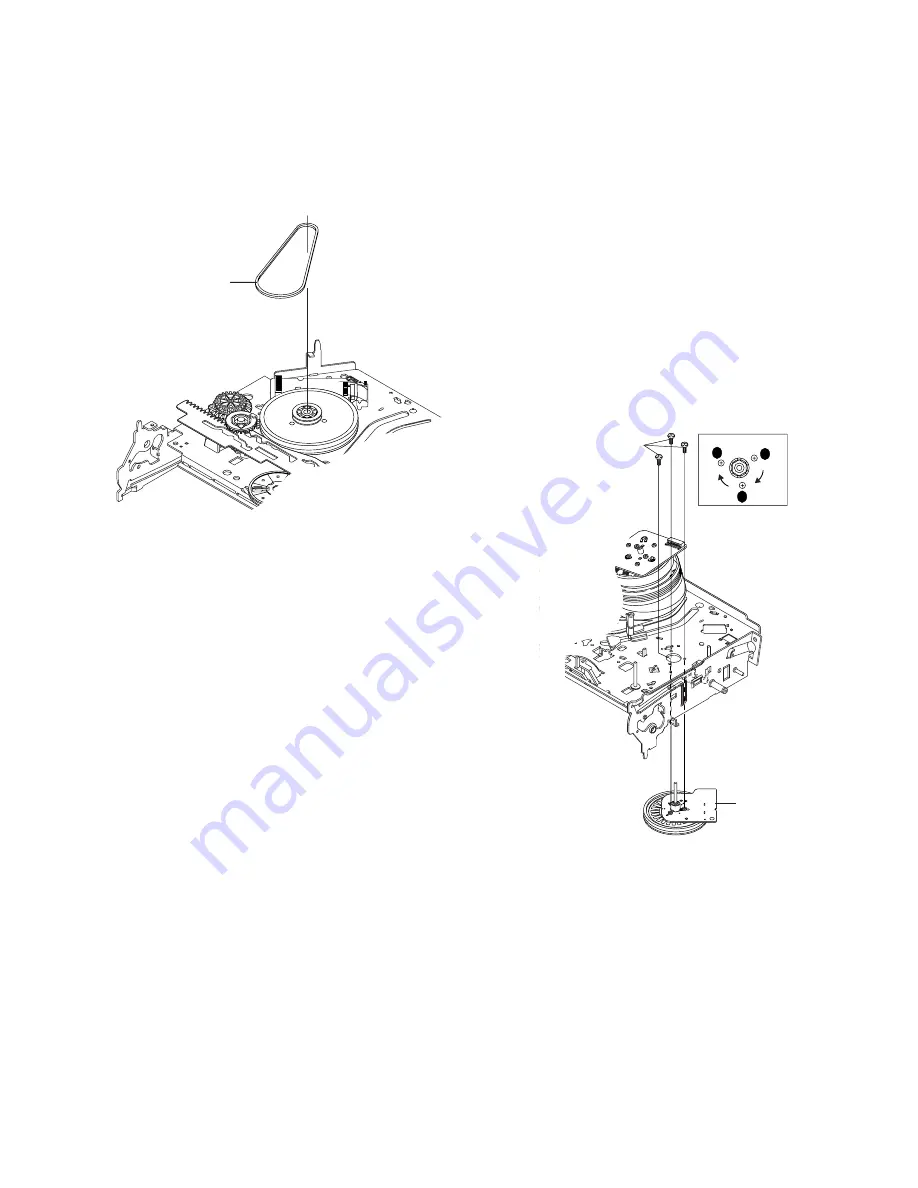
2-4-25 Belt Pulley Removal
1) Remove the Belt Pulley
1
.
Note:
Take extreme care not to get grease on Belt Pulley
1
at
assembling or reassembling.
Fig. 2-38 Belt Pulley Removal
2-4-26 Motor Capstan Ass’y Removal
1) Remove the Damper Capstan
1
in the direction of arrow.
2) Remove the 3 Screws
2
.
3) Remove the Motor Capstan Ass’y
3
.
Assembly:
1) Match the 3 holes of Motor Capstan Ass’y
3
to the 3 holes of
Main Base. Be careful not to drop or knock the Motor Capstan
Ass’y
3
.
2) Tighten the 3 Screws
2
in the direction of arrow as shown detail
drawing.
3) Assemble the Damper Capstan
1
.
Note:
After tightening screws, check if there is gap between the head
of screws and the top side of Main Base. There should have no gap
between the head of screws and the top side of Main Base.
After reinstalling, adjusting the tape transport
system again.
Fig. 2-39 Motor Capstan Ass’y Removal
1
BELT PULLEY
A
B
C
1
3 SCREWS
2
MOTOR CAPSTAN ASS'Y
Summary of Contents for D910B
Page 68: ...3 4E MEMO ...
Page 70: ...4 3 4 4 4 1 VCR MAIN COMPONENT SIDE ...
Page 71: ...4 6 4 5 CONDUCTOR SIDE ...
Page 72: ...4 7 4 8 4 2 DVD MAIN COMPONENT SIDE ...
Page 73: ...CONDUCTOR SIDE 4 9 4 10 ...
Page 74: ...4 12 4 11 4 3 S M P S COMPONENT SIDE CONDUCTOR SIDE ...
Page 76: ...4 16E MEMO ...
Page 79: ...5 1 S M P S 5 6 5 5 ...
Page 80: ...5 2 POWER DRIVE 5 7 5 8 ...
Page 81: ...5 3 OSD VPS PDS 5 10 5 9 ...
Page 82: ...5 4 A2 NICAM 5 11 5 12 ...
Page 83: ...5 5 AUDIO VIDEO 5 14 5 13 ...
Page 84: ...5 6 Hi Fi 5 15 5 16 ...
Page 85: ...5 7 INPUT OUTPUT 5 18 5 17 ...
Page 86: ...5 8 TM 5 19 5 20 ...
Page 87: ...5 9 SYSCON 5 21 5 22 ...
Page 88: ...5 10 LOGIC FUNCTION 5 23 5 24 ...
Page 89: ...5 11 SECAM SLV D950B D910B D910R Only 5 25 5 26 ...
Page 90: ...5 12 DVD MAIN MICOM AV DECODER 5 27 5 28 ...
Page 91: ...5 13 DVD SERVO 5 29 5 30 ...
Page 92: ...5 32E 5 31 5 14 DVD AUDIO VIDEO ...
Page 106: ...6 14E MEMO ...


