background image

©2006 Sony Corporation

2-661-557-

11

(1)

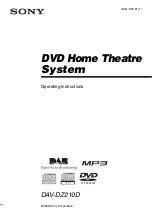
DVD Home Theatre
System

Operating Instructions

DAV-DZ210D

Summary of Contents for DAV-DZ210D

Page 1: ... 2006 Sony Corporation 2 661 557 11 1 DVD Home Theatre System Operating Instructions DAV DZ210D ...

Page 2: ...llow adequate air circulation to prevent internal heat buildup Do not place the unit on surfaces rugs blankets etc or near materials curtains draperies that may block the ventilation slots Do not install the unit near heat sources such as radiators or air ducts or in a place subject to direct sunlight excessive dust mechanical vibration or shock Do not install the unit in an inclined position It i...

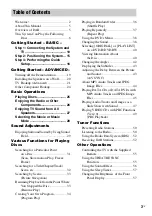
Page 3: ... the Point Where You Stopped the Disc 33 Resume Play Creating Your Own Program 34 Program Play Playing in Random Order 36 Shuffle Play Playing Repeatedly 37 Repeat Play Using the DVD s Menu 38 Changing the Sound 38 Selecting ORIGINAL or PLAY LIST on a DVD R DVD RW 40 Viewing Information About the Disc 40 Changing the Angles 42 Displaying the Subtitles 43 Adjusting the Delay Between the Picture and...

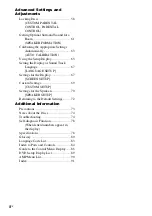
Page 4: ...age 67 LANGUAGE SETUP Settings for the Display 67 SCREEN SETUP Custom Settings 69 CUSTOM SETUP Settings for the Speakers 70 SPEAKER SETUP Returning to the Default Settings 72 Additional Information Precautions 73 Notes about the Discs 74 Troubleshooting 74 Self diagnosis Function 78 When letters numbers appear in the display Specifications 78 Glossary 80 Language Code List 83 Index to Parts and Co...

Page 5: ...ted data can be broadcast along with the services in the form of text With DAB digital radio you can enjoy CD sound quality without any hiss or crackle to spoil the sound both music and data services from a single tuner this tuner does not support data services the same radio stations of the same frequency from anywhere in the country multiple programs services from a single frequency Some service...

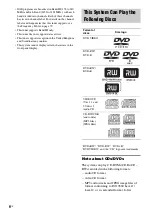
Page 6: ...ted Kingdom and Scandinavian countries This system cannot display certain characters in the front panel display DVD RW DVD RW DVD R DVD VIDEO and the CD logos are trademarks Note about CDs DVDs The system can play CD ROMs CD Rs CD RWs recorded in the following formats audio CD format video CD format MP3 audio tracks and JPEG image files of format conforming to ISO 9660 Level 1 Level 2 or its exten...

Page 7: ...et Write format cannot be played Music discs encoded with copyright protection technologies This product is designed to play back discs that conform to the Compact Disc CD standard Recently various music discs encoded with copyright protection technologies are marketed by some record companies Please be aware that among those discs there are some that do not conform to the CD standard and may not ...

Page 8: ...hnology that is protected by U S patents and other intellectual property rights Use of this copyright protection technology must be authorized by Macrovision and is intended for home and other limited viewing uses only unless otherwise authorized by Macrovision Reverse engineering or disassembly is prohibited This system incorporates with Dolby Digital and Dolby Pro Logic II adaptive matrix surrou...

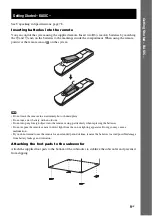
Page 9: ...id place Do not use a new battery with an old one Do not drop any foreign object into the remote casing particularly when replacing the batteries Do not expose the remote sensor to direct light from the sun or lighting apparatus Doing so may cause a malfunction If you do not intend to use the remote for an extended period of time remove the batteries to avoid possible damage from battery leakage a...

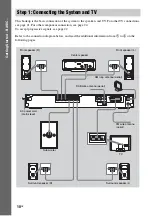
Page 10: ...m below and read the additional information from 1 to 4 on the following pages Step 1 Connecting the System and TV COMPONENT VIDEO OUT Y PB CB PR CR DVD ONLY COAXIAL AM FM 75 SPEAKER FRONT R FRONT L SUR R SUR L CENTER WOOFER EURO AV OUTPUT TO TV ANTENNA DAB 75Ω AM loop antenna aerial Subwoofer AC power cord mains lead FM wire antenna aerial TV Front speaker R Center speaker Front speaker L Surroun...

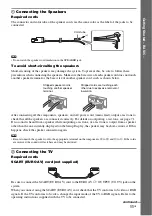
Page 11: ...d is heard from a speaker while outputting a test tone or a test tone is output from a speaker other than the one currently displayed on the Setup Display the speaker may be short circuited If this happens check the speaker connection again Note Be sure to match the speaker cord to the appropriate terminal on the components 3 to 3 and to If the cords are reversed the sound will lack bass and may b...

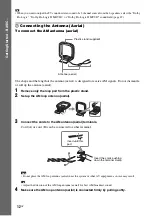
Page 12: ... up the antenna aerial 1 Remove only the loop part from the plastic stand 2 Set up the AM loop antenna aerial 3 Connect the cords to the AM antenna aerial terminals Cord A or cord B can be connected to either terminal Note Do not place the AM loop antenna aerial near the system or other AV equipment as noise may result Tip Adjust the direction of the AM loop antenna aerial for best AM broadcast so...

Page 13: ...nnect the DAB wire antenna aerial With a DAB external antenna aerial you can obtain higher DAB sound quality We recommend that you use the supplied DAB wire antenna aerial only temporarily until you install a DAB external antenna aerial Connect the supplied DAB wire antenna aerial to the ANTENNA DAB 75 Ωjack on the rear of the unit horizontally Then turn the supplied DAB wire antenna aerial vertic...

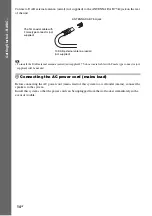
Page 14: ...or not supplied will be needed 4 Connecting the AC power cord mains lead Before connecting the AC power cord mains lead of this system to a wall outlet mains connect the speakers to the system Install this system so that the power cord can be unplugged from the wall socket immediately in the event of trouble To DAB external antenna aerial not supplied ANTENNA DAB 75 Ω jack 75 ohm coaxial cable wit...

Page 15: ...t place the speakers in locations that are Extremely hot or cold Dusty or dirty Very humid Subject to vibrations Subject to direct sunlight Use caution when placing the speakers and or speaker stands not supplied that are attached with the speakers on a specially treated waxed oiled polished etc floor as staining or discoloration may result When cleaning use a soft cloth such as a cleaning cloth f...

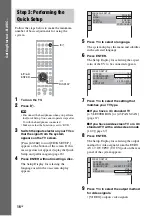
Page 16: ...nu and subtitles in the selected language 6 Press ENTER The Setup Display for selecting the aspect ratio of the TV to be connected appears 7 Press X x to select the setting that matches your TV type x If you have a 4 3 standard TV 4 3 LETTER BOX or 4 3 PAN SCAN page 67 x If you have a wide screen TV or a 4 3 standard TV with a wide screen mode 16 9 page 67 8 Press ENTER The Setup Display for selec...

Page 17: ...l and press X x to select YES then press ENTER Set up the calibration mic at the ear level using a tripod etc not supplied The front of each speaker should face the calibration mic and there should be no obstruction between the speakers and the calibration mic Be quiet during the measurement Auto Calibration starts Note Loud test sound is output when AUTO CALIBRATION starts You cannot turn the vol...

Page 18: ...1 and Calibrating the Appropriate Settings Automatically page 63 If you want to change any of the settings see Using the Setup Display page 65 To recall the Quick Setup display 1 Press DISPLAY when the system is in stop mode The Control Menu appears 2 Press X x to select SETUP then press ENTER The options for SETUP appear 3 Press X x to select QUICK then press ENTER The Quick Setup display appears...

Page 19: ...te To turn off the demonstration set the demonstration mode to off then press 1 on the remote When the demonstration mode is set to off the system saves power in standby mode Setting the demonstration mode on off 1 Press AMP MENU 2 Press X x repeatedly until DEMO appears in the front panel display then press ENTER or c 3 Press X x to select the setting DEMO ON sets the demonstration mode on DEMO O...

Page 20: ...fasten them to the wall Install the speakers on a vertical and flat wall where reinforcement is applied Contact a screw shop or installer regarding the wall material or screws to be used Sony is not responsible for accident or damage caused by improper installation insufficient wall strength or improper screw installation natural calamity etc Installing the Speakers on a Wall 30 mm 1 3 16 inch 4 m...

Page 21: ...o or RGB signals If the TV conforms to S video change the input mode of the TV to RGB signals Refer to the operating instructions supplied with the TV to be connected B To connect to a TV with the COMPONENT VIDEO IN jacks Connect a component video cord not supplied To use the COMPONENT VIDEO OUT jacks Y PB CB PR CR your TV monitor must be equipped with via COMPONENT VIDEO IN jacks Y PB CB TV Hooku...

Page 22: ...ethod you need to connect to a TV that accepts progressive signals PROGRE lights up in the front panel display when the system outputs progressive signals 1 Press FUNCTION repeatedly to select DVD 2 Press PROGRESSIVE Each time you press PROGRESSIVE the display changes as follows x P AUTO PROGRESSIVE AUTO Select this setting when your TV accepts progressive signals and the TV is connected to the CO...

Page 23: ...ed software and video based software Video based software is derived from TV such as dramas and sit coms and displays images at 30 frames 60 fields per second Film based software is derived from film and displays images at 24 frames per second Some DVD software contains both video and film In order for these images to appear natural on your screen when output in progressive format the progressive ...

Page 24: ...d not supplied Tip When listening to MP3 format recordings using a portable audio source you can enhance the sound Press FUNCTION to select AUDIO Connect the portable audio source Press SOUND FIELD repeatedly until A F D STD appears in the front panel display To cancel select other than A F D STD Note Be sure to make connections securely to avoid hum and noise When you connect another component wi...

Page 25: ...appears on the TV screen and in the front panel display Note Depending on the system status the volume level may not appear on the TV screen To save the power in standby mode Press 1 while the system turns on To cancel standby mode press 1 once Additional operations Basic Operations Playing Discs 1 Disc tray FUNCTION Adjust the volume Connect headphones H A 1 FUNCTION x H X MUTING VOLUME To Press ...

Page 26: ...may occur when listening to a component connected to the AUDIO IN jack on the front panel This is not a malfunction and will depend on the component connected To prevent this you can change the input level from the sound of the other components 1 Press FUNCTION repeatedly until AUDIO appears in the front panel display 2 Press AMP MENU 3 Press X x repeatedly until ATTENUATE appears in the front pan...

Page 27: ...tails see TV Hookup Advanced page 21 and Other Component Hookup page 24 1 Press FUNCTION repeatedly until TV appears in the front panel display 2 Press SOUND FIELD repeatedly until the sound field you want appears in the front panel display When you want to output the TV sound or stereo sound of a 2 channel source from the 6 speakers select the PRO LOGIC PLII MOVIE or PLII MUSIC sound field For de...

Page 28: ...ult setting is underlined AUTO selects the mode automatically to produce the sound effect depending on the disc MOVIE provides the sound for movies MUSIC provides the sound for music Tip When the movie or music mode is selected MOVIE or MUSIC is displayed in the front panel display Note You cannot operate these setup items when you connect headphones to the system Selecting the Movie or Music Mode...

Page 29: ...ike CDs by 5 1channel x Dolby Pro Logic Dolby Pro Logic produces five output channels from 2 channel sources This mode performs Pro Logic decoding to the input signal and output to front center and surround speakers Meanwhile the surround channel becomes monaural x Dolby Pro Logic II MOVIE MUSIC Dolby Pro Logic II produces five full bandwidth output channels from 2 channel sources This is done usi...

Page 30: ...ight speakers and subwoofer Enjoying the surround sound by headphones x HEADPHONE 2 CHANNEL STEREO This mode outputs the sound from headphone L R Standard 2 channel stereo sources completely bypass the sound field processing Multi channel surround formats are downmixed to two channels x HEADPHONE VIRTUAL This mode outputs the sound as surround from headphone L R This mode is effective only when a ...

Page 31: ...IDEO DVD R DVD RW VIDEO CD only Press m or M when the system is in pause mode To return to the normal playback speed press H Each time you press m or M during Slow motion Play the playback speed changes Two speeds are available With each press the indication changes as follows Playback direction 2 y 1 Opposite direction DVD VIDEO only 2 y 1 Playing one frame at a time Freeze Frame except for CD MP...

Page 32: ...s 3 Press ENTER changes to 4 Press X x or the number buttons to select the title chapter track index scene etc number you want to search for If you make a mistake Cancel the number by pressing CLEAR then select another number 5 Press ENTER The system starts playback from the selected number To search for a scene using the time code DVD VIDEO and DVD VR mode only 1 In Step 2 select TIME TEXT T play...

Page 33: ...1 While playing a disc press x to stop playback RESUME appears in the front panel display If RESUME does not appear Resume Play is not available 2 Press H The system starts playback from the point where you stopped the disc in Step 1 Note Depending on where you stop the disc the system may not resume playback from exactly the same point The point where you stopped playing may be cleared when you e...

Page 34: ...TOM SETUP is set to OFF page 69 the resume point is cleared when you change the function by pressing FUNCTION You can play the contents of a disc in the order you want by arranging the order of the tracks on the disc to create your own program You can program up to 99 tracks 1 Press DISPLAY The Control Menu appears 2 Press X x to select PROGRAM then press ENTER The options for PROGRAM appear 3 Pre...

Page 35: ...peatedly until the Control Menu is turned off To change or cancel a program 1 Follow steps 1 to 3 of Creating Your Own Program 2 Select the program number of the track you want to change or cancel using X x If you want to delete the track from the program press CLEAR 3 Follow Step 5 for new programming To cancel a program select under T then press ENTER To cancel all of the tracks in the programme...

Page 36: ...lay is activated ON shuffles tracks selected in Program Play x When playing a DATA CD or DATA DVD ON shuffles MP3 audio tracks in the album on the current disc When no album is selected the first album will play in random order Note A track already played is also selected in random order 4 Press ENTER Shuffle Play starts To return to normal play Press CLEAR or select OFF in Step 3 To turn off the ...

Page 37: ... repeatedly DISC repeats all of the tracks on the disc TRACK repeats the current track x When playing a DATA CD or DATA DVD OFF does not play repeatedly DISC repeats all of the albums on the disc ALBUM repeats the current album TRACK MP3 audio tracks only repeats the current track 4 Press ENTER The item is selected To return to normal play press CLEAR or select OFF in Step 3 To turn off the Contro...

Page 38: ... tracks you can also change the language With VIDEO CDs CDs DATA CDs or DATA DVDs you can select the sound from the right or left channel and listen to the sound of the selected channel through both the right and left speakers 1 Press AUDIO during playback The following display appears 2 Press AUDIO repeatedly to select the desired audio signal x When playing a DVD VIDEO Depending on the DVD VIDEO...

Page 39: ...While playing a Super VCD on which the audio track 2 is not recorded no sound will come out when you select 2 STEREO 2 1 L or 2 2 R Checking the audio signal format DVD only If you press AUDIO repeatedly during playback the format of the current audio signal PCM Dolby Digital DTS etc appears as shown below x When playing a DVD Example Dolby Digital 5 1 ch Example Dolby Digital 3 ch About audio sig...

Page 40: ...s in a DVD tracks in a VIDEO CD CD or MP3 using the front panel display page 85 Press DISPLAY Each time you press DISPLAY while playing the disc the display changes 1 t 2 t t 1 t Some displayed items may disappear after a few seconds When playing a DVD VIDEO or DVD R DVD RW 1 Playing time and number of the current title 2 Remaining time of the current title 3 Playing time and number of the current...

Page 41: ... of the current chapter C Remaining time of the current chapter x When playing a VIDEO CD with PBC functions Playing time of the current scene x When playing a VIDEO CD without PBC functions or CD T Playing time of the current track T Remaining time of the current track D Playing time of the current disc D Remaining time of the current disc x When playing a DATA CD MP3 audio or DATA DVD MP3 audio ...

Page 42: ...Electronics and Information Technology Industries Association JEITA Tip Date information is DD MM YYYY DD Day MM Month YYYY Year If various angles multi angles for a scene are recorded on a DVD VIDEO you can change the viewing angle Press ANGLE during playback Each time you press ANGLE the angle changes Note Depending on the DVD VIDEO you may not be able to change the angle even if multi angles ar...

Page 43: ... also may not be able to turn them off When the sound does not match the pictures on the screen you can adjust the delay between the picture and sound 1 Press DISPLAY when the system is in stop mode The Control Menu appears 2 Press X x to select A V SYNC then press ENTER The options for A V SYNC appear 3 Press X x to select the setting you want and press ENTER The default setting is underlined OFF...

Page 44: ...format are recorded in the first session only the first session will be played back Note The system may not be able to play some DATA CDs DATA DVDs created in the Packet Write format MP3 audio track or JPEG image file that the system can play The system can play the MP3 audio tracks or JPEG image files which have the extension MP3 MP3 audio track or JPG JPEG JPEG image file which conform to the DC...

Page 45: ...ach album The system can recognize up to 200 albums and will not play any albums beyond the 200th The system may take longer time to playback when progressing to the following album or jump to other album Some type of JPEG files cannot be played Selecting an MP3 audio track or album 1 Load a DATA CD or DATA DVD The albums recorded on the DATA CD or DATA DVD appear When an album is being played its...

Page 46: ...ss PICTURE NAVI Images of files in the album appear in 16 subscreens Press C X x c to select the image you want to view and press ENTER To play the next or previous JPEG image file Press C c when the Control Menu is not displayed Note that you can select the next album by continuing to press c after the last image on the current album but that you cannot return to the previous album by pressing C ...

Page 47: ...in stop mode The Control Menu appears 3 Press X x to select MODE MP3 JPEG then press ENTER The options for MODE MP3 JPEG appear 4 Press X x to select the setting you want and press ENTER The default setting is underlined AUTO plays both the JPEG image files and MP3 audio tracks in the same album as a slide show AUDIO MP3 plays only MP3 audio tracks continuously IMAGE JPEG plays only JPEG image fil...

Page 48: ...hen press ENTER The options for INTERVAL appear 3 Press X x to select the setting you want The default setting is underlined NORMAL sets the duration to about 6 to 9 seconds Images that are four million pixels or more will lengthen the duration FAST sets the duration shorter than NORMAL SLOW1 sets the duration longer than NORMAL SLOW2 sets the duration longer than SLOW1 4 Press ENTER The selected ...

Page 49: ...tem number you want by the number buttons 3 Press ENTER 4 Follow the instructions in the menu for interactive operations Refer to the operation details supplied with the disc as the operating procedure may differ depending on the VIDEO CD To go back to the menu Press O RETURN Note Depending on the VIDEO CD Press ENTER in Step 3 may appear as Press SELECT in the instructions supplied with the disc ...

Page 50: ... station is tuned in 2 Press PRESET or repeatedly to select the preset station you want Each time you press the button the system tunes in one preset station 3 Adjust the volume by pressing VOLUME To turn off the radio Press 1 To listen to non preset radio stations Use manual or automatic tuning in Step 2 For manual tuning press TUNING or repeatedly For automatic tuning press and hold TUNING or Th...

Page 51: ... character then press c to move the cursor to the next position Letters numbers and other symbols can be input for a radio station name If you make a mistake Press C c repeatedly until the character to be changed flashes then press X x to select the desired character To erase the character press C c repeatedly until the character to be erased flashes then press CLEAR 7 Press ENTER COMPLETE appears...

Page 52: ...using the DAB INITIAL SCAN procedure Before receiving DAB stations DAB INITIAL SCAN DAB INITIAL SCAN starts automatically when you select the DAB function for the first time after you purchase the system or after you cancel DAB INITIAL SCAN while scanning 1 Make sure that the DAB wire antenna aerial is connected to the ANTENNA DAB 75Ω jack on the rear of the unit page 13 2 Make sure that the syste...

Page 53: ...t For continuous tuning press and hold TUNING or then to release the button to select the station you want When the system tunes in a station TUNED and ST for stereo program or joint intensity stereo program appear in the front panel display 3 Adjust the volume by pressing VOLUME Note You cannot select a DAB station by the D TUNING button and number buttons direct tuning When tuning in a DAB stati...

Page 54: ...eived when secondary service ends Viewing the DAB station information in the front panel display Press DISPLAY repeatedly Each time you press DISPLAY while tuning in a DAB station the display changes 1 t 2 t t 1 t 1 Service component label 2 Dynamic label segment1 3 Channel label and frequency2 4 Preset number2 3 1 If a station does not provide the Dynamic label segment NO TEXT is displayed 2 Retu...

Page 55: ...O while entering the code for the TV s input source connected to this system see the table using the number buttons The TV s input source is selected Set your TV s input to the input you used to connect the system For details see the instructions of your TV Except for North American models Other Operations Controlling the TV with the Supplied Remote By pressing You can TV 1 Turn the TV on or off T...

Page 56: ...emote is selected Note This function is only for SONY TVs This function may not work on some SONY TVs If distance between TV and this system is too far this function may not work Install the system near the TV Keep the remote pointed in the direction of the TV and this system while entering the code Reinforcing bass frequencies You can reinforce bass frequencies Press DYNAMIC BASS Bass frequencies...

Page 57: ...function Press SLEEP repeatedly until SLEEP OFF appears in the front panel display The brightness of the front panel display can be set to either of 2 levels 1 Press AMP MENU 2 Press X x repeatedly until DIMMER appears in the front panel display then press ENTER or c 3 Press X x to select the brightness of the front panel display DIMMER ON The front panel display becomes dark DIMMER OFF Bright 4 P...

Page 58: ...ns for PARENTAL CONTROL appear 4 Press X x to select ON t then press ENTER x If you have not entered a password The display for registering a new password appears Enter a 4 digit password using the number buttons then press ENTER The display for confirming the password appears x When you have already registered a password The display for entering the password appears 5 Enter or re enter your 4 dig...

Page 59: ... the users The PARENTAL CONTROL function allows you to set a playback limitation level 1 Press DISPLAY while the system is in stop mode The Control Menu appears 2 Press X x to select PARENTAL CONTROL then press ENTER The options for PARENTAL CONTROL appear 3 Press X x to select PLAYER t then press ENTER x If you have not entered a password The display for registering a new password appears Enter a...

Page 60: ...your password appears 2 Enter your 4 digit password using the number buttons then press ENTER The system starts playback Tip If you forget your password remove the disc and repeat steps 1 to 3 of Preventing playback of specific discs CUSTOM PARENTAL CONTROL When you are asked to enter your password enter 199703 using the number buttons then press ENTER The display will ask you to enter a new 4 dig...

Page 61: ...ake a mistake entering your password Press C before you press ENTER and input the correct number Depending on the shape of the room there will be some speakers you cannot install For the better surround sound it is recommended that first you decide the position of the speakers 1 Press FUNCTION repeatedly until DVD appears in the front panel display 2 Press DISPLAY when the system is in stop mode T...

Page 62: ... the listening position ALL FRONT NO CENTER when installing the front and surround speakers in front of the listening position SECOND ROOM when installing the front speakers in one room and surround speakers in another 6 Press ENTER The selected setting takes effect 7 Press X x to select YES or NO then press ENTER YES continue with AUTO CALIBRATION see Step 5 of Calibrating the Appropriate Setting...

Page 63: ...ote Loud test sound is output when AUTO CALIBRATION starts You cannot turn the volume down Give consideration to children and neighbor 1 Press FUNCTION repeatedly until DVD appears in the front panel display 2 Press DISPLAY when the system is in stop mode The Control Menu appears 3 Press X x to select SPEAKER FORMATION then press ENTER 4 Press X x to select AUTO CALIBRATION then press ENTER The op...

Page 64: ...n mic is not connected front speakers are not correctly connected surround speakers are not correctly connected front and surround speakers are not correctly connected there is excessive noise around the calibration mic the calibration mic is overloaded 6 Press C X x c to select YES or NO then press ENTER x The measurement is OK Disconnect the calibration mic then select YES The result is implemen...

Page 65: ...verall list of Setup Display items see page 89 Displayed items differ depending on the country model Note Playback settings stored in the disc take priority over the Setup Display settings and not all the functions described may work 1 Press DISPLAY when the system is in stop mode The Control Menu appears 2 Press X x to select SETUP then press ENTER The options for SETUP appear 3 Press X x to sele...

Page 66: ...ontrol Menu by selecting NO here 3 Press ENTER All the settings explained on pages 67 to 72 return to the default settings Do not press 1 while resetting the system as it takes a few seconds to complete Note When you turn the system on after resetting and no disc is in the system the guide message appears on the TV screen To perform the Quick Setup page 16 press ENTER to return to normal screen pr...

Page 67: ...is not recorded on the DVD VIDEO one of the recorded languages will be automatically selected depending on the disc the language may not be selected automatically Choose settings according to the TV to be connected Select SCREEN SETUP in the Setup Display To use the display see Using the Setup Display page 65 The default settings are underlined x TV TYPE Selects the aspect ratio of the connected T...

Page 68: ... when you set TV TYPE in SCREEN SETUP to 16 9 page 67 Adjust this to watch 4 3 aspect ratio progressive signals If you can change the aspect ratio on your progressive format 525p 625p compatible TV change the setting on your TV not the system Note This setting is effective only when P AUTO PROGRESSIVE AUTO or P VIDEO PROGRESSIVE VIDEO is selected by using PROGRESSIVE page 22 ON Turns on the screen...

Page 69: ...system selects PCM DTS Dolby Digital sound and MPEG audio tracks in this order x MULTI DISC RESUME DVD VIDEO VIDEO CD only Switches the Multi disc Resume setting on or off x AUDIO DRC DVD VIDEO only Narrows the dynamic range of the sound track Useful for watching movies at low volume late at night Custom Settings CUSTOM SETUP AUTO The picture including subjects that move dynamically is output with...

Page 70: ...gs is automatically displayed Be sure to change the value in the Setup Display when you move the speakers 1 When you perform the Quick Setup page 16 the default settings are changed 2 0 0 to 6 9 meters for North American models 3 0 9 to 6 9 meters for North American models x DISTANCE SURROUND The default distance setting for the speakers in relation to the listening position is shown below When yo...

Page 71: ...e speaker level by using the test tone 1 Press DISPLAY when the system is in stop mode The Control Menu appears 2 Press X x to select SETUP then press ENTER The options for SETUP appear 3 Press X x to select CUSTOM then press ENTER The Setup Display appears 4 Press X x repeatedly to select SPEAKER SETUP then press ENTER or c 5 Press X x repeatedly to select TEST TONE then press ENTER or c L R 3 0 ...

Page 72: ...e adjusting 8 Press ENTER when you have finished making adjustments 9 Press X x repeatedly to select TEST TONE then press ENTER 10Press X x repeatedly to select OFF then press ENTER You can return the system parameters such as preset stations to the default settings 1 Press 1 to turn on the system 2 Press x A and 1 on the system at the same time COLD RESET appears in the front panel display and th...

Page 73: ...When you move the system take out any disc If you don t the disc may be damaged On adjusting volume Do not turn up the volume while listening to a section with very low level inputs or no audio signals If you do the speakers may be damaged when a peak level section is suddenly played On cleaning Clean the cabinet panel and controls with a soft cloth slightly moistened with a mild detergent solutio...

Page 74: ...s not turned on Check that the AC power cord mains lead is connected securely If PROTECTOR and PUSH POWER appears alternately in the front panel display Press 1 to turn off the system and check the following items after STANDBY disappears Are the and speaker cords short circuited Are you using only the specified speakers Is anything blocking the ventilation holes of the system After checking the a...

Page 75: ...e plugs and jacks are dirty Wipe them with a cloth slightly moistened with alcohol Clean the disc The sound loses stereo effect when you play a VIDEO CD a CD or an MP3 Set AUDIO to STEREO by pressing AUDIO page 38 Make sure the system is connected properly The surround effect is difficult to hear when you are playing a Dolby Digital DTS or MPEG audio sound track Make sure the sound field function ...

Page 76: ...o the lenses Remove the disc and leave the system turned on for about half an hour The MP3 audio track cannot be played The DATA CD is not recorded in the MP3 format that conforms to ISO 9660 Level 1 Level 2 or Joliet The DATA DVD is not recorded in an MP3 format that conforms to UDF Universal Disk Format The MP3 audio track does not have the extension MP3 The data is not formatted in MP3 even tho...

Page 77: ...ck cannot be changed Multilingual tracks are not recorded on the DVD being played The DVD prohibits changing the language for the sound track The subtitle language cannot be changed Multilingual subtitles are not recorded on the DVD being played The DVD prohibits changing the subtitles The subtitle cannot be turned off The DVD prohibits turning off subtitles The angles cannot be changed Multi angl...

Page 78: ...hones DVD system Laser Semiconductor laser DVD λ 650 nm CD λ 790 nm Emission duration continuous Signal format system PAL Tuner section System PLL quartz locked digital synthesizer system DAB tuner section Frequency range Band III 174 928 5A 239 200 13F MHz For details see DAB frequency table below Antenna aerial terminal 75 ohm F female FM tuner section Tuning range 87 5 108 0 MHz 50 kHz step Ant...

Page 79: ... d Mass approx 5 6 kg General Power requirements 220 240 V AC 50 60 Hz Power consumption On 150 W Standby 0 3 W at the Power Saving mode Dimensions approx 430 55 365 mm w h d incl projecting parts Mass approx 3 8 kg Design and specifications are subject to change without notice Unpacking Speakers 5 Subwoofer 1 DAB wire antenna aerial 1 AM loop antenna aerial 1 FM wire antenna aerial 1 Speaker cord...

Page 80: ...nd Pro Logic produces four channels from 2 channel sound Compared with the former Dolby Surround system Dolby Surround Pro Logic reproduces left to right panning more naturally and localizes sounds more precisely To take full advantage of Dolby Surround Pro Logic you should have one pair of surround speakers and a center speaker The surround speakers output monaural sound DTS Digital audio compres...

Page 81: ...gressive format sequential scanning In contrast to the Interlace format the progressive format can reproduce 50 60 frames per second by reproducing all scanning lines 525 lines for the NTSC system 625 lines for the PAL system The overall picture quality increases and still images text and horizontal lines appear sharper This format is compatible with the 525 or 625 progressive format Region Code T...

Page 82: ...82GB Version 1 1 You can play only moving pictures and sounds Version 2 0 You can play high resolution still pictures and enjoy PBC functions This system conforms to both versions ...

Page 83: ...347 Maori 1349 Macedonian 1350 Malayalam 1352 Mongolian 1353 Moldavian 1356 Marathi 1357 Malay 1358 Maltese 1363 Burmese 1365 Nauru 1369 Nepali 1376 Dutch 1379 Norwegian 1393 Occitan 1403 Afan Oromo 1408 Oriya 1417 Punjabi 1428 Polish 1435 Pashto Pushto 1436 Portuguese 1463 Quechua 1481 Rhaeto Romance 1482 Kirundi 1483 Romanian 1489 Russian 1491 Kinyarwanda 1495 Sanskrit 1498 Sindhi 1501 Sangho 15...

Page 84: ... 25 H VOLUME control 25 I AUDIO IN A CAL MIC jack 16 26 J Disc tray 25 Rear panel A SPEAKER jacks 10 B COMPONENT VIDEO OUT jacks 21 C EURO AV T OUTPUT TO TV jack 10 21 D AM terminal 10 E COAXIAL FM 75Ω jack 10 F ANTENNA DAB 75Ω jack 10 Index to Parts and Controls COMPONENT VIDEO OUT Y PB CB PR CR DVD ONLY COAXIAL AM FM 75 SPEAKER FRONT R FRONT L SUR R SUR L CENTER WOOFER EURO AV OUTPUT TO TV ANTEN...

Page 85: ...ghts up when the sleep timer is set 57 E Lights up when the music or movie mode is selected 28 F Playing status DVD function only G Lights up when the DYNAMIC BASS is selected 56 H Lights up when CD is loaded I Lights up when the system outputs progressive signals DVD function only 22 J Indicates the selected SPEAKER FORMATION 61 K Current surround format Except for JPEG L Displays system s status...

Page 86: ...ntrol Menu display The Control Menu display 1 and 2 will show different items depending on the disc type For details about each item see the pages in parentheses Example Control Menu display 1 when playing a DVD VIDEO Guide to the Control Menu Display DISPLAY Control Menu display 1 m Control Menu display 2 appears for certain discs only m Control Menu display off ...

Page 87: ... page 32 INDEX page 32 Selects the chapter or index to be played TRACK page 32 Selects the track to be played ORIGINAL PLAY LIST page 40 Selects the type of titles DVD RW DVD R to be played the ORIGINAL one or an edited PLAY LIST TIME TEXT page 32 Checks the elapsed time and the remaining playback time Input the time code for picture and music searching Displays the DVD CD text or the MP3 track na...

Page 88: ...hibit playback on this system SETUP page 65 QUICK Setup page 16 Use Quick Setup to choose the desired language of the on screen display the aspect ratio of the TV speaker formation and choose yes or no to start the Auto Calibration CUSTOM Setup In addition to the Quick Setup setting you can adjust various other settings RESET Returns the settings in SETUP to the default setting ALBUM page 32 Selec...

Page 89: ...BOX MULTI DISC RESUME ON OFF GRAPHICS PAUSE MODE AUTO FRAME SUBTITLE AUDIO OFF 4 3 OUTPUT FULL NORMAL LINE VIDEO RGB SPEAKER SETUP SIZE DISTANCE FRONT FRONT CENTER SURROUND YES YES NONE YES SUBWOOFER YES L 1 0 m 7 0 m R 1 0 m 7 0 m CENTER 0 0 m 7 0 m LEVEL FRONT L CENTER 6 0 dB 6 0 dB TEST TONE OFF ON R 6 0 dB 0 0 dB NONE SUBWOOFER 6 0 dB 6 0 dB LEVEL SURROUND L 6 0 dB 6 0 dB R 6 0 dB 6 0 dB 6 0 d...

Page 90: ...an set the following items with AMP MENU on the remote ATTENUATE may not appear depending on the selected function AMP Menu List AMP menu DEMO DEMO ON DEMO OFF DIMMER DIMMER ON DIMMER OFF ATTENUATE ATT ON ATT OFF ...

Page 91: ...e 81 Freeze Frame 31 Front panel 84 Front panel display 40 84 H Handling discs 74 I INDEX 32 Installing the speakers on a wall 20 Instant Advance 25 Instant Replay 25 INTERLACE 23 INTERVAL 48 J JPEG 44 45 L Language Code List 83 LANGUAGE SETUP 67 LINE 68 Listening to other components 26 Listening to TV sound 27 Locating a specific point by watching the TV screen 31 M MENU 67 MODE MP3 JPEG 47 MOVIE...

Page 92: ...PEAKER FORMATION 61 SPEAKER SETUP 70 DISTANCE 70 LEVEL 71 SIZE 70 SUBTITLE 43 67 T TEST TONE 71 THEATRE SYNC 55 TIME TEXT 32 TITLE 32 Title 81 TRACK 32 Track 81 TRACK SELECTION 69 Troubleshooting 74 TV Hookup 21 TV TYPE 67 U Unpacking 79 Usable discs 6 V VIDEO CD 81 ...

Page 93: ......

Page 94: ......

Page 95: ......

Page 96: ...LD qh 29 SUBTITLE wf 43 THEATRE SYNC w 56 TOP MENU qf 38 TUNING 0 qs 50 53 TV e 55 TV CH wa 55 TV VOL eh 55 TV VIDEO 2 55 VOLUME 8 25 50 71 1 on standby 1 16 19 25 33 50 TV 1 on standby ej 55 C X x c qd 16 19 26 32 50 58 REPLAY ADVANCE 9 25 es wk 25 m M qs 0 31 SLOW qs 0 31 H play ea 25 33 59 STEP 9 31 x stop wl 25 33 58 X pause qa 25 DISPLAY wj 18 32 58 86 O RETURN ed 33 ef 55 The DISC SKIP butto...

Reviews: