background image

1

ES

Reproducción 

en la videocámara

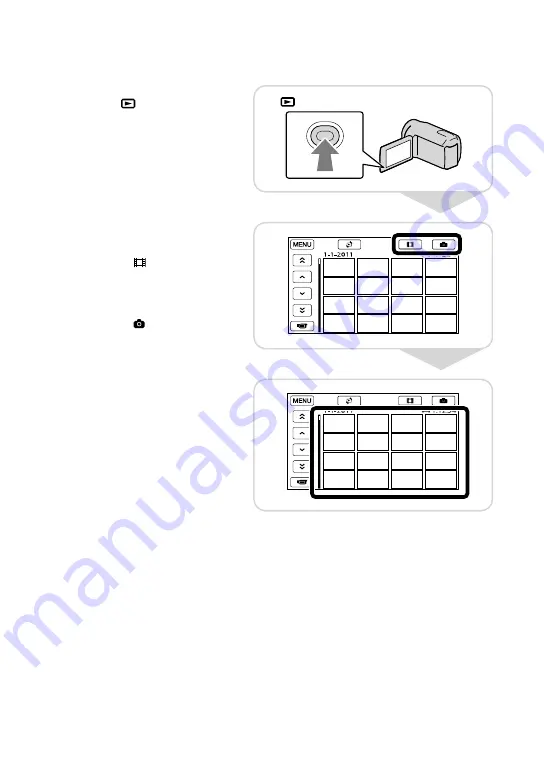
1

Presione   (VISUALIZAR 

IMÁGENES) para mostrar la 

pantalla VISUAL INDEX.

2

Película:
Seleccione   (Película).

Foto:
Seleccione   (Foto).

3

Seleccione la imagen deseada.

 (VISUALIZAR IMÁGENES)

Summary of Contents for DCR-PJ5

Page 1: ...DCR PJ5 SR21 SX21 Digital Video Camera Recorder 4 290 840 12 2 Operating Guide US Guía de operaciones ES ...

Page 2: ... US ...

Page 3: ... not expose the unit to rain or moisture Do not expose the batteries to excessive heat such as sunshine fire or the like This symbol is intended to alert the user to the presence of uninsulated dangerous voltage within the product s enclosure that may be of sufficient magnitude to constitute a risk of electric shock to persons This symbol is intended to alert the user to the presence of important ...

Page 4: ...let consult an electrician for replacement of the obsolete outlet Protect the power cord from being walked on or pinched particularly at plugs convenience receptacles and the point where they exit from the apparatus Only use attachments accessories specified by the manufacturer Use only with the cart stand tripod bracket or table specified by the manufacturer or sold with the apparatus When a cart...

Page 5: ... 1 15P plug rated for 125 V 15 A Europe Countries regions Voltage Frequency Hz Plug type Austria 230 50 C Belgium 230 50 C Czech 220 50 C Denmark 230 50 C Finland 230 50 C France 230 50 C Germany 230 50 C Greece 220 50 C Hungary 220 50 C Iceland 230 50 C Ireland 230 50 C BF Italy 220 50 C Luxemburg 230 50 C Netherlands 230 50 C Norway 230 50 C Poland 220 50 C Portugal 230 50 C Romania 220 50 C Rus...

Page 6: ...60 A Jamaica 110 50 A Mexico 120 127 60 A Nicaragua 120 240 60 A Panama 110 220 60 A South America Countries regions Voltage Frequency Hz Plug type Argentina 220 50 C BF O Brazil 127 220 60 A C Chile 220 50 C Colombia 120 60 A Peru 220 60 A C Venezuela 120 60 A Middle East Countries regions Voltage Frequency Hz Plug type Iran 220 50 C BF Iraq 220 50 C BF Israel 230 50 C Saudi Arabia 127 220 50 A C...

Page 7: ...e specified type only Otherwise fire or injury may result AC Adaptor Do not use the AC Adaptor placed in a narrow space such as between a wall and furniture Use the nearby wall outlet wall socket when using the AC Adaptor Disconnect the AC Adaptor from the wall outlet wall socket immediately if any malfunction occurs while using your camcorder Even if your camcorder is turned off AC power source m...

Page 8: ...on Declaration of Conformity Trade Name SONY Model No DCR SX21 Responsible Party Sony Electronics Inc Address 16530 Via Esprillo San Diego CA 92127 U S A Telephone No 858 942 2230 This device complies with Part 15 of the FCC Rules Operation is subject to the following two conditions 1 This device may not cause harmful interference and 2 this device must accept any interference received including i...

Page 9: ...button by placing an orange frame over it using of the multi selector Press the center of the multi selector to confirm your selection To change the language setting The on screen displays in each local language are used for illustrating the operating procedures Change the screen language before using your camcorder if necessary Show others CLOCK LANG under GENERAL SET category LANGUAGE SET a desi...

Page 10: ...10 US Everyday as unforgettable moment with Handycam Capturing Page 16 Recording ...

Page 11: ...11 US Sharing Page 25 Creating a disc Sharing now Page 22 Projector DCR PJ5 Only ...

Page 12: ... a TV 24 Saving movies and photos Saving images on a disc 25 Saving images in external media DIRECT COPY 30 Using a computer Useful functions available if you connect the camcorder to a computer 32 Preparing a computer 33 Starting PMB Picture Motion Browser 35 Using PMB Portable 36 Customizing your camcorder Using menus 37 Dividing a movie 42 Getting detailed information from the Handycam Handbook...

Page 13: ...e the BATT battery release lever and remove the battery pack 2 Connect the AC Adaptor to the DC IN jack and the wall outlet wall socket DCR SR21 DCR PJ5 SX21 To the wall outlet wall socket To the wall outlet wall socket DC plug DC plug Power cord Mains lead Power cord Mains lead Battery pack BATT battery release lever ...

Page 14: ...e memory card slot To eject the memory card Lightly push the memory card in once Notes The date and time are automatically recorded on the recording media and can be displayed during playback Show others PLAYBACK SET under PLAYBACK category DATA CODE DATE TIME You can turn off the operation beeps Show others SOUND DISP SET under GENERAL SET category BEEP OFF Access lamp Note direction of notched c...

Page 15: ...21 In the default setting both movies and photos are recorded on the internal hard disk You can change the recording media to Memory card Show others MEDIA SETTINGS under MANAGE MEDIA category MOVIE MEDIA SET or PHOTO MEDIA SET desired recording media YES ...

Page 16: ... If you close the LCD screen while recording movies the camcorder stops recording The maximum continuous recordable time of movies is about 13 hours When a movie file exceeds 2 GB the next movie file is created automatically You can check the recordable time estimated remaining capacity etc Show others MEDIA INFO under MANAGE MEDIA category MODE ...

Page 17: ...n on the LED VIDEO LIGHT by pressing LIGHT Zooming You can magnify images up to 67 times the original size with the power zoom lever Displaying the icons and indicators again You can display the icons and indicators by pressing the multi selector if they are not shown ...

Page 18: ...18 US Playback on the camcorder 1 Press VIEW IMAGES to display the VISUAL INDEX screen 2 Movie Select Movie Photo Select Photo 3 Select the desired image VIEW IMAGES ...

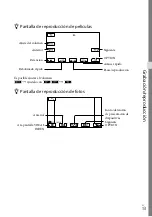
Page 19: ...back screen You can adjust the volume adjust with Photo playback screen Previous To start stop slide show To the VISUAL INDEX screen Next OPTION Volume adjustment Previous To stop To fast reverse Next OPTION To fast forward To pause play ...

Page 20: ...20 US Deleting movies and photos 1 Select Show others DELETE under EDIT category EDIT 2 Movie Select DELETE DELETE Photo Select DELETE DELETE ...

Page 21: ...d The mark appears 4 Select YES Notes You cannot restore images once they are deleted Save important movies and photos in advance Do not remove the battery pack or the AC Adaptor from your camcorder while deleting the images It may damage the recording media ...

Page 22: ...ing operations or situations while using the projector Make sure not to project images towards the eyes Make sure not to touch the projector lens The LCD screen and the projector lens become hot while in use Using the projector shortens battery life If you connect the camcorder to a TV and use the projector function sound will be output from the TV however no image will be output ...

Page 23: ...other device a blank blue screen will be projected Perform the following operations when you want to project images on the camcorder Firstly press PROJECTOR to stop projecting Select Show others PROJECTOR under OTHERS category SOURCE MEMORY CARD and then press PROJECTOR again Turn the power of the camcorder off then on again and then press PROJECTOR Changing the aspect ratio of the image You can c...

Page 24: ...corder will be connected to 1 Connect your camcorder to a TV with the A V connecting cable supplied 2 Play back movies and photos on your camcorder Notes For details refer to the instruction manuals supplied with the TV VIEW IMAGES Red TVs VCRs IN AUDIO White VIDEO Yellow Signal flow ...

Page 25: ... Select END EJECT DISC Notes Refer also to the instruction manual supplied with the DVD writer Only unused discs of the following types can be used 12cm DVD R 12cm DVD R The device does not support two layered discs DVDirect Express is referred to as DVD writer in this section Do not do any of the following when creating a disc Turn off the camcorder Disconnect the USB cable or the AC Adaptor Subj...

Page 26: ... dubbing a desired image When creating multiple copies of the same disc When dubbing images in the memory card DCR SR21 Select DISC BURN OPTION on the screen in step 3 Select the recording media containing the movie s you want to save DCR SR21 Select the movie you want to burn on the disc Select YES on the camcorder screen After the operation is completed select EXIT END Playing back a disc on the...

Page 27: ...Select the recording media that contains the images on the camcorder screen USB CONNECT Internal hard disk DCR SR21 USB CONNECT Memory card 3 Record images on the connected device 4 Select END YES after the operation is completed Notes Refer also to the instruction manuals supplied with devices to be connected Sony DVD writer may not be available in some countries regions ...

Page 28: ...etc 2 Connect your camcorder to the recording device with the A V connecting cable supplied 3 Start playback on your camcorder and record it on the recording device 4 When dubbing is finished stop the recording device and then your camcorder VIEW IMAGES Input VIDEO Yellow White AUDIO Red Signal flow ...

Page 29: ...e time or camera settings data Show others PLAYBACK SET under PLAYBACK category DATA CODE a desired setting Show others OUTPUT SETTINGS under GENERAL SET category DISP OUTPUT V OUT PANEL You can change the aspect ratio according to the screen size of display devices TV etc Show others OUTPUT SETTINGS under GENERAL SET category TV TYPE 4 3 When you connect a monaural device connect the yellow plug ...

Page 30: ...of your camcorder with the USB Adaptor Cable sold separately 3 Select Copy 4 Select after the operation is completed Notes For this operation you need the USB Adaptor Cable VMC UAM1 sold separately The USB Adaptor Cable VMC UAM1 may not be available in some countries regions The number of scenes you can save on the external media are as follows Movies 9 999 movies Photos 9 999 frames 899 folders T...

Page 31: ...g images recorded on external media with your camcorder Select Play without copying in step 4 above The VISUAL INDEX screen of the external media is displayed Play back the image You can also view images on a TV connected to your camcorder ...

Page 32: ...hat enable you to do more with the images recorded with the camcorder Windows Easy uploading when away from home With PMB Portable which is pre installed on the camcorder you can play back or upload your images to the Web by connecting your camcorder to a computer away from home View Save on a disc Edit Upload Calendar DVD Network services Joining image files ...

Page 33: ...mended 5 Macintosh equipped with Intel processor Notes Operation with all computer environments is not assured When using a Macintosh The supplied software PMB is not supported by Macintosh computers To import the movies and photos to the computer please contact Apple Inc Step 2 Installing the supplied software PMB Install PMB before connecting your camcorder to a computer Notes If a version of PM...

Page 34: ...NNECT Internal hard disk DCR SR21 USB CONNECT Memory card If the USB SELECT screen does not appear select Show others USB CONNECT under OTHERS category Click Continue on the computer screen Follow the on screen instructions to install the software Depending on the computer you may need to install third party software If the installation screen appears follow the instructions to install the require...

Page 35: ...he camcorder from the computer The image files may be destroyed or may not be played back Operation is not guaranteed if you perform the above operation Starting PMB Picture Motion Browser Double click the PMB short cut icon on the computer screen Notes If the icon is not displayed on the computer screen click Start All Programs PMB to start PMB Reading PMB Help For details on how to use PMB read ...

Page 36: ... computer with the USB cable The USB SELECT screen appears on the LCD of your camcorder 2 Select the recording media for which you wish to use PMB Portable USB CONNECT Internal hard disk DCR SR21 USB CONNECT Memory card If the USB SELECT screen does not appear Show others USB CONNECT under OTHERS category 3 Click PMB Portable The User Agreement screen appears 4 Configure the settings following the...

Page 37: ...G SET Items for customized shooting p 39 PHOTO SETTINGS Items for recording photos p 39 PLAYBACK Items for playback p 39 EDIT Items for editing p 39 OTHERS Items for other settings p 40 MANAGE MEDIA Items for recording media p 40 GENERAL SET Other setup items p 41 Operating menus Select with and press the center of the multi selector to confirm your selection An orange frame appears on the selecte...

Page 38: ...t like the pop up window that appears when you right click the mouse on a computer When is displayed at bottom right of the screen you can use the OPTION MENU You select and the menu items you can change in the context appear Select OPTION Select the desired tab the item to change the setting After completing the setting select Notes Grayed out menu items or settings are not available When the ite...

Page 39: ...usts the image quality of the face s automatically AUDIO REC SET BLT IN ZOOM MIC Records movies with vivid sound appropriate to the zoom position MICREF LEVEL Sets the microphone level OTHER REC SET DIGITAL ZOOM Sets the maximum zoom level of the digital zoom that exceeds the zoom level of the optical zoom BACK LIGHT Adjusts the exposure for backlit subjects WIDE SELECT Sets the horizontal to vert...

Page 40: ...the order of movies in a playlist OTHERS category PROJECTOR 2 SOURCE Projects the images recorded on other devices p 23 SCREEN FORMAT Changes the aspect ratio of the projected images p 23 USB CONNECT USB CONNECT 1 Connects the internal hard disk via USB USB CONNECT Connects the memory card via USB DISC BURN Allows you to save images onto discs p 25 BATTERY INFO Displays the battery information MAN...

Page 41: ...reen OUTPUT SETTINGS TV TYPE Converts the signal depending on the TV connected p 24 DISP OUTPUT Sets whether the on screen displays appears on the TV screen or not CLOCK LANG CLOCK SET Sets the date and time AREA SET Adjusts for a time difference without stopping the clock DST SET SUMMERTIMESets the summertime LANGUAGE SET Sets the display language p 9 POWER SETTINGS A SHUT OFF Changes the A SHUT ...

Page 42: ...OM supplied using a computer 1 To install the Handycam Handbook on a Windows computer place the supplied CD ROM in the disc drive of your computer 2 Click Handbook 3 Select the desired language and the model name of your camcorder then click Install The model name of your camcorder is printed on its bottom surface To view the Handycam Handbook double click the short cut icon on the computer screen...

Page 43: ...rding remaining time FADER Drop sensor off Drop sensor activated 9999 9999 Approximate number of recordable photos and recording media Playback folder of memory card 100 112 Current playing movie or photo Number of total recorded movies or photos Bottom Indicator Meaning FACE DETECTION set to OFF Manual focus SCENE SELECTION White balance SteadyShot off EXPOSURE TELE MACRO BACK LIGHT INTELLIGENT A...

Page 44: ...D screen LIGHT button 17 Multi selector 9 VIEW IMAGES button 18 24 28 DCR PJ5 LCD screen LIGHT button 17 Multi selector 9 VIEW IMAGES button 18 24 28 PROJECTOR button 22 Projector lens PROJECTOR FOCUS lever Speaker DCR SR21 SX21 USB jack 25 27 30 34 A V OUT jack 24 28 PROJECTOR IN jack DCR PJ5 23 MODE button 16 INTELLIGENT AUTO button RESET button 46 ...

Page 45: ...cess lamp memory card 14 BATT battery release lever 13 Tripod receptacle Memory card slot 14 DCR SR21 Power zoom lever PHOTO button 16 POWER lamp CHG charge lamp 13 Battery pack 13 START STOP button 16 DC IN jack 13 Grip belt Hook for a shoulder belt Access lamp memory card 14 BATT battery release lever 13 Tripod receptacle Memory card slot 14 Fastening the grip belt ...

Page 46: ...ven when the power is set to on It takes a few seconds for your camcorder to be ready to shoot after the power is turned on This is not a malfunction Disconnect the AC Adaptor from the wall outlet wall socket or remove the battery pack then reconnect it after about 1 minute If your camcorder still does not work press RESET p 44 using a pointed object If you press RESET all settings including the c...

Page 47: ...times contact your Sony dealer or local authorized Sony service facility In this case when you contact them give them all the numbers of the error code beginning with C or E C 04 The battery pack is not an InfoLITHIUM battery pack V series Use an InfoLITHIUM battery pack V series Connect the DC plug of the AC Adaptor to your camcorder securely p 13 C 06 The battery pack temperature is high Change ...

Page 48: ...2 6 mm 3 32 in 4 1 8 in When converted to a 35 mm still camera For movies 39 mm 2 223 mm 1 9 16 in 87 5 8 in 16 9 For photos 44 mm 2 508 mm 1 3 4 in 98 3 4 in 4 3 Color temperature AUTO ONE PUSH INDOOR 3 200 K OUTDOOR 5 800 K Minimum illumination 3 lx lux AUTO SLW SHUTTR is set to ON shutter speed 1 30 second Input Output connectors A V OUT jack Video audio output jack USB jack mini AB becomes ful...

Page 49: ...ry pack attached DCR SR21 59 mm 64 5 mm 113 5 mm 2 3 8 in 2 5 8 in 4 1 2 in w h d including the projecting parts 59 mm 64 5 mm 124 5 mm 2 3 8 in 2 5 8 in 5 in w h d including the projecting parts and the supplied rechargeable battery pack attached DCR SX21 54 mm 55 5 mm 113 5 mm 2 1 4 in 2 1 4 in 4 1 2 in w h d including the projecting parts 54 mm 55 5 mm 124 5 mm 2 1 4 in 2 1 4 in 5 in w h d incl...

Page 50: ...rademarks or registered trademarks of their respective companies Furthermore and are not mentioned in each case in this manual Type Li ion Design and specifications of your camcorder and accessories are subject to change without notice Manufactured under license from Dolby Laboratories Expected charging and running times for the supplied battery pack in minutes These tables show the approximate av...

Page 51: ...orded on other devices may not play correctly on this camcorder Movies recorded on SD memory cards cannot be played on A V equipment of other manufacturers About images illustrations and screen displays of this manual The example images used in this manual for illustration purposes are captured using a digital still camera and therefore may appear different from images and screen indicators that a...

Page 52: ...olytic liquid has leaked Consult your local authorized Sony service facility Wash off any liquid that may have contacted your skin If any liquid gets in your eyes wash with plenty of water and consult a doctor When not using your camcorder for a long time To keep your camcorder in optimum state for a long time turn it on and let it run by recording and playing back images about once a month Use up...

Page 53: ...es or perform MEDIA FORMAT data on the internal recording media may not be completely erased When you transfer the camcorder it is recommended that you perform EMPTY See Getting detailed information from the Handycam Handbook on page 42 to prevent the recovery of your data Also when you dispose of the camcorder it is recommended that you destroy the actual body of the camcorder Battery pack When y...

Page 54: ... available under the current recording or playback conditions Save all your recorded image data To prevent your image data from being lost save all your recorded images on external media periodically It is recommended that you save the image data on a disc such as a DVD R using your computer Also you can save your image data using a VCR or a DVD HDD recorder etc p 25 Note on the camcorder battery ...

Page 55: ...or flashing Do not use your camcorder in very loud areas DCR SR21 On the drop sensor DCR SR21 To protect the internal hard disk from shock by dropping the camcorder has a drop sensor function When a drop occurs or under a non gravity condition the block noise made when this function is activated by the camcorder may also be recorded If the drop sensor catches a drop repeatedly recording playback m...

Page 56: ...leshooting 46 Turning the power on 14 TV 24 U USB cable 25 27 USB CONNECT 25 27 V VIDEO LIGHT 17 VIEW IMAGES 18 VISUAL INDEX 18 Volume 19 W Wall outlet wall socket 13 Warning indicators 47 Windows 33 Z Zoom 45 A A V connecting cable 23 24 28 Altitude 55 B battery pack 13 C Care 51 Charging and running times 50 Charging the battery pack 13 CLOCK SET 14 Computer 33 Computer system 33 D DATA CODE 14 ...

Page 57: ......

Page 58: ...e al fuego No manipule baterías de iones de litio dañadas o que presenten fugas Asegúrese de cargar la batería con un cargador de baterías original de Sony o con un dispositivo que pueda cargarla Mantenga la batería fuera del alcance de niños pequeños Mantenga la batería seca Sustitúyala únicamente por otra del mismo tipo o equivalente recomendada por Sony Deshágase de la baterías usada lo antes p...

Page 59: ...tilizan indicaciones en pantalla en cada idioma local Si es necesario cambie el idioma de la pantalla antes de utilizar la videocámara Mostrar otros AJ REL IDIOM en la categoría AJUST GENERALES AJUSTE IDIOMA el idioma deseado Elementos suministrados Los números entre indican la cantidad suministrada Adaptador de alimentación de ca 1 Cable de alimentación 1 Cable de conexión de A V 1 Cable USB 1 Ba...

Page 60: ... ES Cada día se vive como un momento inolvidable con Handycam Captura Página 10 Grabación ...

Page 61: ... ES Archivos compartidos Página 19 Creación de un disco Compartir ahora Página 16 Proyector Solamente para el modelo DCR PJ5 ...

Page 62: ...enamiento de imágenes en un disco 19 Archivo de imágenes en un soporte externo COPIA DIRECTA 24 Utilización de una computadora Funciones útiles disponibles si conecta la videocámara a una computadora 26 Preparación de la computadora 27 Inicio de PMB Picture Motion Browser 30 Uso de PMB Portable 30 Personalización de la videocámara Uso de los menús 32 División de una película 38 Obtención de inform...

Page 63: ...liberación de BATT batería y extraiga la batería 2 Conecte el adaptador de alimentación de ca a la toma de entrada de cc y al tomacorriente de pared Batería Palanca de liberación de BATT batería DCR SR21 DCR PJ5 SX21 Al tomacorriente de pared Al tomacorriente de pared Clavija de cc Clavija de cc Cable de alimentación Cable de alimentación ...

Page 64: ...expulsar la tarjeta de memoria Presione ligeramente la tarjeta de memoria hacia dentro una vez Notas La fecha y la hora se graban automáticamente en el soporte de grabación y se pueden mostrar durante la reproducción Mostrar otros AJUSTES REPROD en la categoría REPRODUCCIÓN CÓDIGO DATOS FECHA HORA Puede desactivar los pitidos de funcionamiento Mostrar otros AJUS SON PANT en la categoría AJUST GENE...

Page 65: ...edeterminado tanto las películas como las fotos se graban en el disco duro interno Puede cambiar el soporte de grabación a la tarjeta de memoria Mostrar otros AJUSTES SOPORTE en la categoría GESTIÓN SOPORTE AJ SOPORTE PEL o AJ SOPORTE FOTO el soporte de grabación deseado SÍ ...

Page 66: ...ristal líquido mientras graba películas se detendrá la grabación El tiempo máximo de grabación continua de películas es de aproximadamente 13 hora Cuando un archivo de película supera los 2 GB el siguiente archivo de película se crea automáticamente Puede comprobar el tiempo de grabación la capacidad de grabación restante estimada etc Mostrar otros INFO SOPORTE en la categoría GESTIÓN SOPORTE MODE...

Page 67: ...er la VIDEO LIGHT de LED Utilización del zoom Es posible ampliar las imágenes hasta 67 veces su tamaño original con la palanca del zoom motorizado Visualización de los iconos e indicadores nuevamente Si no se muestran es posible visualizar los iconos y los indicadores al pulsar el selector múltiple ...

Page 68: ...ES Reproducción en la videocámara 1 Presione VISUALIZAR IMÁGENES para mostrar la pantalla VISUAL INDEX 2 Película Seleccione Película Foto Seleccione Foto 3 Seleccione la imagen deseada VISUALIZAR IMÁGENES ...

Page 69: ...le ajustar el volumen ajústelo con Pantalla de reproducción de fotos Anterior Inicio detención de presentación de diapositivas A la pantalla VISUAL INDEX Siguiente OPTION Ajuste del volumen Anterior Detención Rebobinado rápido Siguiente OPTION Avance rápido Pausa reproducción ...

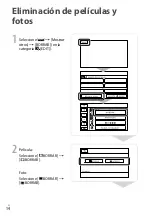
Page 70: ...14 ES Eliminación de películas y fotos 1 Seleccione Mostrar otros BORRAR en la categoría EDIT 2 Película Seleccione BORRAR BORRAR Foto Seleccione BORRAR BORRAR ...

Page 71: ...rca 4 Seleccione SÍ Notas Una vez eliminadas las imágenes no se pueden restaurar Guarde las películas y fotos importantes de antemano No extraiga la batería ni el adaptador de alimentación de ca de la videocámara durante la eliminación de imágenes Podría dañarse el soporte de grabación ...

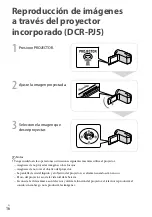
Page 72: ...tes mientras utilice el proyector Asegúrese de no proyectar imágenes sobre los ojos Asegúrese de no tocar el objetivo del proyector La pantalla de cristal líquido y el objetivo del proyector se calientan cuando están en uso El uso del proyector acorta la vida útil de la batería Si conecta la videocámara a un televisor y utiliza la función del proyector el televisor reproducirá el sonido sin embarg...

Page 73: ...itivo se proyectará una pantalla azul vacía Realice las operaciones siguientes cuando quiera proyectar imágenes en la videocámara En primer lugar presione PROJECTOR para detener la proyección Seleccione Mostrar otros PROYECTOR en la categoría OTROS FUENTE TARJ MEMORIA y a continuación vuelva a presionar PROJECTOR Apague la videocámara vuelva a encenderla y luego presione PROJECTOR Cambio de la rel...

Page 74: ...mara 1 Conecte la videocámara a un televisor con el cable de conexión de A V suministrado 2 Reproduzca películas y fotos en la videocámara Notas Para conocer los detalles consulte el manual de instrucciones suministrado con el televisor VISUALIZAR IMÁGENES Rojo Televisores Videograbadoras IN AUDIO Blanco VIDEO Amarillo Flujo de señales ...

Page 75: ...ne DISC BURN en la grabadora de DVD 4 Seleccione FIN EXPULSAR DISCO Notas Consulte también los manuales de instrucciones suministrados con la grabadora de DVD Sólo se pueden utilizar discos no utilizados anteriormente de los siguientes tipos DVD R de 12 cm DVD R de 12 cm El dispositivo no es compatible con discos de doble capa En esta sección DVDirect Express recibe el nombre de grabadora de DVD N...

Page 76: ...n de un disco con OPC GRAB DISCO Lleve a cabo esta operación en los siguientes casos Al copiar una imagen deseada Al crear varias copias del mismo disco Al copiar imágenes en la tarjeta de memoria DCR SR21 Seleccione OPC GRAB DISCO en la pantalla del paso 3 Seleccione el soporte de grabación que contiene las películas que desea guardar DCR SR21 Seleccione la película que desea copiar en el disco S...

Page 77: ...bación que contiene las imágenes en la pantalla de la videocámara CONEXIÓN USB disco duro interno DCR SR21 CONEXIÓN USB tarjeta de memoria 3 Grabe las imágenes en el dispositivo conectado 4 Seleccione FIN SÍ una vez que finalice la operación Notas Consulte también los manuales de instrucciones suministrados con los dispositivos que desea conectar Es posible que la grabadora de DVD de Sony no esté ...

Page 78: ...ocámara al dispositivo de grabación con el cable de conexión de A V suministrado 3 Inicie la reproducción en la videocámara y grabe en el dispositivo de grabación 4 Cuando haya finalizado la copia detenga el dispositivo de grabación y a continuación detenga la videocámara VISUALIZAR IMÁGENES Entrada VIDEO Amarillo Blanco AUDIO Rojo Flujo de señales ...

Page 79: ... datos de ajuste de la cámara Mostrar otros AJUSTES REPROD en la categoría REPRODUCCIÓN CÓDIGO DATOS el ajuste deseado Mostrar otros AJUSTES SALIDA en la categoría AJUST GENERALES SALIDA PANT SAL V LCD Puede cambiar la relación de aspecto según el tamaño de pantalla de los dispositivos de visualización televisor etc Mostrar otros AJUSTES SALIDA en la categoría AJUST GENERALES TIPO TV 4 3 Si conect...

Page 80: ...ión de ca conéctelo al tomacorriente de pared 2 Conecte el soporte externo a la toma USB de la videocámara con el cable de adaptador USB se vende por separado 3 Seleccione Copiar 4 Seleccione una vez que finalice la operación Notas Para realizar esta operación se necesita el cable de adaptador para USB VMC UAM1 se vende por separado Es posible que el cable de adaptador para USB VMC UAM1 no esté di...

Page 81: ...carpetas El número de escenas puede ser más pequeño en función del tipo de imágenes grabadas Visualización en la videocámara de imágenes grabadas en soportes externos Seleccione Reproducir sin copiar en el paso 4 anterior Aparece la pantalla VISUAL INDEX del soporte externo Reproduzca la imagen También puede ver las imágenes en un televisor conectado a la videocámara ...

Page 82: ...mitirán hacer más cosas con las imágenes grabadas en la videocámara Windows Carga fácil cuando no está en casa Con PMB Portable que viene preinstalado en la videocámara puede conectar la videocámara a una computadora para reproducir o cargar imágenes a la web cuando no se encuentre en su hogar Ver Guardar en un disco Editar Cargar Calendario DVD Servicios de red Unión de archivos de imagen ...

Page 83: ...zar la función de creación de discos o similar 3 Starter Edition no es compatible 4 Se recomienda un procesador más rápido 5 Macintosh equipado con procesador Intel Notas No se asegura el funcionamiento con todos los entornos informáticos Si utiliza un Macintosh El software PMB suministrado no es compatible con las computadoras Macintosh Para importar películas y fotos a la computadora póngase en ...

Page 84: ...n haga clic en Siguiente Instalar Encienda la videocámara y conéctela a la computadora mediante el cable USB suministrado La pantalla SELEC USB aparece en la pantalla de la videocámara automáticamente Seleccione uno de los tipos de soportes que aparecen en la pantalla para que la computadora reconozca la videocámara CONEXIÓN USB disco duro interno DCR SR21 CONEXIÓN USB tarjeta de memoria Si la pan...

Page 85: ...a desconectar la videocámara de la computadora Haga clic en el icono situado en la parte inferior derecha del escritorio de la computadora Extracción segura de Dispositivo de almacenamiento masivo USB Seleccione FIN SÍ en la pantalla de la videocámara Desconecte el cable USB Notas No formatee el soporte de la videocámara desde una computadora Es posible que la videocámara no funcione correctamente...

Page 86: ...XIÓN USB en la categoría OTROS 3 Haga clic en PMB Portable Aparece la pantalla del Contrato de usuario 4 Siga las instrucciones que aparecen en pantalla para configurar los ajustes PMB Portable se inicia Inicio de PMB Picture Motion Browser Haga doble clic en el icono de acceso directo de PMB en la pantalla de la computadora Notas Si el icono no se muestra en la pantalla de la computadora haga cli...

Page 87: ...31 ES Utilización de una computadora Para obtener más detalles acerca de PMB Portable consulte la ayuda de PMB Portable ...

Page 88: ...scena pág 35 AJUSTES TOMA Elementos para toma de imágenes personalizada pág 35 AJUST FOTO CÁM Elementos para la grabación de fotos pág 35 REPRODUCCIÓN Elementos para la reproducción pág 35 EDIT Elementos para la edición pág 36 OTROS Elementos para otros ajustes pág 36 GESTIÓN SOPORTE Elementos para los soportes de grabación pág 36 AJUST GENERALES Otros elementos de la configuración pág 37 Operació...

Page 89: ...producción es posible que no se puedan ajustar algunos elementos de menú Uso de OPTION MENU El OPTION MENU se abre igual que las ventanas emergentes que aparecen al hacer clic con el botón derecho del mouse de una computadora Cuando aparece en la parte inferior derecha de la pantalla puede utilizar el OPTION MENU Seleccione y aparecen los elementos de menú que se pueden cambiar en el contexto actu...

Page 90: ...leccione Notas Los elementos de menú o ajustes atenuados no están disponibles Si el elemento que desea no aparece en la pantalla seleccione otra ficha Es posible que no haya ninguna ficha Las fichas y los elementos que aparecen en la pantalla dependen del estado de grabación reproducción de la videocámara en ese momento ...

Page 91: ...ÓN CARA Permite ajustar la calidad de imagen de las caras automáticamente AJ GRAB AUDIO MIC ZOOM INCOR Permite grabar películas con sonido intenso de acuerdo con la posición del zoom NIVEL REFMIC Permite ajustar el nivel del micrófono OTROS AJ GRAB ZOOM DIGITAL Permite ajustar el nivel de zoom máximo del zoom digital que supera el nivel de zoom del zoom óptico CONTRALUZ Permite ajustar la exposici...

Page 92: ... fecha especificada EDICIÓN PLAYLIST AÑADIR Permite añadir películas a una playlist AÑADIR p fecha Permite añadir películas grabadas en un mismo día y a una hora en una playlist BORRAR Permite borrar películas de una playlist BORRAR TODO Permite borrar todas las películas de una playlist MOVER Permite cambiar el orden de las películas en una playlist Categoría OTROS PROYECTOR 2 FUENTE Permite proy...

Page 93: ...ndo de la pantalla de cristal líquido COLOR LCD Permite ajustar la intensidad del color de la pantalla de cristal líquido AJUSTE PANTALLA Permite ajustar la duración de la visualización de los iconos o indicadores en la pantalla de cristal líquido AJUSTES SALIDA TIPO TV Permite convertir la señal en función del televisor conectado pág 18 SALIDA PANT Permite ajustar si se visualizan las indicacione...

Page 94: ... reproducción y pausa 4 Seleccione SÍ Notas Una vez divididas las películas no se pueden restaurar Sugerencias Es posible dividir una película en la pantalla de reproducción desde OPTION MENU Es posible combinar películas divididas mediante el software PMB suministrado Consulte la Ayuda de PMB pág 30 si desea obtener más información Permite ajustar el punto de división con mayor precisión después ...

Page 95: ... práctica 3 Seleccione el idioma deseado y el nombre de modelo de la videocámara y a continuación haga clic en Instalación El nombre del modelo de la videocámara se encuentra impreso en la superficie inferior de esta Para ver la Guía práctica de Handycam haga doble clic en el icono de acceso directo en la pantalla de la computadora Cuando utilice un Macintosh abra la carpeta Handbook ESUS en el CD...

Page 96: ...ción reproducción edición 0 00 00 Contador hora minuto segundo 00min Tiempo de grabación restante previsto DESVANECEDOR Sensor de caídas desactivado Sensor de caídas activado 9999 9999 Número aproximado de fotos que puede grabar y soporte de grabación Carpeta de reproducción de la tarjeta de memoria 100 112 Película o foto en reproducción número total de películas o fotos grabadas Parte inferior I...

Page 97: ...D VIDEO LIGHT 11 DCR SR21 SX21 Pantalla de cristal líquido Botón LIGHT 11 Selector múltiple 3 Botón VISUALIZAR IMÁGENES 12 18 22 Indicador Significado Imagen protegida Botón de índice Modo película modo foto Los indicadores y sus posiciones son aproximados y pueden variar respecto de su apariencia real Según el modelo de la videocámara es posible que algunos indicadores no aparezcan ...

Page 98: ...21 24 28 Toma A V OUT 18 22 Toma PROJECTOR IN DCR PJ5 17 Botón MODE 10 Botón AUTO INTELIGENTE Botón RESET 43 DCR PJ5 SX21 Palanca del zoom motorizado Botón PHOTO 10 Indicador POWER Botón START STOP 10 Batería 7 Indicador CHG carga 7 Correa de sujeción Toma de entrada de cc 7 Indicador de acceso tarjeta de memoria 8 Palanca BATT liberación de la batería 7 Receptáculo del trípode Ranura para tarjeta...

Page 99: ...sible que sea necesario inicializar o cambiar el soporte de grabación interno de la videocámara En este caso se eliminarán todos los datos almacenados en el soporte de grabación interno Antes de enviar la videocámara a reparación asegúrese de guardar los datos almacenados en el soporte de grabación interno en otro soporte copia de seguridad No recibirá compensación por la pérdida de los datos alma...

Page 100: ...go enciéndala La videocámara se calienta Es posible que la videocámara se caliente durante el funcionamiento No se trata de una falla de funcionamiento La alimentación se desconecta repentinamente Utilice el adaptador de alimentación de ca Encienda de nuevo la alimentación Cargue la batería pág 7 En el ajuste predeterminado la alimentación se apaga automáticamente si no utiliza la videocámara dura...

Page 101: ...ar otros REP ARCH BD IM en la categoría GESTIÓN SOPORTE el soporte de grabación DCR SR21 Desconecte el cable USB de la computadora y de la videocámara reinicie la computadora y a continuación conecte de nuevo la computadora con la videocámara de la manera apropiada Visualización de autodiagnóstico Indicadores de advertencia Si en la pantalla de cristal líquido aparecen indicadores compruebe lo sig...

Page 102: ...afía Disco duro interno DCR SR21 80 GB Memory Stick PRO Duo Tarjeta de memoria SD Clase 2 o superior Al calcular la capacidad del soporte 1 GB equivale a 1 000 millones de bytes una parte de los cuales se utiliza para la gestión del sistema o para archivos de aplicación La capacidad que puede utilizar un usuario es aproximadamente 79 3 GB Dispositivo de imagen CCD dispositivo de carga acoplada de ...

Page 103: ...de 7 2 V Voltaje máximo de carga cc de 8 4 V Corriente máxima de carga 2 12 A Capacidad normal 3 6 Wh 500 mAh mínima 3 6 Wh 500 mAh Tipo iones de litio Pantalla de cristal líquido Imagen 6 7 cm tipo 2 7 formato 16 9 Número total de píxeles 230 400 960 240 Proyector DCR PJ5 Tipo de proyección DLP Fuente de luz LED R G B Enfoque manual Tamaño de imagen tipo 10 tipo 60 Distancia focal aprox 0 5 m 3 0...

Page 104: ...ar en función de las condiciones de grabación y del motivo MODO GRAB Marcas comerciales Handycam y son marcas comerciales registradas de Sony Corporation Memory Stick Memory Stick Duo Memory Stick PRO Duo Memory Stick PRO HG Duo Memory Stick Micro MagicGate MagicGate Memory Stick y MagicGate Memory Stick Duo son marcas comerciales o marcas comerciales registradas de Sony Corporation InfoLITHIUM es...

Page 105: ...comienda formatear la tarjeta de memoria con la videocámara pág 53 para obtener una operación estable Cuando se formatee se eliminarán todos los datos grabados en la tarjeta de memoria y no se podrán recuperar Guarde los datos importantes en su computadora etc con antelación Antes de comenzar a grabar pruebe las funciones de grabación para asegurarse de que la imagen y el sonido se graben sin prob...

Page 106: ...o se trata de una falla de funcionamiento Uso y cuidados La videocámara no está protegida contra el polvo las salpicaduras ni el agua No utilice ni almacene la videocámara y los accesorios en los siguientes lugares En lugares extremadamente cálidos fríos o húmedos Nunca los deje expuestos a temperaturas superiores a 60 C como por ejemplo bajo la luz solar directa cerca de calefactores o en un auto...

Page 107: ...las dactilares en la superficie del objetivo En lugares cálidos o húmedos Cuando el objetivo esté expuesto al aire salado como por ejemplo a orillas del mar Guárdelo en un lugar bien ventilado donde no haya suciedad ni mucho polvo Para evitar la aparición de moho limpie el objetivo periódicamente como se ha descrito anteriormente Carga de la pila recargable preinstalada La videocámara contiene una...

Page 108: ... más rápidas y tarjetas de memoria SDXC de clase 2 o más rápidas con esta videocámara No está asegurado el funcionamiento con todas las tarjetas de memoria Se han probado y se ha demostrado que los Memory Stick PRO Duo de hasta 32 GB y las tarjetas de memoria SD de hasta 64 GB funcionan con la videocámara Para grabar películas en un Memory Stick PRO Duo se recomienda utilizar un Memory Stick PRO D...

Page 109: ... de funcionamiento en la videocámara Si no puede grabar o reproducir imágenes ejecute FORMAT SOPORTE Si graba o elimina imágenes repetidamente durante mucho tiempo los datos del soporte de grabación se fragmentarán Las imágenes no se pueden guardar ni grabar En tal caso guarde las imágenes en algún tipo de soporte externo primero y a continuación ejecute FORMAT SOPORTE mediante la selección de Mos...

Page 110: ... el uso de la videocámara a grandes alturas DCR SR21 No encienda la videocámara en áreas de baja presión de altitud superior a los 5 000 metro Si lo hace puede dañarse la unidad de disco duro interno de la videocámara ...

Page 111: ... de memoria 52 Televisor 18 Tiempos de carga y funcionamiento 48 Tomacorriente de pared 7 Trípode 42 V VIDEO LIGHT 11 VISUAL INDEX 12 Visualización de autodiagnóstico 45 VISUALIZAR IMÁGENES 12 Volumen 13 W Windows 27 Z Zoom 42 43 A AJ SOPORTE FOTO 9 AJ SOPORTE PEL 9 AJUS RELOJ 8 Ajuste de la fecha y la hora 8 AJUSTE IDIOMA 3 AJUSTE MI MENÚ 32 AJUSTES SOPORTE 9 Almacenamiento de imágenes en un disc...

Page 112: ...US ES Printed in China 2011 Sony Corporation http www sony net Additional information on this product and answers to frequently asked questions can be found at our Customer Support Website ...

Reviews: