29
Recording
–
Basics Opnamen
–
besisbediening
— Opnemen – basisbediening —
Video-opnamen
maken
Uw camcorder zal vanzelf op uw gekozen
onderwerp scherpstellen.
(
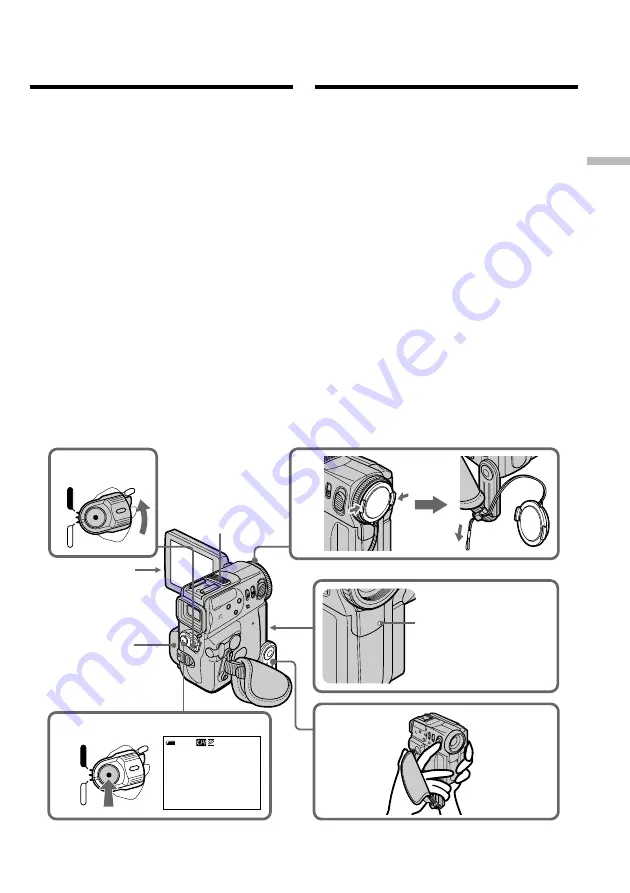
1
)
Verwijder de lensdop en trek het koordje aan
om de lensdop vast te klemmen.
(
2
)
Sluit een stroombron aan en plaats een
videocassette. Zie voor nadere aanwijzingen
“Stap 1” en “Stap 3” (op blz. 18 en 26).
(
3
)
Trek de handgreep omlaag.
Houd uw camcorder stevig vast zoals
hieronder afgebeeld.
(
4
)
Druk op de OPEN toets en klap het LCD
scherm open.
(
5
)
Druk het kleine groene knopje op de POWER
schakelaar in en schuif de schakelaar in de
“CAMERA” stand. De camcorder komt dan in
de opnamepauzestand.
(
6
)
Druk op de START/STOP toets. De
camcorder begint dan met opnemen. De
aanduiding REC licht op. Het camera-
opnamelampje voorop de camcorder gaat
branden. Om te stoppen met opnemen, drukt
u nogmaals op de START/STOP toets.
6
5
2
4
1
3
40min
REC 0:00:01
POWER
VCR
CAMERA
OFF
(CHARGE)
POWER
VCR
CAMERA
OFF
(CHARGE)
Microphone/
Microfoon
Camera recording
lamp/
Camera-
opnamelampje
— Recording – Basics —
Recording a picture
Your camcorder automatically focuses for you.
(
1
)
Remove the lens cap and pull the lens cap
string to fix it.
(
2
)
Install the power source and insert a cassette.
See “Step 1” and “Step 3” for more
information (p. 18, 26).
(
3
)
Pull down the Holding Grip.
Hold your camcorder firmly as illustrated.
(
4
)
Press OPEN to open the LCD panel.
(
5
)
Set the POWER switch to CAMERA while
pressing the small green button. Your
camcorder is set to the standby mode.
(
6
)
Press START/STOP. Your camcorder starts
recording. The REC indicator appears. The
camera recording lamp located on the front of
your camcorder lights up. To stop recording,
press START/STOP again.
Summary of Contents for Digital Handycam DCR-PC8E
Page 192: ...Sony Corporation Printed in Japan ...


