background image

1-12

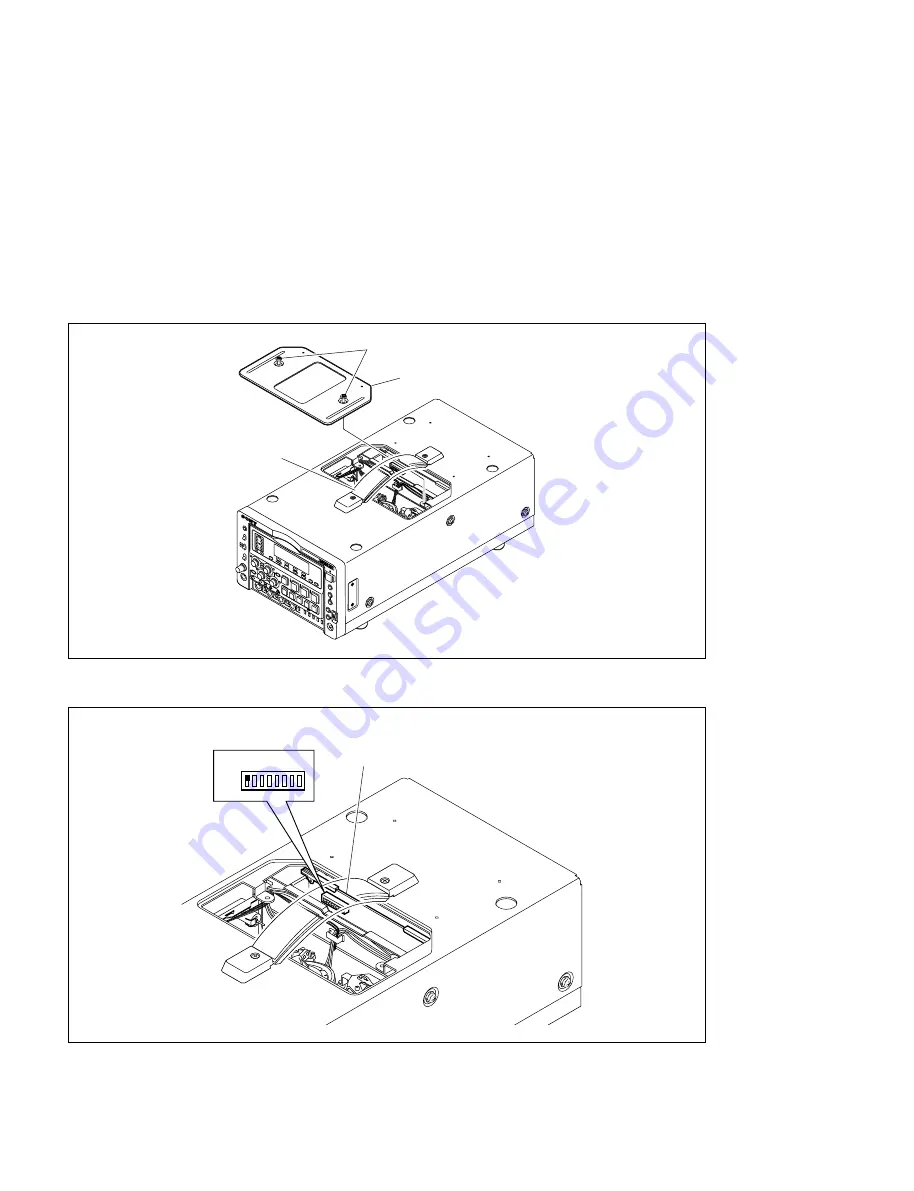
DNW-A28

DNW-A28P

S201

ON

SY-259B board

1-8. Setup Extended Menu

The extended menus of the setup menu are usually not accessible. To display them, set the DIP switch on

the SY-259B board as follows:

n

For details on H-, 9- and B-series items, refer to the operation manual supplied with the unit.

For details on F-series items, refer to the maintenance manual, volume-1.

1.

Pull up the handle so it bows upwards, and then loosen the two lid screws using a coin and so on to

remove the sub panel (TOP).

2.

Set the switch S201-1 on the SY-259B board to “ON.”

3.

Reattach the sub panel (TOP).

1-8. Setup Extended Menu

Sub panel (TOP)

Lid screws

Handle

Summary of Contents for DNW-A28

Page 1: ...INSTALLATION MANUAL 1st Edition Serial No 10001 and Higher DNW A28 Serial No 40001 and Higher DNW A28P DIGITAL VIDEOCASSETTE RECORDER DNW A28 DNW A28P ...

Page 2: ...ssure n effectuer que les réparations indiquées dans le mode d emploi à moins d être qualifié pour en effectuer d autres Pour toute réparation faire appel à une personne compétente uniquement Attention when the product is installed in Rack 1 Prevention against overloading of branch circuit When this product is installed in a rack and is supplied power from an outlet on the rack please make sure th...

Page 3: ...e batterie du même type ou d un type équivalent recommandé par le constructeur Mettre au rebut les batteries usagées conformément aux instructions du fabricant ADVARSEL Lithiumbatteri Eksplosionsfare ved fejlagtig håndtering Udskiftning må kun ske med batteri af samme fabrikat og type Levér det brugte batteri tilbage til leverandøren Voor de klanten in Nederland Dit apparaat bevat een CF n Li batt...

Page 4: ......

Page 5: ... 1 3 1 5 Installation Space 1 4 1 5 1 Outside Dimensions 1 4 1 5 2 Notes on Installation 1 5 1 5 3 Rack Mounting 1 7 1 6 Connectors Cables 1 8 1 7 Signal Inputs and Outputs 1 9 1 8 Setup Extended Menu 1 12 1 9 Settings for External Editors 1 13 1 9 1 Time Code Settings for Recorder 1 13 1 9 2 VTR Constant Settings for External Editors 1 13 1 9 3 System Phase Adjustment 1 14 1 9 4 Setup Menu Settin...

Page 6: ...with the unit This manual is necessary for application and operation and installation of the unit Maintenance Manual available on request Volume 1 Service Instruction Volume 2 Parts List Diagrams These manuals describe the maintenace and service information service over view adjustments board layouts schematic diagrams detailed parts list etc for this unit If these manuals are required please cont...

Page 7: ...n manual 1 Installation manual 1 n After installation be sure to use the supplied cap for protecting unused connector 1 3 Operating Conditions 1 4 Power Supply 1 6 Connectors Cables 1 7 Signal Inputs and Outputs 1 8 Setup Extended Menu 1 9 Settings for External Editors Start Determination of installation place Unpacking Connection Initial setup Operation check End n When the unit is transported it...

Page 8: ... prevent internal heat build up Place the unit in location with sufficient air circulation Do not block the ventilation holes of the cabinet and the front and rear panels Operating temperature 0dC to 40dC Operating humidity 25 to 80 Condensation not allowed Storage temperature _20dC to 60dC Locations to avoid Areas where the unit will be exposed to direct sunlight of any other strong lights Areas ...

Page 9: ...wer While the unit is battery operated the remaining battery capacity is displayed on the FL display panel When the battery is nearly dead the WARNING indicator on the upper left side of the front panel will blink For details refer to the operation manual supplied with the unit 1 4 Power Supply DC IN DNW A28 A28P Rear View DC power cord AC adaptor AC DN2A AC adaptor AC 550 550CE Lithium ion batter...

Page 10: ...INHI DATA PLAY SEQ REC REW F FWD SEARCH EDIT PRESET EDIT PAUSE SHIFT PRESET VAR PRESET VAR PRESET VAR PRESET VAR VIDEO CHROMA SET UP BLACK LEVEL CHROMA PHASE TC GENERATOR REMOTE EXT REGEN R RUN PB EE LOCAL INT PRESET F RUN PB PRESET VAR PRESET VAR F3 F4 DOWN LIST UP EJECT CTL TC U BIT HOLD SET MENU ON OFF POWER PUSH RESET MARK REC INHI METER MONITOR 1 2 1 2 MIX PHONES 2 1 3 4 ON OFF 333 443 6 424 ...

Page 11: ...three DNW A28 A28P can be stacked up provided that these are installed on the horizontal surface such as a stable desktop When stacking the units fit the feet of the upper unit onto the dents of the lower unit n Do not stack the unit other than the DNW A28 A28P The unit may cause malfunction if there is discrepancy in positions of the foot and dent regardless of its weight Battery Adapter Attachme...

Page 12: ...it from the rack be sure to reattach the four feet to protect the cabinet from the damage Tightening torque 78 x 10_2 N m 8 0 kgf cm 2 Remove the two screws to remove the handle n Keep the screws and the handle removed When reattaching the handle tighten the screws with the torque shown below and apply a locking compound on the threads to avoid loosening of the screws and dropping the unit Tighten...

Page 13: ...bottom panels when installing the unit Use adequately long cables for connection of the connector panel considering that the unit is pulled out from the rack Screws and mounting position when rack mounting Be sure to use the following screws and holes when fixing the unit into the rack m Be sure to use the screw specified above or shorter one to avoid damage the unit After rack mounting check that...

Page 14: ... IN Plug BNC 1 564 742 11 BELDEN 8281 cable SDI OUT Maximum cable length 200m Reference value based on DNW series AUDIO INPUT XLR 3P MALE 1 508 084 00 AUDIO OUTPUT XLR 3P FEMALE 1 508 083 00 MONITOR OUTPUT DC IN XLR 4P FEMALE 1 508 362 00 DC power cord 1 551 577 00 supplied with AC 550 550CE DC OUT Plug 4P MALE 1 566 425 11 REMOTE Plug 9P MALE 1 560 651 00 RCC 5G 5 m 10G 10 m 30G 30 m Shell Juncti...

Page 15: ...or composite sync 40 IRE 0 3 Vp p 75 Z negative sync 3 VIDEO INPUT BNC x2 In loop through connection with 75 Z termination switch Analog composite video 1 0 Vp p 75 Z negative sync SDI IN BNC x1 Component digital 270 Mbit s SMPTE 259M ITU R BT 656 8 TC IN BNC x1 Time code 0 5 to 18 0 Vp p 10 kZ unbalanced DC IN XLR 4 pin x1 DC 11 to 17 V REMOTE TC IN TC OUT SDI OUT SDI IN DC OUT DC IN AUX 1 2 VIDE...

Page 16: ...hannel AUDIO OUTPUT enabled by selecting from Sub menu 4 dBm standard 600 Z load low impedance balanced SDI OUT BNC x2 Component digital 270 Mbit s SMPTE 259M ITU R BT 656 TC OUT BNCx1 Time code 1 0 Vp p 3 dB 75 Z load unbalanced 7 DC OUT 4 pin connector x1 for BVR 3 DC 12 V 11 to 17 V 0 5 A max HEADPHONES JM 60 stereo phone jack at the front Analog audio up to _20 dBu adjustable 8 Z load unbalanc...

Page 17: ... UNREG 12 V 1 AUDIO INPUT 3P Female 9 AUDIO OUTPUT 3P Male MONITOR OUTPUT 3P Male Pin No Signal 1 GND 2 X 3 Y AUX 6P Female Pin No Signal 1 COM RX 2 COM TX 3 REG GND 4 CTS 5 RTS 6 NC 1 7 Signal Inputs and Outputs External View External View Female Male External View External View ...

Page 18: ...s on H 9 and B series items refer to the operation manual supplied with the unit For details on F series items refer to the maintenance manual volume 1 1 Pull up the handle so it bows upwards and then loosen the two lid screws using a coin and so on to remove the sub panel TOP 2 Set the switch S201 1 on the SY 259B board to ON 3 Reattach the sub panel TOP 1 8 Setup Extended Menu Sub panel TOP Lid ...

Page 19: ...s The following constants are standard for each type and system listed When using an external editor which requires the VTR constants use the settings listed VTR constants must also be set when switching between the 525 and 625 line systems m 1 Set the data No 8 of VTR CONSTANT 1 to 0A for the following editors BVE 900 ROM version 1 08 or lower BVE 600 ROM version 1 01 or lower 2 If the unit is co...

Page 20: ...etails In combination with an analog switcher The system phase adjustment for the unit is necessary Refer to the operation manual supplied with the analog switcher for details 1 9 4 Setup Menu Setting of ITEM 701 When incorporating the unit into an editing system Set ITEM 701 on the setup menu as follows ITEM 701 SELECTION OF VIDEO SYNC DELAY 8 1 VIDEO DELAY To prevent the picture shift in switchi...

Page 21: ...éreurs de l équipement décrit dans ce manuel Sony Corporation interdit formellement la copie de quelque partie que ce soit de ce manuel ou son emploi pour tout autre but que des opérations ou entretiens de l équipement à moins d une permission écrite de Sony Corporation Das in dieser Anleitung enthaltene Material besteht aus Informationen die Eigentum der Sony Corporation sind und ausschließlich z...

Page 22: ...Printed in Japan Sony Corporation 2000 11 08 Communication System Solutions Network Company 1999 DNW A28 SY DNW A28P SY E 3 202 996 01 2 ...

Reviews: