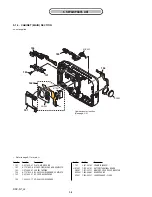
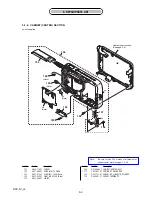
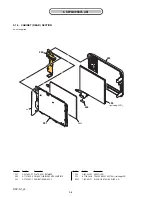
background image

Ref. No.

Part No.

Description

Ref. No.

Part No.

Description

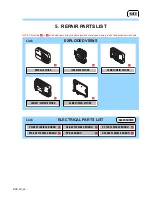
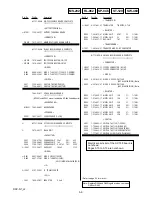
5-2. ELECTRICAL PARTS LIST

DSC-N1_L2

5-7

CD-585

X-2067-995-1 MOUNT BLOCK ASSY, CCD ADAPTOR (Note)
(Not supplied) CD-585 FLEXIBLE BOARD, COMPLETE

*******************************

(CD-585 flexible complete board, IC001 and IC002 are not supplied, but they

are included in CCD adaptor mount block assy)

< CAPACITOR >

C002

1-127-715-91 CERAMIC CHIP

0.22uF

10%

16V

C005

1-125-777-11 CERAMIC CHIP

0.1uF

10%

10V

C007

1-107-826-11 CERAMIC CHIP

0.1uF

10%

16V

C008

1-164-943-81 CERAMIC CHIP

0.01uF

10%

16V

< IC >

IC001

(Not supplied) IC   ICX476CQZ-13 (Note)

IC002

(Not supplied) IC   CXA3691EN-T9

< TRANSISTOR >

Q002

6-550-119-01 TRANSISTOR

DTC144EMT2L

< RESISTOR >

R001

1-218-990-81 SHORT CHIP

0

R004

1-218-990-81 SHORT CHIP

0

R005

1-218-953-11 RES-CHIP

1K

5%

1/16W

R009

1-218-990-81 SHORT CHIP

0

R010

1-218-981-11 RES-CHIP

220K

5%

1/16W

Note: Be sure to read “Precautions for Replacement of

Imager” on page 4-5 when changing the imager.

Electrical parts list of FP-316 flexible and
MC-158 board are not shown.
Pages 5-8 is not shown.

Summary of Contents for DSC-N1

Page 1: ...IGITAL STILL CAMERA 2005L0500 1 2005 12 Published by DI Technical Support Department 9 876 908 32 US Model Canadian Model AEP Model UK Model E Model Australian Model Hong Kong Model Chinese Model Korea Model Japanese Model Tourist Model The components identified by mark 0 or dotted line with mark 0 are critical for safety Replace only with part num ber specified Les composants identifiés par une m...

Page 2: ...nt LCD screen LCD panel 7 5 cm 3 type TFT drive Total number of dots 230 400 960 240 dots Power general Power Rechargeable battery pack NP BG1 3 6 V AC LS5K AC Adaptor not supplied 4 2 V Power consumption during shooting 1 3 W Operating temperature 0 C to 40 C 32 F to 104 F Storage temperature 20 C to 60 C 4 F to 140 F Dimensions 96 7 61 1 22 7 mm 3 7 8 2 1 2 29 32 inches W H D excluding protrusio...

Page 3: ...ard Repairing Keep the temperature of the soldering iron around 270 C during repairing Do not touch the soldering iron on the same conductor of the circuit board within 3 times Be careful not to apply force on the conductor when soldering or unsoldering Unleaded solder Boards requiring use of unleaded solder are printed with the lead free mark LF indicating the solder contains no lead Caution Some...

Page 4: ...Method of Attachment of Cabinet Center Block 2 5 2 3 Exchange Method of Barrier Assembly 2 7 2 4 Exchange Method of LSV 1100A 2 10 3 BLOCK DIAGRAMS 3 1 Overall Block Diagram 1 2 3 1 3 2 Overall Block Diagram 2 2 3 3 3 3 Power Block Diagram 3 5 4 PRINTED WIRING BOARDS AND SCHEMATIC DIAGRAMS 4 1 Frame Schematic Diagram 4 1 4 2 Schematic Diagrams 4 5 4 3 Printed Wiring Boards 4 31 5 REPAIR PARTS LIST...

Page 5: ...h internal memory INTERNAL MEMORY ERROR Checking of lens drive circuit When failed in the focus and zoom initialization Checking of flash unit or replacement of flash unit Note Abnormality when flash is being charged Note After repair be sure to perfom 1 2 PROCESS AFTER FIXING FLASH ERROR 1 2 PROCESS AFTER FIXING FLASH ERROR When FLASH error Self diagnosis Code E 91 occurs to prevent any abnormal ...

Page 6: ...lly charged battery pack or the AC Adaptor not supplied If you attempt to copy image files using a battery pack with little remaining charge the battery pack may run out causing copying to fail or possibly corrupting the data You cannot copy individual images The original images in the internal memory or Album are retained even after copying To delete the contents of the internal memory or Album e...

Page 7: ...rmat Music then transfer the music by Download Music using the supplied Music Transfer software If you format the write in area of the Music file all Music files are deleted and cannot be restored The message All data will be erased Ready appears Format Music OK Formats the Music files All data other than Music files remain as it is Cancel Cancels the formatting ...

Page 8: ...ged Accordingly change the following data so as to set same initial language as that of the set distributing in each region Initial language Language displayed at the next starting if the setting of Setup menu was reset It is different from the language setting selectable with the menu Initial Language Data Page Address Data Language GP1 GP2 GP3 GP4 4F 88 00 English z z z 01 Japanese z 04 Spanish ...

Page 9: ...DSC N1_L2 Link Link 2 DISASSEMBLY EXCHANGE METHOD OF LSV 1100A DISASSEMBLY HELP THE METHOD OF ATTACHMENT OF CABINET CENTER BLOCK EXCHANGE METHOD OF BARRIER ASSEMBLY ...

Page 10: ...GING CAPACITOR C901 The charging capacitor C901 of the ST 129 FLEXIBLE board is charged up to the maximum 300 V potential There is a danger of electric shock by this high voltage when the capacitor is handled by hand The electric shock is caused by the charged voltage which is kept without discharging when the main power of the unit is simply turned off Therefore the remaining voltage must be disc...

Page 11: ...oard x2 5 Flexible board x1 6 Lens block 6 5 4 4 Refer to page 2 1 Discharging of the ST 129 flexible board s charging capacitor C901 when discharging the capacitor 1 Claw x1 2 Claw x2 3 Remove the ST board 4 Claw x3 5 Holder AF 6 Discharging the Capacitor 1 Rotate the ornamental ring A and release the bond 2 Ornamental ring A 3 Insert the tweezers etc 4 Claew x3 5 Barrier block assembly 1 2 3 4 4...

Page 12: ...S guide light BT cover BT cover Spring lock claw Cabinet center block boss hook 1 2 3 4 1 Spring lock claw x1 2 Lock claw BT x1 3 BT cover x1 Slide until the hook of the BT cover reaches the boss of the cabinet 4 MS guide light x1 5 Slide the BT cover at the bottom Check it the BT cover is locked and not removed 5 ...

Page 13: ... battery forcibly Turn the ornamental ring A clockwise to remove Discard the removed ornamental ring A Ornamental ring A 2 3 2 REMOVE OLD BARRIER BLOCK ASSEMBLY Inert tweezers etc into a slit in the lens and pry the barrier block assembly with the fulcrum at a hole in the 1 group frame Discard the removed barrier block assembly Slit 1 group frame Claw Claw Barrier block assembly ...

Page 14: ...rier block assembly on the lens fit it completely avoiding loose engagement or floating 2 3 3 INSTALL NEW BARRIER BLOCK ASSEMBLY Put the battery in the camera and turn on the power press twice to retract the lens barrel Note Check that the diaphragm of the barrier block assembly is not opened slightly or half closed A a b c B C ...

Page 15: ...ve Super X or an equivalent article Don t use what becomes white after drying like a quick drying glue Ornamental ring A Ornamental ring A Adhesive Position of adhesive spreading Note Refer after the adhesive of the removed ring Wipe off when the adhesive adheres outside or edge side on the ring Adhesive 0 1mm 1 5 2 0mm 0 5mm Spring Ornamental ring A Turn on and off the power to check the opening ...

Page 16: ...er such a condition it when the zoom does not move Tweezers etc Tweezers etc 1 S plate spring x1 2 F plate spring x1 3 3 group spring x1 4 Z plate spring x1 5 Remove the reset sensor 6 Flexxible board x1 7 Screw 1 2x4 red x4 8 Back body block 9 Naruto washer 0 Naruto gear qa Zoom gear block 1 2 3 4 7 7 8 qa 9 0 5 6 Discard the removed parts Note Be careful to the focus motor flexible board Do not ...

Page 17: ...OM GEAR BLOCK AND FRONT LENS BLOCK 1 Install the new zoom gear block Zoom gear block Zoom flexible board Boss Boss Check positions Naruto gear Naruto gear Naruto washer Rear side Front side Check the shape Note Turn the difference part a little and set the naruto gear when the naruto gear is floating Difference part ...

Page 18: ...not allow the naruto washer and naruto gear to drop off 3 The flexible cable must be engaged with the ribs of the back body block 4 Do not touch the flexible board etc to G6 lens 3 group spring Flexible cable Z reset sensor Confirm whether flexible board hangs in the rib of the back body block Confirm the flexible board has gone out up Confirm abnormality is not found in the state of the flexible ...

Page 19: ...2 13 DSC N1_L2 2 DISASSEMBLY 2 DISASSEMBLY 5 Insert the flexible cable beware of loose insertion Flexible board Z reset sensor 6 Install the Z reset sensor press fitting into zoom gear block ...

Page 20: ...SPRING Z plate spring 1 Hook a claw of the Z plate spring on the zoom gear block 2 Pressing the spring in the arrow direction engage the part of the Z plate spring in position shown above 3 Pressing the spring in the arrow direction engage two claws of the Z plate spring ...

Page 21: ... 1 Hook two claws of the F plate spring on the zoom gear block 2 Engage two claws of the zoom gear block and F plate spring 2 4 4 INSTALL NEW 3 GROUP SPRING Hook the 3 group spring on the front lens block by using the tweezers etc Tweezers etc Hook 3 group spring Non replaceable part Beware of damage F plate spring P1 reset sensor 1 2 ...

Page 22: ...2 Engage the S plate spring with the claw of the front lens block 2 4 7 CHECK THE OPERATION Confirm the operation after installing the lens in the set 1 Power ON OFF 2 Expansion and contraction confirming of lens and opening and shutting confirmation of barrier Confirm there are neither dirt nor wounds in the surface of the ornamental ring A and lens if there is no problem in operation Wipe off wh...

Page 23: ...he BT discharge spring through a hole in the holder spring 2 Route the BT discharge spring in front of the holder spring and hook it onto the plate as shown below BT discharge spring holder spring S005 SW 460 flexible board Cabinet rear assembly Mode knob SW 460 flexible board Claw Retainer plate LCD Claw Retainer plate LCD ...

Page 24: ...HELP DSC N1_L2 SP 046 flexible board RL 062 flexible board Claw Adhesive sheet including SP flexible board Cabinet rear section Cabinet senter section ...

Page 25: ...HELP DSC N1_L2 CCD block 2 1 CCD block Sheet CD CD 585 ...

Page 26: ...DSC N1_L2 Link Link 3 BLOCK DIAGRAMS OVERALL BLOCK DIAGRAM 2 2 OVERALL BLOCK DIAGRAM 1 2 POWER BLOCK DIAGRAM ...

Page 27: ... CAPACITOR D001 5 6 2 1 4 3 15 T001 STRB_CHG_CONT 4 STRB_ON CN708 5 6 4 1 3 D002 SELF TIMER AF ILLUMINATOR XAF_LED XAF_LED IC_301_AUOUT XIC_301_RST_OUT XIC_301 _RST_OUT XIC_301_RST_OUT XIC_301_RST_OUT 3 OVERALL 2 2 PAGE 3 3 USB_D USB_D E9 AC15 AC17 D901 BACKLIGHT TOUCH PANEL 3INCH COLOR LCD UNIT 12 19 CN714 LCD901 HD VD DCK IC301 1 2 XCS PANEL UNIT IC_301_AUIN Y8 C10 XCS_AUDIO USB_VBUS BL_L BL_H T...

Page 28: ..._SW XSHUTTER_SW BT901 BATTERY TERMINAL BATT_UNREG VL_3V BATT_GND S BATT_SIG CHARGE_V BATT_SIG X302 12MHz Y19 D21 AB14 AA13 AB15 Y15 F9 OVERALL 1 2 PAGE 3 2 4 BL_L C7 AC7 AC6 W6 XPWR_OFF Y9 XCS_DD A6 Y11 B7 MS_PWR_ON D3 B10 C9 E9 A4 BL_H AB13 Y12 MODE SELECT S001 004 FUNCTION KEY Q701 703 TOUCH PANEL ON OFF D302 ACCESS LED B7 AA16 AB11 BATT_SENS 7 5V_ON G5 Y10 XDD_RST_OUT A7 B8 H1 XAF_LED SW 460 FL...

Page 29: ...AB9 W6 AC6 MS_PWR_ON MS_PWR_ON D3 B7 AA16 BATT_SENS UNREGMON CE G5 Y10 XDD_RST_OUT A7 IC301 IC303 CAMERA DSP CPU LENS CONTROL MODE CONTROL FONT CONTROL 2 8 2 8 D8 D7 C5 C6 C5 B6 XPWROFF XRESET SO SI SCLK L007 3 4 7 6 REG3 REG2 1 STB VEE VCC XPWRON1 C7 5 CN714 PVDD VCC2 VCC1 ST_UNREG ST_UNREG L302 L351 L301 AUDIO AMP 6 8 VIDEO AMP 6 8 IC602 POWER S001 D001 004 POWER IC651 D_1 8V D_3 2V A_3 2V A_2 9...

Page 30: ...NC MODE_DIAL0 XSHUTTER_SW KEY_AD0 TOUCH_PANEL_XR REG_GND MIC_GND NC XAE_LOCK_SW MIC_SIG PWR_LED_A TOUCH_PANEL_YU TOUCH_PANEL_YL BL_H M_5V SP NC XPWR_ON NC SP TOUCH_PANEL_XL NC MIC_GND NC SP MIC_SIG NC SP PWR_LED_K REG_GND NC NC 12 SDIO DATA0 MS_BS SCLK MEMORY 11 STICK DUO VSS DATA2 VCC DATA1 VSS INT DATA3 S TERMINAL BATTERY BT901 MIC901 SP901 SPEAKER CAPACITOR 105u CHARGING C901 315V FLASH UNIT 05...

Page 31: ...EXIBLE BOARD CCD IMAGER SP 046 FLEXIBLE BOARD SPEAKER MIC RL 062 FLEXIBLE BOARD CONTROL SWITCH MS 292 FLEXIBLE BOARD MEMORY STICK CONNECTOR BATTERY IN SW 460 FLEXIBLE BOARD CONTROL SWITCH Link Link 4 2 SCHEMATIC DIAGRAMS COMMON NOTE FOR SCHEMATIC DIAGRAMS ...

Page 32: ...suring conditions voltage and waveform Voltages and waveforms are measured between the measurement points and ground when camera shoots color bar chart of pattern box They are reference values and reference waveforms VOM of DC 10 MΩ input impedance is used Voltage values change depending upon input impedance of VOM used Kinds of capacitor Case size External dimensions mm Yellow A A B B A B Fig a V...

Page 33: ...D015 LND018 LND021 LND022 LND040 LND013 LND017 LND045 LND011 LND010 LND036 LND023 LND044 LND039 LND027 LND041 LND026 LND037 LND029 LND035 LND025 LND028 LND020 LND038 LND007 LND034 LND008 LND009 LND043 LND033 LND042 LND019 LND030 Q002 DTC144EMT2L R004 0 R010 220k R005 1k R009 0 R001 0 16 10 20 15 25 23 13 12 14 21 24 17 18 19 11 22 32 33 31 28 26 34 29 27 30 35 36 4 2 9 6 1 8 7 3 5 37 38 39 PAGE 4 ...

Page 34: ...DSC N1_L2 Schematic diagrams of the SY 138 MC 158 and FP 316 flexible boards are not shown Pages from 4 9 to 4 24 are not shown ...

Page 35: ...05 LND015 CHARGE LND007 LND009 LND010 LND011 LND012 LND006 Q001 TIG022TS S TL E R003 33 R002 4 7M C004 0 047u 250V R004 1M T001 2 1 4 3 5 6 C901 105u 315V SY 138 2 8 of LEVEL3 CN708 PAGE 4 12 CHARGE CONTROL FLASH CONTROL AF ILLUMINATOR SELF TIMER FLASH DRIVE FLASH UNIT CHARGING CAPACITOR 8 9 E 10 C D 6 5 F 7 05 2 3 B 4 XX MARK NO MOUNT FLASH DRIVE 7 13 2 3 1 4 6 10 9 11 8 14 5 12 1 2 3 4 5 6 1 2 3...

Page 36: ..._GND SP MODE_DIAL0 TOUCH_PANEL_YU TOUCH_PANEL_YL TOUCH_PANEL_XL TOUCH_PANEL_XR SP NC NC MIC_SIG MIC_GND KEY_AD0 M_5V BL_L NC BL_H CONTROL SWITCH CONTROL SWITCH SHUTTER POWER POWER POWER MIC_SIG SP SP MIC_GND SP901 SPEAKER MIC MIC901 SPEAKER MIC 6 5 13 F 05 G 9 7 12 I 11 8 2 14 3 C B D H E 10 4 7 19 13 22 2 3 17 1 25 4 24 6 10 9 20 11 21 8 14 16 23 15 18 5 12 1 2 3 4 1 2 3 4 5 1 2 6 3 4 7 2 3 1 4 6...

Page 37: ...19 13 2 15 5 11 6 3 17 1 16 4 9 20 8 7 PAGE 4 23 CN715 of LEVEL3 8 8 SY 138 STICK DUO MEMORY 11 12 BT901 BATTERY TERMINAL S D 05 4 3 5 C 6 B 2 MEMORY STICK CONNECTOR BATTERY IN MS 292 FLEXIBLE BOARD VCC BATT_UNREG VSS INT BATT_GND SCLK VSS BATT_GND BATT_UNREG BATT_SIG DATA1 SDIO DATA0 MS_BS BATT_GND BATT_UNREG NC DATA2 BATT_GND BATT_UNREG DATA3 VSS DATA2 VCC DATA1 VSS INT DATA3 SDIO DATA0 MS_BS SC...

Page 38: ...C N1_L2 Link Link 4 3 PRINTED WIRING BOARDS ST 129 BOARD CD 585 FLEXIBLE BOARD SW 460 FLEXIBLE BOARD SP 046 FLEXIBLE BOARD RL 062 FLEXIBLE BOARD MS 292 FLEXIBLE BOARD COMMON NOTE FOR PRINTED WIRING BOARDS ...

Page 39: ...icated Through hole is omitted Circled numbers refer to waveforms There are a few cases that the part printed on diagram isn t mounted in this model C panel designation THIS NOTE IS COMMON FOR PRINTED WIRING BOARDS 2 1 3 2 1 3 2 1 3 3 4 5 2 1 1 2 3 6 5 4 E B C 3 1 5 2 4 6 1 2 3 6 5 4 3 1 5 2 4 6 1 2 3 5 4 4 3 1 2 3 1 2 4 5 5 3 4 1 2 1 4 2 3 4 6 2 5 3 1 1 2 4 3 1 4 2 3 Chip parts Transistor Diode 4...

Page 40: ...5 LND016 LND017 LND018 LND019 LND020 LND021 LND022 LND023 LND024 LND025 LND026 LND027 LND028 LND029 LND030 LND031 LND032 LND033 LND034 LND035 LND036 LND037 LND038 LND039 LND040 LND041 LND042 LND043 LND044 LND045 IC001 C003 1 2 3 15 16 17 18 19 31 32 05 1 39 CD 585 FLEXIBLE BOARD 1 868 865 11 Note CD 585 flexible complete board IC001 and IC002 are not supplied but they are included in CCD adaptor m...

Page 41: ...DSC N1_L2 Printed wiring boards of the SY 138 MC 158 and FP 316 flexible boards are not shown Pages from 4 35 and 4 36 are not shown ...

Page 42: ...4 IC001 T001 LND001 LND002 LND003 LND004 LND005 LND006 LND007 LND008 LND009 LND010 LND011 LND012 LND013 LND014 LND015 LND016 LND017 LND018 LND019 LND020 L001 R002 R003 R004 A K D001 Q001 1 14 FLASH UNIT XE_K L XE_A H TRIG_GND TRIGGER C901 CHARGING CAPACITOR D002 SELF TIMER AF ILLUMINATOR ST 129 FLEXIBLE BOARD 05 1 868 852 11 ...

Page 43: ... 1 2 4 3 1 2 4 3 1 2 4 3 1 2 1 12 05 CN001 R002 S001 S002 R006 R008 S005 R009 R007 R003 R004 D005 S004 S003 S004 D004 D004 KEY ILLUMINATION D005 KEY ILLUMINATION SCREEN STATUS S003 S005 TOUCH PANEL MOVIE S001 T S002 W ZOOM STILL N SW 460 FLEXIBLE BOARD 1 868 854 11 CN002 1 7 8 9 10 2 3 4 5 6 LND001 LND002 LND003 LND004 LND005 LND006 LND007 LND008 LND009 LND010 LND011 LND012 Replace D004 and D005 t...

Page 44: ...1 12 11 MEMORY STICK DUO CN001 BT901 BATTERY TERMINAL S 05 MS 292 FLEXIBLE BOARD 1 868 856 11 LND001 LND002 LND003 LND004 LND005 LND006 LND007 LND008 LND009 LND010 LND011 LND012 LND013 LND014 LND015 LND016 LND017 LND018 LND019 LND020 LND022 LND023 LND024 BATT_UNREG BATT_SIG BATT_GND ...

Page 45: ...4 45 DSC N1_L2 Waveforms of the SY 138 board are not shown Page 4 43 is not shown ...

Page 46: ...4 47 DSC N1_L2 Mounted parts location of the SY 138 MC 158 and FP 316 flexible boards are not shown Page 4 44 is not shown ...

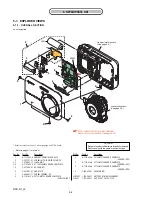
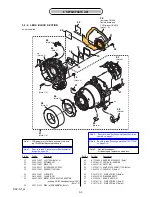
Page 47: ... Characters A to Z of the electrical parts list indicate location of exploded views in which the desired part is shown A B C OVERALL SECTION CABINET MAIN SECTION LENS BLOCK SECTION MS 292 FLEXIBLE BOARD CD 585 FLEXIBLE BOARD SP 046 BOARD RL 062 FLEXIBLE BOARD ST 129 FLEXIBLE BOARD SW 460 FLEXIBLE BOARD C B C C A E D E CABINET CENTER SECTION CABINET REAR SECTION ...

Page 48: ...or the components used on the set CAPACITORS uF µF COILS uH µH RESISTORS All resistors are in ohms METAL metal film resistor METAL OXIDE Metal Oxide film resistor F nonflammable SEMICONDUCTORS In each case u µ for example uA µA uPA µPA uPB µPB µPC µPC uPD µPD Abbreviation AR Argentine model AUS Australian model BR Brazilian model CH Chinese model CND Canadian model EE East European model HK Hong K...

Page 49: ...COMPLETE SERVICE GP2 8 A 1161 639 A SY138 MC158 BOARD COMPLETE SERVICE GP3 8 A 1161 640 A SY138 MC158 BOARD COMPLETE SERVICE GP4 9 2 658 008 01 CUSHION CD 0 BT001 1 756 566 11 BATTERY LITHIUM SECONDARY 0 C901 1 112 809 11 CAP ELECT 105uF 315V 5 1 EXPLODED VIEWS CAUTION Danger of explosion if battery is incorrectly replaced Replace only with the same or equivalent type Refer to page 5 1 for mark 0 ...

Page 50: ...GEAR BLOCK ZOOM 1100 Note 4 64 3 086 156 21 SCREW B1 2 Note 4 65 2 593 175 01 PLATE SPRING Z Note 4 66 2 659 328 02 WASHER NARUTO 67 X 2108 530 1 GEAR NARUTO S 68 2 591 031 01 PLATE SPRING F Note 4 69 2 593 176 01 PLATE SPRING S Note 4 Note 1 CCD adaptor mount block assembly is includ ing CD 585 flexible completed board Note 2 Be sure to read Precuations for Replacement of Imager on page 4 5 Note ...

Page 51: ...EXIBLE BOARD COMPLETE 105 2 657 988 01 HOLDER MICROPHONE 106 1 868 859 11 SP 046 FLEXIBLE BOARD 5 1 3 CABINET MAIN SECTION 107 2 657 901 01 FRAME RELEASE 0BT901 1 780 061 21 BATTERY TERMINAL BOARD CN001 1 817 827 11 MEMORY STICK DUO CONNECTOR MIC901 1 542 666 01 MICROPHONE SP901 1 825 945 11 LOUDSPEAKER 1 3CM ns not supplied ns MIC901 SP901 BT901 CN001 101 102 103 107 104 105 106 Cabinet center se...

Page 52: ...CK Note 154 2 657 915 01 LIGHT MS GUIDE Note 155 2 657 909 01 LID BT ns not supplied 156 X 2102 864 1 CABINET CENTER ASSY 157 2 657 907 01 SPRING BT DISCHARGE 158 2 587 151 01 SCREW M1 4 NEW TRUSTAR P2 159 2 660 401 11 SCREW TAPPING P2 151 152 153 Note 154 Note 155 156 157 158 159 Cabinet rear section See page 5 6 ns Note ns ns ns Note Note Be sure to read The method of attachment of cabinet cente...

Page 53: ... 992 01 PLATE LCD RETAINER 202 A 1151 929 A SW 460 FLEXIBLE BOARD COMPLETE 203 X 2102 867 1 CABINET REAR ASSY 5 1 5 CABINET REAR SECTION 204 2 657 995 01 SHEET LCD 205 A 1148 563 A TP BLOCK ASSY 30STGU including LCD D901 1 479 403 11 BLOCK LIGHT GUIDE PLATE 3 0 ns not supplied D901 ns 201 205 including LCD 204 202 203 ...

Page 54: ...1uF 10 10V C007 1 107 826 11 CERAMIC CHIP 0 1uF 10 16V C008 1 164 943 81 CERAMIC CHIP 0 01uF 10 16V IC IC001 Not supplied IC ICX476CQZ 13 Note IC002 Not supplied IC CXA3691EN T9 TRANSISTOR Q002 6 550 119 01 TRANSISTOR DTC144EMT2L RESISTOR R001 1 218 990 81 SHORT CHIP 0 R004 1 218 990 81 SHORT CHIP 0 R005 1 218 953 11 RES CHIP 1K 5 1 16W R009 1 218 990 81 SHORT CHIP 0 R010 1 218 981 11 RES CHIP 220...

Page 55: ...rical parts list of the SY 138 board is not shown Pages 5 10 to 5 13 are not shown A 1151 968 A MS 292 FLEXIBLE BOARD COMPLETE BATTERY TERMINAL 0BT901 1 780 061 21 BATTERY TERMINAL BOARD CONNECTOR CN001 1 817 827 11 MEMORY STICK DUO CONNECTOR A 1151 930 A RL 062 FLEXIBLE BOARD COMPLETE CONNECTOR CN001 1 816 644 51 FFC FPC CONNECTOR LIF 12P CN002 1 816 654 51 FFC FPC CONNECTOR LIF 6P DIODE D001 6 5...

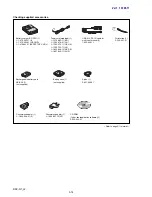
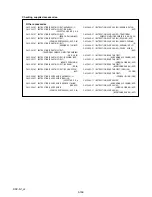
Page 56: ...PT US CND J USB A V DC IN cable for multi use terminal 1 1 830 848 11 Conversion adaptor 1 0 1 569 007 12 JE Wrist strap 1 2 050 981 01 CD ROM Cyber shot application software 1 2 655 049 01 Battery case 1 not supplied Rechargeable battery pack NP BG1 1 not supplied Power cord main lead 1 0 1 776 985 11 KR 0 1 782 476 51 CH 0 1 783 374 11 UK HK 0 1 790 732 71 JE 0 1 823 946 12 AEP E 0 1 827 945 11 ...

Page 57: ...SH EXCEPT KR CH J 2 652 806 21 INSTRUCTION USER S GUIDE FRENCH ITALIAN CND AEP 2 652 806 31 INSTRUCTION USER S GUIDE SPANISH PORTUGUESE AEP E JE 2 652 806 41 INSTRUCTION USER S GUIDE GERMAN DUTCH AEP 2 652 806 51 INSTRUCTION USER S GUIDE TRADITIONAL CHINESE SIMPLIFIED CHINESE E HK CH JE 2 652 806 61 INSTRUCTION USER S GUIDE RUSSIAN AEP 2 652 806 71 INSTRUCTION USER S GUIDE ARABIC PERSIAN E 2 652 8...

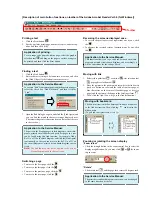
Page 58: ...pplied to the Service Manual depending on the date of issue Switching a page To move to the first page click the To move to the last page click the To move to the previous page click the To move to the next page click the Reversing the screens displayed once To reverse the previous screens operation one by one click the To advance the reversed screens operation one by one click the Application to ...

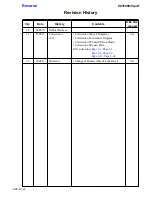
Page 59: ...se Correction 1 C1 Revised 1 Contents Correction of Block Diagrams Correction of Schematic Diagram Correction of Printed Wiring Board Correction of Repair Parts S M correction Page 3 1 Page 3 3 Page 3 5 Page 4 7 Page 4 39 Page 5 14 Change of Disassembly of Lens Block S M Rev issued Yes Yes 987690833 pdf ...

Reviews: