background image

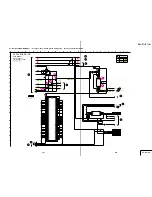
DSC-P71/P71M

4-25

4-26

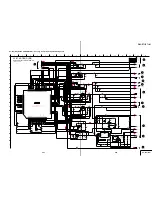
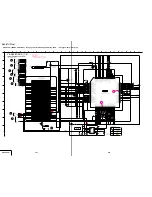
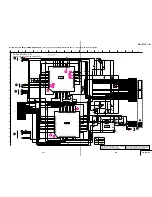
SY-075 (8/8)

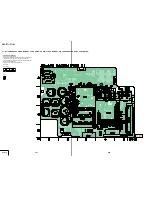
SY-075 (8/8) (DC/DC  CONVERTER)

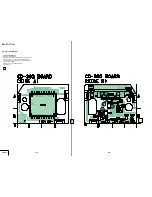
• See page 4-43 for SY-075 printed wiring board.

Note:The voltage and waveform of CSP(chip size package)

     cannot be measured,because its lead layout is different
     form that of conventional IC.

2.5

15

14.3

2.8

15

15

2.8

-11.8

-7.5

0

5

-11.8

1.4

4.9

7.9

1.9

1.6

5

4

4

1

5

5

0

4.9

4.9

0

1.6

4

4.9

0.8

4

1.3

2.9

4.8

1.9

4.8

3.1

2.3

0

4

1.5

4.8

-2.3

13.5

4.9

15 14.3

Q020

MCH5801-TL-E

5

2

1

3

4

L010

1uH

68k

R042

0

R073

XX

C070

0.033u

C014

0.5%

1800

R077

CPH5802-TL

Q019

2

4

3

5

1

1uH

L020

47k

R048

22uH

L002

0.5%

120k

R028

UNREG_SCK

D009

RB161M-20TR

10uH

L015

XX

C072

D012

XX

0.033u

C005

4.7u

C043

D_2.9V

Q017

MCH3306-TL-E

10k

R030

0.5%

100k

R060

0.1u

C021

Q029

MCH3306-TL-E

0

R068

0.033u

C008

4.7u

C042

D_1.5V

22uH

L008

C069

XX

C073

0.1u

22uH

L007

10uH

L017

4.7u

C034

1u

C029

0.1u

C020

4.7uH

L001

1uH

L018

10uH

L021

0.5%

R071

XX

47k

R026

10u

C027

PANEL_4.9V

Q038

XX

0.033u

C065

47k

R076

CPH5802-TL

Q027

2

4

3

5

1

XX

C062

2.2u

C032

4.7u

C038

4.7u

C035

0.5%

100k

R008

10u

C056

0.5%

22k

R007

R065
XX

C039

2.2u

2SD2216J-QR(K8).SO

Q013

Q023

MCH3406-TL-E

R047

470

C033

XX

M_5V

1u

C026

ST_UNREG

4700

R025

10u

C028

D019

XX

BUZER_15V

XX

C061

1u

C066

1u

C025

10u

C049

IC003

BA3986FV-E2

1

STB

2

GND

3

VEE

4

REG3

5

(STB2)

6

REG2

7

VCC

8

REG1

Q021

MCH5801-TL-E

5

2

1

3

4

XX

R072

L003
10uH

1uH

L012

A_4.9V

R044

470

27k

R031

0.5%

XX

R074

100p

C016

C041

XX

0.033u

C015

0.5%

R064

XX

0.033u

C023

1u

C024

22k

R013

XCS_DDCON

D013

XX

Q034

XX

0.033u

C007

4.7u

C067

100p

C018

Q035

XX

UNREG_SO

0.5%

10k

R061

1u

C054

Q022

CPH5803-TL-E

2

4

3

5

1

4700

R014

L019

XX

R069

XX

CAM_15V

BL_VO-

4.7k

R012

L006
0uH

4.7uH

L023

4.7u

C057

33k

R041

L004

100uH

D_3.1V

1uH

L013

IC001

FA3692Q-TE2

1

SCP9

2

FB10

3

IN10-

4

AMPIN

5

AMPOUT

6

CT1

7

RT

8

CT2

9

CS

10

SCPIN

11

CP

12

TLOFF

13

GND

14

VREG(2.2V)

15

DT2

16

DT1

17

PGND1

18

OUT6s

19

VCC4

20

VCC5

21

PGND2

22

OUT10

23

OUT9

24

OUT8p

25

OUT8n

26

OUT7p

27

OUT7n

28

OUT6p

29

OUT6n

30

OUT4p

31

OUT4n

32

OUT3p

33

OUT3n

34

OUT2p

35

OUT2n

36

OUT1p

37

OUT1n

38

OUT5p

39

OUT5n

40

PGND3

41

VCC2

42

VCC3

43

OUT5S

44

XCS

45

D

ATA

46

CLK

47

RST

48

LDON

49

VIN8-

50

VIN6-

51

VIN7-

52

VIN5-

53

VIN4-

54

VIN3-

55

VIN1-

56

VCC1

57

CONT

58

CH2UP

59

FB2

60

IN2-

61

IN2+

62

FB1

63

IN1-

64

FB3

65

IN3-

66

FB4

67

IN4-

68

FB5

69

IN5-

70

FB7

71

IN7-

72

IN7+

73

FB6

74

IN6-

75

IN61-

76

FB8

77

IN8-

78

IN8+

79

FB9

80

IN9-

BL_VO+

47k

R045

CAM_-7.5V

22uH

L025

47k

R075

XX

C071

PANEL_13.5V

0.033u

C009

Q018

MCH3306-TL-E

2200

R010

C068

XX

D011

RB161M-20TR

20V

C063

3.3u

4700

R038

C006

6800p

0.5%

R062

XX

Q028

MCH3306-TL-E

PANEL_2.9V

R063

XX

A_2.9V

R011

22k

0.033u

C022

R049

470

CAM_DD_ON

0.5%

8200

R009

5%

0

R029

R070

XX

PANEL_-15V

D005

MA2SD24008S0

CPH5802-TL

Q026

2

4

3

5

1

Q024

MCH3406-TL-E

CPH5802-TL

Q033

2

4

3

5

1

DD_CON_SENS

35V

C053

XX

SYS_DD_ON

0.1u

C019

4.7u

C036

1uH

L011

10u

C050

R066

XX

6.3V

10u

C047

6.3V

10u

C046

6.3V

10u

C048

2SB1462J-
QR(K8).SO

Q040

L005

4.7uH

XX

Q041

0

R078

0

R079

0

R080

0

R081

5

EVER_3.2V

GND

1

3

2

1

A

4

UNREG_SCK

UNREG_SO

XCS_DDCON

UNREG_SCK

UNREG_SO

XCS_DDCON

SYS_DD_ON

SYS_DD_ON

13.5V

15V

 7.5V

I

L

3

H

15

10

J

7

F

13

C

5

G

D

B

E

9

14

11

12

16

K

6

8

4

17

18

2

05

SY-075 BOARD (8/8)

IC001

DC/DC CONTROL

IC003

-7.5V/13.5V/15V REG

E

SY-075 (7/8)

SY-075 (6/8)

29

34

SY-075 (2/8,4/8)

36

(2/8,3/8,4/8,6/8)

SY-075

37

SY-075

(2/8,3/8,6/8)

38

SY-075 (6/8)

31

SY-075 (6/8)

SY-075 (2/8,3/8,6/8)

39

SY-075 (6/8)

40

SY-075 (5/8)

25

41

SY-075 (6/8)

EMERGENCY DETECT

SWITCHING

SWITCHING

SWITCHING

SWITCHING

SWITCH

SWITCH

SWITCHING

SWITCHING

SWITCHING

SWITCHING

SWITCHING

SWITCHING

SWITCHING

SWITCHING

XX MARK:NO MOUNT

DC/DC CONVERTER(DD BLOCK 2/2)

UN9213J-

(TX).SO

Q039

SWITCHING

REG_GND

REG_GND

(3/8)

SY-075

42

(3/8,4/8,6/8)

SY-075

35

Summary of Contents for DSC-P71 - Cyber-shot Digital Still Camera

Page 1: ...r AA nickel hydride batteries 2 2 4 V AC LS1 AC power adaptor not supplied 4 2 V Power consumption when recording 2 1W Operating temperature range 0 to 40 C 32 to 104 F Storage temperature range 20 to 60 C 4 to 140 F Dimensions 124 9 58 43 6 mm 5 2 3 8 1 3 4 inches W H D protruding portions not included Mass 284 g 10 oz camera two batteries Memory Stick and wrist strap included BC CS1 Ni MH batter...

Page 2: ... MARK 0 OR DOTTED LINE WITH MARK 0 ON THE SCHEMATIC DIAGRAMS AND IN THE PARTS LIST ARE CRITICAL TO SAFE OPERATION REPLACE THESE COMPONENTS WITH SONY PARTS WHOSE PART NUMBERS APPEAR AS SHOWN IN THIS MANUAL OR IN SUPPLEMENTS PUB LISHED BY SONY UNLEADED SOLDER Boards requiring use of unleaded solder are printed with the lead free mark LF indicating the solder contains no lead Caution Some printed cir...

Page 3: ...E OF CONTENTS Section Title Page Section Title Page 4 PRINTED WIRING BOARDS AND SCHEMATIC DIAGRAMS 4 1 Frame Schematic Diagrams 4 1 Frame Schematic Diagram 1 2 4 1 Frame Schematic Diagram 2 2 4 3 4 2 Schematic Diagrams 4 5 CD 392 CCD IMAGER 4 7 CH 109 CAMERA PROCESS 4 9 SY 075 1 8 CAMERA DSP 4 11 SY 075 2 8 VIDEO MEMORY 4 13 SY 075 3 8 LENS DRIVE 4 15 SY 075 4 8 SH DSP 4 17 SY 075 5 8 FLASH MEMORY...

Page 4: ...Initial Data Input 1 5 34 2 LCD Initial Data Input 2 5 34 3 Backlight Current Adjustment PK 064 Board 5 35 4 VCO Adjustment PK 064 Board 5 35 5 PSIG Gray Adjustment PK 064 Board 5 36 6 D Range Adjustment PK 064 Board 5 36 7 Black Limit Adjustment PK 064 Board 5 37 8 Contrast Adjustment PK 064 Board 5 37 9 Center Voltage Adjustment PK 064 Board 5 38 10 V COM DC Adjustment PK 064 Board 5 38 11 White...

Page 5: ... 11 Wrap insulating tape fully around the leads of the resistor to pre vent electrical shock 1 kΩ 1 W Wrap insulating tape Discharging the Capacitor Short circuit between the positive and the negative terminals of charged capacitor with the short jig about 10 seconds SERVICE NOTE NOTE FOR REPAIR Make sure that the flat cable and flexible board are not cracked of bent at the terminal Do not insert ...

Page 6: ...placement of flash unit Caution Display During Error SYSTEM ERROR FORMAT ERROR MEMORY STICK ERROR Description on Self diagnosis Display Self diagnosis display C ss ss You can reverse the camera mal function yourself However con tact your Sony dealer or local authorized Sony service facility when you cannot recover from the camera malfunction E ss ss Contact your Sony dealer or lo cal authorized So...

Page 7: ...not occur in a particular installation If this equipment does cause harmful interference to radio or television reception which can be determined by turning the equipment off and on the user is encouraged to try to correct the interference by one or more of the following measures Reorient or relocate the receiving antenna Increase the separation between the equipment and receiver Connect the equip...

Page 8: ...ra Trial recording Before you record one time events you may want to make a trial recording to make sure that the camera is working correctly No compensation for contents of the recording Contents of the recording cannot be compensated for if recording or playback is not possible due to a malfunction of your camera or recording medium etc Notes on image data compatibility This camera conforms with...

Page 9: ...itions be careful not to get the camera wet If moisture condensation occurs see page 99 and follow the instructions on how to remove it before using the camera 7 The auto zoom lens for the DSC P71 only This camera is equipped with an auto zoom lens Be careful not to bump the lens and be careful not to apply force to it On illustrations Illustrations used in this manual are of the DSC P71 unless no...

Page 10: ...32 C MENU button 24 D VIDEO OUT jack 38 E Jack cover F USB jack 47 G Control button Menu on v V b B z 20 Menu off 7 27 29 30 H RESET button bottom surface 82 I LCD screen J DC IN jack cover 19 K DC IN jack 19 L Mode dial 21 To shoot still images To view or edit images To shoot movies Clip Motion images Multi Burst mode images SET UP To set the SET UP items SCN To shoot in the SCENE SELECTION mode ...

Page 11: ...ccasionally clean the poles of the batteries and the terminals of the charger by wiping them with a dry cloth At the time of purchase or when the Nickel Metal Hydride batteries haven t been used for a long time they may not fully charge This is typical of this type of battery and is not a malfunction If this happens repeatedly using up the battery fully and then recharging it should correct the pr...

Page 12: ...g page 32 In Flash mode the No flash is displayed If you want to shoot using the flash press v on the control button and select forced flash or Auto page 30 When the power turns on the Flash mode is normally set to No flash When the flash is charging the Flash charge lamp blinks the LCD screen turns off In shooting still images the focus only focuses when the shutter is pushed down halfway Battery...

Page 13: ...x 3000 Image size R6 size AA Ni MH 2 supplied Batterylife min No of images 2048 1536 Approx 230 Approx 4600 640 480 Approx 230 Approx 4600 Image size R6 size AA Ni MH 2 supplied Batterylife min No of images 1600 1200 Approx 280 Approx 5600 640 480 Approx 280 Approx 5600 R6 size AA Ni MH 2 supplied LCD screen ON min LCD screen OFF min DSC P71 Approx 120 Approx 170 DSC P31 Approx 150 Approx 200 19 G...

Page 14: ...ange the current settings of the camera bring up the menu or SET UP on the LCD screen page 55 and use the control button to make the changes For each item press v V b B to select the desired value then press the center z or b B to make the setting Spot light metering is not displayed on the menu of the DSC P31 page 61 WHITE BAL AUTO ISO WB EV ISO 0EV 0EV 21 Getting started Setting the date and tim...

Page 15: ... 1 1 12 02 AM OK 5 D M Y OK CANCEL M D Y Y M D CLOCK SET 2002 1 7 12 02 AM OK D M Y OK CANCEL M D Y Y M D CLOCK SET 2002 4 7 10 30 PM OK 6 23 Shooting still images Inserting and removing a Memory Stick Open the Memory Stick cover Slide the cover in the direction of the arrow to open it Insert the Memory Stick Holding the Memory Stick as shown in the illustration insert it all the way in until it c...

Page 16: ... Choose an image size and quality level appropriate for the kind of images you want to shoot You can resize the images later Resize function see page 71 You can choose image size from among the six options in the following tables Image size Examples 2048 1536 DSC P71 Very fine prints 2048 3 2 DSC P71 3 2 prints 1 1600 1200 Printing A4 size images 1600 3 2 DSC P31 3 2 prints 1 1280 960 Printing pos...

Page 17: ...the shutter fully down A beeping sound is heard the shooting is completed and the still image is saved in the Memory Stick When the Recording lamp goes out you can shoot the next image When you are shooting with the battery if no tasks are performed for a while with the camera turned on power is automatically shut off to preserve battery power page 20 When POWER SAVE is set to ON approximately 90 ...

Page 18: ...s used set DIGITAL ZOOM in SET UP to OFF when this feature is not needed page 97 DSC P31 The DSC P31 does not have an optical zoom It has only a 3x digital zoom There is no Digital zoom item in SET UP When you are using digital zoom you cannot confirm the image using the finder When you are using the digital zoom feature the Auto focus frame is not displayed T W The T side of this line shows the e...

Page 19: ...lamp goes out When you press the shutter button halfway down while the flash is flashing the Flash charge lamp turns on 2 2048 F2 3 3 0EV 50 2048 4 31 Shooting still images To reduce red eye when recording live subjects When the flash begins to strobe before the image is shot the red eye phenomenon is reduced In SET UP set RED EYE REDUCTION to ON page 97 will be displayed on the LCD screen The amo...

Page 20: ... displayed in the upper left portion of the LCD screen The actual date and time are displayed when the image is played back When you have chosen a date format you can choose Insert the correct date and time page 21 and the information will be inserted in the format you chose The DIGITAL ZOOM item is not displayed on the SET UP screen of the DSC P31 page 28 Finder DISPLAY LCD ON OFF button 2048 4 r...

Page 21: ...and press the MENU button The menu appears Twilight mode Twilight portrait mode Landscape mode 1 WB EV SCN 0EV 0EV MENU button 35 Shooting still images Select SCN using b B on the control button Spot light metering is not displayed on the menu of the DSC P31 page 61 Select the desired mode using v V on the control button The mode will be set to your choice When the setting is completed press the M...

Page 22: ...ayed see page 105 Viewing single images Turn the mode dial to and turn on the power The last image you shot will be displayed 1 FILE BACK NEXT 10 30PM 2002 7 4 100 0028 6 8 640 Viewing still images 37 Viewing still images Select Still Image using b B on the control button b Displays the previous image B Displays the next image Viewing Index 9 or 3 images display Press the Zoom Wbutton once The dis...

Page 23: ... video input jack and a video connecting cable The color system of the TV must be the same as that of your digital still camera Check the following list NTSC system Bahama Islands Bolivia Canada Central America Chile Columbia Ecuador Jamaica Japan Korea Mexico Peru Surinam Taiwan the Philippines the U S A Venezuela etc PAL system Australia Austria Belgium China Czech Republic Denmark Finland Germa...

Page 24: ... z To halt the deletion select EXIT then press the center z 2 CANCEL DELETE ALL SELECT 41 Deleting still images Select the image you want to delete using v V b B on the control button then press the center z The mark appears next to the selected images At this point the images have not yet been deleted Put a mark next to all of the images you want to delete To cancel your selection press the cente...

Page 25: ... dial to SET UP and turn on the power The term formatting means preparing a Memory Stick to record images this process is also called initialization The Memory Stick provided with this camera and those available commercially are already formatted and can be used immediately When you format a Memory Stick be aware that all of the images in the Memory Stick will be permanently deleted Select SETUP 1...

Page 26: ... There are two modes for a USB connection NORMAL and PTP modes The factory setting is the NORMAL mode This section describes the USB connection using the NORMAL mode Communication with your computer for Windows users only If you recover your computer from the suspend or sleep mode communication between your camera and your computer may not recover at the same time When a USB connector is not provi...

Page 27: ...ing still images to your computer 3 Connecting your camera to your computer Open the jack cover and connect the supplied USB cable to your camera Then connect the other end of the USB cable to your computer When using a desktop computer connect the USB cable to the USB connector on the rear panel When using Windows XP the copy wizard automatically appears on the desktop Proceed to page 49 USB MODE...

Page 28: ...tion message appears When you want to overwrite the existing image with the new one click Yes When you do not want to overwrite it click No then change the file name 1 2 3 49 Copying still images to your computer 4 Copying images for Windows XP users Click Copypicturestoafolder on my computer using Microsoft Scanner and Camera Wizard then click OK The Scanner and Camera Wizard appears When followi...

Page 29: ...pictures then click Next The Completing the Scanner and Camera Wizard window appears 3 1 2 4 1 2 5 1 2 51 Copying still images to your computer Click Finish The wizard closes When you want to continue copying other images disconnect the USB cable once and reconnect it Then follow the process from Step 1 6 Click here Image file storage destinations and file names The image files recorded with your ...

Page 30: ...LP0ssss THM Index image files of Clip Motion files shot in NORMAL mode MBL0ssss GIF Clip Motion files shot in MOBILE mode page 62 MBL0ssss THM Index image files of Clip Motion files shot in MOBILE mode IMCIF100 DSC0ssss JPG Small size image files shot in E MAIL mode page 65 MOML0001 MOV0ssss MPG Movie files shot normally page 74 53 Copying still images to your computer 5 Viewing the images on your...

Page 31: ...or Sony software to copy images to your computer and view the images on your computer To install the software insert the supplied CD ROM drive then click PIXELA ImageMixer on the opening window and follow the instructions on each window For details see the software s help files OS Steps Mac OS 8 5 1 8 6 9 0 Steps 1 to 5 Mac OS 9 1 9 2 Mac OS X v10 0 v10 1 Steps2to5 55 Before advanced operations Ho...

Page 32: ...ubject and the overall color balance is adjusted accordingly When you want to fix the conditions under which the image is captured or when shooting under special lighting conditions you can select the settings manually AUTO no display The white balance is adjusted automatically Daylight Used when shooting outdoors and for shooting at night under neon lights for fireworks sunrises and sunsets Cloud...

Page 33: ... movement is given to subjects in or near the center of the frame In this case the AF range finder isn t displayed Control button Mode dial MENU button 2048 4 2048 4 59 Advanced still image shooting Shooting with the AF lock using Center AF If it is difficult to focus because the subject is not in the center of the frame you can focus in this situation using the AF range finder For example when yo...

Page 34: ... 2048 9 4 WB FOCUS ISO MULTI AF CENTER AF 0 5m 1 0m 1 0m 3 0m 7 0m SOLARIZE B W Like an illustration with clearly delineated bright and dark portions In black and white SEPIA NEG ART Colored to look like an old photograph Made to look like a negative image 61 Advanced still image shooting a Turn the Mode dial to SCN or b Press the MENU button The menu appears c Select PFX P EFFECT using b B then s...

Page 35: ...on in this mode MOBILE mode has strict file size limits so picture quality falls accordingly For the number of images you can record using Clip Motion see page 91 63 Advanced still image shooting Before using Clip Motion In MOVING IMAGE in SET UP select CLIP MOTION pages 55 97 a Turn the Mode dial to b Press the MENU button The menu appears c Select IMAGE SIZE using b B and select the desired mode...

Page 36: ...eature the 16 frames will all be displayed at the same time as part of one image just as they are on a computer For the number of images that can be recorded using the Multi Burst mode see page 91 In Multi Burst mode the date and time cannot be displayed Shutter button Mode dial Control button MENU button INTERVAL 1 30 1 15 1 7 5 1 7 5 PFX 65 Advanced still image shooting Deleting shot images When...

Page 37: ...view a portion of the right side of the image Advanced still image viewing 67 Advanced still image viewing Recording an enlarged image Trimming a After you have viewed an image using playback zoom press the MENU button b Select TRIMMING using B then press the center z c Select the image size using v V then press the center z The image will be recorded and the screen image will return to the size i...

Page 38: ... a personal computer the image viewing software used may not handle the rotation information correctly 69 Still image editting Protecting images Protect Mode dial setting To prevent accidental erasure of an important image you can protect it For single images a Turn the mode dial to b Display the image you want to protect using b B c Press the MENU button The menu appears d Select PROTECT using b ...

Page 39: ...ed to that image e To protect other images move the image you want to protect to the center using b B and repeat Step 4 OK 10 30PM 2002 7 4 100 0005 PROTECT PRINT DELETE 71 Still image editting To remove protection from previously protected images In Step 4 select the image from which you want to remove protection and press the center z To remove protection from all of your images repeat this proc...

Page 40: ...he center z The frame of the selected picture changes to green You cannot select ALL e Select the images you want to print using the control button then press the center z A Print mark is attached to the image 5 5 2048 SLIDE OK DELETE PROTECT PRINT TO NEXT MENU SET 73 Still image editting f To print other images repeat Step 5 for each of them g Press the MENU button The menu appears h Select OK us...

Page 41: ...er Turn the Mode dial to and follow the procedure on page 29 You cannot use a flash You cannot write the date and time on the image Mode dial Control button MENU button DISPLAY LCD ON OFF button 140 0 01 5 28 160 Enjoying movies 75 Enjoying movies Viewing movies on the LCD screen Mode dial setting You can view movies on the LCD screen of the camera a Turn the Mode dial to b Select the desired movi...

Page 42: ...You have not deleted the images yet at this point Mode dial Control button MENU button TO NEXT MENU SET 77 Enjoying movies f Repeat Step 5 of the procedure to delete other images g Press the MENU button The menu appears h Select OK using b B and press the center z The image is deleted when the MEMORY STICK ACCESS message disappears To cancel the deletion Select CANCEL in Step 8 and press the cente...

Page 43: ...2 Cutting scene B 4 Only the desired scenes remain DIVIDE point DIVIDE point DELETE DELETE Mode dial Control button MENU button 79 Enjoying movies e Deciding on a cutting point Press the center z at the desired cutting point When you want to adjust the cutting point use c C frame forward rewind and adjust the cutting point using b B If you want to change the cutting point select CANCEL The playbac...

Page 44: ...lick Next All of the images recorded in the Memory Stick will be displayed on the screen c Click to remove the checkmark from the checkboxes of images that you do not want to copy to the computer then click Next The Image names and Copy destination screen is displayed d Designate the image names and copy destination then click Next The copying of your images begins When the copying is finished the...

Page 45: ...harged p Turn on the power again page 20 p Replace it with a charged battery page 14 Troubleshooting 83 Troubleshooting Taking Still Moving images Symptom Cause Solution The LCD screen does not light when the power is turned on The power was turned off with the LCD screen set to OFF the last time the camera was used p Turn the LCD screen on page 32 The subject is not visible on the LCD screen The ...

Page 46: ...The date and time are recorded incorrectly The date and time are not set correctly p Set the correct date and time page 21 Symptom Cause Solution 85 Troubleshooting Viewing images Deleting Editing an image Symptom Cause Solution The image cannot be played back The mode dial is not set to p Set the mode dial to page 36 Images are coarse right after being played back p This is not a malfunction The ...

Page 47: ...XELA ImageMixer for Sony software click on HELP The image cannot be played back on a personal computer p If you are using the PIXELA ImageMixer for Sony software click on HELP p Consult the personal computer or software manufacturer 87 Troubleshooting Personal computers continued Memory Stick Others Symptom Cause Solution The image is affected by noise when you play back an image on a personal com...

Page 48: ...n of the Memory Stick is dirty Insert the Memory Stick correctly page 23 FORMAT ERROR The Memory Stick format failed Format the Memory Stick again page 43 MEMORY STICK LOCKED The write protect tab on the Memory Stick is set to the LOCK position Move it to the recording UNLOCK position page 100 NO SPACE ON MEMORY STICK The Memory Stick is full You cannot record images Delete unnecessary images page...

Page 49: ...function that you cannot reverse has occurred PresstheRESETbutton pages11 13 on the bottom of the camera then turn the power on again 91 Troubleshooting The number of images that can be saved shooting time The number of images that can be saved and the shooting time are different depending on the capacity of the Memory Stick the image size and the image quality Refer to the following charts when y...

Page 50: ...oting still pictures page 24 Additional information 93 Additional information When the Mode dial is set to SCN continued When the Mode dial is set to MOVING IMAGE is set to MPEG MOVIE in the SET UP settings Item Setting Description QUALITY xFINE STANDARD Records images with fine image quality mode Records images in the standard image quality mode page 24 MODE REC MODE E MAIL xNORMAL Records a smal...

Page 51: ...ional information When the Mode dial is set to when MOVING IMAGE in SET UP is set to Multi Burst Item Setting Description EV 2 0 1 7 1 3 1 0 0 7 0 3 x0 0 3 0 7 1 0 1 3 1 7 2 0 Adjusts the exposure page 56 9 FOCUS x MULTI AF CENTER AF 0 5 m 1 0 m 3 0 m 7 0 m Chooses the auto focus method set the prefocus distance pages 58 60 WB WHITE BAL xAUTO Sets the white balance page 57 Spotlight metering can b...

Page 52: ...he image page 32 DIGITAL ZOOM DSC P71 xON OFF Selects whether to use the digital zoom page 28 RED EYE REDUCTION ON xOFF Reduces the red eye phenomenon when using a flash page 31 AF ILLUMINATOR xAUTO OFF Selects whether to emit an AF assist light in the dark Helps when it is hard to focus on the subject under dark lighting page 31 Item Setting Description FORMAT OK CANCEL Formats the Memory Stick P...

Page 53: ...ed On moisture condensation If the camera is brought directly from a cold to a warm location or is placed in a very damp room moisture may condense inside or outside the camera This moisture condensation may cause a malfunction of the camera Moisture condensation occurs easily when The camera is brought from a cold location such as a ski slope into a warmly heated room The camera is taken from an ...

Page 54: ...o use the battery longer we recommend you keep the battery in a pocket close to your body to warm it and insert it in your camera just before you start shooting If you use the LCD screen or shoot a lot using the zoom the battery power will be used up faster We recommend having spare batteries handy for two or three times the expected shooting time and try test shooting before the actually using th...

Page 55: ... 1 2 3 4 5 6 The page numbers in parentheses indicate the location of additional important information 105 Additional information For still image playback A Recording mode indicator 65 B Protection indicator 69 Print mark indicator 72 C Zoom indicator 66 D File name 52 E Number of pages recorded in Memory Stick 25 F Remaining Memory Stick capacity indicator 25 G Image number 25 H Image size indica...

Page 56: ...T FRONT BLOCK ASSEMBLY Page 2 3 2 3 LCD MODULE Page 2 3 2 9 CD 392 BOARD Page 2 6 2 8 MEMORY STICK CONNECTOR Page 2 5 DSC P71 2 5 CABINET UPPER BLOCK ASSEMBLY Page 2 4 2 7 LENS BLOCK ASSEMBLY Page 2 5 2 10 JK 231 BOARD Page 2 6 2 6 ST 075 BOARD Page 2 4 2 11 SY 075 BOARD Page 2 7 SERVICE POSITION SY 075 BOARD SIDE A Page 2 8 SERVICE POSITION SY 075 BOARD SIDE B Page 2 7 ...

Page 57: ...n the numerical order given 8 Cabinet rear block assembly 7 FP 067 flexible board CN701 1 Screw M2 2 Screw M2 3 Two screws M2 5 Claw 4 Claw 6 7 Three screws 1 7 4 6 Connector CN902 9 PK 064 board 8 Three screws 1 7 4 2 tape 4 tape 3 Flexible board CN802 5 Flexible board CN801 1 FP 067 flexible board CN901 ...

Page 58: ... MODULE 2 4 CABINET FRONT BLOCK ASSEMBLY 2 Two screws 1 7 4 3 LCD retainer 4 Light guide plate block 5 LCD module 1 Two screws 1 7 4 5 Cabinet front block assembly 1 FP 528 board CN708 3 Screw M 2 4 Screw M 2 2 Open the BT lid ...

Page 59: ... 4 DSC P71 P71M 2 5 CABINET UPPER BLOCK ASSEMBLY 2 6 ST 075 BOARD 4 ST 075 board 1 Claw 3 FP 530 flexible board CN502 2 1 Screw 1 7 4 2 Three claws 5 Cabinet upper block assembly 4 Flexible board CN706 3 ...

Page 60: ...MBLY 3 FP 072 flexible board CN704 6 Lens block assembly 2 5 FP 074 flexible board CN102 4 Flexible board CN201 1 Screw 1 7 4 2 8 MEMORY STICK CONNECTOR 3 FP 529 flexible board 2 Two screws M1 7 1 Connector CN703 4 Memory stick connector ...

Page 61: ...2 6 DSC P71 P71M 2 9 CD 392 BOARD 2 10 JK 231 BOARD 1 Two screws 1 7 5 5 CD 392 board 4 Seal rubber K 3 Optical filter block 2 3 FP 072 flexible board CN203 2 Fixed JK plate 4 JK 231 board 1 Screw M 1 7 ...

Page 62: ...board Lens block assembly Memory stick connector Memory stick DC jack CPC 9 jig J 6082 393 C Note 1 2 DC IN connector AC power adaptor Note 1 Don t use the 12 pin flexible board of CPC 9 jig It causes damage to the unit Note 2 The old CPC 9 jig Parts code J 6082 393 B Cannot be used because it cannot operate the adjustment remote commander Note 3 Do not touch the capacitor terminals You could get ...

Page 63: ...Memory stick Memory stick connector SY 075 board DC jack Cabinet upper block assembly CH 109 board Note 1 Don t use the 12 pin flexible board of CPC 9 jig It causes damage to the unit Note 2 The old CPC 9 jig Parts code J 6082 393 B Cannot be used because it cannot operate the adjustment remote commander Note 3 Do not touch the capacitor terminals You could get an electric shock ...

Page 64: ...ion CD 392 CCD IMAGER CH 109 CAMERA PROCESS SY 075 CAMERA DSP VIDEO MEMORY LENS DRIVE SH DSP FLASH MEMORY CLOCK GENERATOR CONNECTOR DC IN DC DC CONVERTER ST 075 FLASH DRIVE PK 064 FRONT CONTROL LCD DRIVE TIMING GENERATOR CONTROL SWITCH JK 231 JACK 2 12 CIRCUIT BOARDS LOCATION ...

Page 65: ...2 10 DSC P71 P71M E FP 528 FP 067 FP 530 Control switch block FP 529 FP 074 FP 072 2 13 FLEXIBLE BOARDS LOCATION ...

Page 66: ...C001 DC DC CONTROL 8 8 CAM 15V CAM 7 5V A 4 9V A 2 9V D 2 9V D 3 1V PANEL 13 5V PANEL 4 9V PANEL 2 9V PANEL 15 5V BL VO AVC UNREG ST UNREG EVER 4V IC401 FRONT CONTROLLER 1 3 SYS DD ON PANEL R PANEL G PANEL B PANEL R PANEL G PANEL B CV OUT IC801 LCD DRIVE 2 3 IC802 LCD TIMING GENERATOR 2 3 CV OUT V OUT COLOR LCD MONITOR D901 BACK LIGHT PANEL UNIT LCD SO XLCD SCK LCD SO XLCD SCK J201 BT401 LITHIUM B...

Page 67: ... 8 43 31 44 05 3 5 6 8 9 11 12 14 32 34 35 37 38 40 41 43 48 50 51 53 54 56 57 59 77 79 80 82 83 85 86 88 137 116 113 112 111 106 XWE QCLK QCLKE XCAS XRAS XCSO 183 TG WEN PIO15 12 10 20 19 16 1 2 3 4 5 6 17 IC351 CCD IMAGER Q352 CN351 BUFFER Q351 SWITCH RG VOUT H2 H1 SUB V4 V3A V3B V2 V1A V1B RG CCD OUT H2 H1 VSHT V4 V3A V3B V2 V1A V1B VSUB CONT CSUB 12 14 13 11 5 6 7 8 9 10 15 17 2 CD 392 BOARD C...

Page 68: ...DIO PTC 1 MSSCLK PTC 3 PTN 6 PTN 0 SCK1 SCPT 6 TXD1 SCPT 4 RXD1 SCPT 5 PTN 5 AN 2 PTL 2 PTM 2 PTM 4 RXD2 PTH 3 XTG CS CCD TEMP MSHUT REF PRELAMP AF ON XCAM RESET XGCAM CS CAM SO XCAM SCK D30 PTB 6 TXD0 SCPT 0 RXD0 SCPT 0 SCK0 SCPT 2 NMI PTN 1 SCS0 SCPT 3 SCK2 PTH 4 TXD2 PTH 2 PTN 4 CN701 3 5 CN703 CN901 1 4 MS DIO MS SCLK MS BS XMS ACCESS LED RST CS SCK DI DO XMS IN CLK LD DI AO4 AO3 CAMERA BLOCK ...

Page 69: ... 31 48 48 VLIM IN7 EN7 43 46 OUT7A OUT7B SHUTTER DRIVER M M SHUTTER MOTOR SHUTTER SHUTTER PRELAMP LED ON LED DRIVE FP 528 FLEXIBLE BOARD MSHUT REF PRELAMP AF ON LENS TEMP AD MSHUT ON MSHUT EN ZOOM ENCODER4 ZOOM ENCODER3 HR EN0 HR DIR0A HR DIR0B HR DIR1A HR DIR1B XFC RST SENS 05 10 9 12 11 IN2 EN2 IN1 EN1 HR DIR2A HR EN2 IRIS IN IRIS EN IC202 7ch LENS DRIVER 3 8 ZOOM ENCODER2 ZOOM ENCODER1 ZM DC EN...

Page 70: ... 52 10MHz IN 10MHz OUT 32kHz IN 32kHz OUT POWER S402 STBR CHARGE AMBER D254 S258 VIDEO OUT J201 TALL ACCESS RED D252 X401 10MHz X402 32 768kHz 05 22 20 26 28 XCS MC XCS MC 7 24 INVERTER Q405 INVERTER Q404 21 13 25 XCPC IN CAMERA BLOCK 2 3 6 19 CAMERA BLOCK 1 3 4 CV OUT 12 10 9 CN201 1 CN902 SP BEEP OUT BZ901 BUZZER 51 LED DRIVE S252 W S254 T ZOOM CN701 5 5 34 20 18 17 AV JACK IN XSHTR ON XAE LOCK ...

Page 71: ...CLP FRP PFRP XSTBY XC SAVE RGT HCK1 HCK2 HST WIDE DWN EN VCK VST PANEL COM PANEL VG 4 BL IC803 BACK LIGHT CONTROL 2 3 1 4 3 BACK LIGHT DRIVE BACK LIGHT SWITCH Q807 Q806 808 809 3 4 CN802 LCD901 COLOR LCD MONITOR PANEL UNIT BACK LIGHT B G COM VCK EN DWN WIDE HST HCK2 HCK1 RGT VST BL H BL THL R PK 064 BOARD 3 3 VIDEO FLASH MODE CONTROL BLOCK 3 9 CAMERA BLOCK 2 3 6 CAMERA BLOCK 1 3 4 VIDEO FLASH MODE...

Page 72: ...9 SWITCHING D009 D011 L006 Q023 026 SWITCHING Q028 Q018 021 SWITCHING L001 L008 Q022 SWITCHING L002 BUZZER 15V BL VO EVER 3 2V SYS DD ON FAST CHARGE XCS DDCON UNREG SO UNREG SCK BATT XEXT EMERGENCY DETECT Q013 PANEL 2 9V D 2 9V EVER 4V L016 L020 L010 L017 L021 L011 L012 L013 POWER BLOCK 2 3 15 PANEL 4 9V 68 68 PANEL 4 9V BL VO 62 62 BL VO M 5V L018 A D005 OUT 1p OUT 1n VIN 1 36 37 55 Q017 020 SWIT...

Page 73: ...Q810 FOCUS SENSOR L202 FB501 PK 064 BOARD 2 2 IC401 FRONT CONTROLLER 1 3 IC402 INITIAL RESET BACK UP VCC 1 3 BT401 LITHIUM BATTERY BACK UP 6 5 4 3 48 67 EVER 4V EVER 3 2V FAST CHARGE VOUT CS RESET FAST CHARGE BATT SENS BACKUP VCC 73 XRESET VBAT 8 VRO 7 VIN 31 BATT IN 22 XCS DDCON XCS DDCON 20 UNREG SO UNREG SO 21 UNREG SCK UNREG SCK 8 BATT XEXT BATT XEXT 76 SYS DD ON SYS DD ON 46 STB CHG 68 ACV SE...

Page 74: ...N AV_JACK_IN REG_GND V_OUT REG_GND REG_GND N C REG_GND D D FP 072 B to B GND V1A CAM_15V V4 GND CAM_ 7 5V VSUB_CONT RG V3B H2 GND V1B CCD_TEMP V2 GND CCD_OUT V3A GND VSHT H1 VSHT GND V3B CCD_OUT CAM_ 7 5V V2 RG V1A GND GND H2 CAM_15V GND VSUB_CONT CCD_TEMP H1 V3A V4 V1B GND N C CH 109 BOARD A_2 9V REG_GND CA_AD11 REG_GND REG_GND REG_GND D_3 1V TG_CLK CA_AD13 REG_GND CA_AD1 REG_GND CLPOB REG_GND RE...

Page 75: ... AV_JACK_IN XAE_LOCK_SW REG_GND HDO XCS_DDCON XLCD_SCK FR_SI FAST_CHARGE REG_GND PANEL_V DD_CON_SENS XSHTR_ON REG_GND REG_GND SYS_V EVER_4 0V BATT XEXT REG_GND XPWR_ON REG_GND XRST_SYS BUZER_15V PANEL_R UNREG_SCK REG_GND PANEL_G REG_GND FR_SO XSTB_PWRSAVE REG_GND REG_GND REG_GND XPWR_LED UNREG_SO REG_GND REG_GND BATT_UNREG STB_CHARGE ACV_UNREG SELF_TIMER_LED PAL XNTSC PANEL_B REG_GND SYS_DD_ON XCS...

Page 76: ... diagrams All capacitors are in µF unless otherwise noted pF µ µF 50 V or less are not indicated except for electrolytics and tantalums Chip resistors are 1 10 W unless otherwise noted kΩ 1000 Ω MΩ 1000 kΩ Caution when replacing chip parts New parts must be attached after removal of chip Be careful not to heat the minus side of tantalum capacitor Because it is damaged by the heat Some chip part wi...

Page 77: ...orm of IC351 cannot be measured because it is mounted by the side of the lens R10 4 P0 0 R10 9 P0 R14 8 P0 R12 9 P0 6 1 2 3 4 5 2200p C357 2SC4250 T5LSONY1 Q352 16V 22u C353 0 1u C356 0 1u C358 35V 3 3u C352 TH351 1M R358 0 1u C359 DTC144EHT2L Q351 3 3 R354 4700 R360 100k R352 C360 10p 20P CN351 1 2 3 4 5 6 7 8 9 10 11 12 13 14 15 16 17 18 19 20 MA111 K8 S0 D351 0 01u C354 2700 R356 0 1u C355 3 3 ...

Page 78: ...50 R112 150 R110 150 R109 R115 150 150 R111 150 R113 150 R114 R122 XX 1 A DRV3V FE3V D0 D2 D4 D6 D8 D10 D12 D1 D3 D5 D7 D9 D11 D13 V4 V3A V3B V1A V1B H1 VSHT V2 RG H2 HVDD H1 H2 RG D13 D12 D11 D10 D9 D8 D7 D6 D5 D4 D3 D2 HVDD TG3V FE3V DRV3V D1 D0 VSHT V4 V3B V3A V2 V1B V1A TG3V H2 VSHT V2 RG CAM_15V H1 GND V3B GND CCD_TEMP VSUB_CONT GND CCD_OUT GND GND V1A V3A V1B CAM_ 7 5V V4 REG_GND XCAM_RESET ...

Page 79: ...6 198 PIO01 199 PIO05 200 VCC2_6 201 PIO00 202 DGND_12 203 VAVS1 204 BO 205 VAVD1 206 VAVS0 207 GO 208 VAVD0 209 VREF1 210 VRO1 211 VAVD2 212 RO 213 VAVS2 214 VAVS3 215 YO 216 VAVD3 217 VREF2 218 VRO2 219 VAVD4 220 CO 221 VAVS4 222 N C 223 EXTPAL 224 DGND_13 225 HD 226 FLD 227 NTVDO 228 CAMVDO 229 LCDVD 230 VPD 231 VCC3_12 232 SENS0 233 EN0 234 DIR0A 235 DIR0B 236 SENS1 237 EN1 238 DIR1A 239 DIR1B...

Page 80: ...2 2200 R328 6 3V 10u C342 ZOOM_DC ZOOM_DC XX L601 M_5V R608 XX _HR_DIR1A D602 XX D601 XX CN601 XX 1 OUT1 2 OUT2 XSENCV_CLOSE XX R604 XX FB602 LENSV_OPEN_ON CN602 XX 1 2 3 4 5 6 XX FB601 R607 XX IC601 XX 1 VCC 2 IN1 3 IN2 4 SGND 5 NC 6 OUT2 7 OUT1 8 PGND R603 XX LENSV_CLOSE_ON XSENCV_OPEN XX C601 R605 XX R601 XX _HR_EN1 6 3V 10u C652 VAMP_ON 10uH L651 NJM2574RB1 TE2 IC651 1 LPF THR SW 2 GND 3 Vsag ...

Page 81: ...S_TEMP_AD XX C212 XX C220 XX 6 3V C225 D_3 1V ZOOM_ENCODER4 XCAM_DR_PS XX R228 REG_GND XOVF_RST_SENS R206 0 XX C223 0 1u C207 IRIS_IN _HR_EN1 XX D205 MSHUT_ON D210 MAZR082H0AS0 10uH L202 D208 MAZR082H0AS0 XX R211 XX R213 XX C211 ZM_DC_EN MSHUT_EN XLENS_RST_LED R257 0 XX R241 HALL_AD ZOOM_ENCODER3 670215501 IC204 BH2223FV E2 1 A02 2 A03 3 A04 4 A05 5 A06 6 A07 7 A08 8 A09 9 VCC 10 A010 11 NC 12 LD ...

Page 82: ... CAP2 176 C19 Vcc PLL2 177 C18 VssQ 178 B19 XTAL 179 D18 EXTAL 180 A19 VccQ 181 B18 MD2 182 B16 MD1 183 A18 MD0 184 B17 UCLK PTH 0 185 A17 SCK0 SCPT 2 186 B15 VssQ 187 A16 CKIO 188 C16 VccQ 189 A15 PTN 0 190 C17 TXD0 SCPT 0 191 C15 RXD0 SCPT 0 192 D15 PTM 7 193 A14 RTS4 SCPT2 2 194 B14 CTS4 SCPT2 3 195 C14 TXD4 SCPT2 0 196 D14 RXD4 SCPT2 0 197 A13 SCK4 SCPT2 1 198 B13 PTM 6 199 C13 SCK1 SCPT 6 200...

Page 83: ... 0 R789 0 R790 IMIC6008ATD IC781 1 2 FIN 3 VSS 4 CLK3_OUT 5 CLK3_ON 6 CCD_SEL1 7 CLK1_0n 8 VDD 9 CLK1_OUT 10 VSS 11 CLK2_OUT 12 VDD 13 CLK2_ON 14 CCD_SEL2 15 VSS 16 REF_OUT 0 R788 FB781 10u 6 3V C781 22 R785 22 R787 0 1u C782 0 1u C785 0 1u C784 22 R786 X781 27MHz 10uH L781 XX R791 0 1u C783 CAM_DD_ON CAM_SO XCAM_SCK 1 A XCS_MC MC_XCS0 MC_A08 USB_D MC_A09 CAM_SI XEEPROM_WE MC_A14 IRQIMG MC_D08 MC_...

Page 84: ...XNTSC PANEL_V PANEL_B PANEL_G PANEL_R SYS_V ACV_UNREG DD_CON_SENS BATT XEXT XCS_DDCON XCS_PANEL_TG XLCD_SCK HDO XMS_ACCESS_LED CVCHK_OUT XRST_SYS PAL XNTSC XMC_NMI XFR_SCK FR_SI AE_LOCK_LED PANEL_B PANEL_G PANEL_R UNREG_SO MS_BS MS_VCC MS_SCLK REG_GND XMS_IN MS_DIO USB_JACK_IN REG_GND REG_GND V_OUT D D AV_JACK_IN REG_GND D_2 9V XSHTR_ON XAE_LOCK_SW REG_GND VSS VCC VSS N C XPWR_ON XPWR_LED REG_GND ...

Page 85: ...347 TE85L Q007 4 7u 10V C052 BATT XEXT 220k R006 L016 10uH 470k R015 BATT_UNREG LND001 STATIC_GND 1k R017 FAST_CHARGE D006 MA2SD24008S0 F006 2A 32V 22uH L014 C002 0 022u RN4983FE TPLR3 Q008 3 5 4 6 2 1 10k R034 ACV_UNREG 1k R001 C001 0 022u XX C012 10V 33u C051 LF001 1 2 4 3 EVER_3 2V 2SD2216J QR K8 SO Q011 HAT1054R EL Q004 8 7 2 1 6 5 4 3 D010 MA2SD24008S0 R016 10k 4P CN002 1 2 3 4 F001 2A 32V XX...

Page 86: ...N10 4 AMPIN 5 AMPOUT 6 CT1 7 RT 8 CT2 9 CS 10 SCPIN 11 CP 12 TLOFF 13 GND 14 VREG 2 2V 15 DT2 16 DT1 17 PGND1 18 OUT6s 19 VCC4 20 VCC5 21 PGND2 22 OUT10 23 OUT9 24 OUT8p 25 OUT8n 26 OUT7p 27 OUT7n 28 OUT6p 29 OUT6n 30 OUT4p 31 OUT4n 32 OUT3p 33 OUT3n 34 OUT2p 35 OUT2n 36 OUT1p 37 OUT1n 38 OUT5p 39 OUT5n 40 PGND3 41 VCC2 42 VCC3 43 OUT5S 44 XCS 45 DATA 46 CLK 47 RST 48 LDON 49 VIN8 50 VIN6 51 VIN7 ...

Page 87: ...SCK XCS_DDCON FAST_CHARGE DD_CON_SENS XTALLY_LED SELF_TIMER_LED XMC_HELP FR_SI USB_JACK_IN XMS_IN XAE_LOCK_SW XSHTR_ON STB_CHARGE ACV_UNREG DD_CON_SENS BATT XEXT XCS_DDCON UNREG_SO XCS_PANEL_TG XLCD_SCK HDO XMS_ACCESS_LED CVCHK_OUT USB_JACK_IN XRST_SYS PAL XNTSC XMC_NMI XFR_SCK FR_SI XSTB_PWRSAVE XPWR_ON AE_LOCK_LED ACV_UNREG CVCHK_OUT XCPC_IN LANC_IN LANC_OUT XTALLY_LED CHARGE_LED AE_LOCK_LED XMS...

Page 88: ...802 3 5 4 6 2 1 22k R812 100 R823 100 R825 22uH L801 10uH L802 0 1u C829 R805 470k 2 2u C823 2 2u C815 68k R813 0 01u C809 R824 100k 100 R819 0 5 47k R836 2SB1218A QRS TX Q809 10k R832 22k R834 0 5 68 R844 0 1u C828 2SB1218A QRS TX Q808 0 5 68 R842 DTC144EHT2L Q807 100 R843 TC75S55F TE85R IC803 1 2 3 4 5 47k R833 0 5 3300 R839 2SD2216J QR K8 SO Q806 0 5 10k R840 0 5 3300 R838 100 R841 BL_VO CN802 ...

Page 89: ...U ZOOM TALLY ACCESS LED RED AE LOCK FLASH LED GREEN STRB CHARGE LED AMBER MS ACCESS LED RED 3 F C 5 D B E 6 4 2 PK 064 BOARD 3 3 PK 064 1 3 1 8 PK 064 1 3 PK 064 1 3 3 10 PK 064 1 3 W T DISPLAY CONTROL MODE DIAL LED DRIVE D252 D253 D254 D251 CONTROL SWITCH SW1 BLOCK XX MARK NO MOUNT Digital Digital Digital Digital LND201 STATIC_GND FB202 1k R202 MA111 K8 S0 D206 D201 MAZT082H08S0 XX C202 XX D204 C...

Page 90: ...10u R509 4700 HAU160C030TP D502 RN1902FE TPL3 Q504 6 2 1 3 5 4 RN1902FE TPL3 Q505 6 2 1 3 5 4 C502 XX DTA114EHT2L Q506 MCH3306 TL Q502 XX C501 4 7M R514 LND501 XE_H C511 0 047u 250V 1M R513 47 R512 LND502 XE_L CY25AAJ 8 T13 Q508 8 4 1 7 6 5 2 3 C510 315V 135uH 142895811 L502 10u C503 T501 4 1 3 2 5 82 R517 0 22u C512 MCH3405 TL Q509 1 2 3 100k R515 0 R518 10k R516 XX R519 0 01u C513 12P CN502 1 2 ...

Page 91: ... few cases that the part printed on diagram isn t mounted in this model C panel designation THIS NOTE IS COMMON FOR WIRING BOARDS In addition to this the necessary note is printed in each block 2 1 3 2 1 3 2 1 3 3 4 5 2 1 1 2 3 6 5 4 E B C 3 1 5 5 2 4 6 1 2 3 5 4 4 3 1 2 1 2 4 3 3 1 2 4 5 5 3 4 1 2 3 4 2 1 1 2 4 3 4 6 2 5 3 1 1 2 4 3 Chip parts Transistor Diode 4 3 PRINTED WIRING BOARDS DSC P71 P7...

Page 92: ...is four layer print board However the patterns of layers 2 to 3 have not been included in the diagram There are a few cases that the part isn t mounted in this model is printed on this diagram See page 4 61 for printed parts location Chip transistor CD 392 CCD IMAGER E B C 11 6 4 2 1 5 3 11 ...

Page 93: ...lder CH 109 board is eight layer print board However the pat terns of layers 2 to 7 have not been included in the diagram There are a few cases that the part isn t mounted in this model is printed on this diagram See page 4 61 for printed parts location 11 21 11 21 Including IC101 CH 111 Board ...

Page 94: ...es unleaded solder SY 075 board is eight layer print board However the patterns of layers 2 to 7 have not been included in the diagram There are a few cases that the part isn t mounted in this model is printed on this diagram See page 4 61 for printed parts location Chip parts 2 1 3 E B C 3 1 5 5 2 4 6 1 2 3 5 4 5 3 4 1 2 Transistor Diode 7 9 8 11 21 ...

Page 95: ...DSC P71 P71M 4 45 4 46 SY 075 MS SOCET 6 5 4 3 2 1 11 21 ...

Page 96: ... 064 board is four layer print board However the patterns of layers 2 to 3 have not been included in the diagram There are a few cases that the part isn t mounted in this model is printed on this diagram See page 4 62 for printed parts location Chip transistor E B C 3 1 5 5 2 4 6 1 2 10 11 12 9 8 7 6 5 4 3 BT401 BATTERY LITHIUM SECONDARY 11 ...

Page 97: ...DSC P71 P71M 4 49 4 50 PK 064 ZOOM T ZOOM W MODE DIAL TALLY ACCESS AE LOCK FLASH STRB CHARGE MS ACCESS DISPLAY LCD MENU CONTROL RESET 11 ...

Page 98: ...ard is four layer print board However the patterns of layers 2 to 3 have not been included in the diagram There are a few cases that the part isn t mounted in this model is printed on this diagram See page 4 62 for printed parts location Chip Diode JK 231 JACK 2 1 3 11 VIDEO OUT USB 11 ...

Page 99: ...board is four layer print board However the patterns of layers 2 to 3 have not been included in the diagram There are a few cases that the part isn t mounted in this model is printed on this diagram See page 4 62 for printed parts location Chip parts 2 1 3 E B C 3 1 5 5 2 4 6 Transistor Diode 11 C510 11 ...

Page 100: ... IC351 qs CN351 qs REC 3 9 Vp p 3 IC351 4 5 6 CN351 8 9 q REC 7 9 Vp p 2 4 IC351 qf ql CN351 qd REC 18 6 MHz 6 2 Vp p 5 IC352 qd w CN351 qf REC 6 0 Vp p 18 6 MHz 116 µsec 6 Q352 E CN351 qj REC 1 1 Vp p 116 µsec IC351 1 2 3 CN351 5 6 7 REC 7 9 Vp p 116 µsec ...

Page 101: ...Vp p 9 7 IC781 4 REC PB 3 0 Vp p 8 1 Q303 E REC PB 340 mVp p 3 Q302 E REC PB 330 mVp p 2 4 Q304 E REC PB 450 mVp p 5 IC651 4 REC PB 1 9 Vp p IC781 2 X781 REC PB 4 0 Vp p H 6 IC651 6 REC PB 460 mVp p Q301 E REC PB 310 mVp p H H H H H 27 MHz 44 MHz 27 MHz ...

Page 102: ...z IC401 ts REC PB 1 3 Vp p 2 4 IC801 ws REC PB 8 9 Vp p 5 IC801 wf REC PB 8 9 Vp p 2H 6 IC801 wj REC PB 5 2 Vp p 10 MHz IC401 wk REC PB 2 3 Vp p 2H 2H 2H 2H 9 7 8 q IC801 rh REC PB 448 mVp p IC802 1 REC PB H 3 0 Vp p IC801 rk REC PB H 528 mVp p H IC801 rj REC PB 400 mVp p H ...

Page 103: ...4 60 DSC P71 P71M PK 064 BOARD 2 2 qa qs 11 4 MHz IC802 wj REC PB 4 2 Vp p IC802 rk REC PB 3 0 Vp p V ...

Page 104: ...4 L301 C 3 L302 D 5 L501 B 2 L502 B 2 L651 D 5 L781 B 4 LF001 C 2 Q001 C 2 Q002 D 3 Q004 C 3 Q006 C 2 Q007 D 3 Q008 D 2 Q010 D 2 Q011 D 3 Q013 B 3 Q017 C 2 Q018 B 1 Q019 B 2 Q020 B 2 Q021 B 1 Q022 B 2 Q023 A 1 Q024 A 1 Q026 A 1 Q027 A 1 Q028 A 1 Q029 A 1 Q033 C 2 Q039 A 2 Q040 A 2 Q042 C 3 Q043 C 3 Q203 B 5 Q301 C 4 Q302 D 4 Q303 D 4 Q304 C 5 Q305 C 5 Q501 B 2 Q701 D 4 Q703 B 5 Q704 A 1 R001 C 2 R...

Page 105: ... B 2 R411 B 2 R413 B 2 R414 D 2 R415 B 2 R416 A 3 R418 B 2 R419 B 2 R420 A 2 R422 B 2 R423 B 2 R424 B 2 R425 B 2 R426 B 2 R429 C 3 R430 B 3 R431 B 3 R433 C 2 R434 C 2 R435 A 2 R436 C 2 R437 C 2 R440 A 2 R441 A 2 R442 A 2 R443 A 2 R444 C 2 R445 A 3 R446 C 3 R451 C 3 R452 C 3 R455 C 3 R460 A 3 R461 A 3 R462 A 3 R463 A 3 R465 A 4 R466 A 4 R469 A 4 R470 B 2 R472 C 2 R801 B 5 R804 B 5 R805 B 5 R808 B 5...

Page 106: ...annot be saved due to defective EEPROM or when the EEPROM cannot be removed or in stalled save the data from the same model of the same destination and download it PC Save the EVR data to a personal computer Download the saved data to a machine Procedure 1 Save the EVR data of the machine in which a board is going to be replaced Download the saved data after a board is replaced Machine after a boa...

Page 107: ... page data Initialization of B E F 7 9 page data z z Video Composite video level adj z z z z z Camera Flange back adj z z z z z F No compensation z z z z z Mechanical shutter adj z z z z z Light value adj z z z z z z z Mixed color cancel adj z z z z z z z Auto white balance standard data input z z z z z z z Auto white balance adj z z z z z z z Color reproduction adj z z z z z z z CCD white and bla...

Page 108: ...r connecting the adjusting remote commander For adjusting the LCD block For adjusting the flange back J 9 Back ground paper J 2501 130 A For adjusting the strobe 5 1 CAMERA SECTION ADJUSTMENT 1 1 PREPARATIONS BEFORE ADJUSTMENT 1 1 1 List of Service Tools Oscilloscope Color monitor Vectorscope Regulated power supply Digital voltmeter Note 1 If the micro processor IC in the adjusting remote commande...

Page 109: ...sting remote com mander 3 Select page 0 address 01 and set data 00 1 1 3 Discharging of the Flashlight Power Supply The capacitor which is used as power supply of flashlight is charged with 200 V to 300 V voltage Discharge this voltage before start ing adjustments in order to protect service engineers from electric shock during adjustment Discharge procedure 1 Press the FLASH button PK 064 board S...

Page 110: ...CN708 CN102 CN101 CH 109 BOARD CN351 CN201 J201 Video Color monitor Vectorscope Terminated 75 Ω CN707 CN701 CN706 CN901 CN802 CN801 CN903 CN502 CPC 9 jig Note 1 2 J 6082 393 C BUZZER CN902 AF ILLUMINATION AC IN AC power adaptor DC IN jack CN704 Note 1 Don t use the 12 pin flexible board of CPC 9 jig It causes damage to the unit Note 2 The old CPC 9 jig Parts code J 6082 393 B cannot be used becaus...

Page 111: ...r bar chart from the pattern box and insert a clear chart in its place Do not perform zoom operations dur ing this time 3 Chart for flange back adjustment Join together a piece of white A0 size paper 1189mm 841 mm and a piece of black paper to make the chart shown in Fig 5 1 8 Note Use a non reflecting and non glazing vellum paper The size must be A0 or larger and the joint between the white and b...

Page 112: ...woody board B 2 500 mm woody board C 1 1000 mm 1026 mm Depth 1 m 513 mm Depth 50 cm 1026 mm Depth 1 m 513 mm Depth 50 cm 1000 mm 1000 mm 1030 mm 2 Apply black mat paint to one side of woody board A and B 3 Attach background paper J 2501 130 A to woody board C 4 Assemble so that the black sides and the background paper side of woody board A B and C are internal Fig 5 1 10 Fig 5 1 9 woody board A wo...

Page 113: ...ITIALIZATION OF A B D E F 7 9 PAGE DATA 1 2 1 Initialization of A D Page Data 1 Initializing A D Page Data Note If the A D page data has been initialized the following adjustments need to be performed again 1 Modification of A D page data 2 Video system adjustments 3 LCD system adjustments 4 System control system adjustments Adjsuting page A Adjsuting Address 00 to FF Adjusting page D Adjusting Ad...

Page 114: ...ddress 01 and set data 01 2 New data for changing are not shown in the tables because they are different in destination When changing the data copy the data built in the same model Note If copy the data built in the different model the camera may not operate 3 When changing the data press the PAUSE button of the adjusting remote commander each time when setting new data to write the data in the no...

Page 115: ... 33 8F 89 90 to 9F Fixed data 1 Initialized data A0 29 A1 D8 A2 6D AWB 5800K standard data input A3 08 A4 03 A5 E9 A6 63 A7 83 Color reproduction adj A8 D5 A9 FE AA 73 5 F Page Table Note 1 Fixed data 1 Initialized data Refer to 1 Initializing the B E F 7 9 Page Data Note 2 Fixed data 2 Modified data Refer to 2 Modification of B E F 7 9 Page Data Address Initial value Remark 00 to 0F Fixed data 1 ...

Page 116: ...dj D7 14 D8 to DA Fixed data 1 Initialized data DB 00 DC 00 Strobe white balance adj DD 00 Address Initial value Remark DE 00 DF 00 E0 00 E1 00 E2 00 E3 00 E4 00 E5 00 E6 00 Strobe white balance adj E7 00 E8 00 E9 00 EA 00 EB 00 EC 00 ED 00 EE 00 EF 00 F0 to FF Fixed data 1 Initialized data 6 7 Page Table Note 1 Fixed data 1 Initialized data Refer to 1 Initializing B E F 7 9 Page Data Note 2 Fixed...

Page 117: ...g Instrument Oscilloscope Adjustment Page A Adjustment Address A0 Specified Value Sync level A 286 5 mV NTSC A 300 5 mV PAL Burst level B 286 10 mV NTSC B 300 30 mV PAL Adjusting method Order Page Address Data Procedure 1 0 01 01 2 A 02 03 3 4 F1 04 4 A A0 Change the data and set the sync level A to the specified value 5 A A0 Press PAUSE button 6 Check the burst level B to the specified value Proc...

Page 118: ...and bit5 are 1 Note 1 2 4 A 00 Set the bit value of bit 1 is 1 and press PAUSE button Note 1 5 A 02 Set the bit value of bit 1 is 1 and press PAUSE button Note 1 6 D 21 04 Press PAUSE button 7 6 C1 Check the data changes to 02 8 6 6C 01 9 Wait for 1 second 10 E 96 00 Press PAUSE button Note 1 For the bit values refer to 5 2 SERVICE MODE 2 3 2 Bit value discrimination Note 2 In case of wrong data S...

Page 119: ... of black A D on the color bar chart should be same See Fig 5 1 12 4 With vertical width of black E F set in same the color bar chart should come to the center of monitor TV See Fig 5 1 13 5 Check that the color bar on the monitor TV is focused 6 0 03 22 7 1 Note down the YH and YL data Note 1 Processing after Completing Adjustment Order Page Address Data Procedure 1 0 03 00 How to reset the zoom ...

Page 120: ...tar chart meets the center of shot image screen with the zoom lens at TELE end and WIDE end respectively Specified voltage The specified voltage varies according to the minipattern box so adjustment the power sup ply output voltage to the specified voltage writ ten on the sheet which is supplied with the mini pattern box Minipattern box Below 3 cm Camera Camera table Red Black Yellow SENS White SE...

Page 121: ...automatically input to page F address 18 to 3E 52 and 53 Processing after Completing Adjustment Order Page Address Data Procedure 1 6 01 00 Press PAUSE button 2 Release the data setting performed at step 1 Refer to page 5 13 3 Perform Flange Back Adjustment 2 2 2 Flange Back Adjustment 2 Perform this adjustment after performing Flange Back Adjust ment 1 Mode CAMERA Subject Subject more than 500 m ...

Page 122: ...he Siemens star up to a point before noise appear on the image 3 Perform Data setting during camera system adjustment Refer to page 5 13 4 B 3D Note down the data 5 B 3D 50 Press PAUSE button 6 Shoot the Siemens star with the zoom TELE end 7 Turn on the auto focus 8 Check that the lens is focused 9 6 2C 01 10 While observe the TV monitor change the zoom to the WIDE end and check that the lens is f...

Page 123: ...E button 2 Release the data setting performed at step 1 Refer to page 5 13 5 Mechanical Shutter Adjustment RadarW RadarW RadarW Adjust the period which the mechanical shutter is closed and com pensate the exposure Mode CAMERA Subject Clear chart Standard picture frame with the zoom lens at WIDE end Adjustment Page F Adjustment Address B8 to D7 Note 1 Check that the data of page 6 address 02 is 00 ...

Page 124: ...djustment data will be automatically input to page F address 65 to 67 Processing after Completing Adjustment Order Page Address Data Procedure 1 0 03 00 2 6 01 00 Press PAUSE button 3 Release the data setting performed at step 1 Refer to page 5 13 7 Mixed Color Cancel Adjustment RadarW RadarW RadarW To perform mixed color cancel adjustment based on data of each color in color bar Mode CAMERA Subje...

Page 125: ...ng camera system adjustment Refer to page 5 13 2 Perform Picture Frame setting Refer to page 5 14 3 6 2C 01 4 6 90 00 5 6 91 04 6 6 92 00 7 6 93 00 8 6 01 79 Press PAUSE button 9 6 07 Check the data changes to 01 10 6 01 00 Press PAUSE button 11 6 B6 03 12 6 37 02 13 6 01 0B Press PAUSE button Note 3 14 6 02 Check the data changes to 01 15 6 01 00 Press PAUSE button 16 6 37 01 17 6 01 C1 Press PAU...

Page 126: ...rocedure 1 Perform Data setting during camera system adjustment Refer to page 5 13 2 Perform Picture Frame setting Refer to page 5 14 3 6 2C 01 4 6 90 00 5 6 91 04 6 6 92 00 7 6 93 00 8 6 01 79 Press PAUSE button 9 6 07 Check the data changes to 01 10 6 01 00 11 6 16 04 12 6 B6 03 13 6 37 0D 14 6 01 C1 Press PAUSE button 15 6 02 Check the data changes to 01 16 0 03 2C 17 1 Check that the R Y level...

Page 127: ...te 2 Check that the data of page 6 address 02 is 00 If not turn the power of unit OFF ON Note 3 The right four digits of the page 1 displayed data of the adjusting remote commander 1 XX XX Displayed data Checking method Order Page Address Data Procedure 1 Auto White Balance 3200K check 1 is completed 2 Perform Data setting during camera system adjustment Refer to page 5 13 3 Perform Picture Frame ...

Page 128: ...ure Frame setting Refer to page 5 14 4 6 2C 01 5 6 90 00 6 6 91 04 7 6 92 00 8 6 93 00 9 6 01 79 Press PAUSE button 10 6 07 Check the data changes to 01 11 6 01 00 Press PAUSE button 12 F A0 29 Press PAUSE button 13 F A1 98 Press PAUSE button 14 F A2 61 Press PAUSE button 15 F A3 08 Press PAUSE button 16 6 B6 03 17 6 37 08 18 6 01 A5 Press PAUSE button Note 2 19 6 02 Check the data changes to 01 2...

Page 129: ...ck 75 Ω terminated Specified Value Y level data 20 to C0 Note 1 Check that the data of page 6 address 02 is 00 If not turn the power of unit OFF ON Checking method Order Page Address Data Procedure 1 Place the C14 filter on the lens 2 Perform Data setting during camera system adjustment Refer to page 5 13 3 Perform Picture Frame setting Refer to page 5 14 4 6 2C 01 5 6 90 00 6 6 91 04 7 6 92 00 8 ...

Page 130: ...reak Note 2 Check that the data of page 6 address 02 is 00 If not turn the power of unit OFF ON Note 3 The right four digits of the page 1 displayed data of the adjusting remote commander 1 XX XX Displayed data Checking method Order Page Address Data Procedure 1 Auto White Balance 5800K Check 1 is complete 2 Place the C14 filter on the lens 3 Perform Data setting during camera system adjustment Re...

Page 131: ... data of page 6 address 02 is 00 If not turn the power of unit OFF ON Note 2 Color Reproduction Adjustment is available only once after the power is turned on Turn the power off then on again if the adjustment is retried Adjusting method Order Page Address Data Procedure 1 Perform Data setting during camera system adjustment Refer to page 5 13 2 Perform Picture Frame Setting Refer to page 5 14 3 6...

Page 132: ...a system adjustment Refer to page 5 13 2 E 64 Note down the data 3 E 64 1E Press PAUSE button 4 E 69 Note down the data 5 E 69 0A Press PAUSE button 6 6 01 8B Press PAUSE button 7 6 02 Check the data changes to 01 8 6 55 Check the data 00 to 7F Normal 80 to FF Defective 9 6 01 00 Press PAUSE button 10 E 64 0F Press PAUSE button 11 E 69 60 Press PAUSE button 12 6 01 87 Press PAUSE button 13 6 02 Ch...

Page 133: ... button 4 6 2C 01 5 6 90 00 6 6 91 03 7 6 92 00 8 6 93 00 9 6 01 79 Press PAUSE button 10 6 30 08 11 6 07 Check the data changes to 01 12 Wait for 4 seconds 13 6 01 8D Press PAUSE button 14 6 02 Check the data changes to 01 15 6 55 Check the data 00 to 14 Normal 15 to FF Defective Note 4 16 6 01 00 Press PAUSE button 17 E 65 5A Press PAUSE button 18 6 01 89 Press PAUSE button 19 6 02 Check the dat...

Page 134: ...PAUSE button 15 7 67 FF 16 7 68 30 17 6 14 8B 18 6 01 0F Press PAUSE button 19 6 02 Check the data changes to 01 20 0 03 04 21 1 Check that the displayed data Note 1 satisfied the R ratio specified value 22 0 03 05 23 1 Check that the displayed data Note 1 satisfied the B ratio specified value 24 6 01 00 Press PAUSE button 25 7 10 Note down the data 26 7 10 FF 27 6 14 90 28 6 13 A0 Order Page Addr...

Page 135: ...E 00 5 6 2C 01 6 6 90 00 7 6 91 00 8 6 92 FF 9 6 93 FF 10 6 6C 01 11 6 01 79 Press PAUSE button 12 6 07 Check the data changes to 01 13 6 01 67 Press PAUSE button 14 Check the flashing 15 6 02 Check the data changes to 01 16 F E8 Check that the displayed data satisfies the Y level specified value 17 6 01 00 Press PAUSE button Order Page Address Data Procedure 18 6 01 67 Press PAUSE button 19 Check...

Page 136: ...Order Page Address Data Procedure 1 6 01 00 Press PAUSE button 2 6 90 00 3 6 91 00 4 6 92 00 5 6 93 00 6 6 2C 00 7 6 6C 00 8 0 03 00 9 4 1E Set data noted down at step 3 and press PAUSE button 10 Release the data setting performed at step 1 Refer to page 5 13 ...

Page 137: ...le Note 3 Refer to 4 Preparing the Flash adjustment box See page 5 7 Preparation 1 Take a reduced or enlarged copy on the clear sheet so that a rectangular frame of the sheet for auxiliary light is suitable for the effective image size of the monitor 2 Stick the copied sheet for auxiliary light on the monitor screen Adjusting method Order Page Address Data Procedure 1 Perform Data setting during c...

Page 138: ...d in CN 903 of the PK 064 board Connect the Measuring Instruments via the CPC 9 jig J 6082 393 C The following table shows the Pin No and signal name of CN 903 Pin No Signal Name Pin No Signal Name 1 BL_L1 10 UNREG 2 CVCHK OUT 11 LANC IN 3 N C 12 LANC OUT 4 REG_GND 13 MAKER_RECOG 5 CPC_IN 14 N C 6 BL_L2 15 N C 7 HSY 16 N C 8 PANEL_COM 17 N C 9 VG 18 N C Fig 5 1 17 CPC lid PK 064 board CN903 CPC 9 ...

Page 139: ...Range adj 86 0A Black Limit adj 87 3A Psig Gray adj 88 90 White Blance adj 89 83 8A 4C Contrast adj 8B 48 Center voltage adj 8C 2F 8D 11 8E 16 Fixed value 8F 1F A3 28 A4 04 Processing after Completing Adjustments 1 Select page 0 address 01 and set data 00 2 LCD Initial Data Input 2 Mode PLAY Signal Arbitrary Adjustment Page B Adjustment Address 3A to 3F Adjusting method 1 Select page 0 address 01 ...

Page 140: ... 0 01 00 4 VCO Adjustment PK 064 Board Set the VCO free run frequency If deviated the LCD screen will be blurred Mode PLAY Signal Arbitrary Measurement Point Pin 7 of CN903 HSY Measuring Instrument Frequency counter Adjustment Page A Adjustment Address 82 NTSC 83 PAL Specified Value T 15734 30 Hz NTSC T 15625 30 Hz PAL Menu setting 1 VIDEO OUT of SET UP setting NTSC NTSC mode This adjustment must ...

Page 141: ... F1 00 3 0 01 00 6 D Range Adjustment PK 064 Board Set the D Range of the RGB decoder for driving the LCD to the specified value If deviated the LCD screen image will be blackish or saturated whitish Mode PLAY Signal Arbitrary Measurement Point Pin 9 of CN903 VG External trigger Pin 8 of CN903 PANEL_COM Measuring Instrument Oscilloscope Adjustment Page A Adjustment Address 85 Specified Value A 7 9...

Page 142: ...ess Data Procedure 1 A 02 00 Press PAUSE button 2 4 F1 00 3 0 01 00 Fig 5 1 21 7 Black Limit Adjustment PK 064 Board Set the maximum amplitude of the RGB decoder for driving the LCD to the specified value If deviated the LCD screen image will be blackish or saturated whitish Mode PLAY Signal Arbitrary Measurement Point Pin 8 of CN903 PANEL COM Measuring Instrument Oscilloscope Adjustment Page A Ad...

Page 143: ... D84 using following equations decimal calculation D84 Dref 02 8 Convert D84 to a hexadeci mal number and obtain D84 Note 2 9 A 84 D84 Press PAUSE button Note 2 Refer to table 5 2 2 Hexadecimal decimal conversion table Processing after Completing Adjustments Order Page Address Data Procedure 1 A 02 00 Press PAUSE buttton 2 4 F1 00 3 0 01 00 Fig 5 1 22 A A A A B B B B 9 Center Voltage Adjustment PK...

Page 144: ...anel 2 Light induction plate 3 IC801 Adjusting method Order Page Address Data Procedure 1 0 01 01 2 A 02 03 Press PAUSE button 3 4 F1 02 4 A 88 90 Press PAUSE button Intital value 5 A 89 83 Press PAUSE button Intital value 6 Check that the LCD screen is not colored If not colored proceed to Processing after Completing Adjustments 7 A 88 Change the data so that the LCD screen is not colored 89 Note...

Page 145: ...r 256 addresses from 00 to FF Changing the data Data setting The data increases when the PLAY N button is pressed and decreases when the STOP x button is pressed There are altogether 256 data from 00 to FF Writing the adjustment data The PAUSE button must be pressed to write the adjustment data in the nonvolatile memory The new adjustment data will not be recorded in the nonvolatile memory if this...

Page 146: ... B C D E F hexadecimal notation The upper digits of the A b c d E F hexadecimal notation 0 0 1 2 3 4 5 6 7 8 9 10 11 12 13 14 15 1 16 17 18 19 20 21 22 23 24 25 26 27 28 29 30 31 2 32 33 34 35 36 37 38 39 40 41 42 43 44 45 46 47 3 48 49 50 51 52 53 54 55 56 57 58 59 60 61 62 63 4 64 65 66 67 68 69 70 71 72 73 74 75 76 77 78 79 5 80 81 82 83 84 85 86 87 88 89 90 91 92 93 94 95 6 96 97 98 99 100 101...

Page 147: ...ble be low to discriminate if the bit value is 1 or 0 Display on the Bit values Adjusting bit3 bit2 bit1 bit0 remote or or or or commander bit7 bit6 bit5 bit4 0 0 0 0 0 1 0 0 0 1 2 0 0 1 0 3 0 0 1 1 4 0 1 0 0 5 0 1 0 1 6 0 1 1 0 7 0 1 1 1 8 1 0 0 0 9 1 0 0 1 A A 1 0 1 0 B b 1 0 1 1 C c 1 1 0 0 D d 1 1 0 1 E E 1 1 1 0 F F 1 1 1 1 Example If 8E is displayed on the adjusting remote com mander the bit...

Page 148: ... 1 Select page 2 address 04 set data 02 and press the PAUSE button of the adjusting remote commander 2 Check that all LED except for the ACCESS LED are lit and all segments of LCD display window are lit 3 Select page 2 address 04 set data 00 and press the PAUSE button of the adjusting remote commander 5 43 E Page 2 Address 04 Data 02 Display Code C 32 ss C 13 ss Countermeasure Turn the power off a...

Page 149: ...ce only with part number speci fied Les composants identifiés par une marque 0 sont critiquens pour la sécurité Ne les remplacer que par une pièce portant le numéro spécifié Ref No Part No Description Ref No Part No Description 1 X 3952 319 1 CABINET FRONT ASSY 2 3 074 049 01 WINDOW OVF 3 3 968 729 71 SCREW M2 LOCK ACE P2 5 3 074 032 01 HOLDER AF 6 3 914 366 01 SCREW DIA 1 7X4 PRECISION 7 1 684 48...

Page 150: ... 01 SHEET LCD BZ901 1 544 829 21 BUZZER PIEZOELECTRIC 0D901 1 477 165 11 BLOCK LIGHT GUIDE PLATE 1 5 LCD901 8 753 050 67 ACX309AK 1 51 52 52 52 54 56 57 55 52 53 ns ns ns D901 LCD901 BZ901 58 BT401 BATTERY LITHIUM SECONDARY Board on the mount position See page 4 48 The components identified by mark 0 or dotted line with mark 0 are critical for safety Replace only with part num ber specified Les co...

Page 151: ...IBLE BOARD 115 X 3952 304 1 BATTERY HOLDER ASSY 116 A 7078 286 A SY 075 BOARD COMPLETE SERVICE 117 3 914 366 01 SCREW DIA 1 7X4 PRECISION 118 A 7078 126 A CH 109 BOARD COMPLETE 119 3 065 690 01 PLATE LIGHT INTERCEPTION BT901 1 694 812 21 TERMINAL BOARD BATTERY IC351 A 7031 361 A CCD BLOCK ASSY Note J001 1 815 571 31 JACK DC Note Be sure to read Precuations for Replacement of CCD Imager on page 4 8...

Page 152: ...RAMIC CHIP 0 1uF 16V C360 1 164 850 11 CERAMIC CHIP 10PF 0 5PF 50V CONNECTOR CN351 1 766 350 21 CONNECTOR FFC FPC 20P DIODE D351 8 719 073 01 DIODE MA111 K8 S0 FERRITE BEAD FB351 1 414 228 11 FERRITE 0uH IC IC351 A 7031 361 A CCD BLOCK ASSY Note COIL L351 1 469 561 21 INDUCTOR 100uH TRANSISTOR Q351 8 729 052 64 TRANSISTOR DTC144EHT2L Q352 8 729 050 22 TRANSISTOR 2SC4250 T5LSONY1 RESISTOR R352 1 21...

Page 153: ...77 11 CERAMIC CHIP 0 1uF 10 10V C420 1 117 746 81 CERAMIC CHIP 8PF 16V C421 1 117 747 11 CERAMIC CHIP 9PF 16V C422 1 164 931 11 CERAMIC CHIP 100PF 10 50V C423 1 164 939 11 CERAMIC CHIP 0 0022uF 10 50V C802 1 113 988 11 TANTAL CHIP 68uF 20 4V C803 1 125 777 11 CERAMIC CHIP 0 1uF 10 10V C806 1 117 919 11 TANTAL CHIP 10uF 20 6 3V C807 1 125 777 11 CERAMIC CHIP 0 1uF 10 10V C808 1 164 943 11 CERAMIC C...

Page 154: ...18 953 11 RES CHIP 1K 5 1 16W R424 1 218 949 11 RES CHIP 470 5 1 16W R425 1 218 949 11 RES CHIP 470 5 1 16W R426 1 218 949 11 RES CHIP 470 5 1 16W R429 1 218 985 11 RES CHIP 470K 5 1 16W R430 1 219 570 11 RES CHIP 10M 5 1 10W R431 1 218 979 11 RES CHIP 150K 5 1 16W R433 1 218 973 11 RES CHIP 47K 5 1 16W R434 1 218 943 11 RES CHIP 150 5 1 16W R435 1 218 977 11 RES CHIP 100K 5 1 16W R436 1 216 803 1...

Page 155: ...0Q508 8 729 053 74 TRANSISTOR CY25AAJ 8 T13 Q509 8 729 056 01 TRANSISTOR MCH3405 TL E RESISTOR R501 1 218 961 11 RES CHIP 4 7K 5 1 16W R502 1 218 977 11 RES CHIP 100K 5 1 16W R503 1 218 965 11 RES CHIP 10K 5 1 16W R505 1 218 957 11 RES CHIP 2 2K 5 1 16W R507 1 218 958 11 RES CHIP 2 7K 5 1 16W R509 1 218 961 11 RES CHIP 4 7K 5 1 16W R510 1 218 953 11 RES CHIP 1K 5 1 16W R511 1 218 943 11 RES CHIP 1...

Page 156: ...C CHIP 0 1uF 10 10V C328 1 117 919 11 TANTAL CHIP 10uF 20 6 3V C329 1 125 777 11 CERAMIC CHIP 0 1uF 10 10V C332 1 125 777 11 CERAMIC CHIP 0 1uF 10 10V C335 1 125 777 11 CERAMIC CHIP 0 1uF 10 10V C337 1 125 777 11 CERAMIC CHIP 0 1uF 10 10V C339 1 127 895 91 TANTAL CHIP 22uF 20 4V C340 1 117 919 11 TANTAL CHIP 10uF 20 6 3V C341 1 117 919 11 TANTAL CHIP 10uF 20 6 3V C342 1 117 919 11 TANTAL CHIP 10uF...

Page 157: ...0uH L018 1 469 549 21 INDUCTOR 1uH L020 1 469 549 21 INDUCTOR 1uH L021 1 469 757 21 INDUCTOR 10uH L023 1 414 770 91 INDUCTOR 4 7uH L025 1 419 628 21 INDUCTOR 22uH L202 1 469 757 21 INDUCTOR 10uH L203 1 412 028 11 INDUCTOR CHIP 4 7uH L204 1 469 757 21 INDUCTOR 10uH L206 1 469 757 21 INDUCTOR 10uH L301 1 469 757 21 INDUCTOR 10uH L302 1 469 757 21 INDUCTOR 10uH L501 1 469 847 11 INDUCTOR 0uH L502 1 4...

Page 158: ...1 218 973 11 RES CHIP 47K 5 1 16W R202 1 218 973 11 RES CHIP 47K 5 1 16W R203 1 218 973 11 RES CHIP 47K 5 1 16W R204 1 218 973 11 RES CHIP 47K 5 1 16W R206 1 218 990 11 SHORT 0 R215 1 218 961 11 RES CHIP 4 7K 5 1 16W R216 1 218 974 11 RES CHIP 56K 5 1 16W R218 1 211 969 11 METAL CHIP 10 0 5 1 10W R219 1 211 969 11 METAL CHIP 10 0 5 1 10W R221 1 211 969 11 METAL CHIP 10 0 5 1 10W R222 1 211 969 11 ...

Page 159: ...7 31 CHARGER BATTERY BC CS1 AEP UK E HK AUS JE 0 1 477 227 41 CHARGER BATTERY BC CS1 KR 0 1 477 227 51 CHARGER BATTERY BC CS1 CH 0 1 569 007 11 ADAPTOR CONVERSION E JE 0 1 569 008 21 ADAPTOR CONVERSION 2P E 0 1 696 819 11 CORD POWER AUS 0 1 769 608 11 CORD POWER AEP E 0 1 776 985 11 CORD POWER KR 0 1 782 476 11 CORD POWER CH 0 1 783 374 11 CORD POWER UK HK 0 1 790 107 22 CORD POWER US CND 0 1 790 ...

Page 160: ... 201 DSC P71 P71M For NTSC mode DSC P71 P71M FOR CAMERA COLOR REPRODUCTION ADJUSTMENT Take a copy of CAMERA COLOR REPRODUCTION FRAME with a clear sheet for use R Y B Y R B G MG YE CY ...

Page 161: ... 202 DSC P71 P71M Sony EMCS Co 9 929 949 11 2002K0500 1 2002 11 Published by DI Customer Center ...

Page 162: ...066 Addition of Brazilian Model Change of the end number of the board SY 075 CH 109 board the end number of the board has been changed from 11 21 to 12 22 Level 3 Ver 1 1 2002 04 Note Brazilian model is same as other models except accessories Accessories Brazilian model 1 824 009 81 CORD CONNECTION AV CONNECTING 1 5m 1 823 932 11 CORD CONNECTION USB 5P 3 070 841 01 STRAP HAND 3 072 414 01 SPVD 008...

Page 163: ...a few cases that the part printed on diagram isn t mounted in this model C panel designation THIS NOTE IS COMMON FOR WIRING BOARDS In addition to this the necessary note is printed in each block 2 1 3 2 1 3 2 1 3 3 4 5 2 1 1 2 3 6 5 4 E B C 3 1 5 5 2 4 6 1 2 3 5 4 4 3 1 2 1 2 4 3 3 1 2 4 5 5 3 4 1 2 3 4 2 1 1 2 4 3 4 6 2 5 3 1 1 2 4 3 Chip parts Transistor Diode 4 3 PRINTED WIRING BOARDS DSC P71 P...

Page 164: ...er CH 109 board is eight layer print board However the pat terns of layers 2 to 7 have not been included in the diagram There are a few cases that the part isn t mounted in this model is printed on this diagram See page 11 for printed parts location 12 22 Including IC101 CH 111 Board 12 22 ...

Page 165: ... unleaded solder SY 075 board is eight layer print board However the patterns of layers 2 to 7 have not been included in the diagram There are a few cases that the part isn t mounted in this model is printed on this diagram See page 11 for printed parts location Chip parts 2 1 3 E B C 3 1 5 5 2 4 6 1 2 3 5 4 5 3 4 1 2 Transistor Diode 12 22 7 9 8 ...

Page 166: ...DSC P71 P71M 9 10 SY 075 1 4 5 8 1 4 5 8 A K K A K A A K MS SOCET 12 22 6 5 4 3 2 1 ...

Page 167: ... CN708 B 5 D001 D 2 D002 D 2 D003 D 2 D005 D 3 D006 C 2 D009 B 2 D010 C 3 D011 A 3 D012 B 2 D013 B 2 D014 C 2 D016 B 1 D017 B 1 D019 A 3 D021 C 3 D204 B 5 D205 C 5 D208 C 5 D209 C 5 D210 C 4 D212 C 5 D213 C 5 D214 C 5 D601 A 4 D602 A 4 D701 D 4 F001 D 2 F002 C 2 F003 C 2 F004 C 2 F005 C 2 F006 C 2 F007 C 2 FB001 C 2 FB301 D 4 FB302 D 4 FB303 D 4 FB501 A 3 FB502 A 2 FB503 B 2 FB504 B 5 FB601 A 4 FB...

Page 168: ...5 R328 C 5 R505 A 3 R506 C 3 R507 A 3 R517 A 3 R520 C 3 R521 B 2 R522 C 2 R525 C 2 R526 C 2 R527 C 2 R528 C 2 R533 B 2 R536 B 2 R540 B 2 R548 B 2 R549 B 2 R554 A 3 R557 A 3 R563 A 3 R564 A 3 R568 A 3 R569 A 3 R573 A 3 R579 A 4 R582 B 2 R583 B 2 R586 A 3 R601 A 4 R603 A 4 R604 A 4 R605 A 4 R607 A 3 R608 A 3 R651 D 5 R652 D 5 R653 D 5 R654 D 5 R655 D 5 R656 D 5 R701 D 4 R702 D 4 R703 D 4 R704 A 1 R7...

Page 169: ... 14 DSC P71 P71M Sony EMCS Co 9 929 949 82 2002D0500 1 2002 4 Published by DI Customer Center ...

Page 170: ...02 03 2002 04 2002 11 History Official Release Supplement 1 S1 PV01 066 Correction 1 C1 Contents Addition of Brazilian Model Change of the end number of the board Correction of repair parts S M correction Page 6 9 S M Rev issued No Yes 992994913 pdf ...

Reviews: