64
1
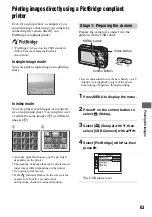
Connect the
(USB) jack on your
camera and the USB jack on the
printer with the supplied USB
cable.
2
Turn on your camera and the
printer.
After the connection is made,
the indicator
appears
The camera is set to playback mode,
then an image and the print menu appear
on the screen.
Regardless of what the mode dial is set to,
the print menu appears when you complete
Stage 2.
1
Select the desired printing
method with
v
/
V
on the control
button, then press
z
.
[All In This Folder]
Prints all the images in the folder.
[DPOF image]
Prints all the images with a
order) mark (page 66) regardless of the
displayed image.
[Select]
Selects images and prints all the
selected images.
1
Select the image you want to print with
b
/
B
, then press
z
.
The
mark appears on the selected
image.
• To select other images, repeat this
procedure.
2
Select [Print] with
V
, then press
z
.
[This image]
Prints a displayed image.
• If you select [This image] and set [Index] to
[On] in step 2, you can print a set of the
same images as an index image.
2
Select print settings with
v
/
V
/
b
/
B
.
[Index]
Select [On] to print as an index image.
Stage 2: Connecting the camera
to the printer
USB cable
To the USB jack
To the
(USB)
jack
All In
This Folder
DPOF image
Select
This image
Cancel
Stage 3: Printing
OK
Exit
1
Off
Default
Size
Date
Quantity
Off
Index


