background image

5

Locations and Functions of Parts and Controls

Front Panel

(Continued)

1

¬

POWER

PANEL

INH

SDTI

IN1

IN2

IN1

IN2

EXT

525

625

36M

18M

7/8

3/4

ANALOG

SDI

CH3/4

CH1/2

OPTION

REF

ALARM

MENU

ITEM

RESET

ENTER

INPUT

SEL

FEC

RATE

FREQ

BW

AUDIO 

SEL

VIDEO

STD

1

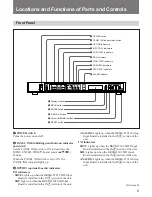
 POWER switch

2

 PANEL INH indicator and switch

3

 OPTION indicators

4

 INPUT SEL indicators

5

 AUDIO SEL indicators

6

 REF indicators

8

 FREQ BW indicators

7

 VIDEO STD indicators

9

 FEC RATE indicators

 ALARM indicator

 Display window

!™

 MENU button

 ENTER button

 ITEM 

Â

/

µ

 buttons

!∞

 Cursor (

4

/

$

/

/

) buttons

 RESET button

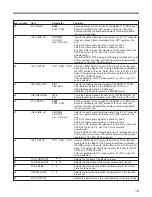
1

 POWER switch

Turns the power on and off.

2

 PANEL INH (inhibiting panel buttons) indicator

and switch
Set the PANEL INH switch to ON to deactivate the
MENU, ENTER, ITEM 

Â

/

µ

, and cursor (

4

/

$

/

/

)

buttons.
When the PANEL INH switch is set to ON, the
PANEL INH indicator lights up.

3

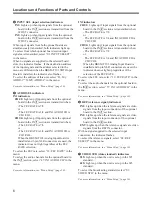
 OPTION (optional boards) indicators

IN1 indicators

SDTI: Lights up when the BKSM-T101 SDTI Input

Board is installed in the IN

1

 section of the unit.

SDI: Lights up when the BKSM-T102 SDI Input

Board is installed in the IN

1

 section of the unit.

ANALOG: Lights up when the BKSM-T103 Analog

Input Board is installed in the IN

1

 section of the

unit.

IN2 indicators

SDTI: Lights up when the BKSM-T101 SDTI Input

Board is installed in the IN

2

 section of the unit.

SDI: Lights up when the BKSM-T102 SDI Input

Board is installed in the IN

2

 section of the unit.

ANALOG: Lights up when the BKSM-T103 Analog

Input Board is installed in the IN

2

 section of the

unit.

Summary of Contents for DSM-T1

Page 1: ...OPERATION MANUAL English 1st Edition Serial No 10001 and Higher DIGITAL SATELLITE MODULATOR DSM T1 ...

Page 2: ...o Subpart B of Part 15 of FCC Rules WARNING THIS WARNING IS APPLICABLE FOR USA ONLY If used in USA use the UL LISTED power cord specified below DO NOT USE ANY OTHER POWER CORD Plug Cap Parallel blade with ground pin NEMA 5 15P Configuration Cord Type SJT three 16 or 18 AWG wires Length Less than 2 5 m 8 ft 3 in Rating Minimum 10A 125 V Using this unit at a voltage other than 120 V may require the ...

Page 3: ... 5 Front Panel 5 Rear Panel 8 Menu Setup 10 Initial Display 10 Changing the Parameters 10 Saving the Parameters in Menu Banks 11 Recalling the Parameters from Menu Banks 11 Menu List 12 Connection 14 Operation Warnings 15 Error Messages 15 Warning Messages 15 Specifications 16 ...

Page 4: ...ndwidth Direct digital transmission at up to twice real time The DSM T1 enables transmission at up to twice real time speed at 36 MHz transmission bandwidth with connection of a DNW A100 A100P digital video cassette recorder through the SDTI 1 Serial Data Transport Interface This feature contributes to increase of news gathering productivity Optional interface boards available The BKSM T101 SDTI I...

Page 5: ...ns indicator and switch Set the PANEL INH switch to ON to deactivate the MENU ENTER ITEM Â µ and cursor 4 buttons When the PANEL INH switch is set to ON the PANEL INH indicator lights up 3 OPTION optional boards indicators IN1 indicators SDTI Lights up when the BKSM T101 SDTI Input Board is installed in the IN1 section of the unit SDI Lights up when the BKSM T102 SDI Input Board is installed in th...

Page 6: ... To select the audio channels for the optional board in the IN1 section select 47 IN1 AUDIO CH in the menu For more information see Menu Setup page 10 IN2 indicators CH1 2 Lights up if input signals from the optional board in the IN2 section are transmitted when The FEC RATE is 7 8 or The FEC RATE is 3 4 and IN2 AUDIO CH is CH1 CH2 CH3 4 Lights up if input signals from the optional board in the IN...

Page 7: ...TE in the menu For more information see Menu Setup page 10 º ALARM indicator When a fault is detected while the unit is in operation the ALARM indicator lights up In this case a warning message 0X WARNING appears in the display window The ALARM indicator turns off when the operation returns to normal For more information about warning messages see Operation Warnings page 15 Display window Normally...

Page 8: ...is connector is for future use Rear Panel The rear panel on each optional board BKSM T101 SDTI SX Input Board BKSM T102 SDI Input Board BKSM T103 Analog Input Board AUDIO connectors REF IN SPARE BREAKER AC IN IF OUT MONITOR 1 IN1 section 2 IN2 section 3 REF IN connector 4 SPARE connector 5 IF OUT connector 6 IF MONITOR connector 7 y jack 8 BREAKER button 9 AC IN socket º SDTI connector SDI connect...

Page 9: ...A500P Digital Video Cassette Recorder etc AUDIO AES EBU connectors BNC type Input 2 channel digital audio signals in AES EBU format from the AES EBU audio output connectors on external equipment CH 1 2 Inputs AES EBU audio signals on channels 1 and 2 CH 3 4 Inputs AES EBU audio signals on channels 3 and 4 VIDEO connector BNC type Inputs composite analog video signals from the video output connecto...

Page 10: ...MENU button lights up and the menu appears in the display window 2 Select a menu item to be changed using the ITEM Â or µ button 3 Change the parameters using the 4 or button Use the or button to move a digit to the left or right 4 To change the parameters of other items repeat steps 2 and 3 5 Press the ENTER button The changed parameters are saved in the current bank The contents of the current b...

Page 11: ... contents of the current bank are saved in the selected menu bank The contents of the menu bank are saved even after the power is turned off To cancel saving in the menu bank Press the MENU ITEM Â or µ button before pressing the ENTER button 5 Press the MENU button The back lighting for the MENU button turns off and the unit exits the menu Recalling the Parameters from Menu Banks Follow the proced...

Page 12: ...input connector of the optional board in the IN1 section IN2 Video signals from the input connector of the optional board in the IN2 section Selects the broadcasting standard for which the unit is set up 525 525 standard 625 625 standard Turns the password function on or off When ON is selected set the password OFF The DSM R1 outputs normal video audio signals regardless of the password of the DSM...

Page 13: ...nals in AES EBU format Turns the audio emphasis function on or off if the BKSM T103 Analog Input Board is installed in the IN2 section of the unit Sets an address for the unit itself if the BKSM T101 SDTI Input Board is installed in the IN2 section of the unit When the address matches the destination address of the input signals the unit receives them Selects the audio input signal channels to the...

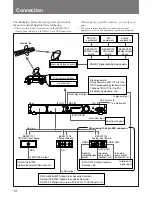
Page 14: ...sette Recorder DNW A100 A100P Digital Video Hybrid Recorder DNW 7 7P Digital Camcorder with the CA 701 SDI Adaptor etc Any two IF OUT REF IN to test signal output IF MONITOR AC IN AUDIO CH2 AUDIO CH1 VIDEO SDI to SDI output SDTI to SDTI SX output BKSM T103 Analog Input Board BKSM T102 SDI Input Board BKSM T101 SDTI SX Input Board Rear to monitor input to analog composite video output to analog aud...

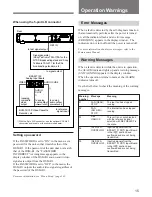
Page 15: ...ORRECT warning message appears in the display window of the DSM R1 and no audio video signals are output from the DSM R1 If the PASSWORD is set to OFF in the menu the DSM R1 outputs the audio video signals regardless of the password of the DSM R1 For more information see Menu Setup page 10 FAN REAR STOP FAN SW REG STOP REF UNLOCK IN1 DATA OVERFLOW IN2 DATA OVERFLOW The rear fan has stopped running...

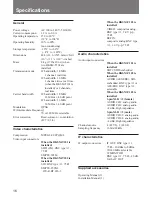
Page 16: ...ML Video input connectors When the BKSM T101 is installed SDTI SX BNC type 1 75 Ω SMPTE 305M When the BKSM T102 is installed SDI BNC type 1 75 Ω SMPTE 259M ITU R BT 656 3 When the BKSM T103 is installed VIDEO composite analog BNC type 1 1 0 V p p 75 Ω REF IN composite analog BNC type 1 1 0 V p p 75 Ω Audio characteristics Audio input connectors When the BKSM T101 is installed SDTI SDTI embedded Wh...

Page 17: ...SDTI Input Board BKSM T102 SDI Input Board BKSM T103 Analog Input Board Optional accessories RMM 30 Rack Mount Rail CCXA 53 conversion audio cable 5 pin XLR 3 pin XLR 2 Design and specifications are subject to change without notice ...

Page 18: ...18 ...

Page 19: ...DSM T1 SY 3 860 007 01 1 Printed in Japan 1998 03 13 1998 Sony Corporation Broadcasting and Professional Systems Company ...

Reviews: